Introduction
This post is a continuation of the previous post "How to make a Command-Line Utility in Python". If you have not seen it yet, click here.
Prerequisites
Alright, so we are going to be needing a few modules and tools for this. First, we need pyinstaller and second, we need auto-py-to-exe
Explanation
On Windows(not sponsored by Microsoft), if you want to access the file without the ".py" extension, we need to convert it to an executable or ".exe" file. So we are going to be using these two tools to make it an executable. pyinstaller is pretty popular, and I am sure a lot of you already know about it. And how to use it.
Installation
pyinstaller
Official Way
Steps:
- Click on Start
- Type "Command Prompt" and click Enter on your Keyboard
- A new command prompt window should open
- Now, type
pip install pyinstaller - And done!
Unofficial Way
Warning! - This is not the official pyinstaller wheel. Only use this if for some reason the official way fails. Steps:
- Go to ifd.uci.edu/~gohlke/pythonlibs/#pyinstaller
- The first link at the top of the page, is to be downloaded. The name of the file is
pyinstaller-4.2-py3-none-any.whl. This is only for Python3. - Download the file and save it on the Desktop
- Then, click on start
- Type "Command Prompt" and click Enter on you keyboard.
- A new command prompt window should open
- Now type the following commands:
C:\Users\[username]> cd Desktop
C:\Users\[username]\Desktop> pip install pyinstaller-4.2-py3-none-any.whl
A lot of text keeps on scrolling and then shows, successfully installed pyinstaller
- And done!
auto-py-to-exe
Steps:
- Click on Start
- Type "Command Prompt" and click Enter on your Keyboard
- A new Command Prompt Window should open
- Now, type
pip install auto-py-to-exe - And done!
Converting to exe
Steps:
- Open windows explorer and navigate to the folder where you have your CLU(Command-Line Utility) file stored.
- Now open another Command Prompt window
- And, type
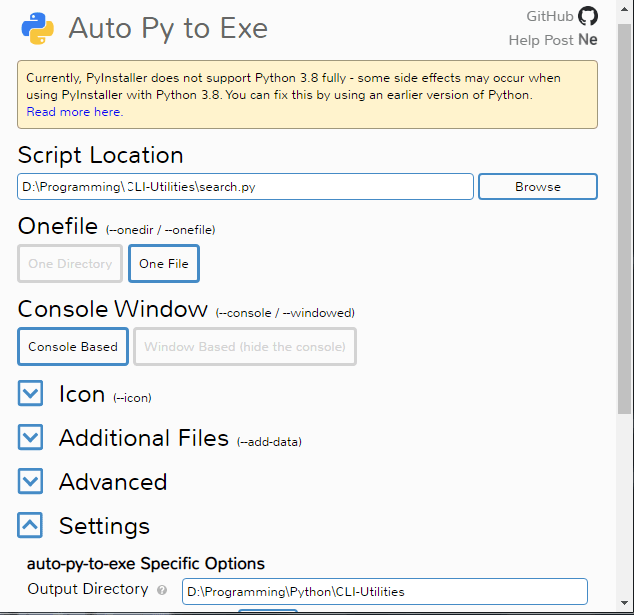
auto-py-to-exe - A new window should pop-up as given below

- Now, copy the path to the file from the explorer and paste it in the Script Location box. For e.g., - D:\Programming\CLI-Utilities\search.py If the path is correct, the border should turn to red from blue
- Then, select One File and Console Based
- Then expand Settings
- Under output folder, enter the folder path where, the
.pyfile is located For e.g., - D:\Programming\CLI-Utilities Refer to the above image - And then, click on "CONVERT PY TO EXE" button, And a lot of output will be shown.
- Then go to the directory where the script is located and an
exenamedsearch.exeshould be there. - Now, go back to the Command Prompt
- Now type, only
searchand pass the arguments and it will work like a charm!
Conclusion
Maybe, you will be wondering, why can't we just rename the file to search from search.py and it should work, just like in Unix right? No, windows does not work like that! If you did that and typed search, then windows would simply search the PATH variable for an exe named "search", and since it won't find any, it would just say, that Not Found... So we need to convert it to an exe to work as intended.


Top comments (0)