
Arduino Blynk App Iot Project
Hey Friends! During this project we tend to find out how to create IoT based mostly Home Automation Project mistreatment App Blynk. By Home Automation we tend to mean dominant lighting, climate, diversion systems, and appliances while not a manual switch. Sound fascinating. Let’s begin out project.
Introduction:
Internet of Things permits us to manage connected devices from anywhere and exchange info over the devices. The house automation system controls home appliances automatically and once this system is connected to the net it becomes a part of IoT. There’s a unit of 3 main generations of home automation. First is, the assorted wireless technology with proxy servers, second is computing controlled home automation and last robots that directly communicate with humans. Our project is that the first generation automation. Implementing the first generation of the house automation appliances got to connect with the online, therefore, users can manage the system from any remote place. That’s why IoT has enhance a required for automation.
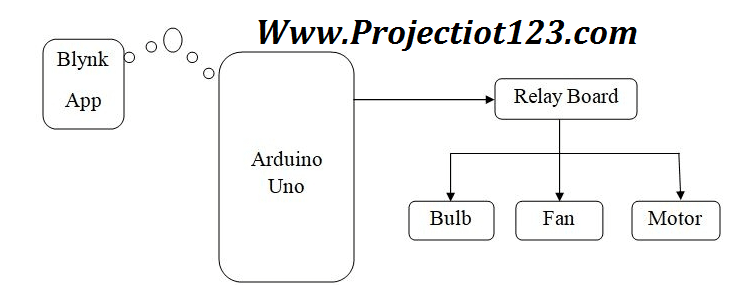
Block Diagram:
you can Download Proteus Library from this link Download Proteus Library
Components Required:
- Arduino
- LED
- Compim
- Blynk App
Setting Blynk Application:
Now let’s study the Blynk Application. During this project, all the management is completed by the Blynk Application. It’s a digital dashboard wherever you'll build a graphic interface for your project by merely dragging and dropping widgets. You’ll transfer the Blynk Application from Play store if you associate mechanical man User. You’ll conjointly install the Blynk Application on IOS from App Store. Now let’s organize the Blynk App for IoT Home Automation. First, open the applying and build a brand new account mistreatment your Email ID. Then create on New Project and begin using this App.
Circuit Detail:
This circuit connection is uncomplicated. The Arduino pin 0 is connected with compim module pin 2 RXD. Next pin of Arduino 1 is connected with 3 TXD. While pin 13 is attach with LED. While this circuit is controlling with Phone App.
Working:
The home automation is build Blynk humanoid App, and a 4-channel relay. The hardware originated ought to be consistent with the circuit diagram. AC mains appliances (Bulbs) are going to be connected to relays that area unit controlled by the Compim. User should install and put together the Blynk App as per the higher than directions. Whenever the user presses an icon within the app, then that info are going to be send to compim via wireless fidelity. The compim analyses the received commands and turns ON/OFF of the individual device via four channel Relay board.
Conclusion:
In our planned model a high proportion of precise has been attain through execution. This methodology is capable of dominating the house appliances supported the user’s desired mode. All the modes work with smart accuracy that was found throughout implementation. Users exclusively have to be compelled to select modes from their smart phones and our system will do the rest of dominant the appliances. This planned project is extraordinarily reliable. Thus it's aforementioned that this technique has higher accuracy with nice efficiency.
See you guys in next tutorial. Till than take care.


Top comments (0)