Introduction
This guide is a step-by-step demonstration of ERC20 Tokens in React using a local Truffle Ethereum blockchain. It is not, nor is intended to be, a best practice study on how to write ERC20s. It is intended to produce familiarisation and working code, which can be the basis for further education.
ERWhat?
ERC20 is a standard for tokens that applies on the Ethereum network (ERC standing for Ethereum Request for Comments) which ensures interoperability of these assets across the network.
Having a standard for tokens is a big deal as tokens are a central feature of Ethereum as laid out in the original whitepaper:
On-blockchain token systems have many applications ranging from sub-currencies representing assets such as USD or gold to company stocks, individual tokens representing smart property, secure unforgeable coupons, and even token systems with no ties to conventional value at all, used as point systems for incentivization. Token systems are surprisingly easy to implement in Ethereum. The key point to understand is that a currency, or token system, fundamentally is a database with one operation: subtract X units from A and give X units to B, with the provision that (1) A had at least X units before the transaction and (2) the transaction is approved by A.
Using this standard therefore ensures that everyone is following a common set of rules, so allowing a token developed by one person to be traded across the system. There are a number of other tokens, however I'm using ERC20 primarily as it is the most popular.
Although it is possible to roll your own ERC20 by implementing the interface provided in the standard, it makes sense to use one that has been created and thoroughly tested by a specialised third party, in this case OpenZeppelin.
Prerequisites
- NodeJS - If you haven't installed it before, I found installing it using the Node Version Manager (nvm) as suggested on this Stack Overflow answer to cause less aggravation than downloading via the official website.
- If you've previously installed create-react-app globally via
npm install -g create-react-app, then uninstall it with the commandnpm uninstall -g create-react-appso you are using the latest version as below.
Ganache
Ganache, part of the Truffle suite, positions itself as a "one-click blockchain." It allows a developer to host an Ethereum blockchain quickly on a local machine and provides a number of accounts (or wallets) already full of pretend Ether. This is much easier and quicker than deploying on either a testnet (e.g. Ropsten) or the main Ethereum network (which costs actual money).
Download the Appimage from their homepage and run (I've blogged previously on how I like to install Appimages, but clearly install how you want). Once the application is running select the Quickstart Ethereum option when you are invited to 'Create a workspace.' You should be presented with something similar to the following:
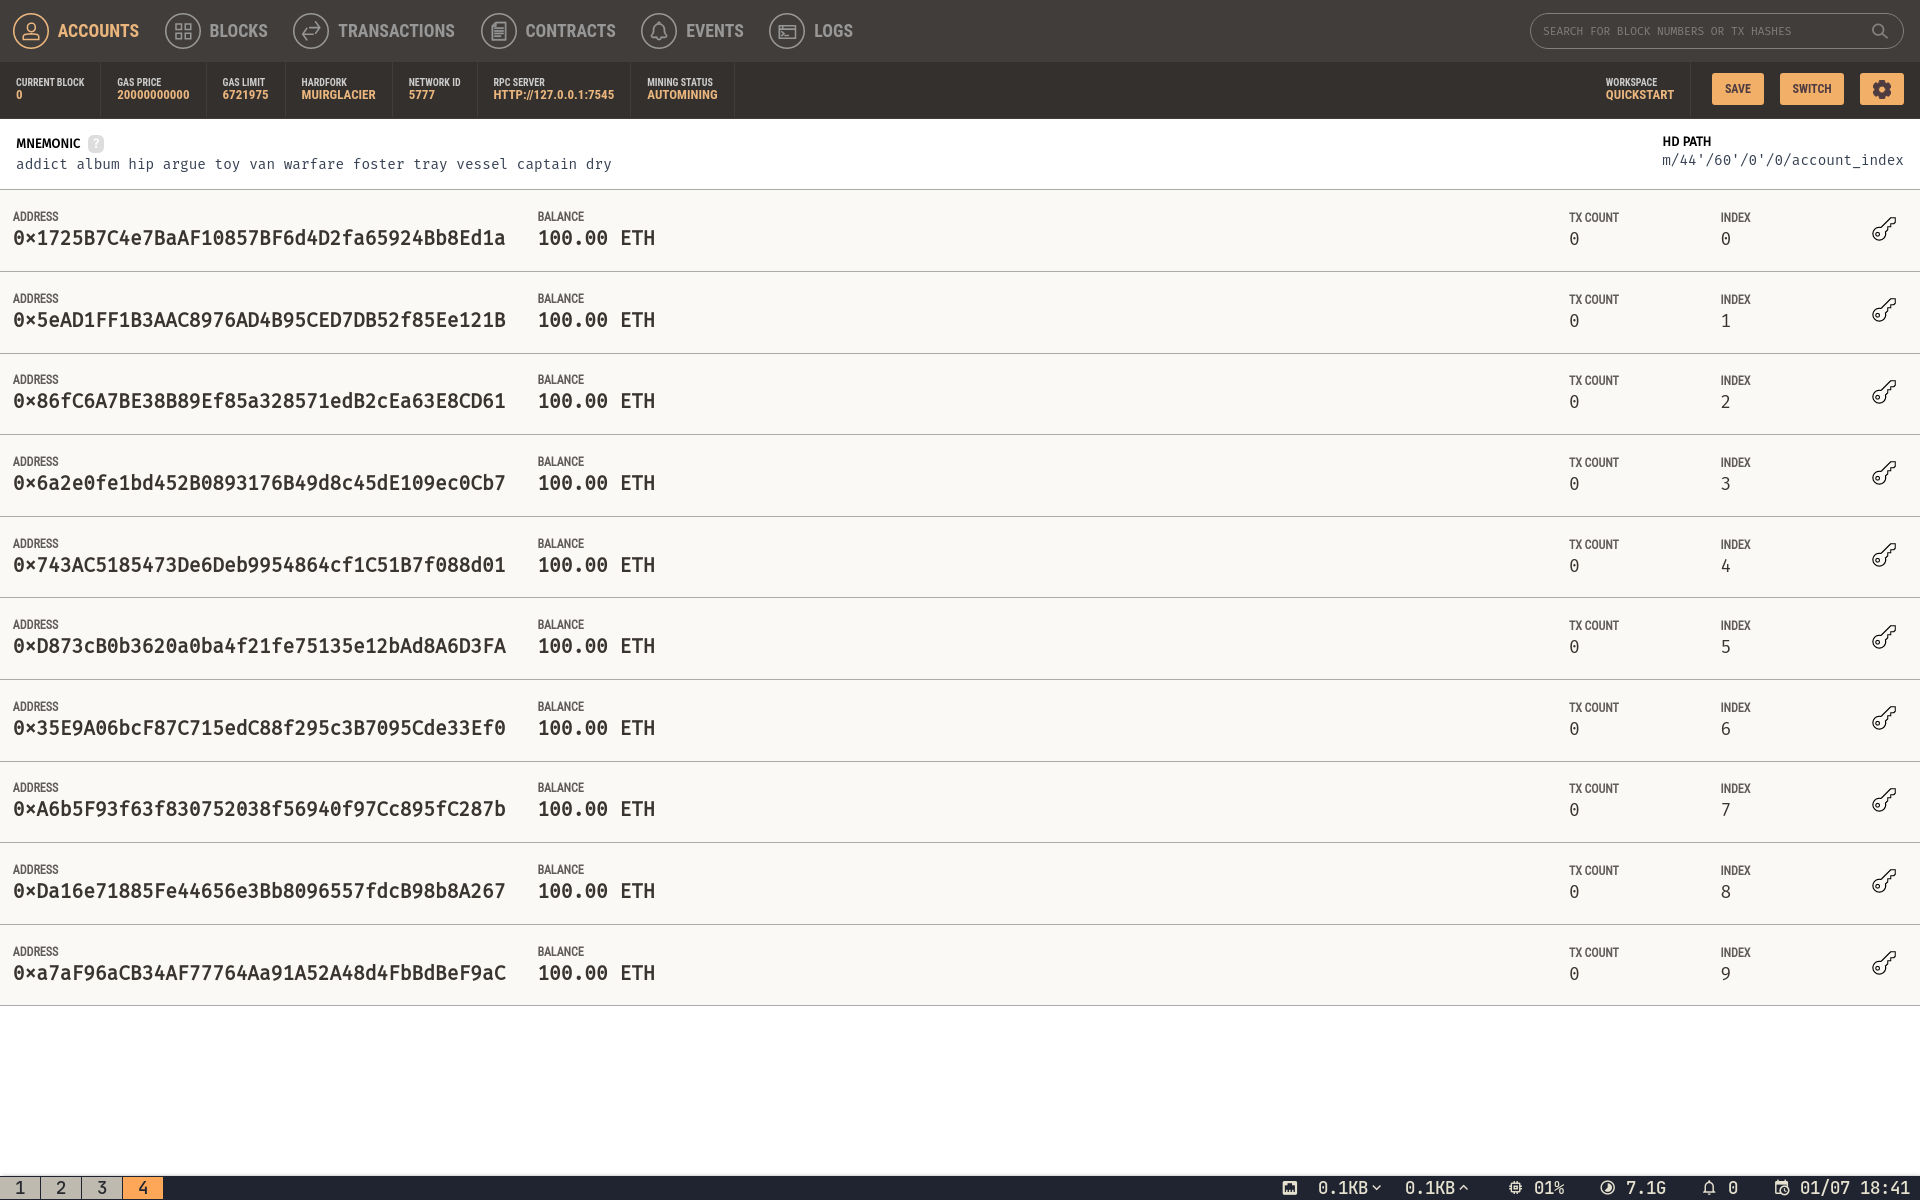
which gives a list of accounts (or wallets) Ganache has created for you and the pretend Ether they contain.
There are other non-GUI ways of running a local blockchain, and although I'm generally a fan of the terminal, this is such a neat solution I'm going to use it.
Truffle
Although Ganache is part of the Truffle suite; the main course, if you'll excuse the pun, is Truffle itself. Truffle is a development framework for Ethereum which allows you to deploy and test smart contracts quickly.
Create a directory that will hold our project:
mkdir erc20-pct
cd erc20-pct
Now we (globally) install and then initialise Truffle which will install a number of default files and folders:
npm install -g truffle
truffle init
Install OpenZeppelin ERC20
As we will be using OpenZeppelin's implementation of ERC20 we need to install with npm (initialising this first):
npm init -y
npm install @openzeppelin/contracts
Smart Contract: PreciousChickenToken
The ERC20 we will be creating for this demo will be called the PreciousChickenToken (Symbol: PCT), and to do so we need to create a smart contract.
Using your favourite text editor (mine happens to be vim) create and edit the following file:
vim contracts/PreciousChickenToken.sol
Copy and paste the following text (or alternatively download it from my github repository):
// SPDX-License-Identifier: Unlicense
pragma solidity ^0.6.2;
import "@openzeppelin/contracts/token/ERC20/ERC20.sol";

contract PreciousChickenToken is ERC20 {

    // In reality these events are not needed as the same information is included
    // in the default ERC20 Transfer event, but they serve as demonstrators
    event PCTBuyEvent (
        address from,
        address to,
        uint256 amount
    );

    event PCTSellEvent (
        address from,
        address to,
        uint256 amount
    );

    address private owner;
    mapping (address => uint256) pendingWithdrawals;

    // Initialises smart contract with supply of tokens going to the address that
    // deployed the contract.
    constructor(uint256 _initialSupply) public ERC20("PreciousChickenToken", "PCT") {
        _mint(msg.sender, _initialSupply);
        _setupDecimals(0); // Sets PCTs as integers only
        owner = msg.sender;
    }

    // A wallet sends Eth and receives PCT in return
    function buyToken(uint256 _amount) external payable {
        // Ensures that correct amount of Eth sent for PCT
        // 1 ETH is set equal to 1 PCT
        require(_amount == ((msg.value / 1 ether)), "Incorrect amount of Eth.");
        transferFrom(owner, msg.sender, _amount);
        emit PCTBuyEvent(owner, msg.sender, _amount);
    }

    // A wallet sends PCT and receives Eth in return
    function sellToken(uint256 _amount) public {
        pendingWithdrawals[msg.sender] = _amount;
        transfer(owner, _amount);
        withdrawEth();
        emit PCTSellEvent(msg.sender, owner, _amount);
    }

    // Using the Withdraw Pattern to remove Eth from contract account when user
    // wants to return PCT
    // https://solidity.readthedocs.io/en/latest/common-patterns.html#withdrawal-from-contracts
     function withdrawEth() public {
        uint256 amount = pendingWithdrawals[msg.sender];
        // Pending refund zerod before to prevent re-entrancy attacks
        pendingWithdrawals[msg.sender] = 0;
        msg.sender.transfer(amount * 1 ether);
    }
}
This contract when called generates a number of 'PreciousChickenTokens' and allocates them to the address that deployed the contract - in our case that will be the first address listed in Ganache (marked as 'Index 0'). It then has a function to allow users to buy PCTs in exchange for Ether (with the conversion rate set at one Eth equal to one PCT), and to sell those PCT back in return for Ether. Any Ether collected goes to the contract address itself.
Again it is worth re-iterating this code is intended as a demonstrator only and is not intended to be a model for anything production ready that is exposed to financial risk.
Next is the code that deploys the contract we've just written. Create the following file:
vim migrations/2_deploy_contract.js
Copy and paste the following into the file you've just created:
var PreciousChickenToken = artifacts.require("PreciousChickenToken");

module.exports = function(deployer) {
  // Arguments are: contract, initialSupply
  deployer.deploy(PreciousChickenToken, 1000);
};
This code is responsible for telling Truffle to deploy the smart contract we've just written above. It also serves to provide arguments to the constructor method within PreciousChickenToken.sol: this had one argument called _initialSupply which sets the amount of tokens created on deployment of the contract (i.e. one thousand).
Lastly we need to make some amends to our existing truffle configuration file:
vim truffle-config.js
Delete the entire contents and replace with this:
const path = require("path");

module.exports = {
    contracts_build_directory: path.join(__dirname, "client/src/contracts"),
    networks: {
    },
    mocha: {
    },
    compilers: {
        solc: {
            version: "^0.6.2",    // Fetch exact version from solc-bin (default: truffle's version)
        }
    }
}
So a number of changes have been made to the original:
- Comments have been deleted. Clearly normally we'd keep them in, but for the purposes of this guide it is easier to see what's happening if we delete them.
- A build directory has been set in a sub-directory. We are going to be putting our React front end in a subdirectory called client. As the front end needs to have access to the smart contract and can't view the root directory, we need to tell truffle to build the files in a directory it does have access to i.e. client/src/contracts. An alternative way to do this would be to create a soft link (e.g.
ln -s ../../build/contracts/ contracts) and let Truffle build the files where it normally would. - We've changed the solidity compiler to minimum version 0.6.2. This is different to the Truffle default which would fail to compile the OpenZeppelin ERC20 (3.1.0) due to dependencies.
If we weren't using React or the latest version of OpenZeppelin's contracts therefore, we could keep this as is.
Build the front end
As we are viewing this in React we now need to generate the front end, to do this we are going to use create-react-app to create a new sub-folder:
npx create-react-app client
Once finished you will have your standard create-react-app files and folders, but there are a couple of additional installations we need to do:
cd client
npm install ethers react-bootstrap bootstrap
npm audit fix
(Update 25 November 2020: Currently running the above command with npm version 7.0.8 creates a npm ERR! Cannot read property 'length' of undefined error. Using version 6.14.9 however does not. If this command generates an error therefore, check your npm version with npm -v.)
The first of these packages, ethers.js, is the most important - it aiming to be a "complete and compact library for interacting with the Ethereum Blockchain and its ecosystem"; the second two are for the purposes of UI. The primary alternative to ethers.js is web3.js, Adrian Li and infura.io have written more on the difference between the two.
Edit the following file with your text editor:
vim src/App.js
Delete all the content, and replace with:
import React, { useState } from 'react';
import './App.css';
import { ethers } from "ethers";
import PreciousChickenToken from "./contracts/PreciousChickenToken.json";
import { Button, Alert } from 'react-bootstrap';
import 'bootstrap/dist/css/bootstrap.min.css';
// Needs to change to reflect current PreciousChickenToken address
const contractAddress ='0xa8dC92bEeF9E5D20B21A5CC01bf8b6a5E0a51888';
let provider;
let signer;
let erc20;
let noProviderAbort = true;
// Ensures metamask or similar installed
if (typeof window.ethereum !== 'undefined' || (typeof window.web3 !== 'undefined')) {
try{
// Ethers.js set up, gets data from MetaMask and blockchain
window.ethereum.enable().then(
provider = new ethers.providers.Web3Provider(window.ethereum)
);
signer = provider.getSigner();
erc20 = new ethers.Contract(contractAddress, PreciousChickenToken.abi, signer);
noProviderAbort = false;
} catch(e) {
noProviderAbort = true;
}
}
function App() {
const [walAddress, setWalAddress] = useState('0x00');
const [pctBal, setPctBal] = useState(0);
const [ethBal, setEthBal] = useState(0);
const [coinSymbol, setCoinSymbol] = useState("Nil");
const [transAmount, setTransAmount] = useState('0');
const [pendingFrom, setPendingFrom] = useState('0x00');
const [pendingTo, setPendingTo] = useState('0x00');
const [pendingAmount, setPendingAmount] = useState('0');
const [isPending, setIsPending] = useState(false);
const [errMsg, setErrMsg] = useState("Transaction failed!");
const [isError, setIsError] = useState(false);
// Aborts app if metamask etc not present
if (noProviderAbort) {
return (
<div>
<h1>Error</h1>
<p><a href="https://metamask.io">Metamask</a> or equivalent required to access this page.</p>
</div>
);
}
// Notification to user that transaction sent to blockchain
const PendingAlert = () => {
if (!isPending) return null;
return (
<Alert key="pending" variant="info"
style={{position: 'absolute', top: 0}}>
Blockchain event notification: transaction of {pendingAmount}
Ξ from <br />
{pendingFrom} <br /> to <br /> {pendingTo}.
</Alert>
);
};
// Notification to user of blockchain error
const ErrorAlert = () => {
if (!isError) return null;
return (
<Alert key="error" variant="danger"
style={{position: 'absolute', top: 0}}>
{errMsg}
</Alert>
);
};
// Sets current balance of PCT for user
signer.getAddress().then(response => {
setWalAddress(response);
return erc20.balanceOf(response);
}).then(balance => {
setPctBal(balance.toString())
});
// Sets current balance of Eth for user
signer.getAddress().then(response => {
return provider.getBalance(response);
}).then(balance => {
let formattedBalance = ethers.utils.formatUnits(balance, 18);
setEthBal(formattedBalance.toString())
});
// Sets symbol of ERC20 token (i.e. PCT)
async function getSymbol() {
let symbol = await erc20.symbol();
return symbol;
}
let symbol = getSymbol();
symbol.then(x => setCoinSymbol(x.toString()));
// Interacts with smart contract to buy PCT
async function buyPCT() {
// Converts integer as Eth to Wei,
let amount = await ethers.utils.parseEther(transAmount.toString());
try {
await erc20.buyToken(transAmount, {value: amount});
// Listens for event on blockchain
await erc20.on("PCTBuyEvent", (from, to, amount) => {
setPendingFrom(from.toString());
setPendingTo(to.toString());
setPendingAmount(amount.toString());
setIsPending(true);
})
} catch(err) {
if(typeof err.data !== 'undefined') {
setErrMsg("Error: "+ err.data.message);
}
setIsError(true);
}
}
// Interacts with smart contract to sell PCT
async function sellPCT() {
try {
await erc20.sellToken(transAmount);
// Listens for event on blockchain
await erc20.on("PCTSellEvent", (from, to, amount) => {
setPendingFrom(from.toString());
setPendingTo(to.toString());
setPendingAmount(amount.toString());
setIsPending(true);
})
} catch(err) {
if(typeof err.data !== 'undefined') {
setErrMsg("Error: "+ err.data.message);
}
setIsError(true);
}
}
// Sets state for value to be transacted
// Clears extant alerts
function valueChange(value) {
setTransAmount(value);
setIsPending(false);
setIsError(false);
}
// Handles user buy form submit
const handleBuySubmit = (e: React.FormEvent) => {
e.preventDefault();
valueChange(e.target.buypct.value);
buyPCT();
};
// Handles user sell form submit
const handleSellSubmit = (e: React.FormEvent) => {
e.preventDefault();
valueChange(e.target.sellpct.value);
sellPCT();
};
return (
<div className="App">
<header className="App-header">
<ErrorAlert />
<PendingAlert />
<img src="https://upload.wikimedia.org/wikipedia/commons/thumb/6/6f/Ethereum-icon-purple.svg/512px-Ethereum-icon-purple.svg.png" className="App-logo" alt="Ethereum logo" />
<h2>{coinSymbol}</h2>
<p>
User Wallet address: {walAddress}<br/>
Eth held: {ethBal}<br />
PCT held: {pctBal}<br />
</p>
<form onSubmit={handleBuySubmit}>
<p>
<label htmlFor="buypct">PCT to buy:</label>
<input type="number" step="1" min="0" id="buypct"
name="buypct" onChange={e => valueChange(e.target.value)} required
style={{margin:'12px'}}/>
<Button type="submit" >Buy PCT</Button>
</p>
</form>
<form onSubmit={handleSellSubmit}>
<p>
<label htmlFor="sellpct">PCT to sell:</label>
<input type="number" step="1" min="0" id="sellpct"
name="sellpct" onChange={e => valueChange(e.target.value)} required
style={{margin:'12px'}}/>
<Button type="submit" >Sell PCT</Button>
</p>
</form>
<a title="GitR0n1n / CC BY-SA (https://creativecommons.org/licenses/by-sa/4.0)" href="https://commons.wikimedia.org/wiki/File:Ethereum-icon-purple.svg">
<span style={{fontSize:'12px',color:'grey'}}>
Ethereum logo by GitRon1n
</span></a>
</header>
</div>
);
}
export default App;
Deploy the contract
With everything built we are going to deploy the smart contract. At the terminal we change directory back to the one containing our contract and deploy:
cd ..
truffle deploy
If everything works you should see output similar to this:
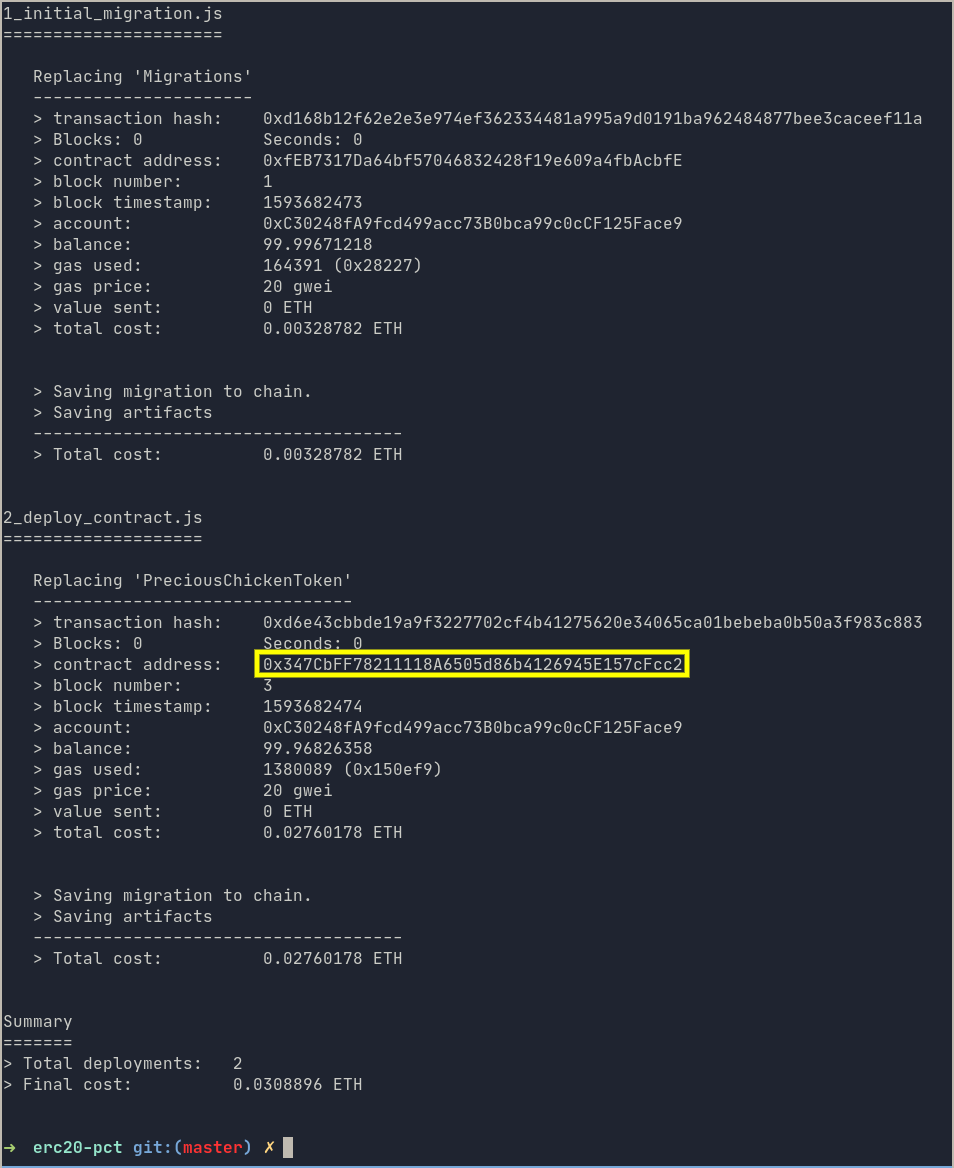
I've highlighted the contract address in a yellow box on the above - this is the address on the blockchain that your contract has been deployed to (your address will be similar but different). Copy this address to clipboard.
Now we know this address we have to change the client src code to reflect this. Therefore edit App.js:
vim client/src/App.js
Find the relevant line of code, in my example it is:
const contractAddress ='0xa8dC92bEeF9E5D20B21A5CC01bf8b6a5E0a51888';
and replace the string within the single quotes with the address you copied from the yellow box above.
If you switch to Ganache you will see that the first account (Index 0) no longer has a balance of 100 Eth, this is because a small amount of Eth has been consumed in deploying the contract. This account now also owns 1000 PreciousChickenTokens, although we don't know that looking at Ganache.
Approve the transacting account
As the first account in Ganache (Index 0) is now set as the owner by the smart contract, e.g. it owns the 1000 ERC20 tokens; we'll be using the account at Index 1 to transact on. The ERC20 specification says that when the transferFrom method is used authorisation has to be given specifically so that Account A can pass Account B tokens. We will do this using truffle console. Therefore at the terminal:
truffle console
Your prompt should now change to truffle(ganache)> or similar. Enter:
token = await PreciousChickenToken.deployed()
If successful this should return undefined. We can now increase the allowance:
token.increaseAllowance(accounts[1], 1000, {from: accounts[0]})
This code should output a transaction log to the console. The command states that accounts0 authorises accounts1 to hold up to 1000 tokens.
Lastly exit the console:
.exit
Start React
Time to fire up React:
cd client
npm start
Your browser should now point to localhost:3000. If you do not have Metamask installed, or some equivalent software for accessing the Ethereum blockchain, then you will see the error message: Metamask or equivalent required to access this page. The remainder of this guide will assume you have a fresh install of Metamask; I haven't tested other options (e.g. Brave browser), so they may not work.
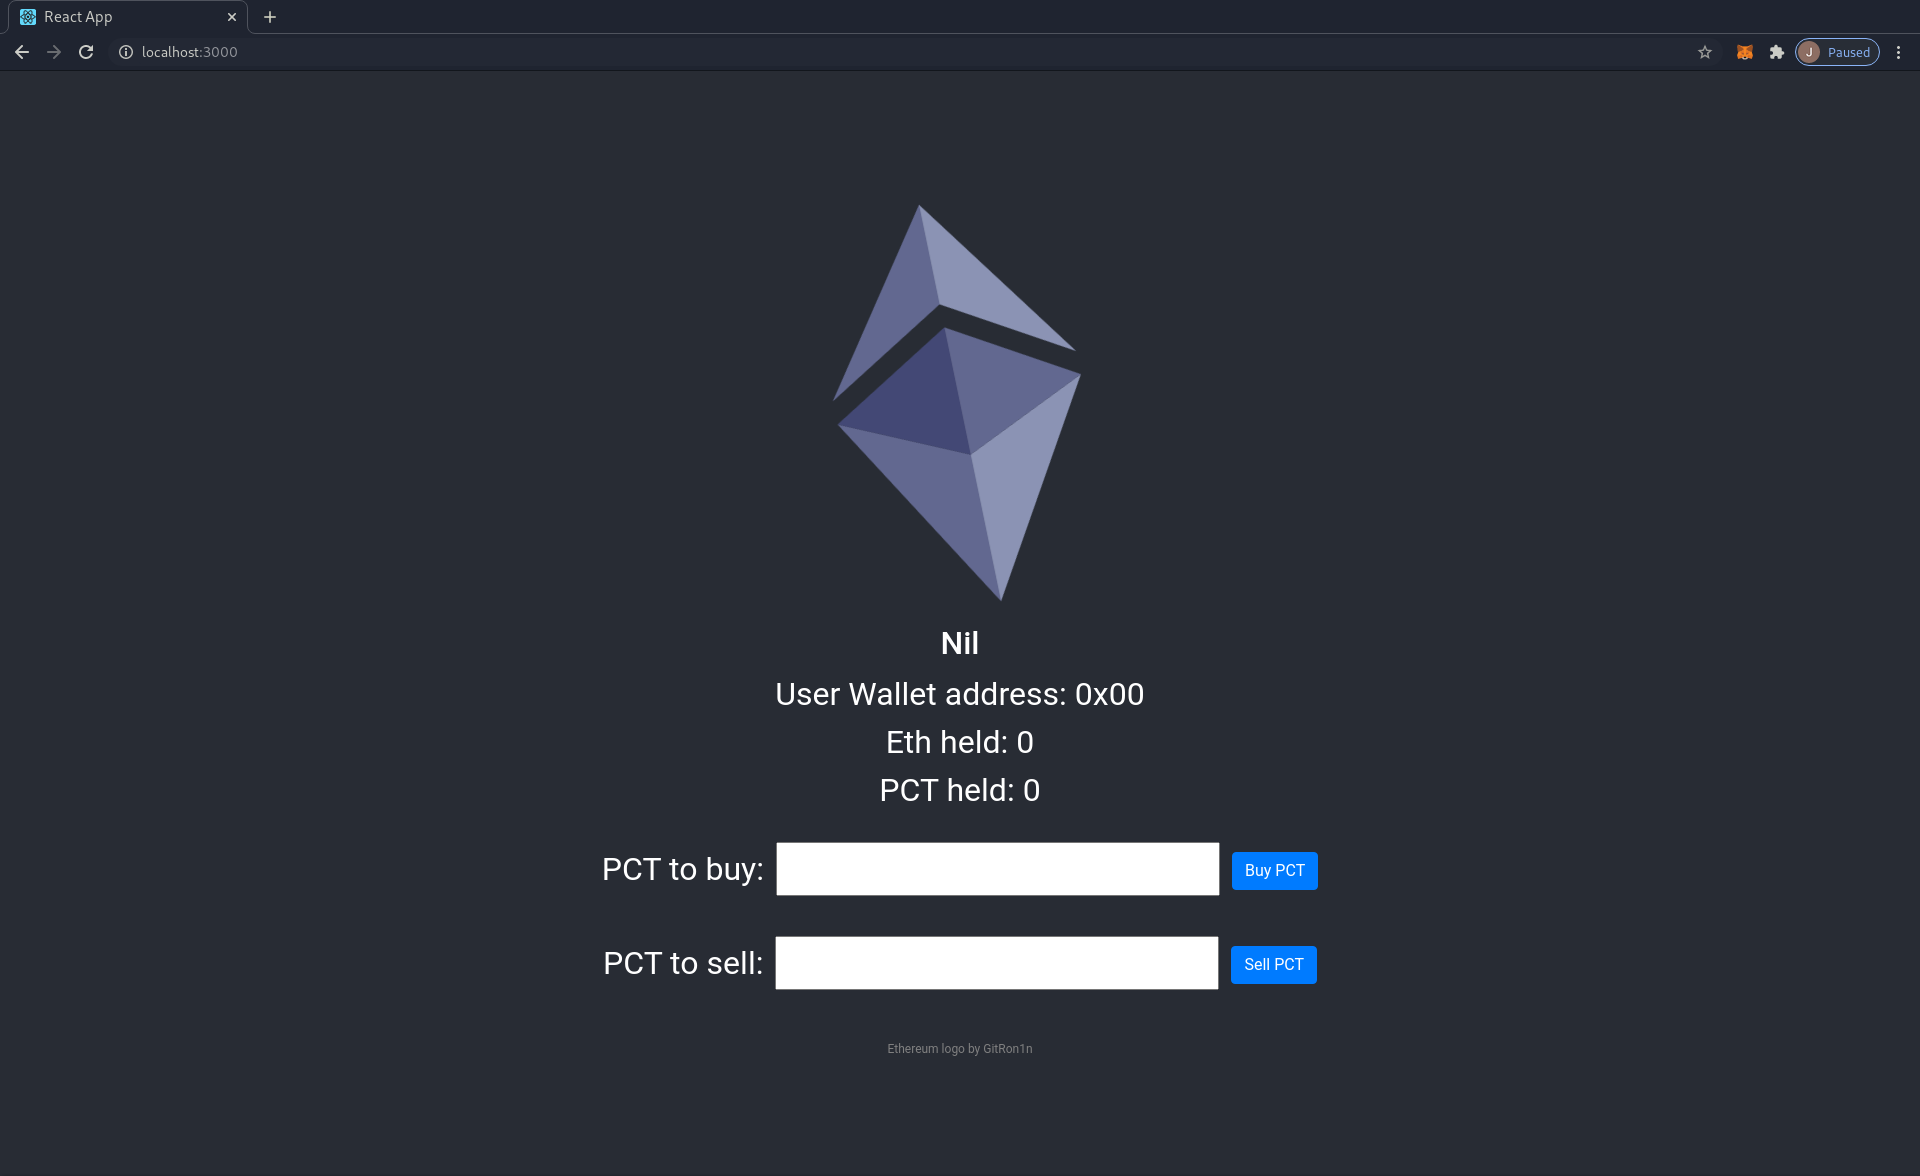
If your browser is suitably enabled you should otherwise see the rotating Ethereum symbol, and a number of blank fields:
Import wallet into Metamask
This process will assume your starting point is a fresh install of Metamask on Google Chrome (v83.0.4103.116); other browsers are likely going to be different; and if you have already used Metamask previously you will need to logout etc.
Assuming you do have that fresh install selecting the Metamask extension icon will result in:
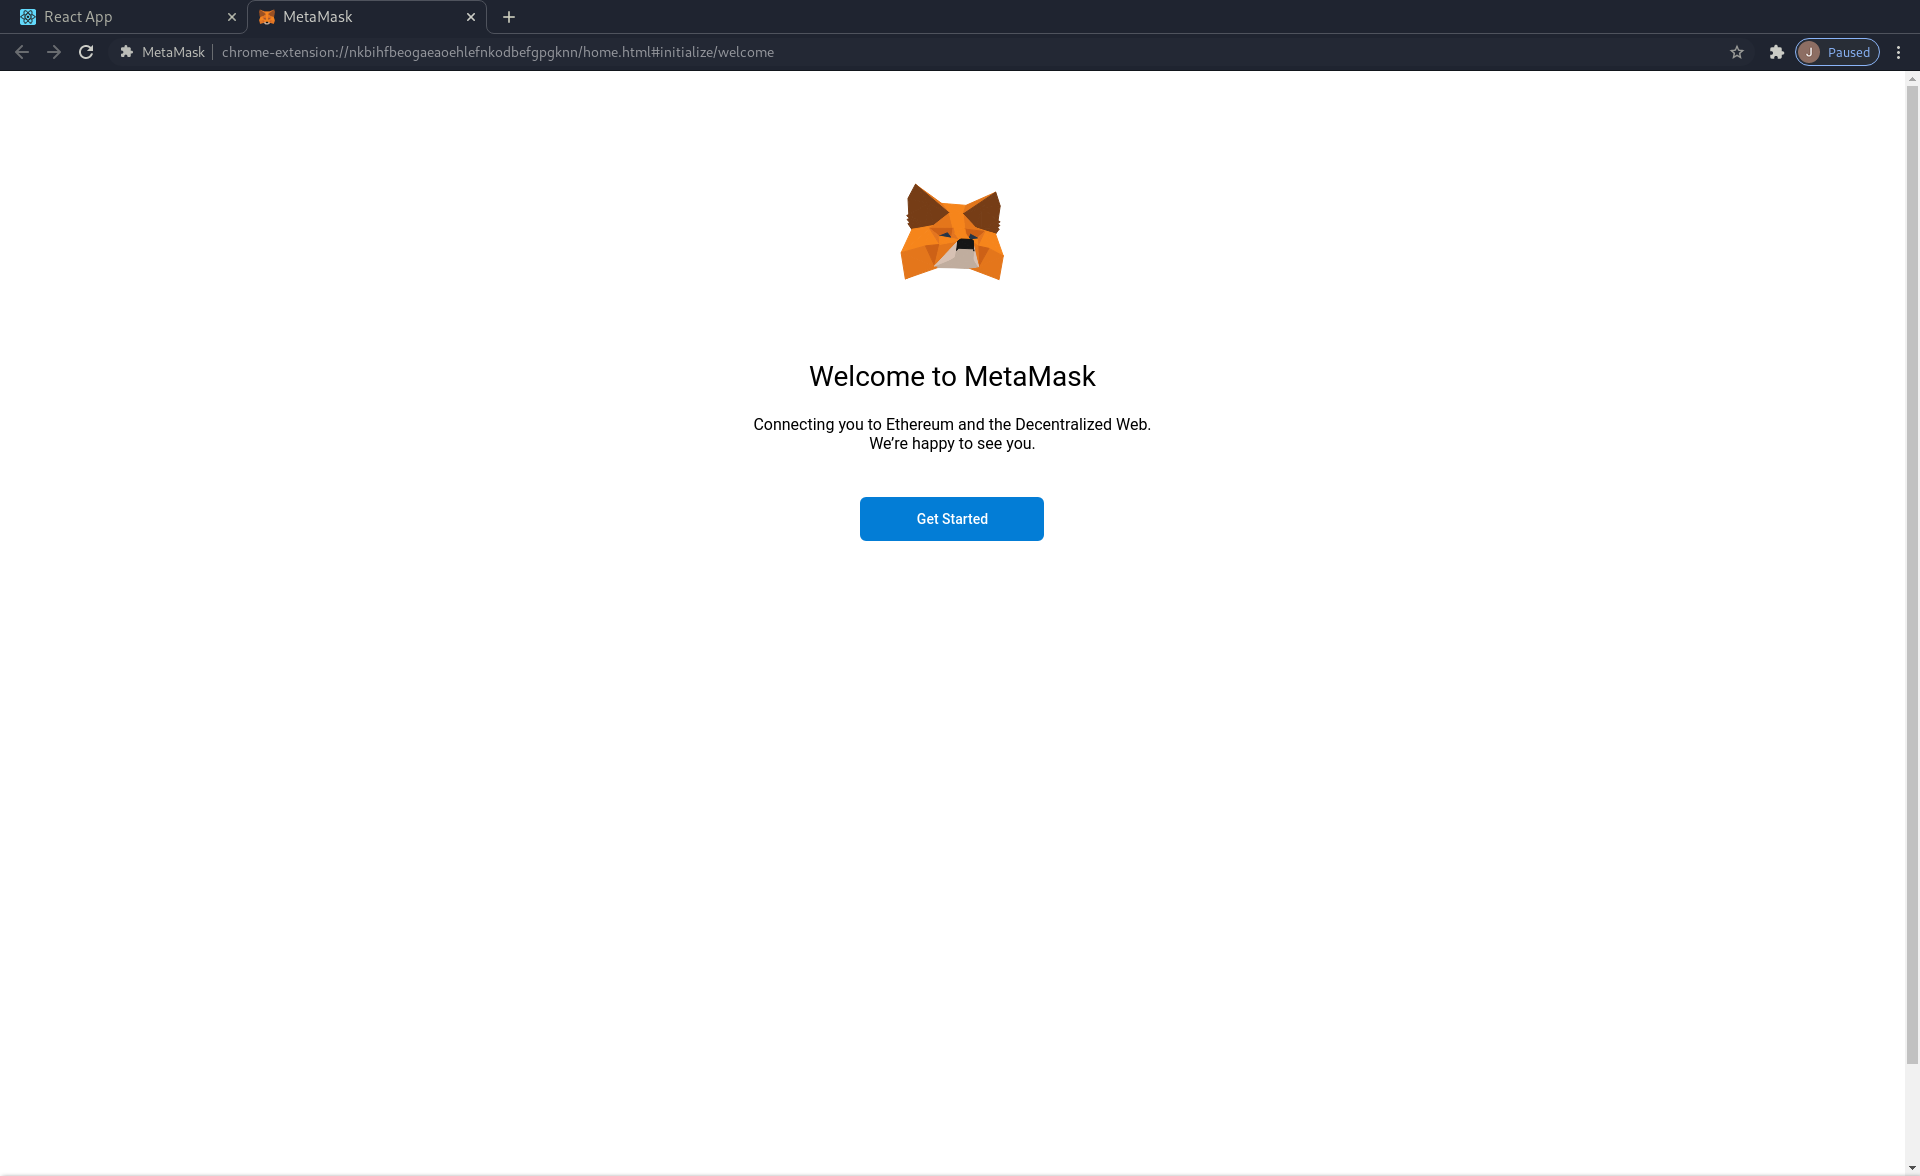
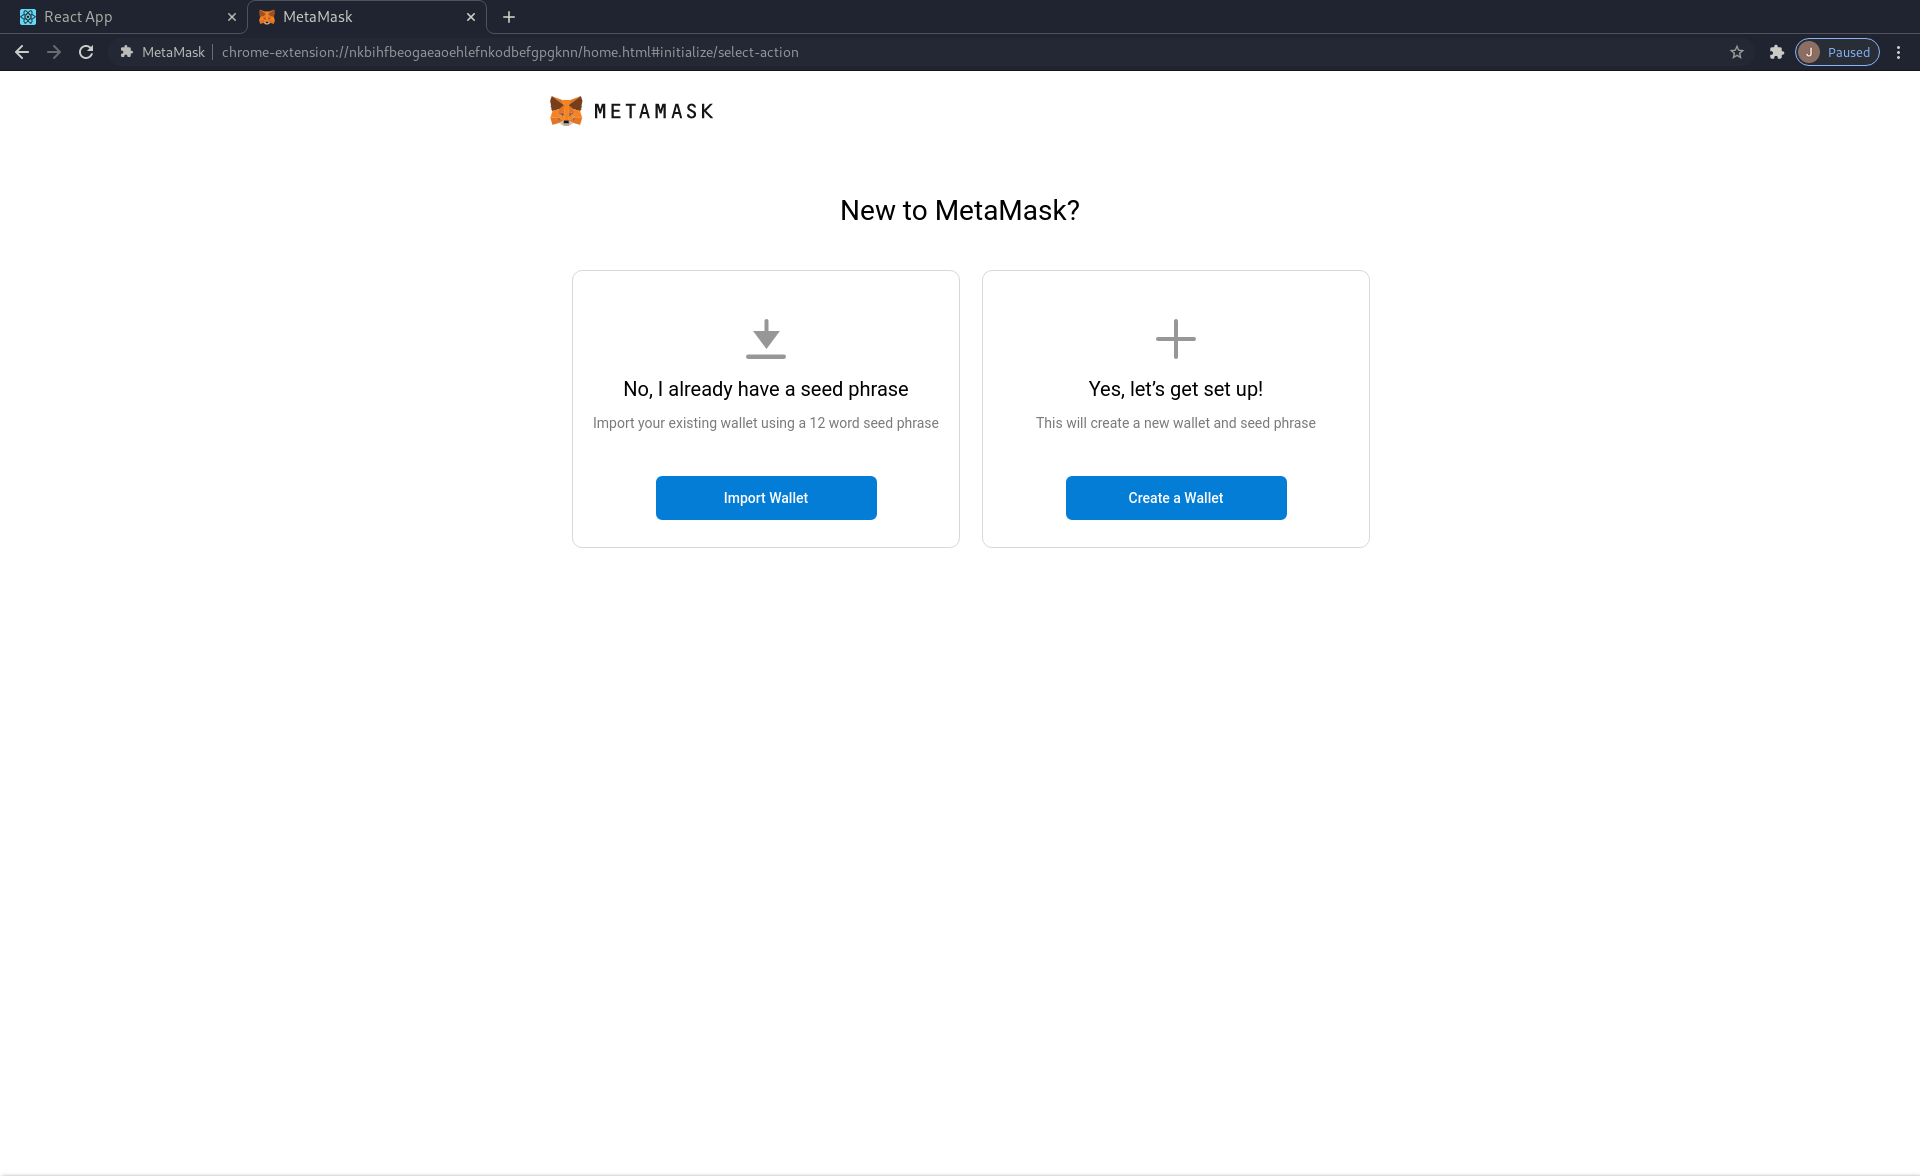
Selecting the Get Started option will take us to our set up options. Here we want to select No, I already have a seed phrase:
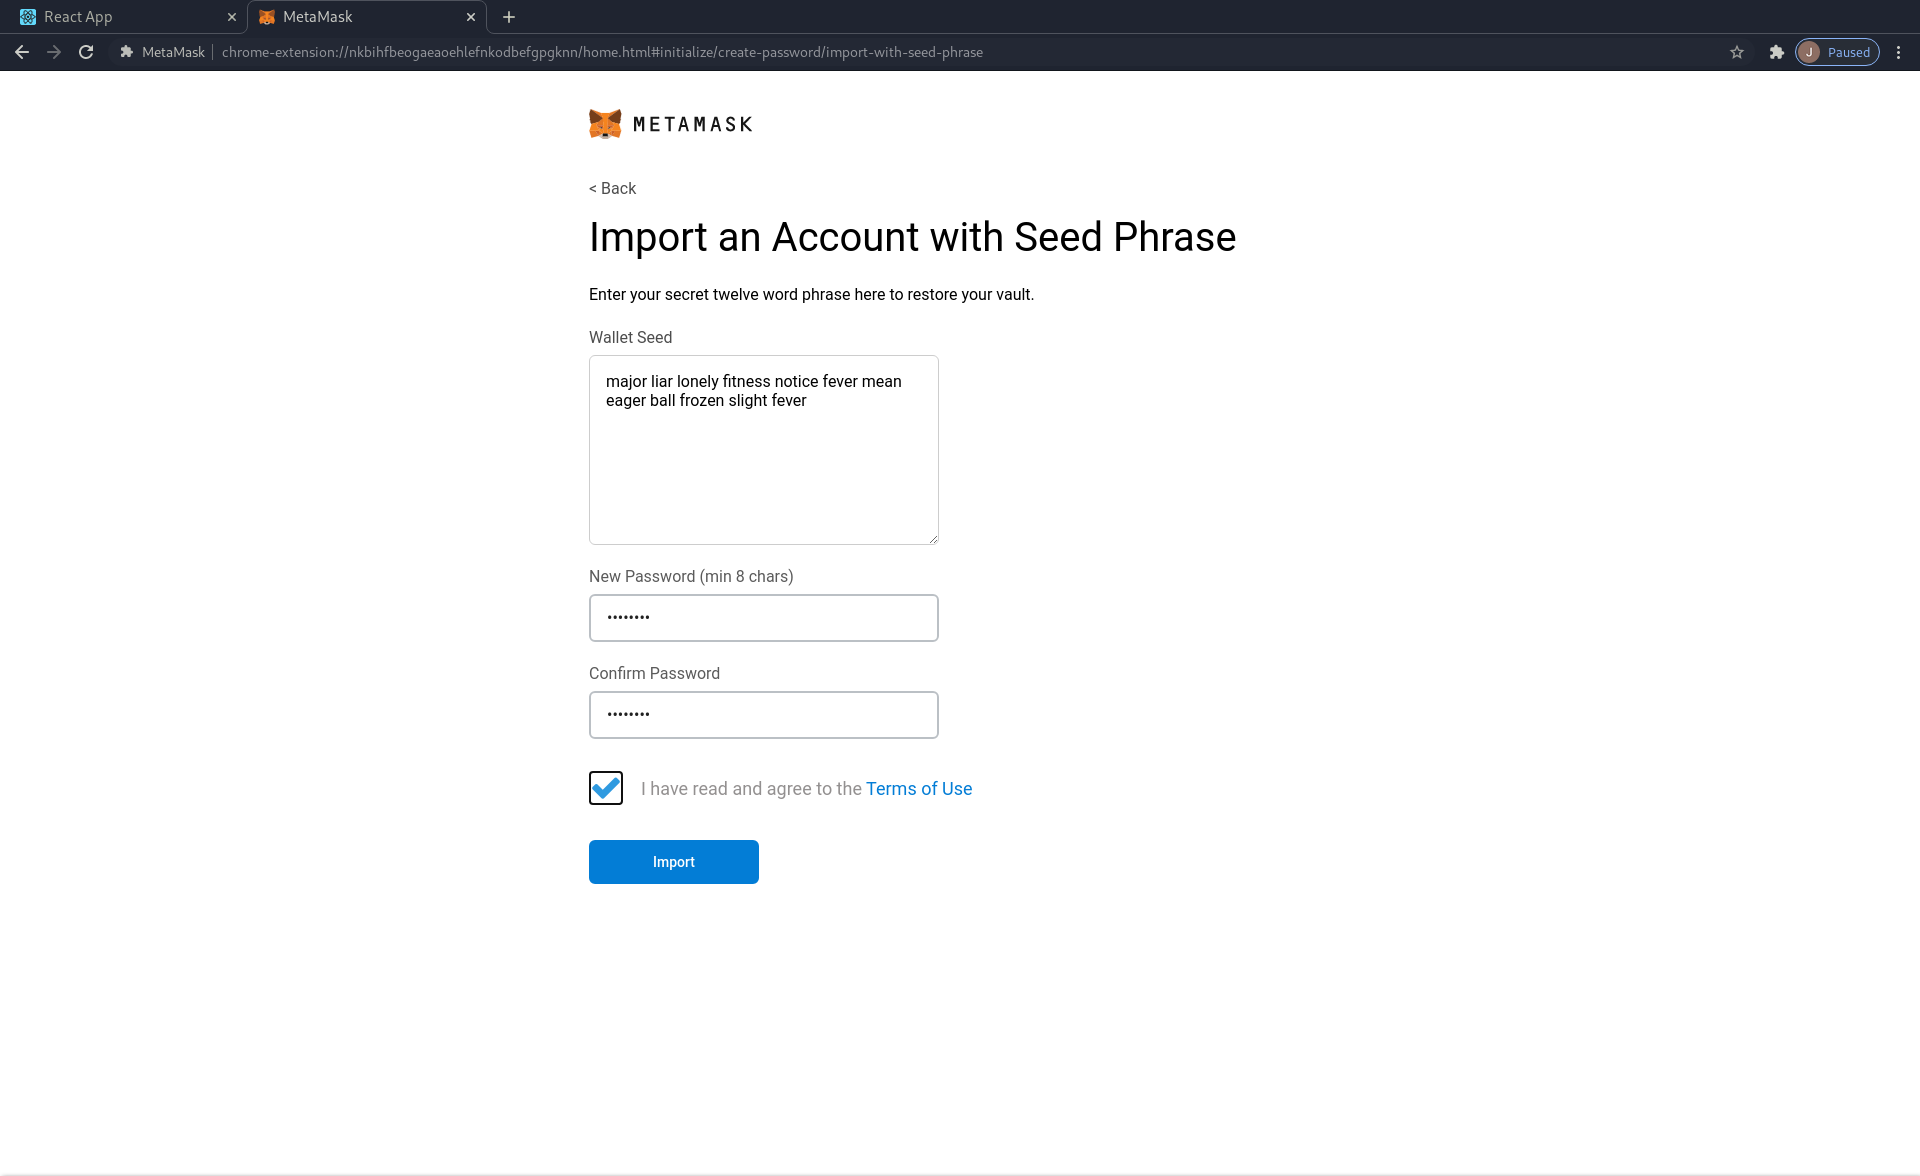
We now need our seed phrase that Ganache has created for us; at the top of the screen we will find twelve words under the heading Mnemonic. Copy and paste them into the Wallet Seed field below, and add a password of your choosing:
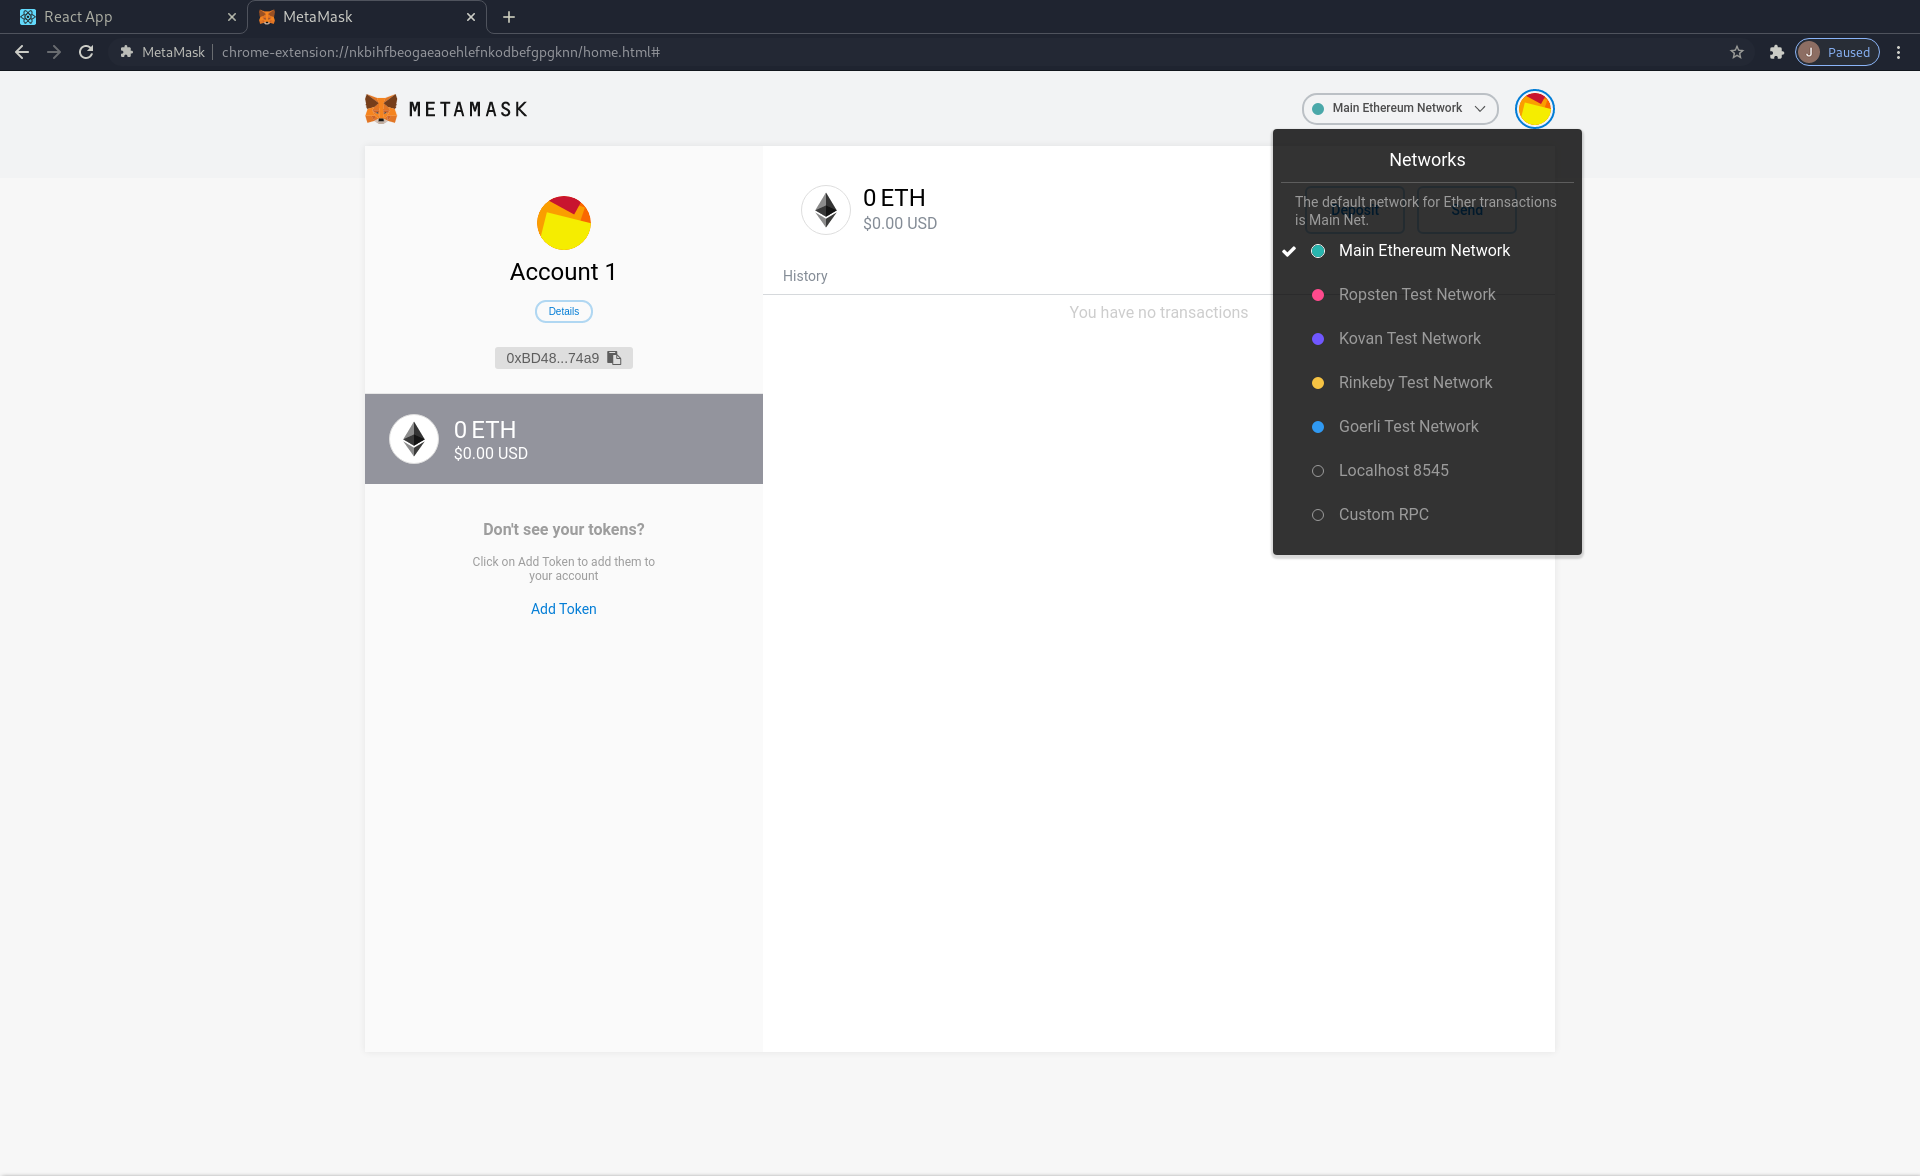
There will be a number of congratulatory / analytics sreens to click through after which you will see your account. Currently blank as we haven't connected it to our local blockchain instance. Therefore select Custom RPC from the Networks drop-down menu accessed by selecting Main Ethereum Network (which is the currently selected network):
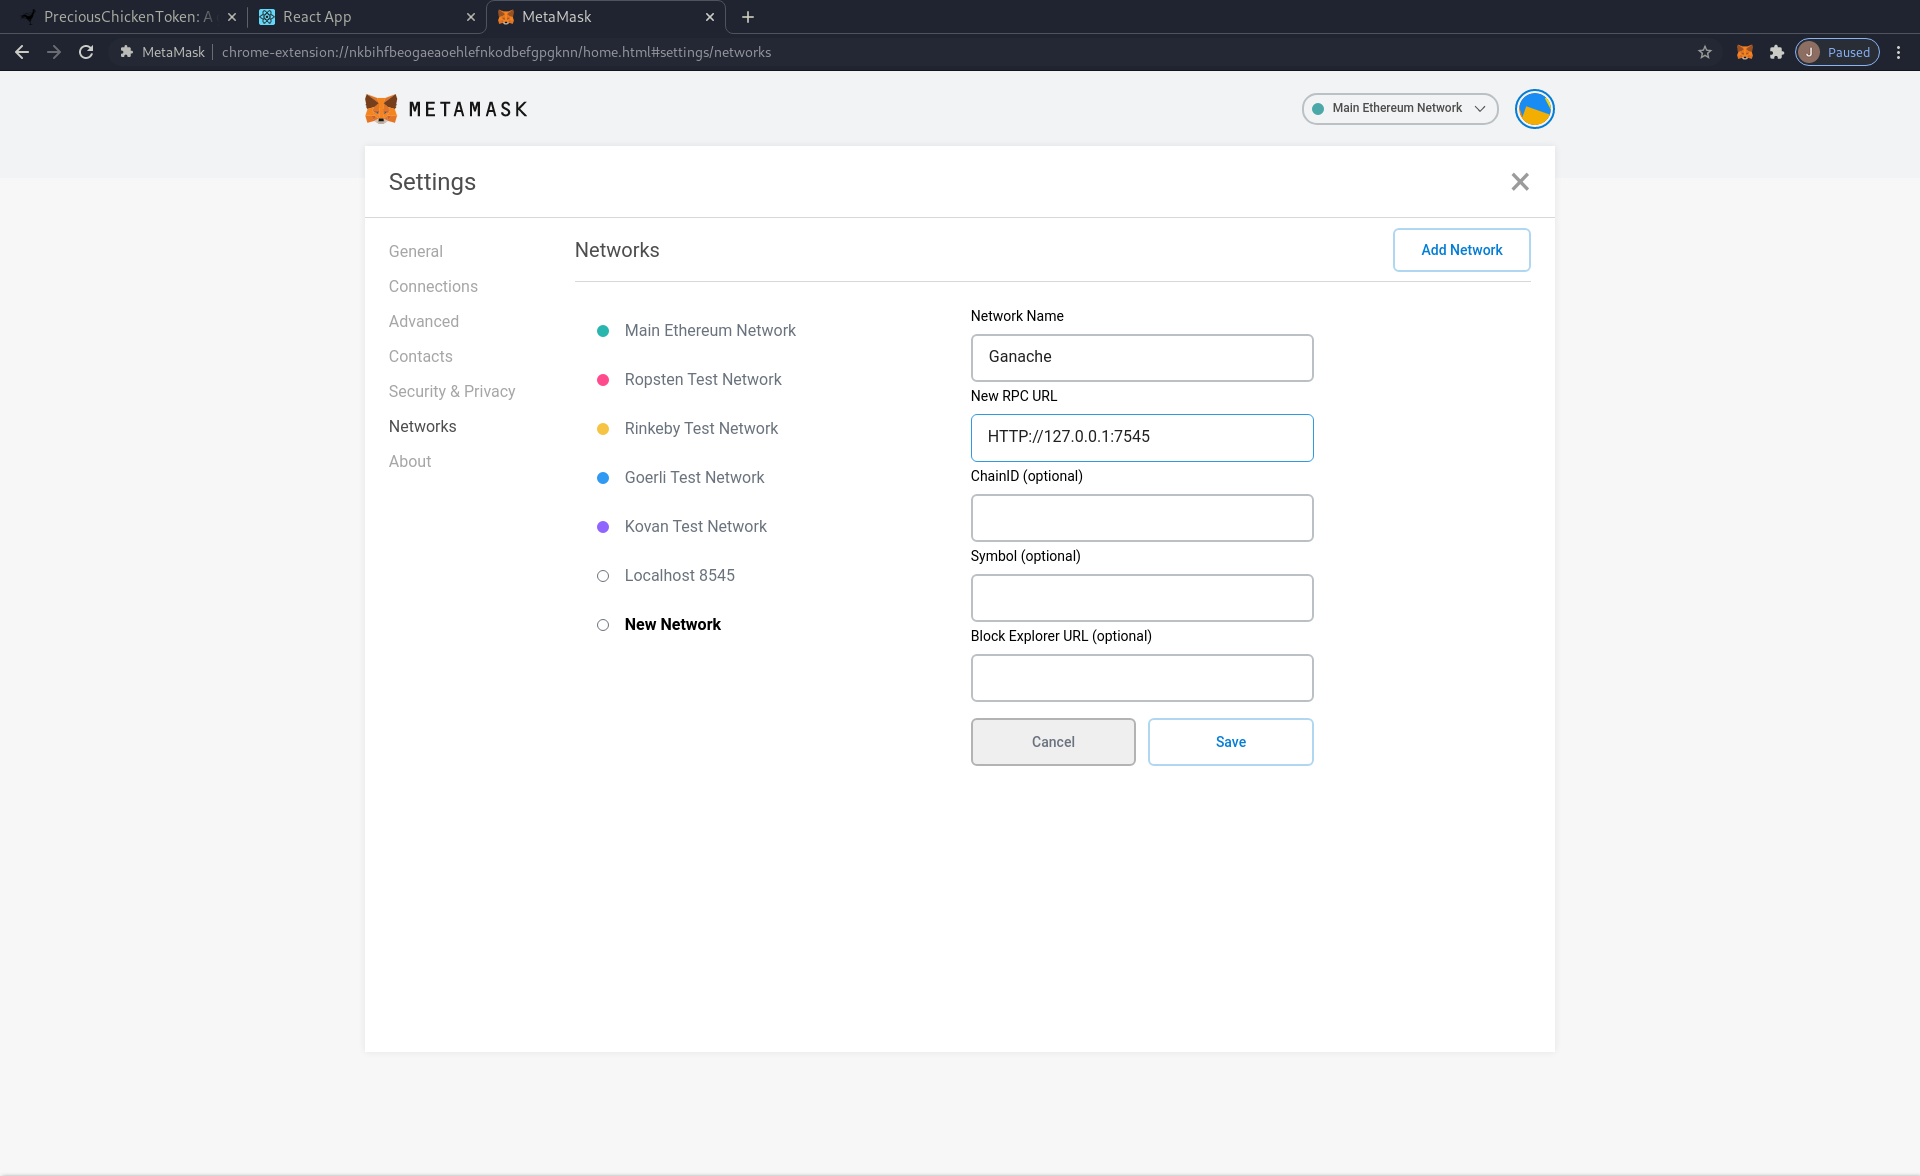
We now need to enter the details of where Metamask can find Ganache on the network. Returning to Ganache copy the RPC Server details (in my instance this is HTTP://127.0.0.1:7545) and copy them into New RPC URL field on the add network screen, give it a sensible Network Name (e.g. Ganache), and select Save:
Confirm that Ganache (or whatever you called your network) is now displayed in the network dropdown menu at the top of the Metamask window, as opposed to the default of Main Ethereum Network. This ensures the application is talking to your local blockchain (where we have deployed the smart contract), rather than the real-world Ethereum network (where we have not).
We now need to return to the page serving our React app (typically this is http://localhost:3000/). A pop up should now appear asking to 'Connect with Metamask':
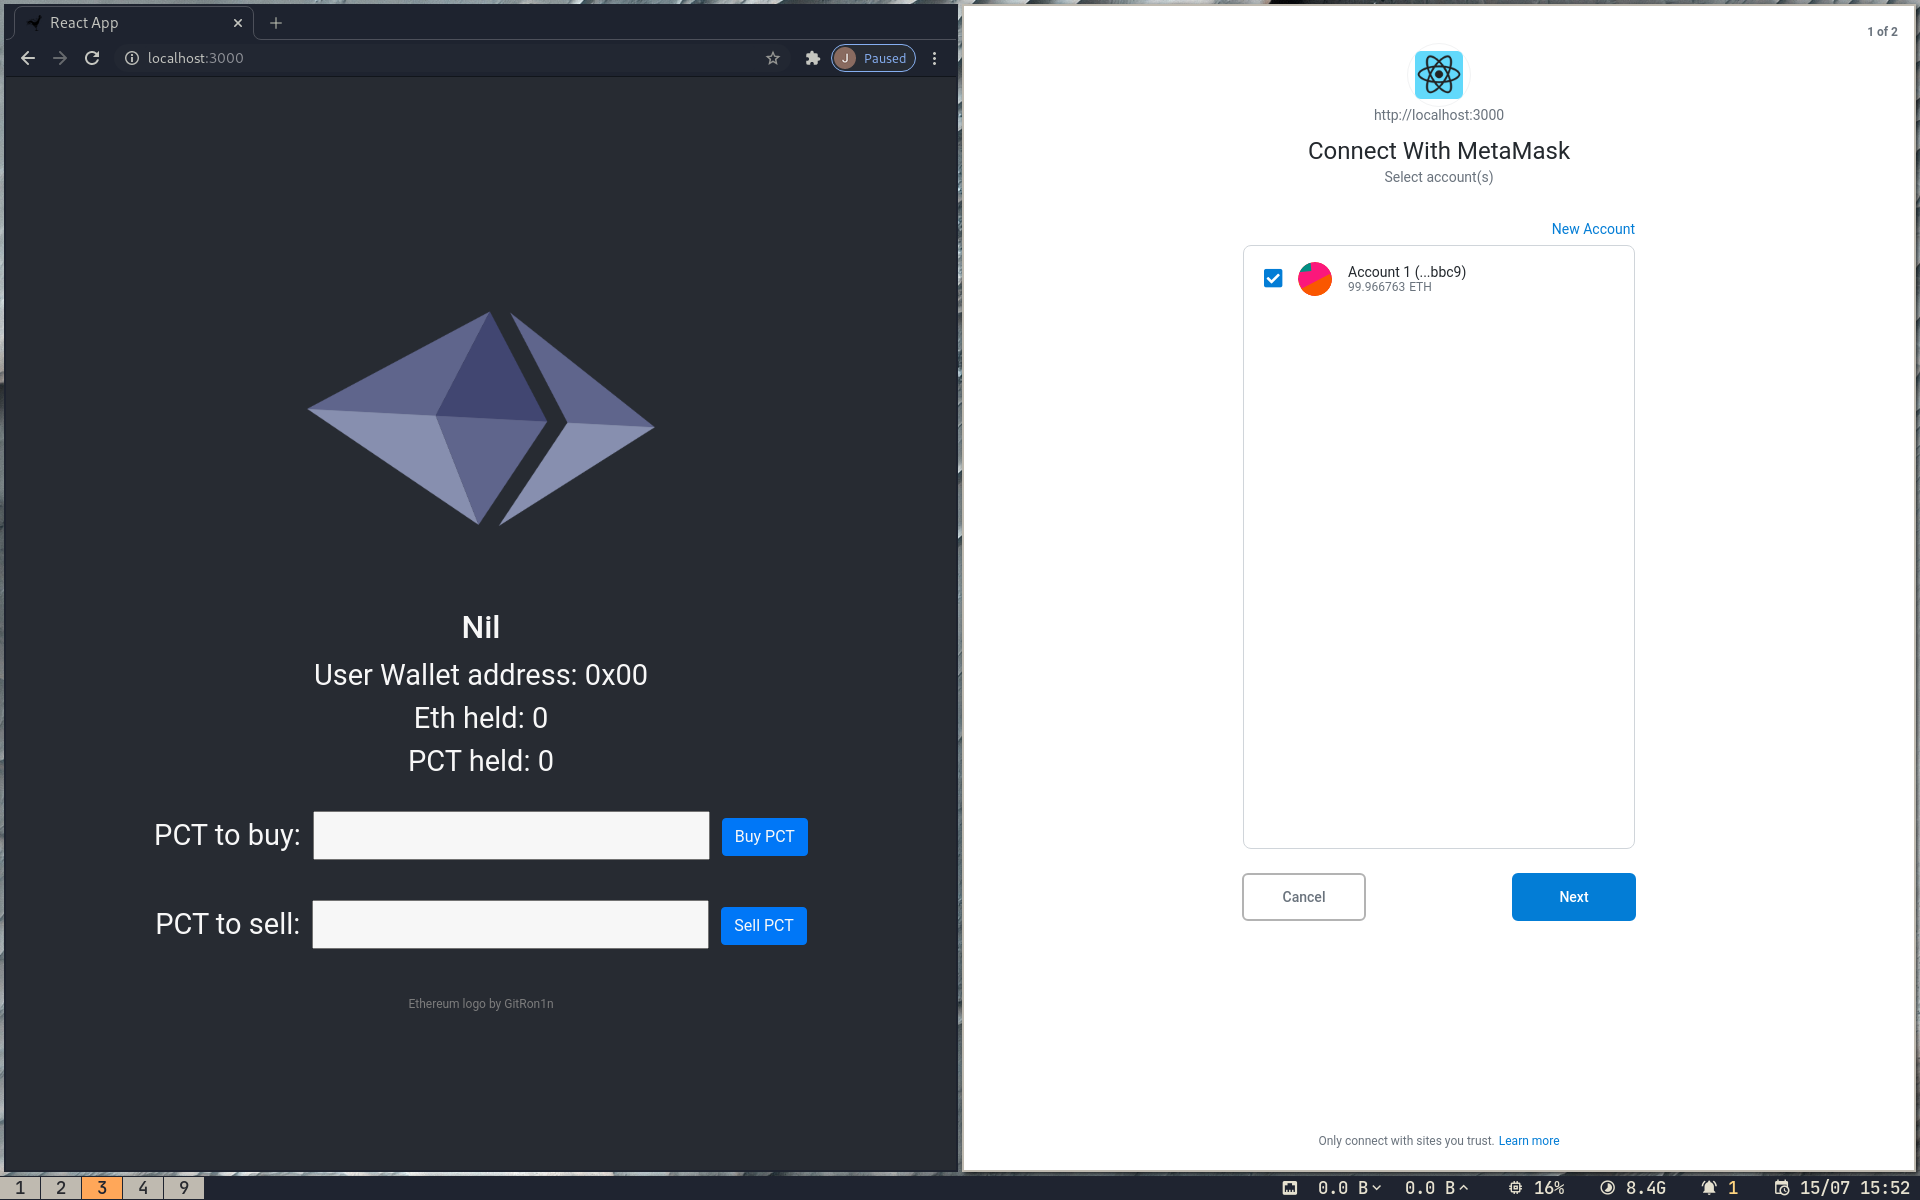
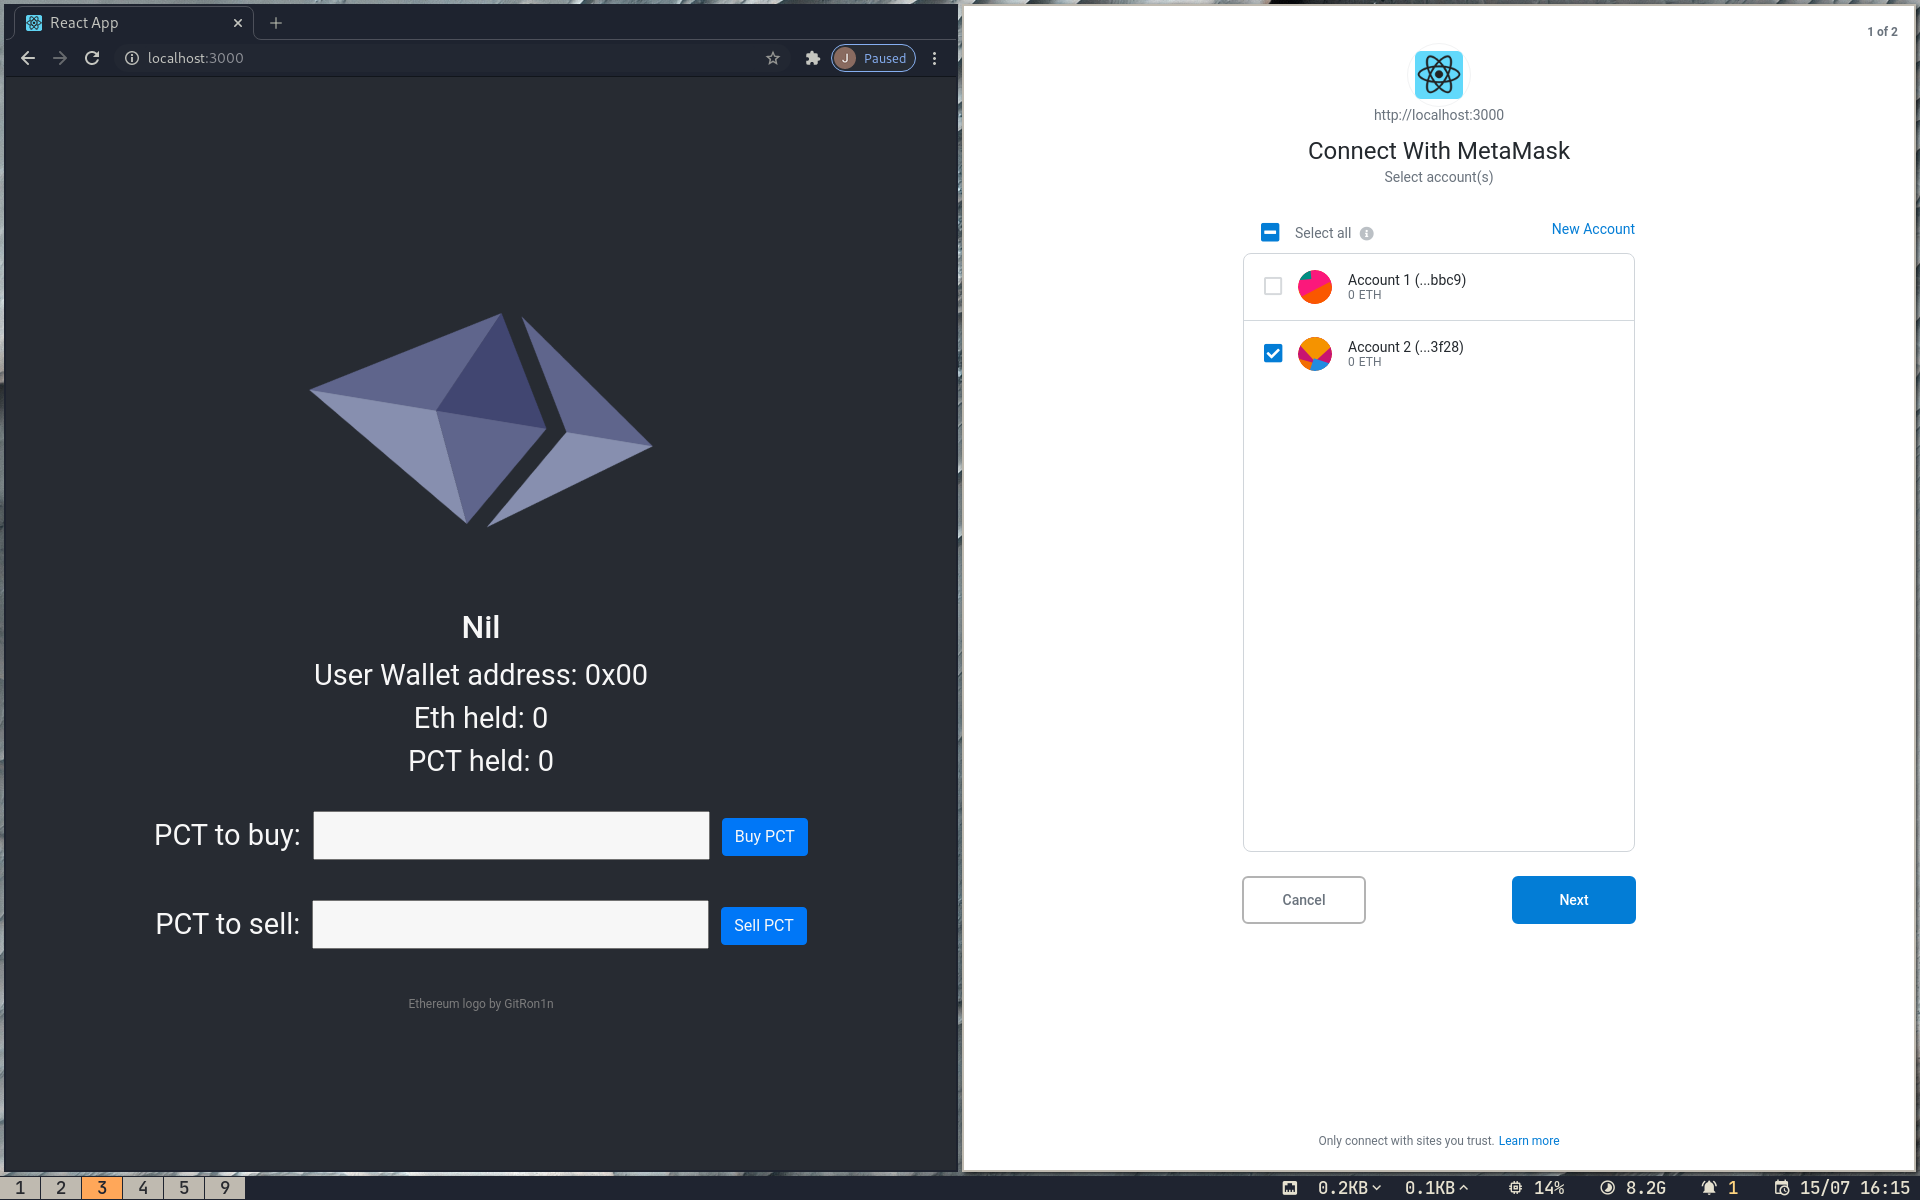
We don't want to select Next to proceed yet though. Slightly confusingly, as Ganache uses zero-based numbering, when it asks to connect to Account 1, this is actually Ganache Account 0 - which contains all of our PCT. We want to connect on Ganache Account 1 (which Metamask refers to as Account 2). Therefore select the New Account link, save the default option of Account 2; then de-select Account 1 and select Account 2 as shown:
Once done select Next. We now get another confirmation from Metamask as to whether we want to connect Account 2:
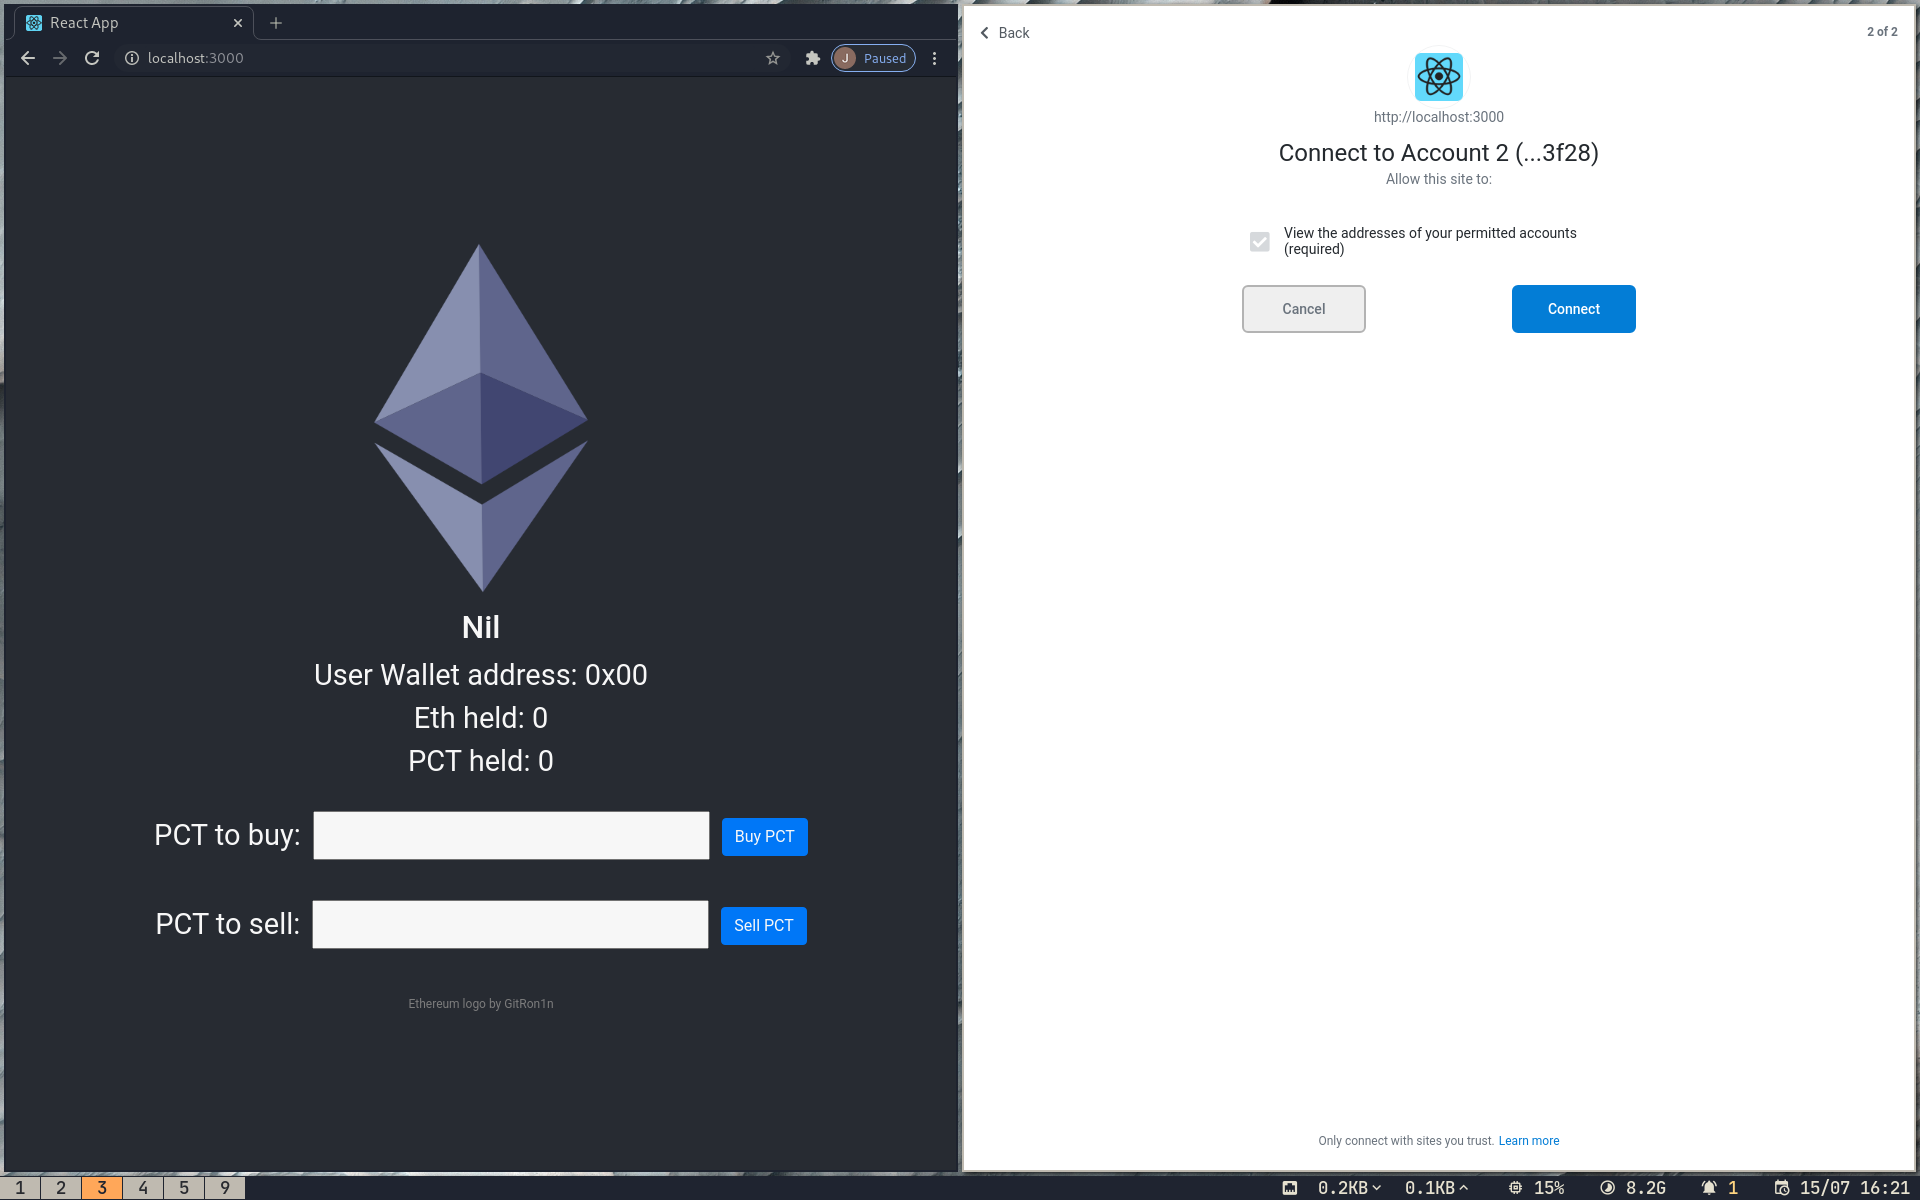
Select Connect and after a browser refresh we should now have the details of Ganache Account 1 on screen:
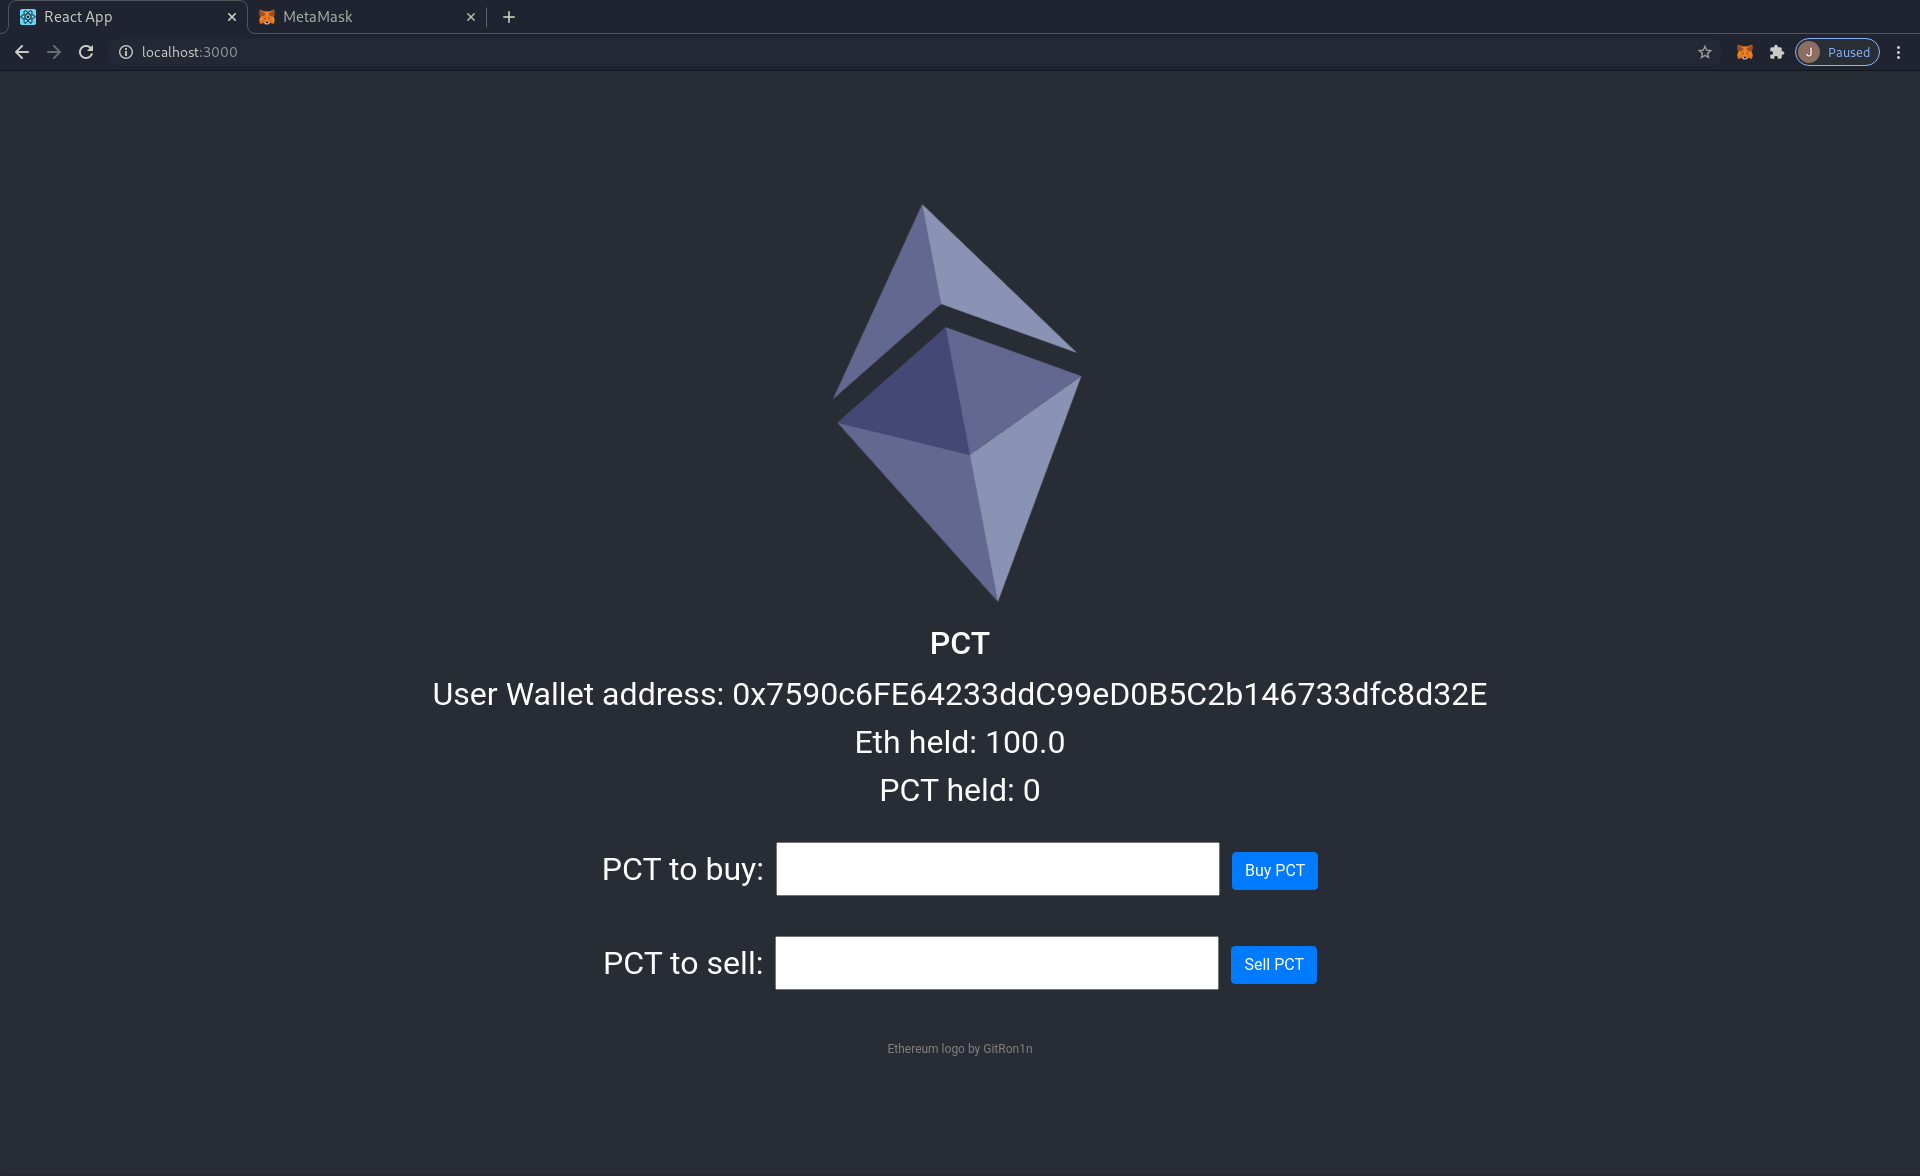
Success! A bit of a tortuous process, that varies across browsers. For instance other browsers might not produce a pop-up, but rather have a far less obvious notification on the Metamask icon itself.
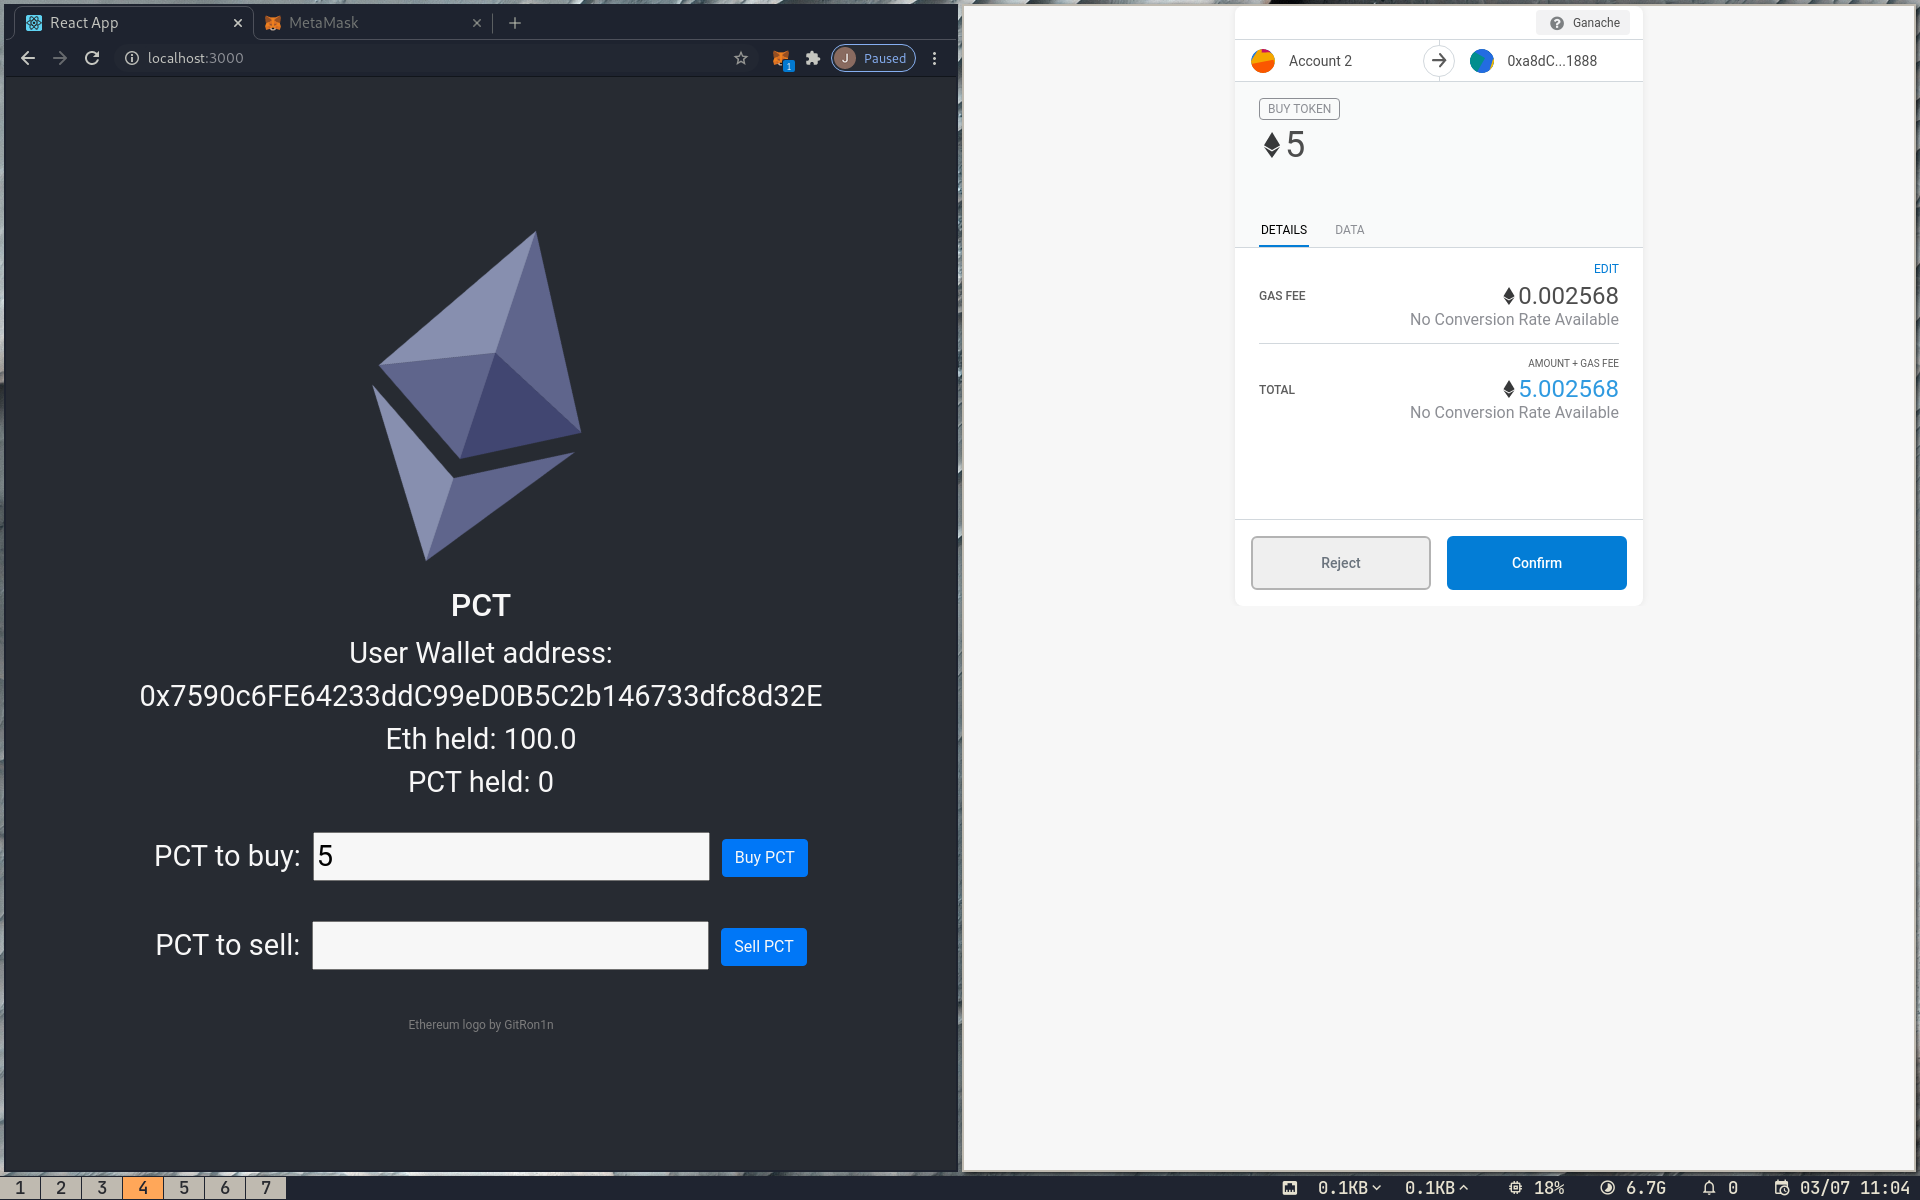
Buy, buy, buy; sell, sell, sell!
At this point we can go ahead, test the application, and buy and sell some PCT. Putting an order to buy PCT will result in a request for authorisation from Metamask (this might pop up, or remain in the background, in which case you will have to manually select the Metamask icon):
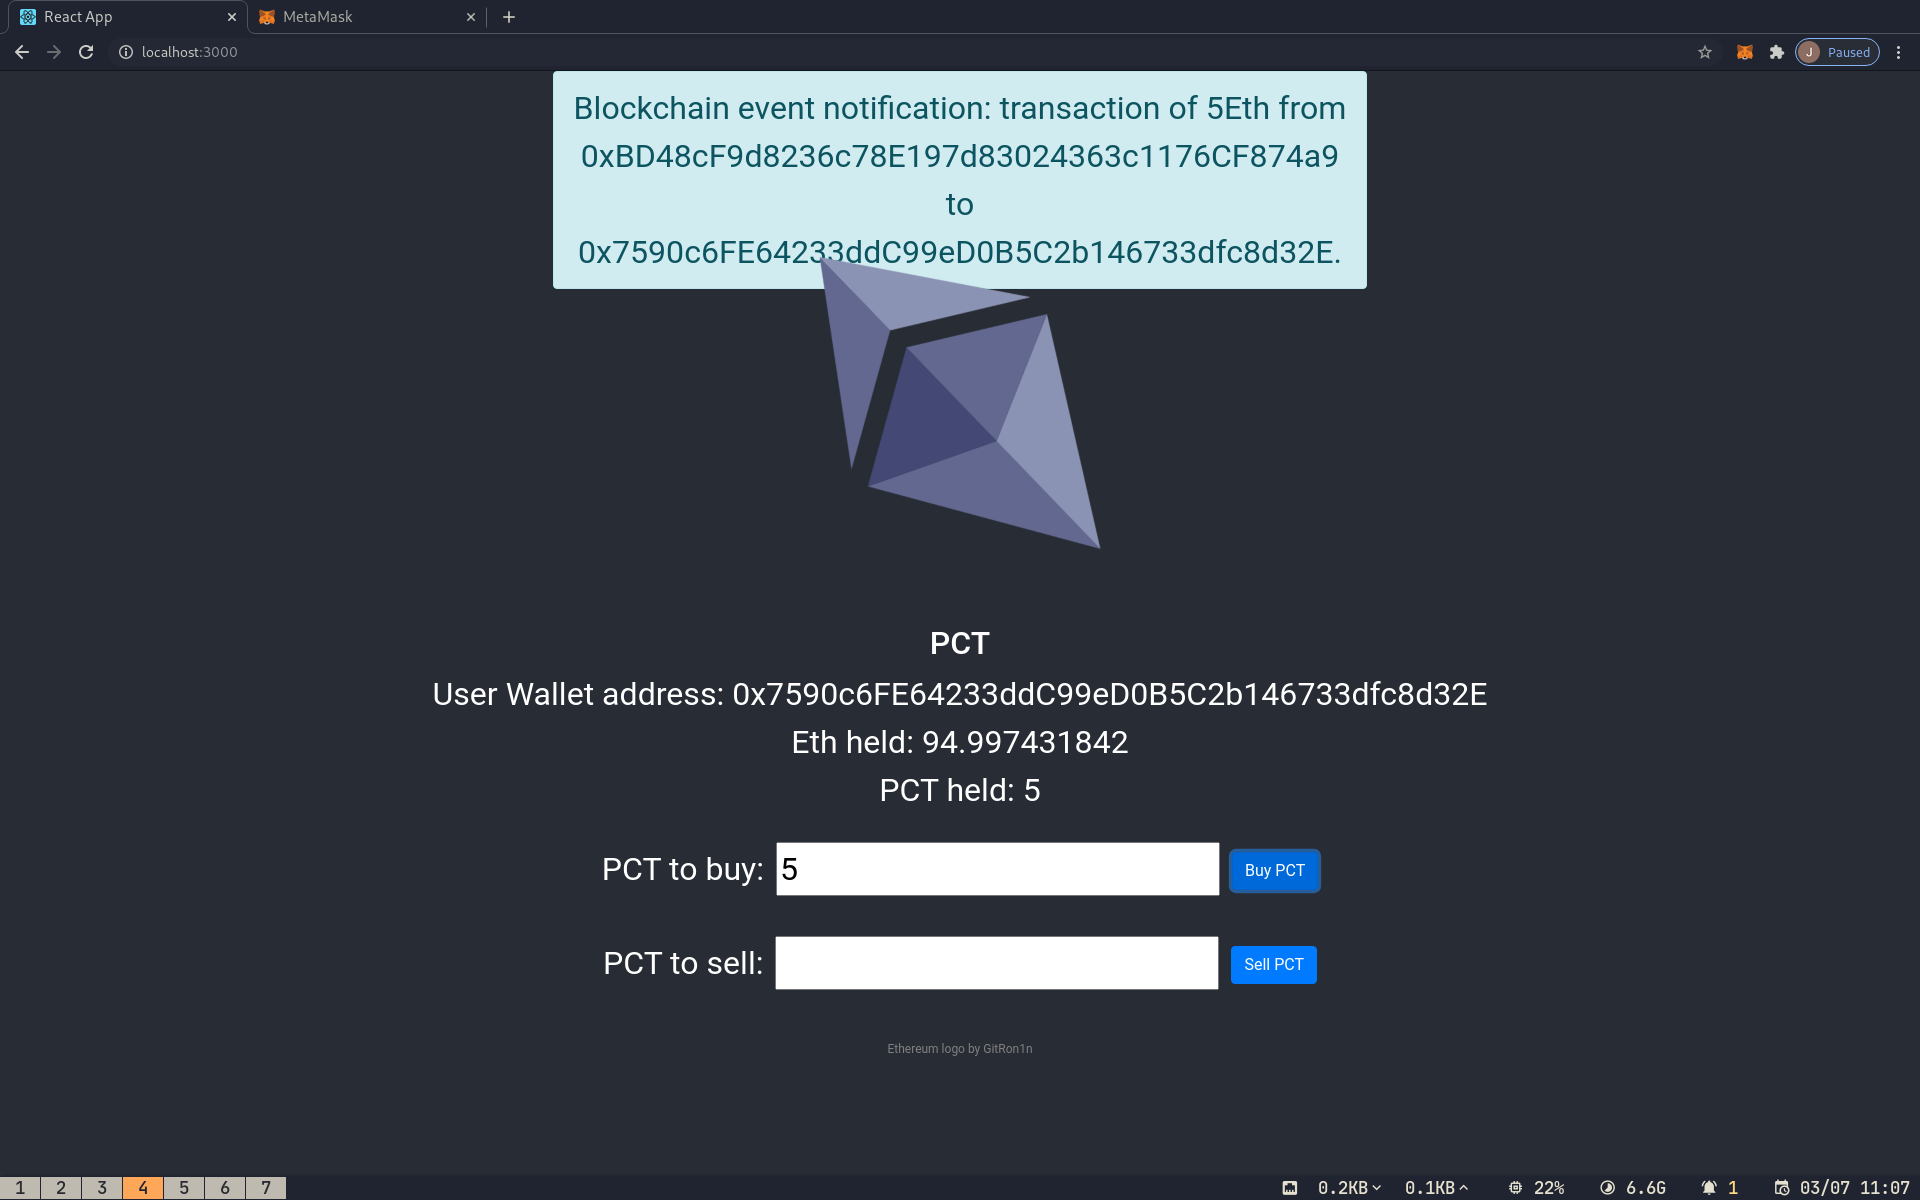
Authorisation will lead to the relevant block being mined on the local blockchain and if successful a pop up will appear:
Likewise failure (in this case trying to sell more PCT than the Account holds) will lead to an error message:
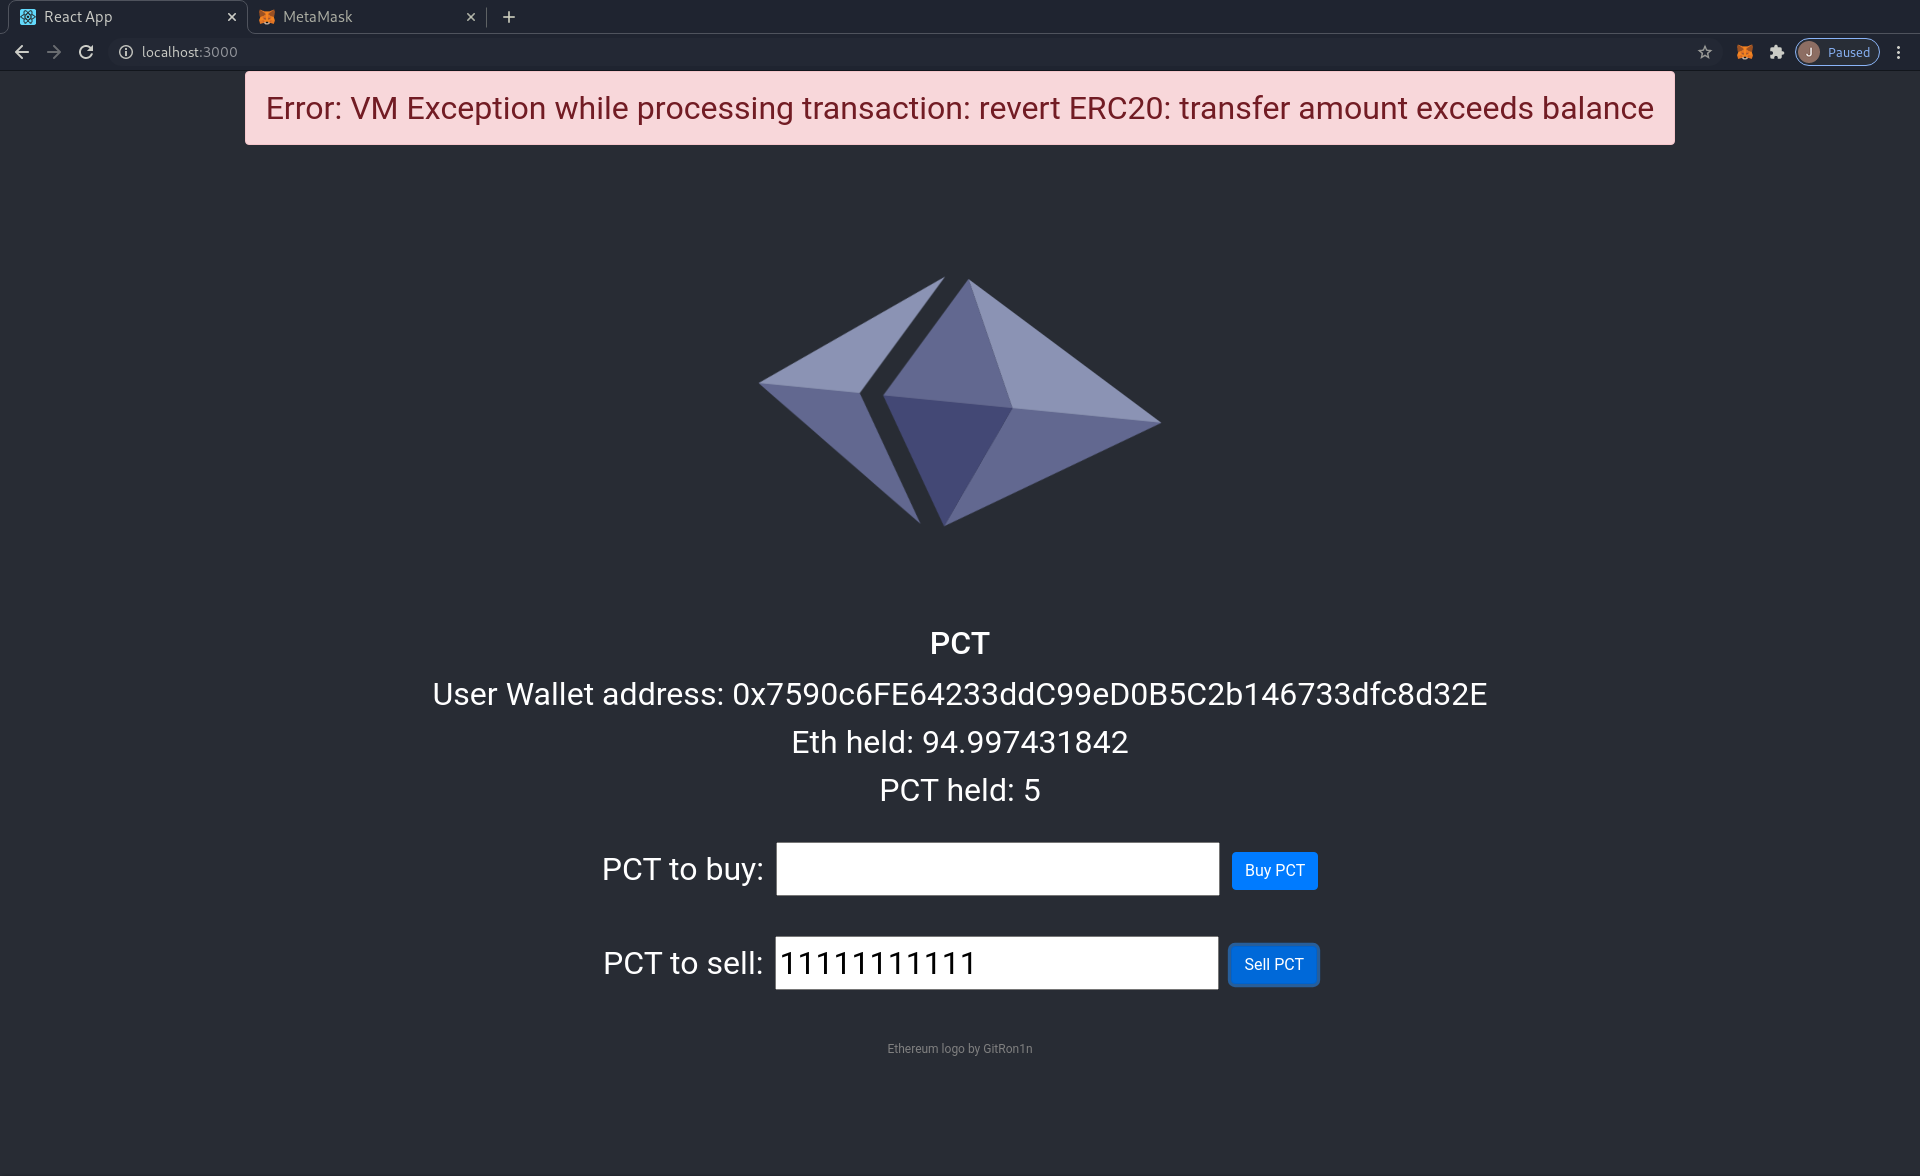
Go ahead and try and break things.
Configuration control
If this hasn't worked it might be due to different software versions having been released since this post was written. This is especially the case due to the number of moving parts plus the frequency of breaking changes in the Ethereum world. So for reference, components used are: node v14.4.0, truffle v5.1.30, ganache v.2.4.0, metamask v7.7.9, openzeppelin/contracts v3.1.0, ethers v5.0.3, create-react-app v3.4.1, solidity v0.6.2 and my OS is Ubuntu 20.04 LTS (Regolith flavour).
Conclusions
So my aim here was to achieve working code, rather than to develop the next hot ICO (if such things even exist anymore). There is no testing (bad), it doesn't handle decimals, and there are oodles of other things to refactor - however it does give a good idea of how the building blocks stack up. I also got some great feedback on the OpenZeppelin forum as to how the structure of the smart contract could be improved:
I would keep any non-core functionality separate from the token (such as purchasing). The token should ideally just be the functionality to use the token. If you have purchasing functionality you can put this in a separate contract.
You could also transfer an amount of tokens to the purchasing functionality contract rather than having to set an allowance for the token contract to be able to use some of the deployer of the token contracts tokens.
Definitely worth bearing in mind if this guide is being used as a jumping off point (or I revisit this).
If you have feedback, observations, etc; I'd love to read them in the comments section.
Further reading
Documentation
- OpenZeppelin contracts documentation particularly the ERC20 section
- Ethers documentation
Tutorials
- Code Your Own Cryptocurrency on Ethereum (How to Build an ERC-20 Token and Crowd Sale website) by Dapp University
- How to Connect a React App to the Blockchain
- How to create an ERC20 token the simple way
- Ethereum Dapps with Truffle,Ganache, Metamask, OppenZippelin and React

Top comments (1)
@horaceshmorace I saw in another comment you were on the lookout for an Ethereum tutorial which encompassed ERCs - I daresay the moment has passed, but thought I'd flag my modest effort up anyhow.
I considered adding a link in the original article, but didn't want to spam...