
Introduction
Hosting a React framework Single Page Application as a Web App on the Microsoft Azure can be an extremely frustrating process, for a number of reasons. To start with despite React being (rightly or wrongly) the most popular web framework, there are no specific instructions within the Microsoft documentation for how one might deploy a React Single Page Application (SPA) as an Azure Web App. Far worse however is that the choice of operating system (Windows or Linux) when creating a React web app on Azure is key - in short it is very difficult to use create-react-app to deploy to a base Linux O/S - yet this is both unintuitive and seemingly undocumented (see the What's up with Linux? section).
And continuous integration / continuous development via Github workflow is painful on Azure too; I couldn't find a single explanation which worked from start to finish without inexplicably failing half way through. As an aside the access the Azure App Service, which I'm not using in this demo, wants of your Github account is onerous too (you can't restrict access to private repos - which, er, are meant to be private).
What follows therefore is a fully worked example of how to deploy a React Single Page Application to an Azure web app. GitHub will be used for continuous integration / continuous development. It assumes you have an Azure account, a GitHub account and node / npm installed. Some common command line tools are also used: sed and curl. Development is being done on Manjaro Linux 21.2.1, Node 16.13.2, npm 8.3.2. To give the demo more flavour, I am going to use the NASA Astronomy Picture of the Day API to make a fully featured app - you don't have to do this though, Section 3 can be omitted if you just want to deploy the create-react-app template to Azure.
The steps below are also demonstrated in an accompanying video:
All code is available on the PreciousChicken/azure-react-apod GitHub repository.
1. Set up an Azure Web App
First we need to set up a Web App on Azure. From the Azure portal select Create a Resource and then Web App. Go through the various options until you are faced with a confirmation screen that looks like:

The key point here is that the Operating System is given as Windows, if Linux is selected it will not work (see What's up with Linux?). You might want to check that you are on the free plan too (F1) as opposed to the paid for (B1) which is the default. We've named the app nasa-apod-picker but you will need to give it a different name to prevent conflict.
2. Use create-react-app to generate the React SPA
On our local machine from the terminal enter:
npx create-react-app azure-react-apod
A React SPA will now be created using create-react-app tool.
Once installed change directory into the App:
cd azure-react-apod
3. Make some changes to the React App
If you are just interested in uploading any old React Single Page Application to Azure then you can safely skip this section and leave the default create-react-app settings in place.
However that does seems a bit dull. The (somewhat detailed) instructions below will let us create a rather lovely app where we can pick NASA's Astronomy Photo of the Day by date.
3a. Change app title and description
Change the App title and description to something more meaningful (we could do this by editing the public/index.html file, but using sed from the terminal is quicker:
sed -i 's/React App/NASA APOD Picker/g' public/index.html
sed -i 's/Web site created using create-react-app/Date picker for NASAs Astronomy Picture of the Day/g' public/index.html
3b. Replace logos
The favicon and logos are currently the default create-react-app one; so we'll replace that by using curl to overwrite them with suitably space-themed ones1 (feel free to use whatever files you want, or simply leave the c-r-a one in place):
curl https://www.preciouschicken.com/blog/images/azure-react-apod_favicon.ico > public/favicon.ico
curl https://www.preciouschicken.com/blog/images/azure-react-apod_logo192.png > public/logo192.png
curl https://www.preciouschicken.com/blog/images/azure-react-apod_logo512.png > public/logo512.png
3c. Replace App.js file
The meat of the change, erase the contents of the src/App.js file and replace with:
import './App.css';
import 'isomorphic-fetch';
import { useState } from "react";
import TextField from '@mui/material/TextField';
import AdapterDateFns from '@mui/lab/AdapterDateFns';
import LocalizationProvider from '@mui/lab/LocalizationProvider';
import enLocale from 'date-fns/locale/en-GB';
import DatePicker from '@mui/lab/DatePicker';
import { format, isWithinInterval } from 'date-fns';

function App() {
  const [apod, setApod] = useState([]);
  const [userDate, setUserdate] = useState(null);
  const [isLoading, setIsLoading] = useState(false);
  const [hasError, setHasError] = useState(false);
  const [errorState, setErrorstate] = useState(null);

  // Earliest photo in APOD
  const apodEarliest = new Date(1995,5,16);
  // Latest photo in APOD, ie today
  // Hours set to midnight to ensure user selection of date+time always before this date
  const apodLatest = new Date().setHours(23,59,59);

  //NASA API URL
  const url = "https://api.nasa.gov/planetary/apod?api_key=" + process.env.REACT_APP_NASA_API_KEY + "&date=";

  // Fetches photo from NASA API
  const fetchPost = async (uDate) => {
    setIsLoading(true);
    setHasError(false);
    try {
      const response = await fetch(
        url + uDate
      );
      if (response.status >= 400) {
        setErrorstate(response.status);
        hasError(true);
      }
      const data = await response.json();
      setApod(data);
    } catch (error) {
      setHasError(true);
    }
    setIsLoading(false);
  };

  // Sets userDate as today if null
  // e.g. loads today's photo on first render
  if (!userDate) {
    setUserdate(new Date());
    fetchPost(format(new Date(), 'yyyy-MM-dd'));
  }

  // Adjusts HTML for image vs video
  function MediaType(media) {
    var mediaLink;
    // Determines whether APOD picture is image or video
    if(media === "image") {
      mediaLink = <img src={apod.url} alt={apod.title}/>;
    } else {
      mediaLink = <iframe title={apod.title} src={apod.url} allowFullScreen> </iframe>;
    }
    return (
      <>
        {mediaLink}
        <p><strong>{apod.title}</strong></p>
        <p>{apod.explanation}</p>
        <p>Copyright: { apod.copyright ? apod.copyright : "NASA (Public Domain)" }</p>
      </>
    );
  }

  // Component that serves photo, with error handling
  function Picture() {
    // Return if server has error
    if (hasError) {
      return (
        <p className="userMsg">Error connecting to server.
          <br/>
          Server response: {errorState}</p>
      );
    }
    // Return when waiting for API
    else if(isLoading) {
      return <p className="userMsg">Loading...</p>;
    }
    // Return once user has selected date and no longer loading and no error
    else if(userDate) {
      return MediaType(apod.media_type);
    }
    // Default return if date not chosen or no error
    // This should never return: userDate is set as today if null on load
    return <p className="userMsg">Select a date between 16-Jun-1995 and today</p>;
  }

  return (
    <>
      <h1>NASA Astronomy Picture of the Day Picker</h1>
      <div className="datepicker">
        <LocalizationProvider dateAdapter={AdapterDateFns} locale={enLocale}>
          <DatePicker
            minDate={apodEarliest}
            maxDate={apodLatest}
            value={userDate}
            onChange={(newDate) => {
              if (isWithinInterval(
                newDate,
                {start: apodEarliest, end: apodLatest })) {
                setUserdate(newDate);
                fetchPost(format(new Date(newDate), 'yyyy-MM-dd'));
              };
            }}
            renderInput={(params) => <TextField {...params} />}
          />
        </LocalizationProvider>
      </div>
      <Picture />
      <p className="footer"><a href="https://apod.nasa.gov/apod/lib/about_apod.html">About NASA's Astronomy Picture of the Day</a></p>
      <p className="footer">This page is part of the web development tutorial: <br/> <a href="https://www.preciouschicken.com/blog/posts/azure-react-apod/">Étoile du jour: Deploying a React Web App on the Microsoft Azure Cloud</a></p>
    </>
  );
}

export default App;
3d. Replace App.css file
Erase the contents of the src/App.css file and replace with:
body {
  background-color: white;
  color: black;
  display: flex;
  justify-content: center;
}

h1 {
  text-align: center;
}

div.datepicker {
  text-align: center;
  margin-bottom: 1em;
}

p {
  max-width: 75ch;
  margin-right: auto;
  margin-left: auto;
}

iframe {
  width: 100%;
  height: 500px;
}

img {
  width: 100%;
}

p.userMsg {
  text-align: center;
  font-size: x-large;
}

p.footer {
  text-align: center;
  font-size: small;
}
3e. Replace App.test.js
When we continuously deploy using GitHub it automatically runs through any test files prior to deploying. Create-react-app automatically creates ones of these, src/App.test.js, for you and this will fail if you make any changes to the src/App.js file. You can either therefore delete src/App.test.js or amend it to include updated tests; as tests are good I've done the latter:
import { render, screen } from '@testing-library/react';
import App from './App';

test('renders H1 correctly', () => {
  render(<App />);
  const nasaHeader = screen.getByRole('heading', { name: /nasa astronomy picture of the day picker/i });
  expect(nasaHeader).toBeInTheDocument();
});


test('renders link to APOD about', () => {
  render(<App />);
  const nasaAbout = screen.getByRole('link', { name: /about nasa's astronomy picture of the day/i });
  expect(nasaAbout).toBeInTheDocument();
});
3f. Install additional node dependencies
At the terminal:
npm i date-fns isomorphic-fetch @mui/material @emotion/react @emotion/styled @mui/lab
4. Add a workflow to Github
We now need to tell GitHub how to deploy the web app to Azure by adding a workflow.
Therefore create a new file, named azure-webapps-node.yml, located in a new GitHub workflow directory on your machine:
mkdir -p ./.github/workflows/ && touch ./.github/workflows/azure-webapps-node.yml
Then copy and paste the following into this .github/workflows/azure-webapps-node.yml file (changing the name of the env variables to suit your Azure configuration):
on:
  push:
    branches:
      - main
  workflow_dispatch:

env:
  # change to your application's name in Azure
  AZURE_WEBAPP_NAME: nasa-apod-picker
  # change both instances of azure-react-apod to the name of your repo
  AZURE_WEBAPP_PACKAGE_PATH: '/home/runner/work/azure-react-apod/azure-react-apod'
  # set this to the node version to use if not 16
  NODE_VERSION: '16.x'
  # NASA API key recorded as GitHub secret, delete if you haven't followed APOD section
  REACT_APP_NASA_API_KEY: ${{ secrets.REACT_APP_NASA_API_KEY }}

jobs:
  build:
    runs-on: ubuntu-latest
    steps:
    - uses: actions/checkout@v2

    - name: Set up Node.js
      uses: actions/setup-node@v2
      with:
        node-version: ${{ env.NODE_VERSION }}
        cache: 'npm'

    - name: npm install, build, and test
      run: |
        npm install
        npm run build --if-present
        npm run test --if-present

    - name: Upload artifact for deployment job
      uses: actions/upload-artifact@v2
      with:
        name: node-app
        path: ./build

  deploy:
    runs-on: ubuntu-latest
    needs: build
    environment:
      name: 'Development'
      url: ${{ steps.deploy-to-webapp.outputs.webapp-url }}

    steps:
    - name: Download artifact from build job
      uses: actions/download-artifact@v2
      with:
        name: node-app


    - name: 'Deploy to Azure WebApp'
      id: deploy-to-webapp
      uses: azure/webapps-deploy@v2
      with:
        app-name: ${{ env.AZURE_WEBAPP_NAME }}
        publish-profile: ${{ secrets.AZURE_WEBAPP_PUBLISH_PROFILE }}
        package: ${{ env.AZURE_WEBAPP_PACKAGE_PATH }}
The majority of the above yaml code came from websitebeaver.com's Deploy Create React App to Azure App Services tutorial; however a number of changes were made. The addition of the process.json code step was removed as it was redundant 2. Also the AZURE_WEBAPP_PACKAGE_PATH was changed from build to /home/runner/work/azure-react-apod/azure-react-apod, the latter being the location that the build apparently stores the zipped Web App in ready for upload to Azure 3.
5. Create an empty Github repo
We are going to enable continuous deployment (CD) on this project via Github. Therefore point your browser at GitHub and follow the instructions to create a new repo entitled azure-react-apod (though don't add a README, .gitignore or licence). We don't actually need to push the project at this stage however.
6. Download publish profile from Azure
Now navigate to your Web App within the Azure portal and select the Get publish profile option, as shown below, to download a file named your_app_name.PublishSettings (e.g. nasa-apod-picker.PublishSettings) to your local machine:

7. Add secrets to GitHub repo
Following the GitHub guide Creating encrypted secrets for a repository create a new secret with the name AZURE_WEBAPP_PUBLISH_PROFILE and copy and paste the contents of the publish profile you downloaded at the last step. To make this easier on Linux you can copy a file into the clipboard from the terminal (assuming you have xsel installed) like so:
xsel -b < ~/Downloads/nasa-apod-picker.PublishSettings
This secret will allow GitHub to access Azure portal in order to deploy your web app on your behalf.
If you have been following the Astronomy Picture of the Day instructions in Section 3, then you will also need to generate a NASA API key too. Go through the steps again to add this key to GitHub as a repository secret, but this time with the name REACT_APP_NASA_API_KEY 4.
8. Git push
All that is left to do is the initial push of the project to our repo and GitHub and Azure will take care of the rest. Digital Ocean features a good tutorial on pushing an existing project to GitHub.
As a reminder the basic terminal commands, changing the github PreciousChicken url to your own, are:
git add .
git commit -m "Initial commit"
git remote add origin git@github.com:PreciousChicken/azure-react-apod.git
git branch -M main
git push -u origin main
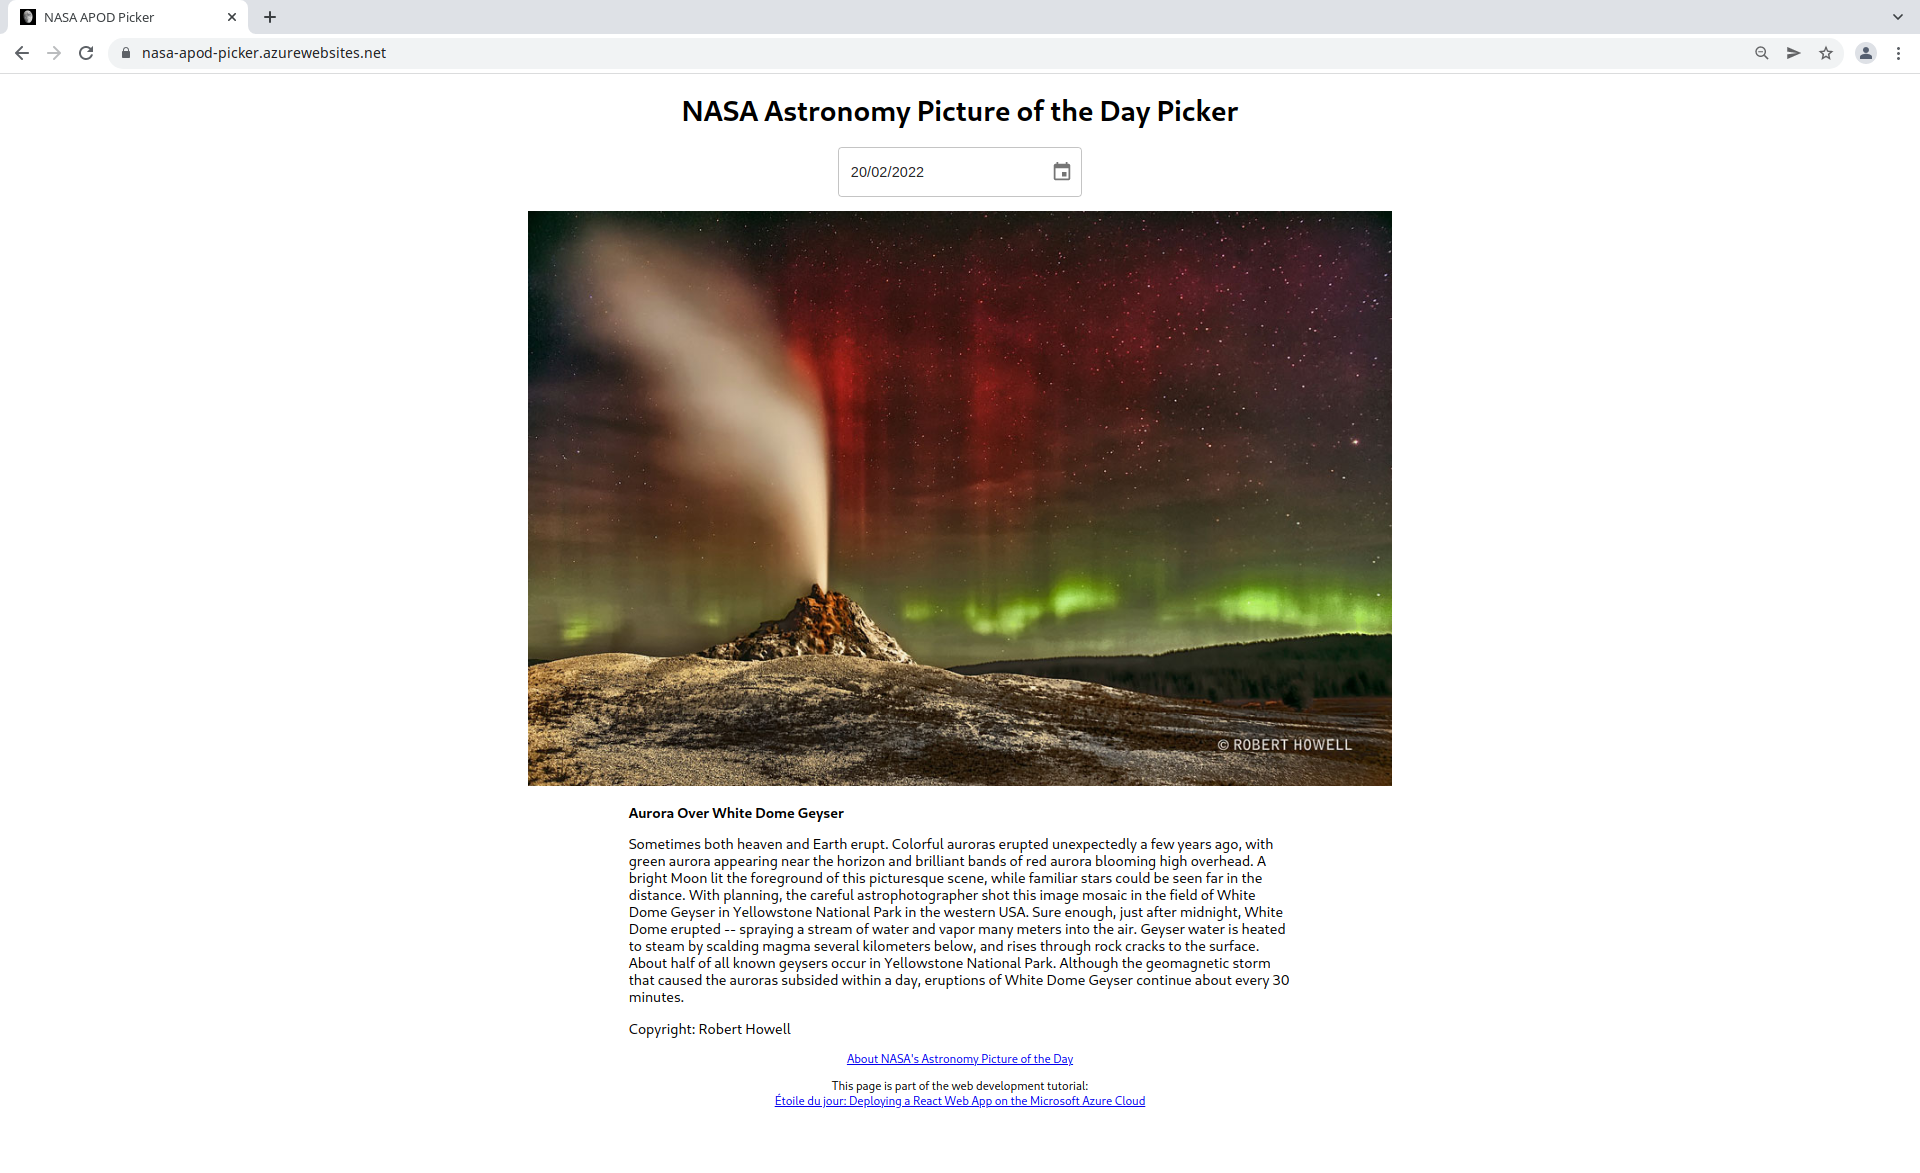
The final product
If all has gone to plan your app should be deployed, depending on your Azure set-up configuration, at an address following the format your_app_name.azurewebsites.net, e.g. nasa-apod-picker.azurewebsites.net; as demonstrated:
What's up with Linux?
My default is Linux in any form of virtual machine environment. As you will note however this example uses a Windows base O/S; Linux and React did not play well within Azure.
The nub of the problem is that once you've created a React app the actual part that gets shown to the public is produced by running npm run build and then serving the resulting web pages found in the build folder to the web. Everything outside the build folder is for development and not public view. Often this detail is taken care of behind the scenes, so for instance the Vercel platform knows what a React SPA is and does the donkey work for you (see Stacking Vercel, a GraphQL Apollo Server and React for more). To replicate this in Azure you manually have to upload the contents of the build folder to Azure's /site/wwwroot directory. However this only works if you have chosen Windows as your O/S when creating the Web App, if you have chosen Linux it simply does not work. No explanation given, and a couple of hours consigned to trying to figure out where you have gone wrong.
There are answers by Lutti Coelho and bach vo on StackOverflow which fix this problem by amending the configurations in your Azure dashboard. I can't vouch for this solution, but clearly it adds one more point of failure if you haven't defaulted to Windows in your original set up.
Further reading
- Host a web application with Azure App Service
- Deploy Create React App to Azure App Services - A good starter for ten, but following this only got me ninety percent of the way there.
-
Photo of moon by OldakQuill, Public domain, via Wikimedia Commons. ↩
-
At first glance it looks as if this might enable the web app to run with Linux O/S on Azure (see the What's up with Linux? section), but it didn't. ↩
-
I would like to say I figured this out though deductive reasoning; but in reality I watched the build fail many times, read the error messages and eventually worked out what directory the zip file was in... ↩
-
If you are going to run this locally by using
npm startas well as via GitHub then you will also need to create a file named .env.local in the root folder of your directory with the contentREACT_APP_NASA_API_KEY=your_key_here↩

Top comments (0)