Recap of Part 1 - We learned what Sparkle is, and why we need it for apps released outside of the macOS App Store. We added Sparkle in our app via Cocoapods. We also learned few concepts related to Sparkle, how does Sparkle works, appcasts, how to serve appcast XML, and finally, we configured Sparkle to give the location info of our appcast XML, using which it can figure out whether a newer version of our app exists.
Let's begin this part where we left off in the previous. Build and run the app.
The below screenshot is the state of the app where we left off in the previous part.

Go ahead and try to update the app by clicking on the "Install Update" and you should see the following behavior with an error alert generated at the end, captured in video recording below:

Observations from using current version of the app (v1) thus far:
- App remains open upon clicking the "Check for Updates" button. This behavior causes the Sparkle update alert hidden behind the App. This behavior is an issue, and we fix it in version 2 of the App. The app updates to version two via Sparkle
- When we click on "Install Update," Sparkle downloads "a" version of "some app." We don't have a version two yet (heck, we don't even have the binary of current version one), so what does it download then?
- We are using a default appcast XML from Sparkle, which comes with a test app "https://sparkle-project.org/files/Sparkle%20Test%20App.zip". Once we have a binary for version 2, we replace this test app URL with ours.
Production ready
Releasing a macOS app, which can also be trusted by users, especially if we are distributing the App outside of the App store, means code signing and getting the App notarized by Apple. So let's do it.
For us to be able to test updates via Sparkle, our App should be in binary form and run from within the Applications folder (not via Xcode).
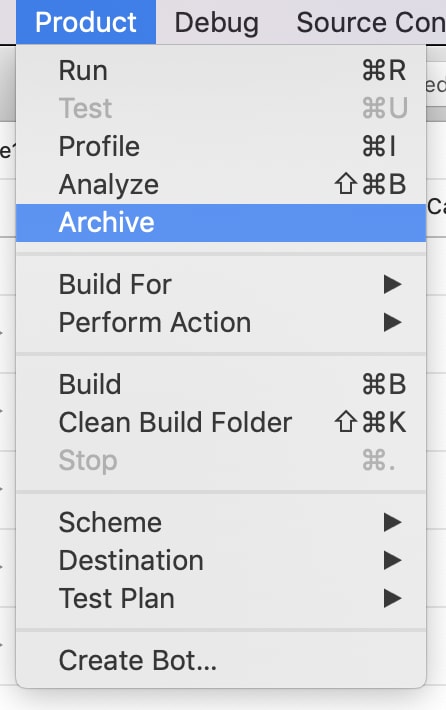
The first step in creating a binary of your macOS app is Archiving it. Archive your App in Xcode by clicking on the "Archive" option under the "Product" menu.
Once the generation of the Archive instance is finished, click Distribute App" Since we are distributing the App directly to our users, select the "Developer ID" option as the method of distribution.
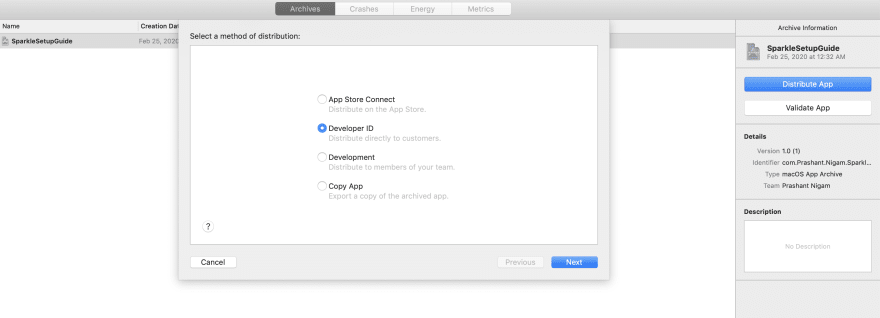
Click "Next." You get an option to upload your App to Apple notary service or proceed without notarizing.
If you are thinking of proceeding without Notarizing your macOS app, then think again. While this tutorial is not about App code signing or Notarization, but I feel Apple notarization is very important and should always be considered, so adding more info about it.
Apple Notarization helps the user know that the App doesn't contain any malicious code
Notarization gives users more confidence that the Developer ID-signed software you distribute has been checked by Apple for malicious components.
 Prashant Nigam@prashantnigam_
 It's important for macOS app to be @apple notarized if they are downloaded outside of mac app store. It gives user a peace of mind that app is not malicious. Wish @apple provide a way for devs to embed a label within app that says it is notarized twitter.com/EasyFinderApp/…23:48 PM - 09 Oct 2019EasyFinder @EasyFinderApp@adampymble Hi Adam, thanks.There r certain mandatory requirements in order for app to be available in app store. If followed,EasyFinder wouldn't work the way it is supposed to be.However I want to assure you that app has be dev signed and notarized by apple which means it is safe to be run


 EasyFinder@easyfinderapp@adampymble Here is the link to apple's dev id signing and notarization developer.apple.com/developer-id/23:32 PM - 09 Oct 2019
 EasyFinder@easyfinderapp@adampymble Highlighting the portion which informs users on opening an app downloaded outside of app store,that Apple has checked app for malicious software and none was detected. It's also the reason why mac gatekeeper let an app (notarized by Apple) run. Hope this helps and great question23:38 PM - 09 Oct 2019
Not only does apple notarization provide confidence for your user, but starting with macOS Catalina, an App distributed outside of App store must be notarized by Apple to run on macOS Catalina
Ok, now that we understood the importance of Apple notarization, let's move on to the next step, which is choosing the option to Upload to Notary service. Click "Next."

Boom, We see an error. Well, we did everything right, then what is causing this error? All comes back to code-signing and Notarization. The Apple notarization process is a topic in itself, and Apple covered it in great detail in WWDC 2019. You can watch the video here.
So let's get to resolving the issue that is causing the failure to upload to Notary service. First, describing the issue in brief. Not only our App code but any deeply nested code withing our App must also be code signed with our Developer ID, for us to be able to get our App Notarized by Apple. In our case, Sparkle code is embedded in our app binary, and also needs to be codesigned by our Developer ID. In the normal codesigning process, it does not automatically codesign embedded code/app, so we need to do it explicitly. In the following part, we add a step to codesign Sparkle and resolve upload to notary issue.
Codesigning and Notarizing Sparkle
In Xcode, head over to your project's Targets "Build Phase" tab. Click on + sign located on the top left and add a "New Run Script Phase." I call my run script Run Script - Deep Signing Sparkle framework
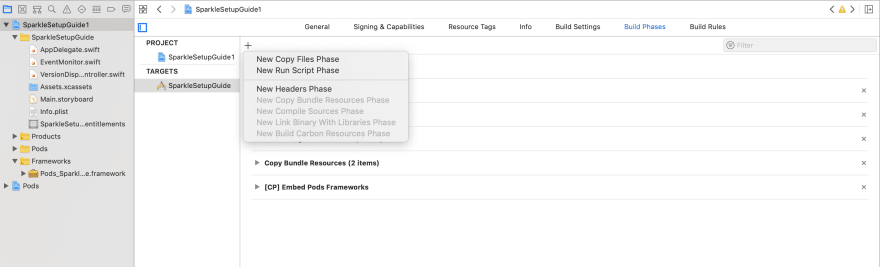
Inside script text field type in the following script:
#For Apple notarization, we need to deep sign Sparkle framework
LOCATION="${BUILT_PRODUCTS_DIR}"/"${FRAMEWORKS_FOLDER_PATH}"
IDENTITY=${EXPANDED_CODE_SIGN_IDENTITY_NAME}

codesign --verbose --force --deep -o runtime --sign "$IDENTITY" "$LOCATION/Sparkle.framework/Versions/A/Resources/AutoUpdate.app"
codesign --verbose --force -o runtime --sign "$IDENTITY" "$LOCATION/Sparkle.framework/Versions/A"
This Run Script build phase should solve our failure to Upload to Notary service issue. Let's see if it did. Start over and Archive again. Once it is archived, click "Distribute App" and choose the "Developer ID" option. Click "Next" and finally the moment of truth. Choose "Upload" (send to Apple notary service) option and click "Next." This upload was the step that gave the error before.
This time upload to notary service works. See screen recording below.

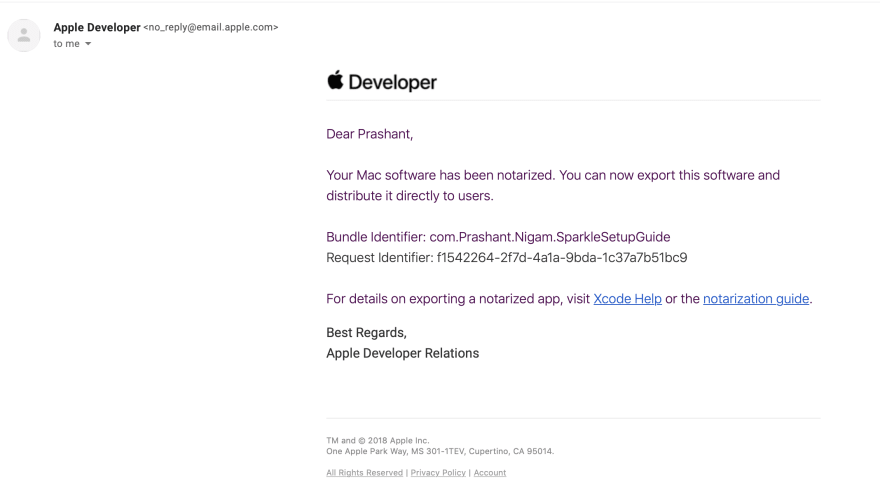
Once Apple successfully notarizes our App, it sends us notifications. For a super simple App like ours, I got it within a couple of minutes.
Apple delivers notarization completion notification via both email and Xcode.

![]()
Finally, we are successful in notarizing our App. Now it's time to distribute our App to users. For that, let's export App in the form of the .app file (binary). The version of the Archive that got notarized has "Ready to distribute" under Status.

Click on the "Export App" button and save .app file.
Congrats, you have successfully finished creating a distributable signed and notarized first version of your App.
All that is left is moving the .app file to your Application folder. Go ahead and move it and launch your App by clicking on the App icon.
The App works similar to how it worked when we run it from Xcode. So now, we need to fix the issue we found earlier in this version of the App.
This brings us to the end of Part 2.
In Part 3, we fix this issue and update the App to version 2. Create version 2 binary and upload it to the cloud. Update our appcast XML, with relevant release notes, to notify to the (current) version 1 that a newer version is available for update. Finally, the current version of the App, sitting in our Application folder, gets updated to version 2 via Sparkle.
Well, we did quite some work, and so it's good to take a quick break. For some, a break could be taking a walk or stretch, then go ahead and do that (come back later for this last exciting part). However, if you one of those who find trivia to be exciting and save them for interesting party conversations, then here is one for you.
💡 There is just one letter that's not in ANY of U.S. state name. What is that letter? 🤔 Think about it and then head here to check if your answer was correct


Top comments (7)
A tip for someone that may meet codesign issue.
The script in project "SparkleSetupGuide" works fine on my Mac, but my own project gives a warning, saying "no identity found". After some research, I replace the line
with
and everything works.
Thanks for the Tip
Thanks a lot Prashant! It was helpful.
Thanks for reading Dragos and and I glad you found it useful
Hi Prashant -- do you know if this approach is still needed as of XCode 12.5 / Sparkle 1.26.0, or have things changed?
I've got a fairly complex app with helper tools which I'm trying to get notarized, and after the first couple of screens in the wizard (Distribute App > Developer ID > Upload) it brings up a "Select certificate and Developer ID profiles" dialog. I choose the profiles to sign my own components -- but there isn't one for org.sparkle-project.Sparkle.Autoupdate (and I can't create one, presumably because that ID is taken).
Any idea how to handle this?
where is part third of this series?
Hello Prashant, I followed your tutorial and now I am stuck for iterative updates of the app. Any plans to make the tutorial 3 as you mentioned?