
If you are interested in reading this article in Spanish, check out my blog The Developer's Dungeon
Hey guys what's up? As part of the development team at Maruja, we have been working very hard to make the project we analyzed in the last article a reality, by the way, if you haven't read the first article I suggest you start with that one because today we are gonna go deep into the implementation.
We are gonna start by setting up the next.js project, and the basic integration with Sanity and MercadoPago. So without further ado let's start.
The Setup
As I mentioned in the first part, we decided the use the following stack:
- Next.js
- TypeScript
- Styled Components
- Jest + Enzyme for testing
- Sanity.io
- MercadoPago
- Vercel/Now.sh
Luckily, the initial setup is pretty straight forward, we create a Next app using the following command:
npm init next-app by-maruja-ecommerce
This will create the starter Next project, without any template. After that, adding TypeScript is a piece of cake, we install TypeScript and Node.js types:
npm install --save-dev typescript @types/react @types/node
and we create an empty tsconfig.json file:
touch tsconfig.json
after that, if we start the Next application, the tsconfig.json will be filled in for us and everything will be ready to go. Installing styled-components was also pretty straight forward, just one command:
npm install styled-components babel-plugin-styled-components @types/styled-components
With Jest and Enzyme is where things got a little more complex, luckily there is always someone who has done it before you, and I found this great article by Halil Kayer that worked magic for me.
Now comes the fun part, the integrations.
Sanity.io
Sanity has very good documentation and even some example projects using Next.js, I will refer to an article on Sanity's page that was super helpful for creating the proper service and studio, you can read it here.
After the studio is created and we have the proper sanity client library installed in our project, we proceed to create our first schema, the product.
import { BsBag } from "react-icons/bs";

export default {
  title: "\"Producto\","
  icon: BsBag,
  name: "product",
  type: "document",
  fields: [
    {
      title: "\"Nombre\","
      name: "name",
      type: "string",
    },
    {
      title: "\"Precio\","
      name: "price",
      type: "number",
    },
    {
      title: "\"Stock\","
      name: "stock",
      type: "number",
    },
    {
      title: "\"Imagen\","
      name: "image",
      type: "image",
    },
  ],
};
As you can see here we define all the properties a product will have in our sanity studio, name, price, stock, and an image, even the icon for the menu using react-icons which comes by default with Sanity. Our studio looks like this:

The UI is super simple and easy to use, with our schema defined we can create multiple products and store them in Sanity, in the following articles we will retrieve the list of products to show our catalog on our website.
For now, we just gonna create a small test in our Index page:
const Index = (product: Product) => {
  const [buttonText, setButtonText] = useState('');

  return (
    <Layout>
      <Container>
        <Main>
          <p>
            Nombre: {product.name} - Stock: {product.stock} - Precio: {product.price}
          </p>
          <img src={urlFor(props.image)} alt="hero image" />
        </Main>
      </Container>
    </Layout>
  );
};

Index.getInitialProps = async () => {
  return sanity.fetch(
    `
    *[_type == "product"][0]
  `
  );
};
In this example, we just retrieve the first product (the only one we currently have) using Sanity's query language (you can also use GraphQL), we pass it into our react component representing our Index page and we display the name, stock, and price inside a paragraph.
Then, we load the image, for this Sanity has a great library that is gonna do the job for us, we first run the following command:
npm install @sanity/image-url
and then we add the following code:
import imageUrlBuilder from '@sanity/image-url';
import { SanityImageSource } from '@sanity/image-url/lib/types/types';

const builder = imageUrlBuilder(sanity);

export const urlFor = (source: SanityImageSource) => builder.image(source).url();
After some styling to make it the proper size, our page looks like this:
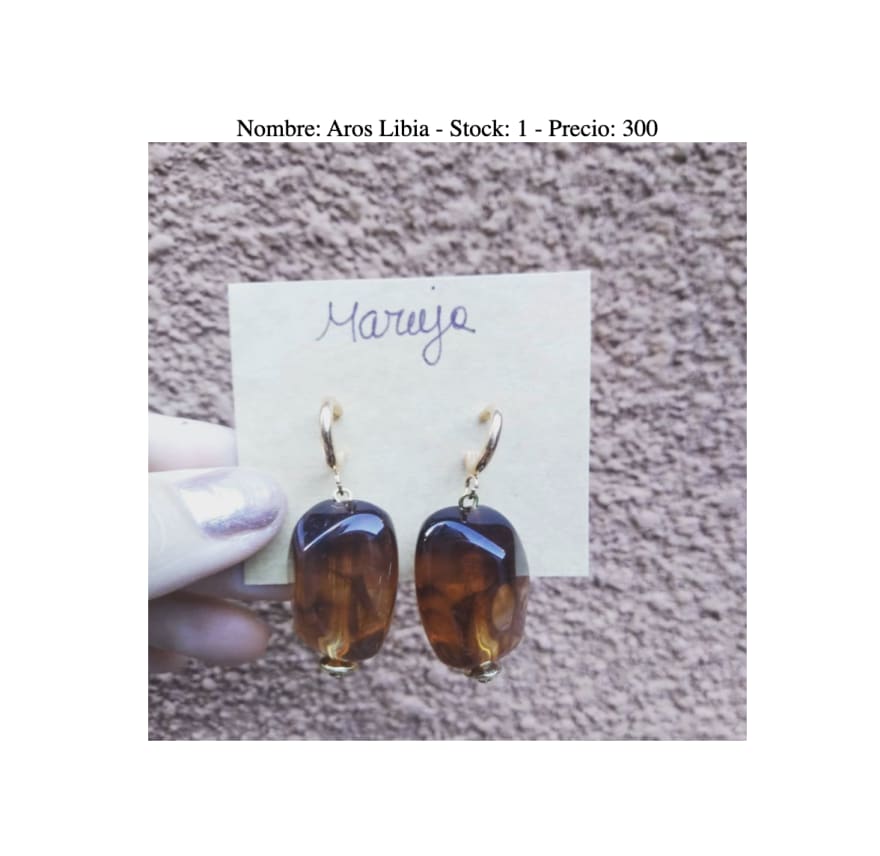
Pretty cool right? the sanity-client even has some functions and properties you can use so you can create images with the right size on the fly, we will probably have to deal with that in following articles.
MercadoPago
Building the integration with MercadoPago was not as easy as I expect, though the API Reference is fairly good, it lacks examples and there are no @types whatsoever to get some TypeScript support for the official MercadoPago JavaScript SDK.
After a few hours of looking for an example, looking at other open-source projects that use the service and logging a lot of stuff I went ahead and made a small type definition to cover the endpoints we are gonna use to generate the payment link. With the link we are gonna redirect the user to MercadoPago's platform so the payment can be processed.
(if you notice some strange notation is because the markdown highlighter is not getting everything 100% right)
declare module 'mercadopago' {
  export function configure(options: ConfigureOptions);
  export const preferences: Preferences;

  export interface ConfigureOptions {
    client_id?: string;
    client_secret?: string;
    access_token: string;
    sandbox?: boolean;
    show_promise_error?: boolean = true;
  }

  export interface PaymentItem {
    title: "string;"
    description: "string;"
    quantity: number;
    currency_id: Currencies;
    unit_price: number;
    picture_url?: string;
  }

  enum Currencies {
    ARS = 'ARS',
  }

  export interface MercadoPagoResponse {
    response: {
      init_point: string;
      sandbox_init_point: string;
    };
  }

  export interface MercadoPagoPaymentRequest {
    items: PaymentItem[];
    back_urls?: {
      success: string;
      pending: string;
      failure: string;
    };
    auto_return?: string;
    external_reference: string;
    expires: boolean;
  }

  export interface Preferences {
    schema: {
      additionalProperties: false;
      properties: PaymentRequest;
    };
    partnersHeaders: true;
    create: (data: MercadoPagoPaymentRequest) => MercadoPagoResponse;
    save: Function;
    update: Function;
    get: Function;
    findById: Function;
  }
}
After defining those types I went ahead and created the Next.js API route that we will use in our app to call MercadoPago when we want to proceed with the payment. I created a small service that will work a layer between the MercadoPago Client library and our code:
import { configure, MercadoPagoPaymentRequest, preferences } from 'mercadopago';

export function configureMercadoPagoSDK() {
  configure({
    access_token: process.env.mercadoPagoAccessToken,
  });
}

export const createPreferenceLink = async (data: MercadoPagoPaymentRequest) => preferences.create(data);
and I called that from our API Route:
import { NextApiRequest, NextApiResponse } from 'next';
import { configureMercadoPagoSDK, createPaymentLink } from '../../lamda-services/mercadopago.service';

export default async (req: NextApiRequest, res: NextApiResponse) => {
  configureMercadoPagoSDK();

  const result = await createPaymentLink(req.body)?.init_point;
  res.json(result);
};
After that I just added a button, and paragraph and made a call to our API route from inside our Index page to call the endpoint. Our code looks like this:
const Index = (product: Product) => {
  const [buttonText, setButtonText] = useState('');

  const contactCreatePayment = () => {
    axios.post('/api/create-payment', paymentDataRequest).then((result) => setButtonText(result.data));
  };
  return (
    <Layout>
      <Container>
        <Main>
          <p>
            Nombre: {product.name} - Stock: {product.stock} - Precio: {product.price}
          </p>
          <Img src={urlFor(product.image)} alt="product" />
          <button type="button" onClick={contactCreatePayment}>
            Call MercadoPago
          </button>
          <br />
          <p id="buttonText">{buttonText}</p>
        </Main>
      </Container>
    </Layout>
  );
};
And when we click the button in the screen? Voilà

In the following articles, we will create real components and start building the user interface for our website.
Wow, that was a lot to take in, I am sorry if that was a harsh introduction, unfortunately, an article is not enough to guide you on every step, like setting up ESLINT for TypeScript or adding the styles with styled-components. If you would like to see a course or video tutorial where we go through every step of building a project please let me know in the comments below and consider signing to my newsletter, that is gonna be the best way to contact you when that happens 😄
If you liked this article and how the series is going so far, please share it.

Latest comments (0)