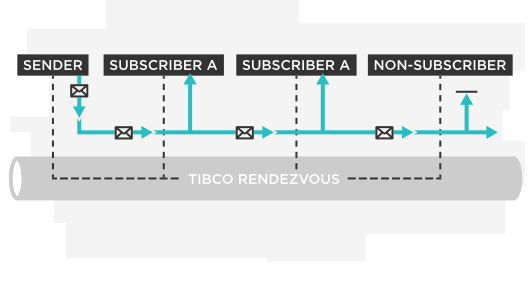
TIBCO Rendezvous (RDV) is one of the popular messaging product for real-time data processing. Predominantly used in Financial corporations to process real-time trading, market data and efficient information flow between control systems. In this post, we will see how we can deploy this messaging application to RedHat Enterprise Linux (RHEL) 7 (on Azure VM) using Azure DevOps.
For this post, we are assuming that we have a RHEL VM provisioned on Azure to which we are going to deploy. Also, the installers are downloaded published to Azure Artifacts as an Universal Package.
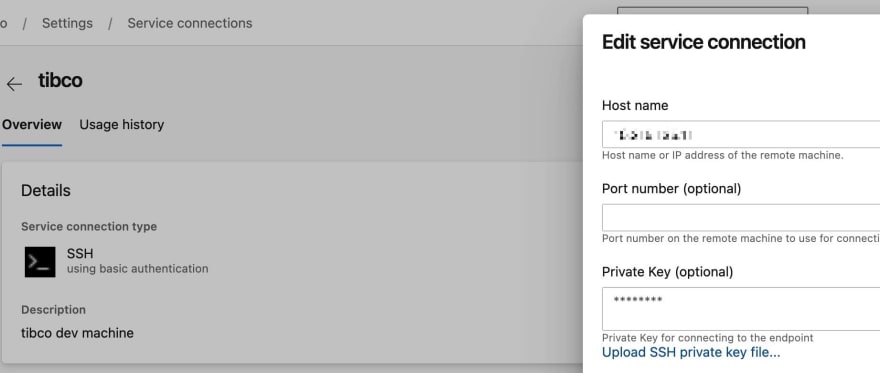
Create SSH service connection in Azure DevOps
The first step is to ensure Azure DevOps can connect to our VM in Azure. For that, we set up a service connection in Azure DevOps. Since its Linux VM, we use SSH connection. Detailed steps of creating the SSH service connection are here
Create deployment pipeline
To summarize, the steps for deployment are
- Download and extract the installer from Azure Artifacts
- Install required pre-requisites
- Copy the installer to VM
- Adjust the install path in TIBCO Rendezvous response file
- Set the execute permission on the installer so that we can run the installer
- Delete any existing instance of the RDV, so that we can trigger this pipeline again without any manual changes.
- Install TIBCO Rendezvous
- Add installer file to
~/.bash_profile - Set execute permissions and start the service.
1. Download and extract the installer from Azure Artifacts
We use Universal Package task from Azure DevOps.
steps:
- task: UniversalPackages@0
  displayName: download rdv package from artifacts
  inputs:
    command: 'download'
    downloadDirectory: '$(system.artifactsdirectory)'
    feedsToUse: 'internal'
    vstsFeed: 'Demo/my-artifacts'
    vstsFeedPackage: 'tibco-rdv'
    vstsPackageVersion: '8.4.5'
2. Install required pre-requisites
We then install any required pre-requisites needed on the machine. Here we are installing Java 1.8, GNU C Library. Notice that we are using SSH task so that these commands are run on the VM we are deploying to. We use the service connection created above and passing that as a parameter to this pipeline YAML. Azure DevOps has a powerful templating feature for YAML pipelines, and here I am using a template. So I am using ${{ }} syntax. More on this expression is here.
- task: SSH@0
  displayName: 'install prerequisites'
  inputs:
    sshEndpoint: '$'
    runOptions: 'commands'
    commands: |
        sudo yum -y install java-1.8.0-openjdk.x86_64
        sudo yum -y install glibc.x86_64
    readyTimeout: '20000'
3. Copy the installer to VM
Next we need to copy the installer files to VM. We again do that using CopyFilesOverSSH task in Azure DevOps.
- task: CopyFilesOverSSH@0
displayName: 'copy tibco rvd installer files to machine'
inputs:
  sshEndpoint: '$'
  sourceFolder: '$(system.artifactsdirectory)/out'
  contents: '**'
  targetFolder: '/data/tibco-rdv/'
  readyTimeout: '20000'
4. Adjust the install path in TIBCO Rendezvous response file
Since we are deploying TIBCO Rendezvous in our CD pipeline, we need to install using non-interactive (or silent) mode. TIBCO provides a response file (TIBCOUniversalInstaller-rv.silent) along with installer. This response file can be edited to select all the configurations (like Install path, home directory etc) for the installer. We are using simple SSH task and running few sed commands to replace the path according to our needs in the response file.
- task: SSH@0
displayName: 'adjust response silent file'
inputs:
  sshEndpoint: '$'
  runOptions: 'commands'
  commands: |
      sed -i 's/\/opt\/tibco/\/opt\/tibco\/rdv/g' /data/tibco-rdv/TIBCOUniversalInstaller-rv.silent
      sed -i 's/TIBCO-HOME/TIBCO-RDV-HOME/g' /data/tibco-rdv/TIBCOUniversalInstaller-rv.silent
  readyTimeout: '20000'
5. Set the execute permission on the installer so that we can run the installer
Before we run the installer, we need to ensure that the user running it (in our case the credentials used while creating the service connection) has execute permissions. So we set the execute permissions for the installer file.
- task: SSH@0
  displayName: 'set execute permissions'
  inputs:
    sshEndpoint: '$'
    runOptions: 'commands'
    commands: 'chmod a+x /data/tibco-rdv/TIBCOUniversalInstaller-lnx-x86.bin'
    readyTimeout: '20000'
6. Delete any existing instance of the RDV
Also, before we install the service, we need to remove any existing services running, This will also enable to run this pipeline again and again without manually configuring something in the VM.
- task: SSH@0
  displayName: 'delete previous instance'
  inputs:
    sshEndpoint: '$'
    runOptions: 'commands'
    commands: |
        pkill 'rvd64'
        sudo rm -rf /opt/tibco/rdv/*
    readyTimeout: '20000'
7. Install TIBCO Rendezvous
Next, we start the installation by executing installer file.
- task: SSH@0
  displayName: 'install tibco rdv'
  inputs:
    sshEndpoint: '$'
    runOptions: 'commands'
    commands: 'sudo /data/tibco-rdv/TIBCOUniversalInstaller-lnx-x86.bin -silent -V responseFile=/data/tibco-rdv/TIBCOUniversalInstaller-rv.silent -is:javahome $(dirname $(dirname $(readlink $(readlink $(which java))))) -is:log "$(build.buildnumber).log"'
    readyTimeout: '20000'
Notice we pass the modified response file to the installer so that it can without any manual interaction.
8. Add installer file to ~/.bash_profile
Next, we need to add install path to ~/.bash_profile so that its available from anywhere.
- task: SSH@0
  displayName: 'update bash profile'
  inputs:
    sshEndpoint: '$'
    runOptions: 'commands'
    commands: |
        cp ~/.bash_profile ~/.bash_profile.tmp
        echo 'export PATH=$PATH:/opt/tibco/rdv/tibrv/8.4/bin' >> ~/.bash_profile
        echo 'export LD_LIBRARY_PATH=$LD_LIBRARY_PATH:/opt/tibco/rdv/tibrv/8.4/lib' >> ~/.bash_profile
    readyTimeout: '20000'
In the above step, I am just backing up existing ~/.bash_profile file. A better way probably is to find and replace the values (to avoid duplicates) which I am planning to do in the future
9. Set execute permissions and start the service.
Final step is to start the Rendezvous service itself. Before that we need to set the execute permissions for the file. So our YAML looks as below.
- task: SSH@0
  displayName: 'set execute permissions'
  inputs:
    sshEndpoint: '$'
    runOptions: 'commands'
    commands: 'sudo chmod a+x /opt/tibco/rdv/tibrv/8.4/bin/rvd64'
    readyTimeout: '20000'

- task: SSH@0
  displayName: start the rvd service
  timeoutInMinutes: 2
  continueOnError: true
  inputs:
    sshEndpoint: '$'
    runOptions: 'inline'
    inline: |
        /opt/tibco/rdv/tibrv/8.4/bin/rvd64 -listen 8500
        sleep 70
        exit
    readyTimeout: '20000'
Notice in the last step, we have enabled
continueOnError: true. For some reason, when you start the service, its not ending the console. There must be an option in the response file to properly start the service, but I am yet to figure it out.
Final YAML template
# template file to deploy tibco rendezvous

parameters:
  - name: sshEndPoint
    type: string
    default: ''

steps:
- task: UniversalPackages@0
  displayName: download rdv package from artifacts
  inputs:
    command: 'download'
    downloadDirectory: '$(system.artifactsdirectory)'
    feedsToUse: 'internal'
    vstsFeed: 'Demo/my-artifacts'
    vstsFeedPackage: 'tibco-rdv'
    vstsPackageVersion: '8.4.5'

- script: |
    unzip -oq $(system.artifactsdirectory)/TIB_rv_8.4.5_linux_x86.zip -d $(system.artifactsdirectory)/out
  displayName: 'extract files'

- task: SSH@0
  displayName: 'install prerequisites'
  inputs:
    sshEndpoint: '$'
    runOptions: 'commands'
    commands: |
        sudo yum -y install java-1.8.0-openjdk.x86_64
        sudo yum -y install glibc.x86_64
    readyTimeout: '20000'

- task: CopyFilesOverSSH@0
  displayName: 'copy tibco rvd installer files to machine'
  inputs:
    sshEndpoint: '$'
    sourceFolder: '$(system.artifactsdirectory)/out'
    contents: '**'
    targetFolder: '/data/tibco-rdv/'
    readyTimeout: '20000'

- task: SSH@0
  displayName: 'adjust response silent file'
  inputs:
    sshEndpoint: '$'
    runOptions: 'commands'
    commands: |
        sed -i 's/\/opt\/tibco/\/opt\/tibco\/rdv/g' /data/tibco-rdv/TIBCOUniversalInstaller-rv.silent
        sed -i 's/TIBCO-HOME/TIBCO-RDV-HOME/g' /data/tibco-rdv/TIBCOUniversalInstaller-rv.silent
    readyTimeout: '20000'

- task: SSH@0
  displayName: 'set execute permissions'
  inputs:
    sshEndpoint: '$'
    runOptions: 'commands'
    commands: 'chmod a+x /data/tibco-rdv/TIBCOUniversalInstaller-lnx-x86.bin'
    readyTimeout: '20000'

- task: SSH@0
  displayName: 'delete previous instance'
  inputs:
    sshEndpoint: '$'
    runOptions: 'commands'
    commands: |
        pkill 'rvd64'
        sudo rm -rf /opt/tibco/rdv/*
    readyTimeout: '20000'

- task: SSH@0
  displayName: 'install tibco rdv'
  inputs:
    sshEndpoint: '$'
    runOptions: 'commands'
    commands: 'sudo /data/tibco-rdv/TIBCOUniversalInstaller-lnx-x86.bin -silent -V responseFile=/data/tibco-rdv/TIBCOUniversalInstaller-rv.silent -is:javahome $(dirname $(dirname $(readlink $(readlink $(which java))))) -is:log "$(build.buildnumber).log"'
    readyTimeout: '20000'

- task: SSH@0
  displayName: 'update bash profile'
  inputs:
    sshEndpoint: '$'
    runOptions: 'commands'
    commands: |
        cp ~/.bash_profile ~/.bash_profile.tmp
        echo 'export PATH=$PATH:/opt/tibco/rdv/tibrv/8.4/bin' >> ~/.bash_profile
        echo 'export LD_LIBRARY_PATH=$LD_LIBRARY_PATH:/opt/tibco/rdv/tibrv/8.4/lib' >> ~/.bash_profile
    readyTimeout: '20000'

- task: SSH@0
  displayName: 'set execute permissions'
  inputs:
    sshEndpoint: '$'
    runOptions: 'commands'
    commands: 'sudo chmod a+x /opt/tibco/rdv/tibrv/8.4/bin/rvd64'
    readyTimeout: '20000'

- task: SSH@0
  displayName: start the rvd service
  timeoutInMinutes: 2
  continueOnError: true
  inputs:
    sshEndpoint: '$'
    runOptions: 'inline'
    inline: |
        /opt/tibco/rdv/tibrv/8.4/bin/rvd64 -listen 8500
        sleep 70
        exit
    readyTimeout: '20000'
Conclusion
That’s it, you now know how we implemented Azure DevOps pipeline to deploy TIBCO Rendezvous 🥳


Top comments (0)