
In a previous post, I wrote about the benefits of the rolling deployments pattern as a way to reduce application downtime at deployment time. Designing an application to fit this deployment pattern is arguably much easier when you’re first creating it, but where do you start with an existing application, and how do you take the application and convert it to use the rolling deployments pattern?
In this post, I show you how to convert an existing application to use the rolling deployments pattern in Octopus with the help of child steps.
In this post
The application
I am going to use PetClinic as an example and convert the deployment process for the application from one that runs deployment steps sequentially in Octopus to a rolling deployment process. PetClinic is a sample Spring Boot application written in Java that has two main components:
- A web front-end.
- A database.
I don’t explain how to build the PetClinic application in this post. If you are new to building Java applications, we have a number of guides that include step-by-step instructions to setup CI/CD pipelines for various tools.
For both the sequential and rolling deployment processes, the PetClinic application and MySQL database are hosted in Google Cloud. All of the infrastructure used in these examples, including the servers, load balancer, and databases are re-created regularly using Operations Runbooks.
Some caveats
It’s important to highlight that this post won’t cover every element required for a zero-downtime deployment. It makes some assumptions about the application set-up:
- The database is already deployed in a highly available configuration. For more information on MySQL high availability, refer to the documentation.
- Changes to the database are made in a backward and forward compatible way using Flyway.
- Any required session state is persisted for when an individual server is being deployed to.
Sequential deployment process
For deployments where you aren’t concerned about application downtime, Octopus caters for this by running steps sequentially one after the other, by default.
Start trigger
It’s also possible to configure your deployment process to run steps in parallel. However, care should be taken to avoid situations where steps running in parallel depend on one another.
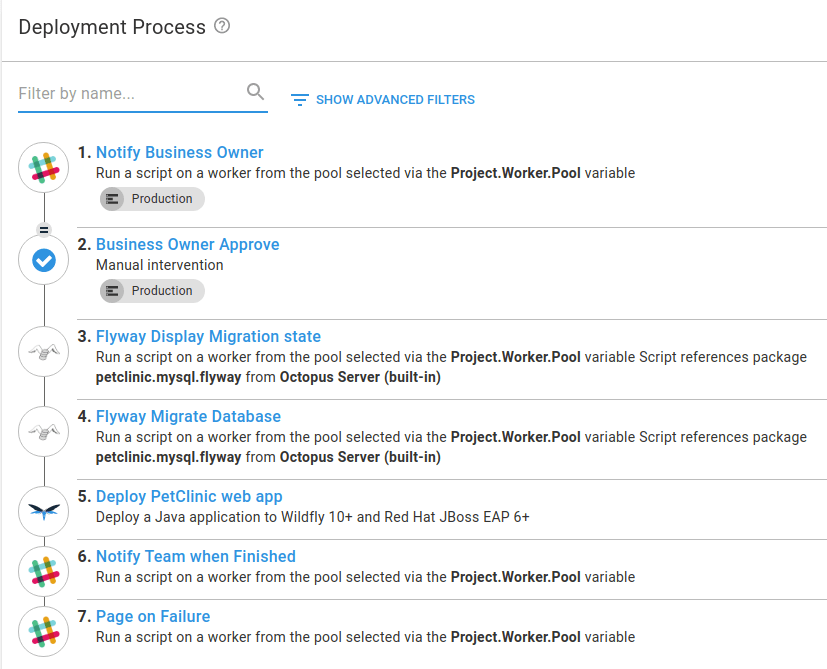
The existing PetClinic application is modeled using this sequential deployment technique. The deployment process consists of a number of key steps:
- A manual intervention approval step for the Production environment only.
- Flyway DB migration community step template steps to display the migration state and apply any new database changes.
- A deploy to WildFly step for the PetClinic web front-end.
In addition, the deployment process includes steps that will post messages to a Slack channel with deployment progression updates.
The complete deployment process can be seen here:
After creating a release in Octopus, you can see an example of the sequential deployment in action to the Development environment:

The steps are run one at a time until the deployment is complete. When the Deploy PetClinic web app step is run, the application becomes unavailable to serve requests to users.
Perhaps unsurprisingly, the infrastructure used in these deployments (per environment) looks like this:

It includes:
- A single Ubuntu virtual machine hosting the Wildfly application server.
- A MySQL database hosted in a Google Cloud SQL service.
Sample Octopus project
You can see the PetClinic sequential deployment process before the conversion to a rolling deployment process in our samples instance.
Convert to a rolling deployment process
Now that we have seen the deployment process for the existing application, we first need to decide on what our infrastructure will look like for the rolling deployment process.
Scale up the servers
In order to reduce downtime and still serve requests for users, we need to scale up the number of servers we use. We also need a load-balancer that we can use to control which servers are available.
In the previous sequential deployment example, we had a single virtual machine per environment. To keep things simple we’ll keep the infrastructure for the Development environment the same as before. For the Test and Production environments, however, the infrastructure will look like this:

This includes a shared load balancer, and this time, two application servers in each environment, connecting to the MySQL database as before.
After you have created your new servers, you also need to add them in Octopus as new deployment targets and tag them with any appropriate target roles.
Choosing a load balancer
There are many different types of load balancer, but a key requirement for this rolling deployments example is the ability to control which servers are available to serve traffic. For this reason, and as this example is running from Google Cloud, we’ll use a network load balancer. This provides a way to add and remove our servers from the load balancer as part of the deployment process, which we’ll see a little later on. For more information about setting up a network load balancer, please refer to the Google documentation.
In this example, the load balancer is shared between the Test and Production environments. To route traffic to the correct place, a different TCP port is used at the load balancer to identify the intended environment.
- Port
8080is used for traffic destined for the Test environment.- Port
80is used for traffic destined for the Production environment.
Load balancer target pools
Previously, users accessed the PetClinic web front-end directly on a single virtual machine. Here, we use dedicated target pools for the Test and Production environments. A target pool is the name given to a group of virtual machine instances hosted in Google Cloud.
Create a new project
In order to change our deployment process, and keep the ability to deploy PetClinic sequentially, we need to create a new project. One way to achieve this is by cloning the existing project.
In the existing project, under Settings, use the overflow menu (...) and select Clone:

- Give the new project you are cloning from the original project a name, review the settings, and when you are satisfied, click SAVE:

Convert the PetClinic deployment process
Next, we’ll convert the deployment process for the project itself. Not all of the PetClinic deployment process lends itself naturally to the rolling deployments pattern, and for this reason, we are focusing on the web front-end of PetClinic.
Choosing what to convert
It’s important to decide for yourself what elements of your project’s deployment process should be converted to use a rolling deployments pattern. In certain situations, it could make things harder to deploy.
Configure a rolling deployment
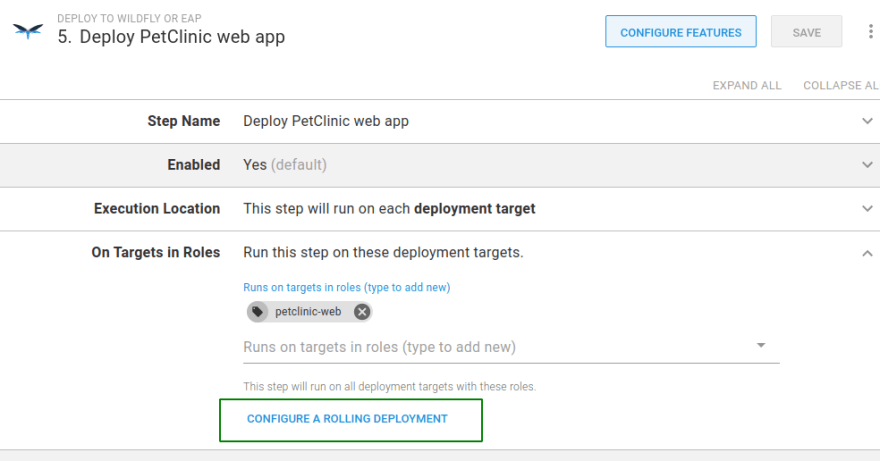
To convert the Deploy PetCinic web app step to a rolling deployment we perform the following actions:
- Open the step in the deployment process editor, expand the section On Targets in Roles, and click CONFIGURE A ROLLING DEPLOYMENT:
- In the Rolling Deployment option that appears, choose a Window size. I’ve chosen a Window Size of
1since we will only deploy to a maximum of two servers per environment:
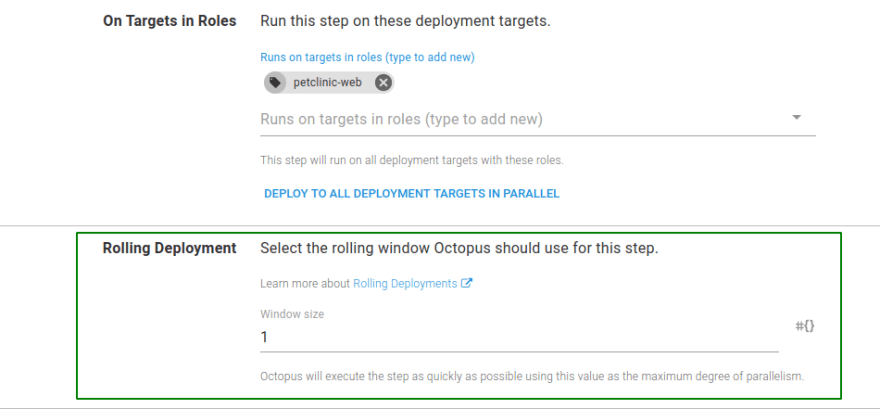
- Click SAVE to update the deployment step.
Add the child steps
We’ve configured a rolling deployment, but it’s not very intelligent yet. Currently, the process deploys PetClinic to each server one at a time, taking each instance of the application offline as it deploys.
We need to add new steps to our rolling deployment to safely deploy new versions of the PetClinic application to each virtual machine and continue serving traffic to users on the other server.
These steps will:
- Retrieve the virtual machine name.
- Remove the virtual machine from the load balancer before the PetClinic deployment.
- Add the virtual machine into the load balancer after the PetClinic deployment.
- Test the PetClinic web front-end is available.
In Octopus, adding multiple steps to a rolling deployment process is done with child steps.
gcloud CLI and authorization
Most of the commands used for interacting with Google in this next section make use of the Google Cloud CLI. To use the gcloud CLI you usually need to authorize it. For further information on gcloud authorization, please refer to the documentation.
Add a new child step
To add a child step, we open the overflow menu (...) for the existing Deploy PetClinic web app step and select Add child step:

We are presented with the Choose Step Template selector where we choose the required step type.
Next, I’ll walk through the new child steps needed to complete the rolling deployment process. Some of the script examples have been reduced to the minimum needed to highlight the key parts.
Retrieve the instance name
This script step is required so that we can identify the name of the virtual machine hosted in Google Cloud for use when removing and adding to the load balancer. We do this by querying Google with the gcloud instances describe command:
$machineName = $OctopusParameters["Octopus.Machine.Name"]

$instanceName=(& gcloud compute instances describe $machineName --project=$projectName --zone=$zone --format="get(name)" --quiet) -join ", "
If a match is found using the machine identified by the Octopus system variable Octopus.Machine.Name, the script sets an output variable with the name as recorded in Google Cloud:
Set-OctopusVariable -name "InstanceName" -value $instanceName
Remove the machine from the load balancer
When we have the name of the machine we are deploying to, we need to remove it from the load balancer target pool. However, to prevent an attempt to remove the virtual machine from the target pool when it’s not present to start with, we can run the gcloud target-pools describe command to check:
$instances=(& gcloud compute target-pools describe $targetPoolName --format="flattened(instances[])" --region=$region --project=$projectName --quiet)
If the instance is found in the target pool, we run the gcloud target-pools remove-instances command supplying the instance name with the --instances parameter:
$instanceName = $OctopusParameters["Octopus.Action[Retrieve machine instance name].Output.InstanceName"]

$response=(& gcloud compute target-pools remove-instances $targetPoolName --instances=$instanceName --instances-zone=$zone --project=$projectName --quiet)
After the virtual machine has been removed from the load balancer, we can proceed to deploy the PetClinic application.
We don’t need to add a new child step to deploy the PetClinic application, as it already exists. Instead, we will place that step in the right place after we have added the necessary child steps.
Testing the PetClinic application
After the PetClinic front-end has been deployed, we can test if it’s responding to requests by adding a community step template called HTTP - Test URL as a child step.
We use a variable of #{Project.Wildfly.Url} to test that it returns an HTTP 200 OK response. This will tell us if the application is running. Any other HTTP response will result in a failure.
Add the machine to the load balancer
Lastly, when the PetClinic application has been verified as online, we can add it back to the load balancer target pool. We do this by running the gcloud target-pools add-instances command and supplying the instance name (as before) with the --instances parameter:
$instanceName = $OctopusParameters["Octopus.Action[Retrieve machine instance name].Output.InstanceName"]

$response=(& gcloud compute target-pools add-instances $targetPoolName --instances=$instanceName --instances-zone=$zone --project=$projectName --quiet)
Re-order the child steps
After all of the child steps have been added, you can reorder them if necessary. In our case, we need to move the original Deploy PetClinic web app step to the middle so that we don’t deploy the application to the virtual machine until it has been removed from the load balancer.
To reorder the child steps:
- Use the overflow menu (...) and select Reorder child steps.
- Rearrange the steps in the desired order.
- Click SAVE when done.
The rolling deployment process
Some of the steps in the rolling deployment process aren’t required for the Development environment. This is because we’re not using a load balancer in that environment. To skip the steps that don’t need to run, we use an environment run condition. This will skip the steps applicable to the load-balanced environments when deploying to Development.
The complete rolling deployment process is shown here:

You can see an example deployment to Production using the new rolling deployment process:

And that’s it! We’ve successfully converted our deployment process from a sequential one to a rolling deployment process.
Sample Octopus project
You can see the complete PetClinic deployment process after the conversion to a rolling deployment process, in our samples instance.
Switch over to new infrastructure
In order to use our new infrastructure, we need to direct our users to our application via the load balancer. The simplest way to do that is to adjust your DNS records. In the case of PetClinic, I just need to adjust the DNS A record to point to the load balancer and wait for the DNS changes to update.
Changing any DNS records may result in a period of time where users are still connecting directly to the virtual machines. This is usually no more than 24 hours, but this will depend on your DNS provider and how long the DNS changes take to propagate.
Clean-up
At this point, you no longer need your old Octopus project. You can clean it up by either disabling it (and effectively archiving it) or delete it if you no longer need it for any auditing requirements.
Conclusion
As you can hopefully see from this post, with a few steps, you can switch from a sequential deployment process in Octopus to one using the rolling deployments feature. This allows you to benefit from reduced downtime, safe in the knowledge that your application can remain online to serve requests to your users.
Until next time, Happy Deployments!
Learn more
This post was originally published at octopus.com.


Top comments (0)