Use the most popular single-board computer with the most popular IoT tools.

Introduction
In October of 2016 Particle announced that they would add support for Raspberry Pi on their IoT cloud platform. I was in the first community focus group and was one their alpha testers. Now that Particle has publicly announced their support for Raspberry Pi, anyone can sign up for the Open Beta.
Particle on Raspberry Pi allows you to bring the features of the Particle Cloud to the full features of Raspberry Pi and create amazing projects that could not have been easily created previously.
With Particle on Raspberry Pi, you can use the same C++ code for Particle's other devices to create powerful solutions.
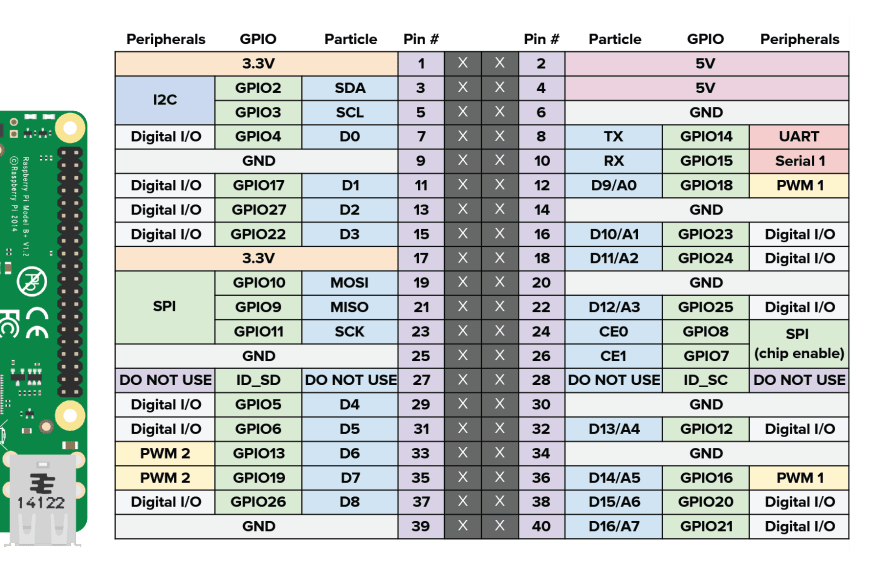
Particle on Raspberry Pi provides complete access to the forty IO pins on Raspberry Pi, allowing you to do digital and analog interactions with your favorite electronics. Additionally, Particle on Raspberry Pi allows you to create functions for calling virtually any Bash command or script present on Raspberry Pi, facilitating dynamic, flexible interaction from within firmware.
Currently, Particle on Raspberry Pi is optimized for the Raspberry Pi 3, the Raspberry Pi 2, the Raspberry Pi Zero, the Raspberry Pi B+, and the newly released Raspberry Pi Zero Wireless.
Basic Setup
Read below for full setup.
The first step is to make sure your Raspberry Pi is updated to the latest version of Raspbian Jessie and it is connected to your network. Update your Pi's software using the following command:
$ sudo apt update && sudo apt upgrade
Next, once you have been accepted into the Raspberry Pi on Particle Beta, run the following command on your Raspberry Pi to install particle-agent:
$ bash <( curl -sL https://particle.io/install-pi )
During the installation of particle-agent, you will be asked to log in using your Particle credentials in order to claim your Raspberry Pi to your account.
Once the installation has completed, you can use your Raspberry Pi with Particle's tools. You can build and flash firmware using the Web IDE, Particle Dev, particle-cli, or po-util to build locally.
Running bash commands with Particle
Particle on Raspberry Pi supports running bash commands and scripts as Linux processes from within the firmware. Input can be supplied with arguments and stdin, and output can can be captured for use in your firmware.
Here is an example for retrieving the internal CPU temperature of the Raspberry Pi:
# include "Particle.h"

int getTempC(String args)
{
  Process proc = Process::run("vcgencmd measure_temp");
  proc.wait(); // The output is temp=43.5'C, so read past the = and parse the number
  proc.out().find("=");
  float cpuTemp = proc.out().parseFloat();
  Particle.publish("cpu-temp", String(cpuTemp));
  return 0;
}

void setup()
{
  Particle.function("getTempC", getTempC);
}

void loop()
{
  // Nothing in the loop
}
Input and Output
With Particle on Raspberry Pi you can control the numerous pins on Raspberry Pi. Many of them are digital inputs and outputs, with several of them able to perform protocols like I2C, SPI, and UART. A few of the pins are capable of analog write through PWM (Pulse Width Modulation). Raspberry Pi's do not have native analog input capability, but one could use an ADC to obtain analog readings.
Raspberry Pi Zero Wireless Full Setup
On March 9, 2017 my Raspberry Pi Zero Wireless arrived. After an hour of setup I was happily tinkering away. The installation was successful and Particle is running well on my Pi Zero W, and I can do many of the same things I can do on my Pi 3.

There were several steps to setup the Pi Zero W. These instructions apply to the Pi 3 as well.
Part One:
Unbox the kit: The Pi Zero W and various accessories came in small separated plastic bags.
Download Raspbian: I chose to use Raspbian Jessie Lite.
Prepare the Pi Zero W for soldering: I gathered the Pi Zero W, 40 pin header, breadboard, and case and brought them down to my workshop.
Solder the Pi Zero: I soldered the headers onto the Pi Zero W by placing the headers and Pi in the breadboard and soldering them in. (I am a perfectionist so it took me awhile to do it perfectly.)
Flash Raspbian to Micro SD card: I first formatted the 8GB card and then used the USB Stick Writer in Linux Mint to write Raspbian Jessie Lite to the SD card.
Configure Wi-Fi, Enable SSH, and Change Hostname on Pi Zero W:
- To enable Wi-Fi I simply created an entry in
etc/wpa_supplicant/wpa_supplicant.confon the SD card.
network={
    ssid="MyWiFiNetwork"
    psk="the_password"
    key_mgmt=WPA-PSK
}
To enable SSH(Secure Shell) on my Pi Zero W I created a file called
sshin the root of the SD card.To change the hostname to something more useful than
raspberrypi, I had to make the following changes to the following files:In
etc/hostnameI changed the line topizero.In
etc/hosts, I changed theraspberrypion the last line topizero.
Part Two:
Boot Raspberry Pi Zero Wireless and Connect using SSH: Using Terminal on Linux or macOS I connected to my Pi Zero W by running:
ssh pi@pizero.local.
Your command will be different if you chose to set a different hostname in the previous section.OPTIONAL - Change the password for the
piuser: You can change the password fromraspberryto something more secure withpasswd.Check for updates: Run the following to check and install any available updates:
sudo apt update && sudo apt upgradeInstall
particle-agent: To install Particle on Raspberry Pi you must run the following command:bash <( curl -sL https://particle.io/install-pi )
After the installation has finished, try the following in your own terminal (not your Pi Zero W) to test your Pi:
# Here, my device is named `pizero`, but yours can be different

$ particle call pizero digitalwrite D7,LOW # This turns off the onboard lED

$ particle call pizero digitalwrite D7,LOW # This turns it on
You should now be able to write your own code for the Raspberry Pi using the Web IDE, Particle Dev, particle-cli, or po-util to build locally.
More information
Particle is thoroughly documenting Particle on Raspberry Pi. Their official documentation provides a multitude of information, reference material, and tutorials. Their setup guide for Raspberry Pi is comprehensive.
For me the most useful section of the documentation is the Firmware Reference.
Additionally, the Particle Community is always available to help with any issues or questions.

Top comments (0)