Introduction
This is the second part of the Spring Shell series. In the previous article a cli application was built to get customer data from an e external. Then, the data was presented in tabular format. Now we are going to extend functionality of our app to perform write operations via the customers web service.
Here is the list of items that will be covered:
- Registering new commands to update/delete customers.
- Capturing user input.
- Validating input.
- Adding Authentication.
- Dynamic Command Availability.
- Customization.
Registering new commands
The steps to register the new commands were already explained in the first part of these series. The new command takes one required argument, the customer id to be deleted. Code is shown here as a reference
@Command(command = "delete-customer",
         description = "Delete Customer By Id.")
    public String deleteCustomer(
    @Option(label = "id", required = true,
    longNames = "id", shortNames = 'i') Long id) {
    customerService.deleteCustomer(id);
    return String.format("Customer %d deleted successfully", id);
}
Also it is worth printing the implementation of the delete method. Notice that the response from the web service is bodiless, hence the return type is void.
public void deleteCustomer(Long id) {
    restClient.delete()
        .uri("/{id}",id)
        .accept(MediaType.APPLICATION_JSON)
        .retrieve()
        .toBodilessEntity();
}
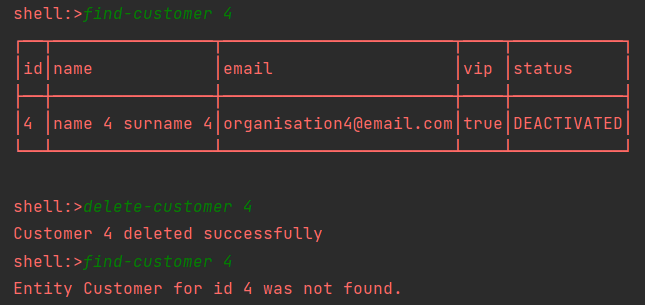
Let's re-run the application to verify that the command actually works as expected and customers can be removed.
Capturing user input
Next, let's implement a command to update a customer. This time, the user will be required to enter the new values of the fields. Spring shell relies on JLine (a Java library for handling console input) and many of its features are avalaible. To interact with the user and ask for input the class LineReader will be used. More information on JLine can be found in its home page.
First, we will write a class to read from the CLI which will delegate to LineReader to get user input.
public class ShellReader {
    private LineReader lineReader;

    public ShellReader(LineReader lineReader) {
        this.lineReader = lineReader;
    }

    public String readLine(String displayText) {
        return lineReader.readLine(displayText + ": ");
    }

    public String readLineRequired(String displayText) {
        String value;

        do {
            value = lineReader.readLine(displayText + ": ");

            if (value.isEmpty())
                lineReader.getTerminal().writer().println("Value
                    is mandatory. Please enter a value.");
        } while (value.isEmpty());

        return value;
    }

    public String readLineOptions(String displayText,
                                  List<String> options) {
        String value;

        do {
            value = lineReader.readLine(displayText +" "+ options
                                        + ": ");

            if (!options.contains(value))
                lineReader.getTerminal().writer().println("Please
                    select a value from "+ options);
        } while (!options.contains(value));

        return value;
    }
}
An auto-configured LineReader is injected by Spring. The ShellReader class has three methods to read input:
- Method readLine simply prints a message on the console, waits for the user input and returns the value entered.
- The second method readLineRequired checks that the input is not empty and loops till a non-emtpy value is typed. If the value is empty a message is printed to the consloe via getTerminal method.
- The last method readLineOptions checks the input matches from a list of possible options and loops till a valid option is entered.
Next, the class will be registered as a bean so that it can be constructor-injected in the Customer Command class. The bean will be placed in the AppConfig class
@Configuration
public class AppConfig {
    // Other beans omitted

    @Bean
    public ShellReader shellReader(@Lazy LineReader lineReader) {
        return new ShellReader(lineReader);
    }
}
Finally, ShellReader is declared as a member in the command class
@Command(group = "Customer Commands")
public class CustomerCommands {
    private OuputFormatter ouputFormatter;
    private CustomerService customerService;
    private ShellReader shellReader;

    public CustomerCommands(CustomerService customerService,
                            OuputFormatter ouputFormatter,
                            ShellReader shellReader) {
        this.customerService = customerService;
        this.ouputFormatter = ouputFormatter;
        this.shellReader = shellReader;
    }
}
Now, we are in a position to define the command method to update a customer. Code is shown below
@Command(command = "update-customer",
         description = "Updates Customer fields.")
public String updateCustomer(
    @Option(label = "id", required = true,
    longNames = "id", shortNames = 'i'``) Long id) {
    CustomerResponse customer = customerService.findCustomer(id);

    var name = shellReader.readLineRequired(String.format(
        "Enter new Name (%s)",customer.personInfo().name()));
    var email = shellReader.readLineRequired(String.format(
        "Enter new Email (%s)",customer.personInfo().email()));
    var dob = shellReader.readLineRequired(String.format(
        "Enter new Date Of Birth (%s)",
        customer.personInfo().dateOfBirth()));
    var info = shellReader.readLineRequired(String.format(
        "Enter new Info (%s)",customer.detailsInfo().info()));
    var vip = shellReader.readLineOptions(String.format(
        "Is customer vip ?",customer.detailsInfo().vip()),
        List.of("Y","N"));

    var customerRequest = new CustomerRequest(
                name,
                email,
                DateUtils.parseDate(dob),
                info,
                vip.equals("Y"));

    customer = customerService.updateCustomer(id,customerRequest);

    return String.format("Customer %d deleted successfully. \n%s",
           id, ouputFormatter.coverToTable(customer));
}
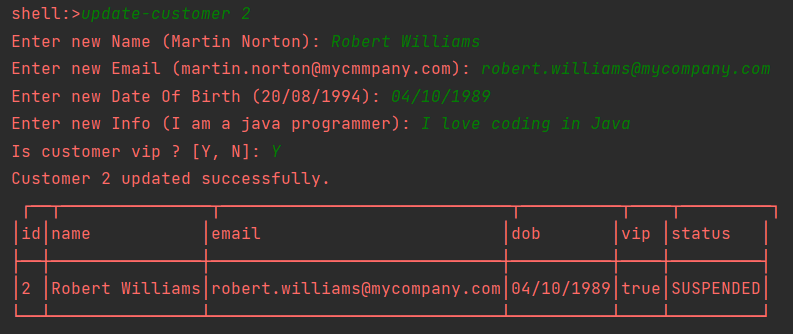
Let's examine the above snippet. First, the customer dto is loaded from the service. Then, each field is read from the console thanks to the ShellReader object. A customer request record is created with the data entered by the user and passed to the service for updating. The user is presented a message if the operation is completed successfully.
The following figure demonstrates the code in action when the application is run.
The update customer code of the service layer is added here just for reference
public CustomerResponse updateCustomer(Long id,
                CustomerRequest customerRequest) {
    return restClient.put()
                .uri("/{id}",id)
                .accept(MediaType.APPLICATION_JSON)
                .body(customerRequest)
                .retrieve()
                .body(CustomerResponse.class);
}
Now that the new commands are working as expected, it is time to add new features to our application.
Validation input
Spring shell integrates with the Bean Validation API to support constrains on command parameters. Annotations on command parameters trigger a validation before the command is executed.
The following dependencie must be added to make use of Bean Validation.
<dependency>
    <groupId>org.springframework.boot</groupId>
    <artifactId>spring-boot-starter-validation</artifactId>
</dependency>
Suppose the id to delete a customer must be a number between 1 and 9999. Adding the @Range annotation to the command param will take care of it.
public String deleteCustomer(
    @Range(min = 1, max = 9999, message = "Customer id must be
        between {min} and {max}.")
    @Option(label = "id", required = true, longNames = "id",
        shortNames = 'i') Long id) {
    customerService.deleteCustomer(id);
    return String.format("Customer %d deleted successfully", id);
}
Because exceptions are handled by our custom command exception resolver in the application, the thrown exception (of type ParameterValidationException) can be intercepted when the validation fails. The error messages from the constrains (in case more than one validation does not pass) can be extracted and joined together.
public class CLIExceptionResolver implements CommandExceptionResolver {
    @Override
    public CommandHandlingResult resolve(Exception ex) {
        if (ex instanceof RestClientCustomException e)
            return CommandHandlingResult.of(
              e.getErrorDetails().message()+'\n');
        else if (ex instanceof ResourceAccessException e)
            return CommandHandlingResult.of(
              "Customer API is not available at the moment"+'\n');
        else if (ex instanceof ConversionFailedException e)
            return CommandHandlingResult.of(
              "Customer id must be a positive integer"+'\n');
        else if (ex instanceof ParameterValidationException e)
            return CommandHandlingResult.of(
              e.getConstraintViolations()
                    .stream()
                    .map(ConstraintViolation::getMessage)
                    .collect(Collectors.joining(". "))
                    +'\n');

        return CommandHandlingResult.of(ex.getMessage()+'\n', 1);
    }
}
From the preceding code, the below output is displayed

Adding Authentication
The next feature of cli app is to create a command class to login and logout a user. The idea is to allow to access to the write commands (update and delete) based on user authentication. These commands will only be available once a user has logged in.
To keep things simple the user credentails are stored in the application.properties files. Password will be encrypted with the algorithm bcrypt. Hence, the dependency security crypto from Spring Security project can be added to the pom.xml
<dependency>
    <groupId>org.springframework.security</groupId>
    <artifactId>spring-security-crypto</artifactId>
</dependency>
The login service contains methods to login and logout. It verifies username and password are matched. If login is successful the user will be stored so that it can be later checked if the user is logged or not.
@Service
public class LoginService {
    @Value("${application.cli.username}")
    private String username;

    @Value("${application.cli.password}")
    private String hashedPassword;

    private final AtomicReference<SimpleUser> user
        = new AtomicReference<>();

    public void login(String username, String password) {
        if (!username.equals(username) || !BCrypt.checkpw(password,hashedPassword)) {
            throw new LoginException("Incorrect username/name!");
        }

        user.set(new SimpleUser(username));
    }

    public void logout() {
        user.set(null);
    }

    public boolean isLoggedIn() {
        return Objects.nonNull(user.get());
    }
}
SimpleUser is just a record with one data field, the username.
public record SimpleUser(String username) {}
Credentails are kept in the application.properties. In a real life application it may connect to a database or service to authenticate the user. We will just keep it simple in this article.
application.cli.username=administrator1
application.cli.password=$2a$12$LqTeXfZfc6sw6D86YcbLKeY4Y.Hrq0HXYQhg7vFTS0.psZoF4UdkK
The last step is to create the command class to perform the two actions. Not much going here, the new LoginService is used to authenticate the user or terminate the session by logging out.
@Command(group = "Login Commands")
public class AuthenticationCommands {
    private LoginService loginService;

    public AuthenticationCommands(LoginService loginService) {
        this.loginService = loginService;
    }

    @Command(command="login",
             description="Login to get Admin privileges.")
    public String login(
        @Size(min = 8, max = 20, message = "Username must be
        between {min} and {max} ")
        @Option(required = true) String username,
        @Size(min = 10, message = "Password must be at least
        {min} chars long")
        @Option(required = true) String password) {
        loginService.login(username,password);
        return "You are logged in now!";
    }

    @Command(command="logout",description="logout as an Admin.")
    public String logout() {
        loginService.logout();
        return "You have been logged out.";
    }
}
Now, the app can login and logout users. But they are of no use on themselves. We need a way to enable and disable commands based on them. The next section provides an answer to this.
Dynamic Command Availability.
Some registered commands require a prior action to take place before they can be invoked. For instance, the logout method will only work if the user has already logged in. Trying to call the logout method when the user is not yet authenticated, the shell will express that the method exists but it is not available at the moment.
The way of indicating command availality in Spring Shell is by annotating the method with @CommandAvailability and specifying a availability provider. The main types involved in this mecanism are Availability class and AvailabilityProvider interface. Availability class indicates whether or not a command is currently available. It is constructed with one of the two factory methods available() or unavailable() with a reason. AvailabilityProvider is a functional interface to supply an Availability instance.
Let's see how all this works. The steps to get the job done are described here:
- Declare two providers as beans. One to be applied to commands with write operations like update/delete. The other to permit logging out.
- Apply the annotation to the coomands with the particular provider.
The below code is added the our AppConfig class
@Bean
public AvailabilityProvider userLoggedProvider() {
    return () -> loginService.isLoggedIn()
        ? Availability.available()
        : Availability.unavailable("You are already logged in.");
}

@Bean
public AvailabilityProvider userLoggedOutProvider() {
    return  () -> !loginService.isLoggedIn()
        ? Availability.available()
        : Availability.unavailable("You are not logged in.");
}
The second step is to add the annotation on the command classes. Lets begin with AuthenticationCommands
@Command(command="login",
         description="Login to get Admin privileges.")
@CommandAvailability(provider = "userLoggedOutProvider")
public String login(...) { ... }

@Command(command="logout",description="logout as an Admin.")
@CommandAvailability(provider = "userLoggedProvider")
public String logout() { ... }
and continue with CustomerCommands
@Command(command = "update-customer",
description = "Updates Customer fields. It requires user login.")
@CommandAvailability(provider = "userLoggedProvider")
public String updateCustomer(...) { ... }

@Command(command = "delete-customer",
description = "Deletes Customer By Id. It requires user login.")
    @CommandAvailability(provider = "userLoggedProvider")
    public String deleteCustomer(...) { ... }
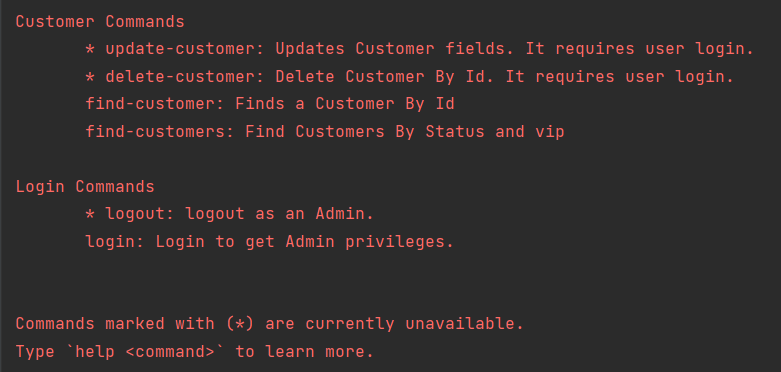
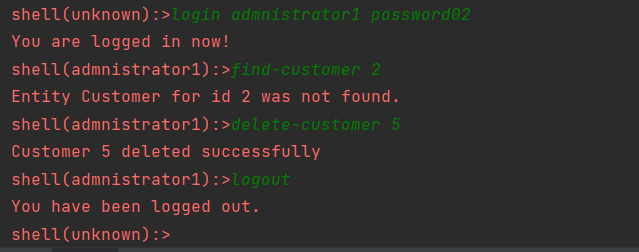
It is time to start up the app and see if all is in order. The first thing to notice is the output of the help command. It marks the unavailable commands with asterisk as demostrated in the next figure
Invoking the delete-customer command would prompt the following message on the console

The user must be logged first to be able to call the command.
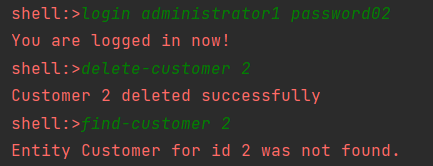
Now the delete operation can be perfomed as expected. Also the help command shows that the write commands are available. Login is disabled as it does not make sense once the user is already logged.
Finally, the user can logout once it is done with the session.

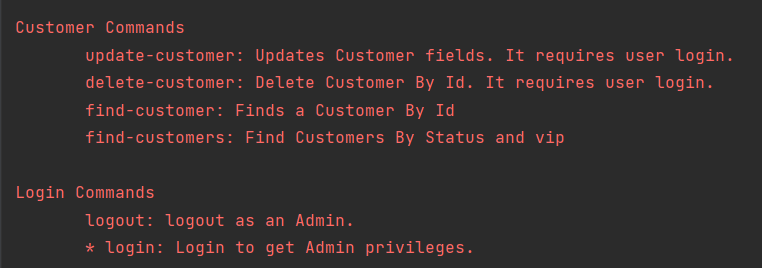
Customization
Spring Shell offers a wide range of options to customize the shell. In this section we are going to look at a couple of those options.
- Command Not Found message: By default a non-existing command is handled via CommandNotFoundResultHandler and outputs a simple message

Internally CommandNotFoundResultHandler is using CommandNotFoundMessageProvider which is a functional interface taking a ProviderContext and returning a text message. It is possible to define it as a bean and can be written as a lambda function.
@Bean
CommandNotFoundMessageProvider provider() {
    var message = """
               The command '%s' you entered was not found.
               Use help to view the list of available commands
               """;
    return ctx -> String.format(message, ctx.text());
}
As we can see the new message is returned now

- Prompt Name: By default the prompt displays the value shell:>. This can be changed by implementing the PromptProvider interface. It can be either defined as a bean or a compoment class.
@Bean
PromptProvider promptProvider() {
    return () -> loginService.isLoggedIn() ?
        new AttributedString(
            "shell("+loginService.getUser().username()+"):>")
        : new AttributedString("shell(unknown):>");
}
Let's run the app again to verify the change and call some commands
Conclusion
In this second part, we have explored more advance features of spring shell. The project allows to build cli app easily freeing the developer to focus on core command logic. It comes with a lot of features and we have seen some of them in action. Full code can be found in the git hub repository here.
Hope you enjoyed reading the article and don’t Forget to Share This Post!

Top comments (1)
Thanks, this
helped me today to override the message when no comman found during solving app.codecrafters.io/courses/shell/... challenge