Intro
For those of you who don't know about Gatsby.js, it's an open source static site generator based on react. If you want to learn more about Gatsby take a look at their website and doc here
Pre-requisite
To follow this tutorial, you must:
- Have basic Knowledge of React
- Install Node.js and npm ou yarn package manager.
- Install Git (as it used behind the scene by gastby-cli)
- Install gatsby-cli installed
Using a Starter
With Gatsby and Git we have the possibility to start new projects using templates. In the Gatsby world they are referred to as starters. You can find all of them here.
For our demo project, I chose to use gatbsby-starter-sellar.
So here's the command to create the folder containing all the code to start our landing page
gatsby new gatsby-starter-stellar https://github.com/codebushi/gatsby-starter-stellar
After that go into the folder than we start the development server locally
cd gatsby-starter-stellar
gatsby develop
Once you get the build success message navigate to http://localhost:8000/
Now you should get you landing page up an running and it should look like the screenshot below 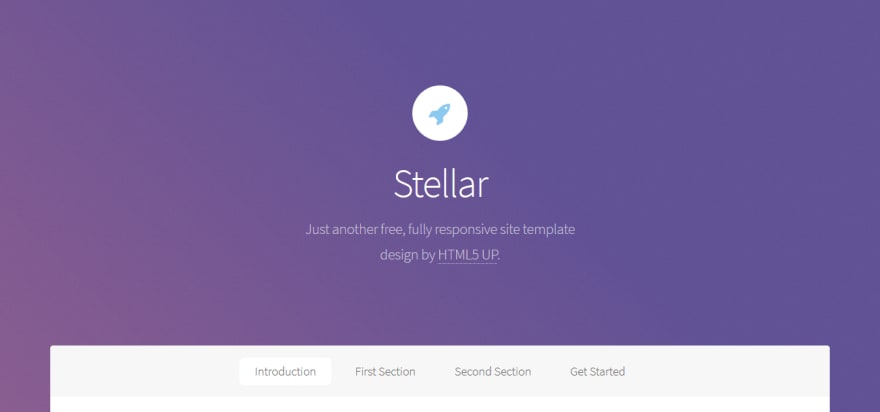
Adding a contact form
Now that we have fully functioning landing page. Let's add a contact form.
In order to do that, we are going to create a ContactForm component that we are going to add to our page.
Creating the ContactForm component
First of all we create a new file name ContactForm.js in the src/components folder. It's a really simple React component that should look like the following
import React from 'react'

class ContactForm extends React.Component {

  render() {
    const formStyle = {
      textAlign: 'left'
    }
    const buttonsStyle = {
      margin: '1rem',
      textAlign: 'center',
    }
    return (
      <form style={formStyle} className="form" action={this.props.action} method="post">
        <div>
          <label>Full name</label>
          <input type="text" name="fullname"/>
        </div>
        <div>
          <label>Email</label>
          <input type="email" name="email"/>
        </div>
        <div>
          <label>Message</label>
          <textarea name="message" rows="5"></textarea>
        </div>
        <ul className="actions" style={buttonsStyle}>
            <li>
              <button type="submit"  className="button special">Send</button>
            </li>
        </ul>
      </form>
    );
  }
}

export default ContactForm
Adding the ContactForm component to the landing page
Now that we have our component, let's append it to our landing page.
To do so we'll have to import our component into src/pages/index.js
import ContactForm from '../components/ContactForm'
Then we append a new section in the bottom of our Layout
<section id="contactUs" className="main special">
    <header className="major">
        <h2>Contact Us</h2>
        <ContactForm></ContactForm>
    </header>
</section>
And finally we'll add a new entry in the nav bar to ease the navigation.
To do so, we just have to edit _src/componenents/Nav.js file to make it look like this
import React from 'react'
import Scrollspy from 'react-scrollspy'
import Scroll from './Scroll'

const Nav = (props) => (
    <nav id="nav" className={props.sticky ? 'alt' : ''}>
        <Scrollspy items={ ['intro', 'first', 'second', 'cta', 'contactUs'] }
currentClassName="is-active" offset={-300}>
            <li>
                <Scroll type="id" element="intro">
                    <a href="#">Introduction</a>
                </Scroll>
            </li>
            <li>
                <Scroll type="id" element="first">
                    <a href="#">First Section</a>
                </Scroll>
            </li>
            <li>
                <Scroll type="id" element="second">
                    <a href="#">Second Section</a>
                </Scroll>
            </li>
            <li>
                <Scroll type="id" element="cta">
                    <a href="#">Get Started</a>
                </Scroll>
            </li>
            <li>
                <Scroll type="id" element="contactUs">
                    <a href="#">Contact Us</a>
                </Scroll>
            </li>
        </Scrollspy>
    </nav>
)

export default Nav
Now we should have a wonderful contact form that looks like the this

Handling the form submission
Now that we have this magnificent contact form. We must handle the form submission.
As Gatsby is static form generator we don't have any backend service and we have to connect it to an API or some backend service.
For this tutorial we are going to use FlexyForm. It's a service that provide form submission endpoints.
You just have to fill the "action" attribute of any form with the URL the service provides and you will receive an email for each submission.
They also provide you with a backend where you can see all your forms submissions.
You can check it out here if you don't want to bother creating a API form simple forms => FlexyForm
Once you are registered, you can create a form.
You can configure the email address you want to notify and the return URL.
Each form has a unique "form key".
This is the key that you can use in the submission URL below
<!-- Replace [YourFormKey] by the form key you get from FlexyForm-->
https://www.flexyform.com/f/[YourFormKey]
Once you have this URL we can set it as the action property of the ContactForm component in the src/pages/index.js file:
<ContactForm action="https://www.flexyform.com/f/YouFormKey"></ContactForm>
Now when I submit the form, I get the following Email

Tada! We have been able to create a contact form with form submission handling on a static website without a line of backend code. All of that in less than 10 minutes of actual coding.
Thank you for reading me until the end. I hope you find it useful.
Cheers!!!

Top comments (0)