
Welcome to the brand new series. Here, we will create an small translation app using the new Context System in ReactJS.
This series have been inspired from an example in “Modern React with Redux” series by Stephen Grider on udemy.
So, open up your terminal and create a new react app translation.
 translation app
Next cd in to translation, open your code editor in that folder and do a npm start
Then go to the src directory in your code editor and remove everything inside it.
 Delete everything
Next create an index.js inside the src directory and add the boilerplate code for React.
import React from 'react';
import ReactDOM from 'react-dom';
import App from './components/App';

ReactDOM.render(
    <App />, document.querySelector('#root')
);
Then we create a components folder inside src directory. Here, create an App.js file.
 components foler
The content of App.js is below.
import React, { Component } from 'react'

class App extends Component {
    render() {
        return (
            <div>
               App is rendered
            </div>
        )
    }
}

export default App;
After this just confirm, where the basic setup is done by checking in browser.
 App is rendered
Next, we will update our App.js to contain a basic language selector
import React, { Component } from 'react';
import './App.css';

class App extends Component {
    state = { language: 'english' };

    onLangChange = (lang) => {
        this.setState({ language: lang });
    }

    render() {
        return (
            <div className="main__container">
               <div className="lang__flags">
                <span>Select a language :</span>
                <span onClick={() =>  this.onLangChange('english')}>🇺🇸</span>
                <span onClick={() => this.onLangChange('hindi')}>🇮🇳</span>
               </div>
               {this.state.language}
            </div>
        )
    }
}

export default App;
Also, create a file App.css in same directory and add the below code.
.main__container {
    display: grid;
    place-content: center;
    grid-gap: 10px;
}

.lang__flags {
    font-size: 1.5rem;
    font-weight: bold;
}
Our App now look like below, with two clickable flags which changes the text.
 Basic layout
Next, we create three new files inside our components directory — UserCreate.js, Button.js and Field.js.
 New files
Now, we will quickly add code inside these files, to show our basic form containing an input box and submit button.
Put the below code in UserCreate.js
import React from 'react';
import Field from './Field';
import Button from './Button';

const UserCreate = () => {
    return (
        <div className="ui__form">
            <Field />
            <Button />
        </div>
    )
}

export default UserCreate
Then in Field.js put this code.
import React, { Component } from 'react'

class Field extends Component {
    render() {
        return (
            <div>
                <label>Name </label>
                <input />
            </div>
        )
    }
}

export default Field;
Then in Button.js put the following code.
import React, { Component } from 'react';

class Button extends Component {
  render() {
    return (
      <button>Submit</button>
    )
  }
}

export default Button;
We will also put some Styles for this form in App.css
…
…

.ui__form {
    display: grid;
    grid-gap: 10px;
    background: #f9f9f9;
    border: 1px solid #c1c1c1;
    margin: 2rem auto 0 auto;
    width: 600px;
    padding: 1em;
  }

  .ui__form input {
    background: #fff;
    border: 1px solid #9c9c9c;
    font-size:1rem;
    padding: 0.7em;
  }
  .ui__form input:focus {
    outline: 3px solid gold;
    width:80%;
  }
  .ui__form label {
      font-size:1.2rem;
      font-weight: 900;
  }
  .ui__form button {
    background: lightgrey;
    border-radius: 2%;
    font-size:1.2rem;
    padding: 0.7em;
    width: 30%;
    border: 0;
  }
  .ui__form button:hover {
    background: gold;
  }
  .err__msg{
      font-size: 1rem;
      color:red;
  }

  h3{
    text-align: center;
  }
Now, go to App.js to hook up the UserCreate component.
render() {
        return (
            <div className="main__container">
               <div className="lang__flags">
                <span>Select a language :</span>
                <span onClick={() => this.onLangChange('english')}>🇺🇸</span>
                <span onClick={() => this.onLangChange('hindi')}>🇮🇳</span>
               </div>
               **<UserCreate />**
            </div>
        )
    }
Now, our App shows this beautiful form.
 Beautiful form
Now, we will use the Context System to pass data from App component to Button and Field component.
Without the context system, we had to pass it from App to UserCreate and from there to Button and Field component.
Now, create a new folder contexts inside src directory and a file LanguageContext.js inside it.
 LanguageContext
Next, we will create the context object inside the file LanguageContext.js and pass english as a default value.
import React from 'react';

export default React.createContext('english');
Next, we use this context object in our Button.js file.
import React, { Component } from 'react';
import LanguageContext from '../contexts/LanguageContext';

class Button extends Component {
  static contextType = LanguageContext;

  render() {
    const text = this.context === 'english' ? 'Submit' : 'जमा करें';
    return (
      <button>{text}</button>
    )
  }
}

export default Button;
Now, time to update our Field.js file to use this context object.
import React, { Component } from 'react';
import LanguageContext from '../contexts/LanguageContext';

class Field extends Component {
    static contextType = LanguageContext;

    render() {
        const text = this.context === 'english' ? 'Name' : 'नाम';

        return (
            <div>
                <label>{text}</label>
                <input />
            </div>
        )
    }
}

export default Field;
The statement static contextType = LanguageContext is a boilerplate for using the context object.
Next, we will go back to our App.js file and use the the LanguageContext object. We need to wrap UserCreate our component with Provider and pass the value, which in this case is the current value of language.
import React, { Component } from 'react';
import UserCreate from './UserCreate';
import LanguageContext from '../contexts/LanguageContext';
import './App.css';

class App extends Component {
    state = { language: 'english' };

    onLangChange = (lang) => {
        this.setState({ language: lang });
    }

    render() {
        return (
            <div className="main__container">
               <div className="lang__flags">
                <span>Select a language :</span>
                <span onClick={() => this.onLangChange('english')}>🇺🇸</span>
                <span onClick={() => this.onLangChange('hindi')}>🇮🇳</span>
               </div>
               <LanguageContext.Provider value={this.state.language}>
                <UserCreate />
               </LanguageContext.Provider>
            </div>
        )
    }
}

export default App;
There is another way to consuming or showing data in our child component (Field and Button in our case) and it is via Consumer instead of context object. We are not exploring it here.
Our App is complete now and so head over to http://localhost:3000/ and click on India flag and the text changes to Hindi.
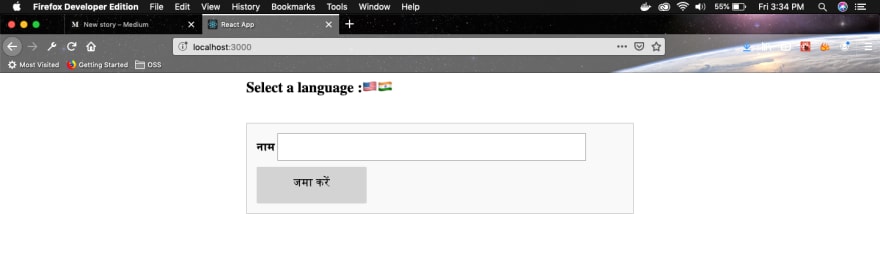 Text Translated.
This completes our little app and you can find the source code here.


Top comments (0)