
Welcome to part-4 of the series. In part-3 we had completed the version-1 of the app. Here, we will start making the version-2, where the images will be tiled better. To do so, we will use the magic of CSS grids and React Ref.
We will first start with CSS grid. For applying grid, lets add a class image__list to the <div> containing image list. Also, create a file imageList.css in the same directory.
    import React from 'react';
    import './imageList.css';

    const ImageList = (props) => {
        const imgs = props.foundImages.map(img => {
            return <img key={img.id} src={img.urls.regular} alt={img.alt_description} />
        });

        return (
            <div className="image__list">{imgs}</div>
        )
    }

    export default ImageList;
Next, we will add some basic CSS grid to our imageList.css file. Here, we are giving rule to have each column 250px wide or 1fr(special unit in grid).
    .image__list{
        display: grid;
        grid-template-columns: repeat(auto-fill, minmax(250px, 1fr));
        grid-gap: 10px;
    }

    .image__list img{
        width: 250px;
    }
Head over to localhost and the see the magic of CSS grid.
 Grid magic
Now, you can see from above screenshot that all is not nice. Vertically, the larger images are spanning more, so creating an ugly space in smaller images.
We will fix it my using grid-row-end but we dont know how much to span for each images vertically. For this we will use JavaScript.
For this first, we will make a separate component ImageCard for image. It will be responsible to show each image.
 ImageCard Component
We will create our ImageCard component now. Open ImageCard.js and add the below code.
    import React, { Component } from 'react';

    class ImageCard extends Component {
      render() {
        return (
          <div>
              <img src={this.props.image.urls.regular}
                   alt={this.props.image.alt_description} />
          </div>
        )
      }
    }

    export default ImageCard;
Here, we are simply shifting all the logic to display an <img /> tag to this component. Next, we head over to ImageList.js to change code to show this component. Our changes are marked in bold.
    import React from 'react';
    import './imageList.css';
    import ImageCard from './ImageCard';

    const ImageList = (props) => {
        const imgs = props.foundImages.map(img => {
            return <ImageCard key={img.id} image={img} />
        });

        return (
            <div className="image__list">{imgs}</div>
        )
    }

    export default ImageList;
Now, we will use JavaScript to reach into the DOM and figure out height of each image. Now, to get access to DOM in React we use the ref system.
Let’s add the ref system to ImageList.js .Here, we have added a constructor to create a Ref by the React.createRef() method. Then, we assign it to the imag tag by ref={this.imageRef}.
Now, we use componentDidMount to get access to it. As, we know componentDidMount lifecycle method runs after the DOM is rendered.
    import React, { Component } from 'react';

    class ImageCard extends Component {
        constructor(props) {
            super(props);
            this.imageRef = React.createRef();
        }

        componentDidMount() {
            console.log(this.imageRef);
        }

        render() {
            return (
                <div>
                    <img ref={this.imageRef}
                        src={this.props.image.urls.regular}
                        alt={this.props.image.alt_description} />
                </div>
            )
        }
    }

    export default ImageCard;
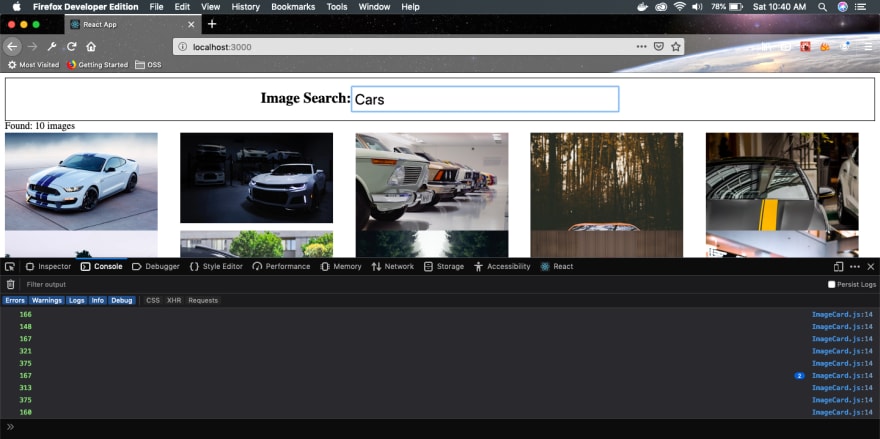
Now, open the app in localhost and also the developer console. Here we will see 10 images been shown in the console.
 The img access
Now, open a rendered tag and you will see the clientHeight property. This property tells about the height of each image. We will use it to fix our app.
 The clientHeight
As from the screenshot above, it is clear that the clientHeight can be accessed as this.imageRef.current.clientHeight, so put the same in console log.
    componentDidMount() {
            console.log(this.imageRef);
            console.log(this.imageRef.current.clientHeight);
        }
On doing the search again, we should see the image height. But we see zero(0) instead.
 The unexpected
This is because the DOM element(this.imageRef) which we see in the console, doesn’t have the complete information about the image at the time. It only gets the information, once we expand the element and is done by the browser.
To solve this issue, we have to go through the route of eventlistner as in the below code.
    componentDidMount() {
            this.imageRef.current.addEventListener('load', this.setSpans);
        }

        setSpans = () => {
            console.log(this.imageRef.current.clientHeight);
        }
Here, we had added Event Listener to current object. Then when the image is loaded, we call a method setSpans().
On doing the search again, we correctly see the image height.
 The image Height
Before starting our grid-row-end maths, we have to do a small change in our imageList.css file. We will add a property grid-auto-rows and set it to 150px. It specifies that each row will be 150 pixels height.
    .image__list{
        display: grid;
        grid-template-columns: repeat(auto-fill, minmax(250px, 1fr));
        grid-gap: 10px;
        grid-auto-rows: 150px;
    }

    .image__list img{
        width: 250px;
    }
Next we will start our Maths. Here we are taking our height and dividing it with 150. The value 150 is our row height, so it will give us the number of spans.
Now, we have a state variable spans. We then do a this.setState inside setSpans().
    class ImageCard extends Component {
        constructor(props) {
            super(props);
            this.state = { spans: 0 };
            this.imageRef = React.createRef();
        }

        componentDidMount() {
            this.imageRef.current.addEventListener('load', this.setSpans);
        }

        setSpans = () => {
            const height = this.imageRef.current.clientHeight;
            const spansRows = Math.ceil(height / 150 );
            this.setState({ spans: spansRows });
        }

        render() {
            return (
                <div style={{gridRowEnd: `span ${this.state.spans}`}}>
                    <img ref={this.imageRef}
                        src={this.props.image.urls.regular}
                        alt={this.props.image.alt_description} />
                </div>
            )
        }
    }
Next, we will use this in the CSS grid property grid-row-end: span <Number>. Now , this property will expand each row according to the value.
Let’s do the Search again in localhost. Also, open the developer console. You can see that each grid element now have a property like grid-row-end: span 2
 grid-row-end: span
As, from the above screenshot all is not completely well. This is because 150px height is way too much and for some images it creates too much empty spaces. To fix it we will make some little adjustments first in imageList.css
Here, we are making each row of 10px and also eliminating the gap between the rows. The place-items:center; is just to center everything perfectly.
    .image__list{
        display: grid;
        grid-template-columns: repeat(auto-fill, minmax(250px, 1fr));
        grid-gap: 0 5px;
        grid-auto-rows: 10px;
        place-items:center;
    }
Next in ImageCard.js also we make the same adjustment. Now instead of dividing by 150, we are dividing by 10.
    setSpans = () => {
            const height = this.imageRef.current.clientHeight;
            const spansRows = Math.ceil(height / 10 );
            this.setState({ spans: spansRows });
        }
This will cause a lot more spans, but will fix our problem.
 Problem fixed
This completes our mini project. Hope you liked it. You can find the github link here.
It is also deployed in Netlify and the link is here.


Top comments (0)