This is a little tutorial I wish I would have found when I was asked to read more into PlayCanvas as a web developer with no game dev experience 😊
PlayCanvas is an open-source 3D game engine/interactive 3D application engine alongside a proprietary cloud-hosted creation platform that allows for simultaneous editing from multiple computers via a browser-based interface (Source).
Basics
First we need to define the basics for moving entities by dragging. We create a new script (in this case picker.js) which will then get attached to the element which we want to move with the mouse.
Prerequisites
- Create a new PlayCanvas project.
- Import
ammo.js. Go to the settings in the bottom-left corner and then to "Physics". Click "IMPORT AMMO" - Create a new script down at the asset section. I called mine
picker.js.
For beginners: I also made the following changes to my project setup before coding.
- Create a new material (choose a color under "Diffuse") and drag it onto the plane for better visibility.
- Remove the box entity and add a sprite entity instead.
- Give the sprite entity a sprite and a script component (add
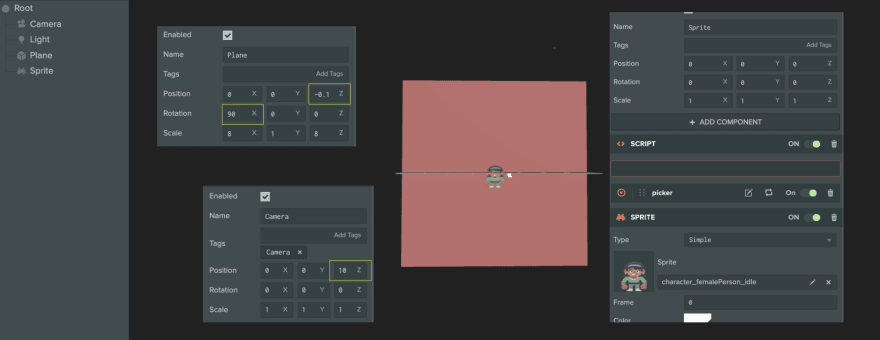
picker.js). - Move and rotate all entities according to the following picture.
Register mouse events
First we need to register the mouse events for dragging and dropping. This means pressing the mouse button, moving the mouse and also releasing the mouse button. Within picker.js we add the following code.
var Picker = pc.createScript("picker");

Picker.prototype.initialize = function() {
    // Used for selecting an entity
    this.app.mouse.on(pc.EVENT_MOUSEDOWN, this.onMouseDown, this);
    // Moving an entity
    this.app.mouse.on(pc.EVENT_MOUSEMOVE, this.onMouseMove, this);
    // Dropping an entity
    this.app.mouse.on(pc.EVENT_MOUSEUP, this.onMouseUp, this);
};
Find scene camera
Next we need to find the camera of the scene for the ray-casting in the next step. Add the following function to the script.
Picker.prototype.findCamera = function() {
    var cameraEntity = pc.app.root.findByName('Camera');

    if (cameraEntity) {
        return cameraEntity;
    }
};
Call the new function from within Picker.prototype.initialize.
Picker.prototype.initialize = function() {
    ...
    this.cameraEntity = this.findCamera();
    // console.log(this.cameraEntity);
};
Uncomment the console.log to check if everything is working so far.

Pick an entity
For this example we use collision picking to determine which entity was clicked. Therefore we firstly need to add a collision component to our sprite. Select the sprite and click on "ADD COMPONENT" and then "Collision". Set "Half extends" to 0.5, 0.5 and 0.1.

Then we initialize the following two variables in our initialize function:
Picker.prototype.initialize = function() {
    ...
    this.pickedEntity = null;
};
Next we define the first function from our mouse events - onMouseDown(). Add the following code within picker.js.
Picker.prototype.onMouseDown = function(event) {
    // Raycast startpoint
    var from = this.cameraEntity.camera.screenToWorld(event.x, event.y, this.cameraEntity.camera.nearClip);
    // Raycast endpoint
    var to = this.cameraEntity.camera.screenToWorld(event.x, event.y, this.cameraEntity.camera.farClip);
    // The actual raycasting
    var result = pc.app.systems.rigidbody.raycastFirst(from, to);

    if (result && result.entity) {
        this.pickedEntity = result;
        // console.log(this.pickedEntity);

        this.initialPosition = this.pickedEntity.entity.getPosition().clone();
        // Map the position of the entity in scene to the position on screen
        var worldToScreen = this.cameraEntity.camera.worldToScreen(this.initialPosition);

        // The offset from the clicked position of the entity to the center of the entity
        this.offset = new pc.Vec3().sub2(worldToScreen, event);
    }
};
The offset is later needed to prevent the dragged entity's center to 'snap' to the cursor.
Adding the offset later on back to the position allows to drag the entity by the point of the raycast hitting rather than the entities center.
Uncomment the console.log to check if the raycast was successful.

Dragging
After picking our entity we now need to move it as soon as we move the mouse. Add the following code to your picker.js.
Picker.prototype.onMouseMove = function(event) {
    if (this.pickedEntity) {
        // The distance between the camera and the dragged entity stays always the same
        var zDistance = this.cameraEntity.getPosition().z - this.initialPosition.z;
        // Get the new position adding the offset calculated before
        var pos = this.cameraEntity.camera.screenToWorld(event.x + this.offset.x, event.y + this.offset.y, zDistance);
        // Set the sprite to the new position
        this.pickedEntity.entity.setPosition(pos);
    }
};
Note how we check for this.pickedEntity since we want the code to fire only if an entity is selected and not on EVERY mouse move.
Dropping
Finally add the following function to drop the picked entity on releasing the mouse button. Make sure you set this.pickedEntity to null.
Picker.prototype.onMouseUp = function(event) {
    this.pickedEntity = null;
};
Result
Aaaand finished. Now you can drag and drop your sprite over the screen.
Links
- See the full project here: https://playcanvas.com/project/689317/overview/2d-drag--drop-example
- I used a sprite by KENNEY. Get the full pack here: https://kenney.nl/assets/toon-characters-1
Feedback
Spotted a mistake or got some feedback on the code? Leave a comment or reach out to me on Twitter. I would love to here from you 😊


Top comments (1)
Nice tutorial i like playcanvas