สมัยนี้ใครๆ ใช้ Type กำกับข้อมูลกันหมดแล้วถ้าทำทั้ง API และ UI ก็จะคุมข้อมูลได้ง่ายขึ้น เลยบันทึกไว้สักหน่อย ผมจะยกตัวอย่าง FastAPI ซึ่งเป็น Python และ VueJS 3 ที่ใช้ TypeScript
ตัวอย่าง
mrchoke/ui-api-datatype-exmaple
API
อย่างที่เกริ่นไว้ฝั่ง API ผมจะใช้ FastAPI เป็นตัวอย่าง ซึ่งจะเขียนง่ายๆ ด้วย app ยอดฮิตคือ Notes List (TODOs) ซึ่งฝั่ง API จะทำหน้าที่หลักๆ คือ
- create
- update
- delete
- get
ติดตั้ง FastAPI
อ่านฉบับเต็มจะเข้าใจมากขึ้น
สร้าง Virtual Environment สำหรับพัฒนา
python3 -m venv fastapi-example-type-api.env
Active evnv
source fastapi-example-type-api.env/bin/activate
ติดตั้ง package
pip install fastapi
สร้าง Directory สำหรับพัฒนา API
mkdir fastapi-example-type-api
ถ้าใช้ VSCode ตอนนี้สามารถเปิดด้วยคำสั่ง
code fastapi-example-type-api
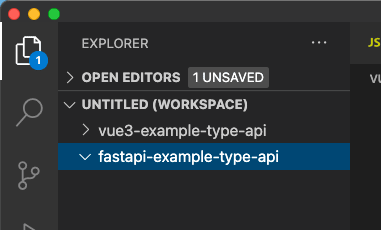
หรือถ้าจะเปิดเป็นส่วนหนึ่งของ Workspace ที่เปิด UI ไว้ก่อนแล้วก็สามารถทำได้โดยการ Click ขวาบน Sidebar Explorer ของ VSCode ดังรูป (หรือจาก menu file ก็ได้)

หลังจากนั้นก็จะได้ Workspace หน้าตาแบบนี้สามารถ save เก็บไว้ได้เลย
เริ่มเขียน API
สร้าง main.py
from fastapi import FastAPI

app = FastAPI()

@app.get("/")
def read_root():
    return {"Hello": "World"}
โดยปกติถ้าเรายังไม่เคย config python มาก่อน VSCode จะถามว่าจะปรับแต่งสภาพแวดล้อมสำหรับ python ไหม เช่นติดตั้ง plugin ต่างๆ เลือก interpreter เป็นต้น สำหรับผมจะเลือก interpreter โดยระบุให้ชี้ไปยัง venv ที่สร้างไว้ ถ้ามันไม่ยอมเปลี่ยนตามก็ต้องบังคับบ้าง เช่น บน mac เครื่องผมไม่ยอมใช้ใน venv ถ้า linux นี่คิดว่าไม่น่ามีปัญหาแต่ถ้ามีปัญหาก็ให้สร้าง .vscode ใน project แล้วสร้าง settings.json
{
  "python.pythonPath": "../fastapi-example-type-api.env/bin/python3"
}
สังเกตมุมด้านซ้ายล่าง ต้องชี้ไปที่เราสร้างเท่านั้นไม่งั้น vscode ก็จะมั่วไปหมด :P

เมื่อจัดการเรียบร้อยก็ลอง run api ที่สร้างไว้เมื่อกี้ ซึ่งระหว่าง dev เราก็จะใช้ uvicorn เป็น dev server ระวังนะติดตั้งใน venv ที่สร้างไว้ด้วยนะครับ
pip install uvicorn
หลังจากนั้นก็ start
uvicorn main:app --reload
ปกติถ้าไม่ระบุ port ก็จะได้ 8000 ลองเปิดใน browser
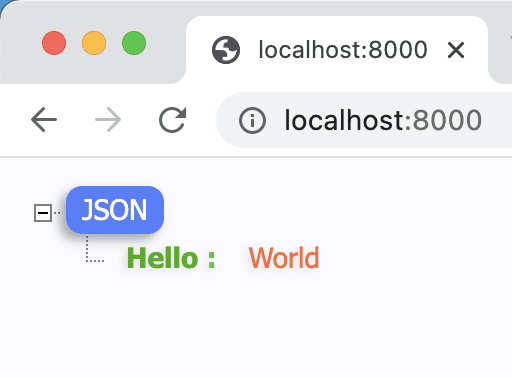
FastAPI จะมีตัวช่วยในการทดสอบ api ของเราซึ่งสามารถเข้าได้ด้วย url
http://localhost:8000/docs


ลองศึกษาเพิ่มเติมกันดูยิ่งแนะนำบทความยิ่งยาว ฮาๆ
สร้าง class model สำหรับกำหนด Types ของข้อมูลที่เราจะใช้
models.py
from pydantic import BaseModel

class NoteIn(BaseModel):
    """ Insert """
    text: str
    completed: bool

class NoteUp(BaseModel):
    """ Update """
    id: int
    completed: bool

class NoteDl(BaseModel):
    """ Delete """
    id: int

class Note(NoteIn):
    """ Get """
    id: int
Database
ผมจะใช้ SQLAChemy + encode/databases (ตามคู่มือ FastAPI)
ติดตั้ง (ผมใช้ sqlite เป็นตัวอย่างเพื่อความสะดวก)
pip install databases[sqlite]
สร้าง database connection และ schema
Async SQL (Relational) Databases - FastAPI
db.py
import databases
import sqlalchemy
from pydantic import BaseModel

#DATABASE_URL = "mysql://user:passwd@sever/db?charset=utf8mb4"
DATABASE_URL = "sqlite:///./todos.db"

database = databases.Database(DATABASE_URL)

metadata = sqlalchemy.MetaData()

notes = sqlalchemy.Table(
    "notes",
    metadata,
    sqlalchemy.Column("id", sqlalchemy.Integer, primary_key=True),
    sqlalchemy.Column("text", sqlalchemy.String(255)),
    sqlalchemy.Column("completed", sqlalchemy.Boolean),
)

engine = sqlalchemy.create_engine(
    DATABASE_URL, connect_args={"check_same_thread": False}
)
metadata.create_all(engine)
ถ้าใช้ mysql หรือ ตัวอื่นไม่ต้องใส่ connect_args={“check_same_thread”: False}
เชื่อม db.py เข้ากับ main.py
from fastapi import FastAPI
from db import database

app = FastAPI()

@app.get("/")
def read_root():
    return {"Hello": "World"}

@app.on_event("startup")
async def startup():
 await database.connect()

@app.on_event("shutdown")
async def shutdown():
 await database.disconnect()
สำหรับใครที่ใช้ SQLAlchemy มาก่อนอาจจะงงๆ ว่าทำไมต้อง connect database สองรอบ ผมใช้
เป็นต้วช่วยในการจัดการ query ซึ่งดูแล้วมันง่ายดี และเป็น async / await ด้วย
code ข้างบน เมื่อ import มาแล้วก็ทำการใช้ event ของ FastAPI จัดการ start / shutdown database
ตอนนี้เราควรจะมี file todos.db ถูกสร้างขึ้นมาใน directory

สร้าง router สำหรับ CURD
ก่อนอื่นเราต้อง import table schema และ model ที่สร้างไว้มาก่อน
from db import database, notes
 from models import Note, NoteIn, NoteDl, NoteUp
ด้านบนผม import มารอไว้ก่อนจริงๆ แล้วถ้าเขียนจริง import เท่าที่ใช้นะครับ
CREATE
@app.post("/ notes /", response_model=Note )
async def create_note( note: NoteIn ):
    query = notes.insert().values(text=note.text, completed=note.completed)
    last_record_id = await database.execute(query)
    return {note.dict(), "id": last_record_id}
route แรกคือเราจะสร้าง notes ด้วย method POST ส่งค่ามาสองค่าตาม model NoteIn คือ
- text
- completed
แล้วทำการ insert เข้าไปใน table notes และ return กลับไปด้วยการแปะ id ที่ได้มาจาก insert
เมื่อ save แล้วหน้า docs ควรจะเป็นแบบนี้

ซึ่งเราจะเห็นว่า api ของเราต้องการข้อมูลประเภทไหน โครงสร้างเป็นอย่างไร และ ตอบกลับไปแบบไหน ลองกด Try it out และ กรอกข้อมูลเพื่อเพื่อทดสอบ

ข้อมูลแรกผมลองใส่
{
  "text": "กินข้าว",
  "completed": true
}
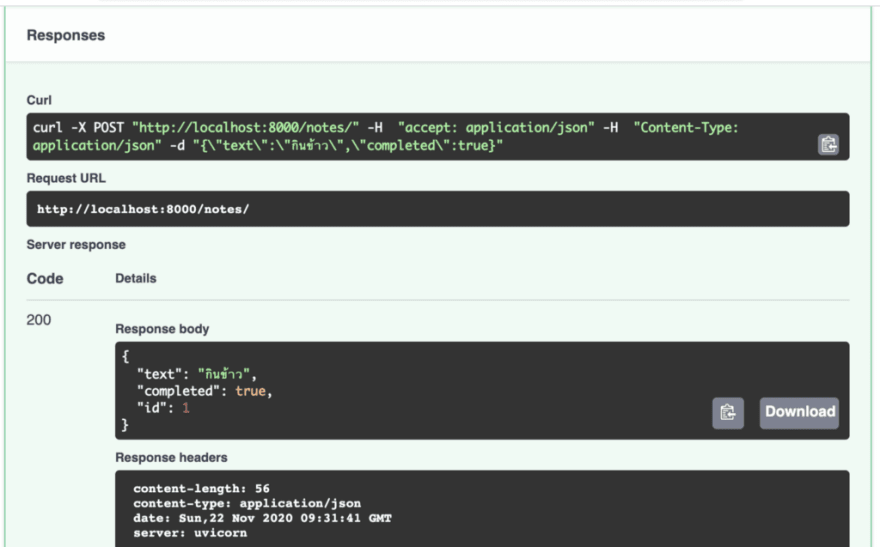
เมื่อเรากดส่งค่าถ้าไม่มีอะไรผิดพลาดควรจะมีการตอบกลับจาก api ดังรูปด้านบน ซึ่งจะมี ID 1 กลับมาด้วย
ถ้าดูทาง SQLite ก็ควรจะเห็นข้อมูลดังนี้

มาถึงตอนนี้เป็นนิมิตหมายที่ดีว่าทุกอย่างทำงานถูกต้อง เราก็เพิ่ม ในส่วนอื่นๆ ต่อเลย
from fastapi import FastAPI
from typing import List
from db import database, notes
from models import Note, NoteIn, NoteDl, NoteUp

app = FastAPI()

@app.get("/")
def read_root():
    return {"Hello": "World"}

@app.on_event("startup")
async def startup():
    await database.connect()

@app.on_event("shutdown")
async def shutdown():
    await database.disconnect()

@app.post("/notes/", response_model=Note)
async def create_note(note: NoteIn):
    '''Create Note'''
    query = notes.insert().values(text=note.text, completed=note.completed)
    last_record_id = await database.execute(query)
    return {**note.dict(), "id": last_record_id}

@app.put("/notes/")
async def update_note(note: NoteUp):
    '''Update Note'''
    print(note,flush=True)
    query = notes.update().values(completed=note.completed).where(notes.c.id == note.id)
    id = await database.execute(query)
    return id

@app.delete("/notes/")
async def delete_note(note: NoteDl):
    '''Delete Note'''
    print(note,flush=True)
    query = notes.delete().where(notes.c.id == note.id)
    id = await database.execute(query)
    return id

@app.get("/notes/", response_model=List[Note])
async def read_notes(showCompleted: Optional[bool] = False):
    '''Get Note'''
    query = notes.select()
    if not showCompleted:
        query = query.where(notes.c.completed == False)
    return await database.fetch_all(query)
หน้า Docs ก็จะมีหน้าตาแบบนี้

ลอง Create Update ลบ และ Get ดูนะครับ ซึ่งสามารถทดสอบส่งข้อมูลไม่ตรงกับ Type ที่กำหนด ดูนะครับว่ามี error ไหม
UI
มาทาง UI กันบ้าง
Types
ก่อนอื่นเลยก็กำหนด Types เตรียมไว้เลย (ผมใช้ Project จากบนความที่แล้วซึ่งเป็น Vue 3 นะครับ)
ลองเล่น Vuejs 3 + TailwindCSS 2.0
สร้าง src/types/Notes.ts
export interface NoteIn {
  text: string
  completed: boolean
}

export interface NoteUp {
  id: number
  completed: boolean
}

export interface NoteDl {
  id: number
}

export interface Note extends NoteIn {
  id: number
เมื่อเปรียบเทียบกับทางฝั่ง API

จะเห็นว่าใกล้เคียงกันมาก ทางฝั่ง typescript อาจจะประกาศเป็น class ก็ได้
Dev Server Proxy
vue.config.js
devServer: {
    disableHostCheck: true,
    proxy: {
      '^/api/': {
        target: 'http://localhost:8000',
        changeOrigin: true,
        pathRewrite: {
          '^/api': '/'
        }
      }
    }
  }
การกำหนด proxy จะทำให้การพัฒนาง่ายขึ้น แต่ตอน deploy เราต้องกำหนด proxy ของ production ชี้มาที่เดียวกันด้วยตัวอย่างของผมคือ /api นั่นเอง
สร้าง Component สำหรับจัดการ Notes
<template>
  <div class="h-100 w-full flex items-center justify-center bg-cyan-50">
    <div class="bg-white rounded shadow p-6 m-4 w-full">
      <div class="mb-4">
        <h1 class="text-2xl">งาน</h1>
        <div class="flex mt-4">
          <input
            type="text"
            v-model="newNotes.text"
            [@keyup](http://twitter.com/keyup).enter="saveNote"
            class="m-2 focus:ring-cyan-500 focus:border-cyan-500 block w-full border-cyan-300 rounded-md sm:text-sm"
            placeholder="งานใหม่"
          />
          <input
            type="checkbox"
            v-model="newNotes.completed"
            class="text-cyan-500 mt-3 rounded focus:border-cyan-500 focus:ring-cyan-500 border-cyan-300 h-8 w-8"
          />
          <button
            :disabled="newNotes.text.length < 1"
            [@click](http://twitter.com/click)="saveNote()"
            class="btn ml-2"
            :class="newNotes.text.length > 1 ? 'btn-info' : 'border border-gray-200'"
          >
            เพิ่ม
          </button>
        </div>
      </div>
      <div>
        <nav class="bg-gray-50">
          <div class="w-full my-2 pr-3 pb-2">
            <div class="flex">
              <div class="ml-2">
                <button [@click](http://twitter.com/click)="fetchNotes()" class="focus:border-0 mt-3 text-cyan-500 group-hover:text-cyan-800 focus:ring-0">
                  <span>
                    <svg class="h-6 w-6 focus:border-0" xmlns="[http://www.w3.org/2000/svg](http://www.w3.org/2000/svg)" fill="none" viewBox="0 0 24 24" stroke="currentColor">
                      <path
                        stroke-linecap="round"
                        stroke-linejoin="round"
                        stroke-width="2"
                        d="M4 4v5h.582m15.356 2A8.001 8.001 0 004.582 9m0 0H9m11 11v-5h-.581m0 0a8.003 8.003 0 01-15.357-2m15.357 2H15"
                      />
                    </svg>
                  </span>
                </button>
              </div>
              <div class="flex-1"></div>
              <div class="flex-shrink">
                <label class="mx-1">
                  <input
                    type="checkbox"
                    v-model="showCompleted"
                    class="text-cyan-500 rounded focus:border-cyan-500 focus:ring-cyan-500 border-cyan-300 h-6 w-6"
                  />
                  แสดงงานทั้งหมด
                </label>
              </div>
            </div>
          </div>
        </nav>
      </div>
      <div v-if="notes.length > 0">
        <div class="flex mb-4 items-center" v-for="note in notes" :key="note.id">
          <p class="w-full text-md" :class="note.completed ? 'line-through text-gray-400' : ''">{{ note.text }}</p>
          <input
            type="checkbox"
            v-model="note.completed"
            [@click](http://twitter.com/click)="updateNote({ id: note.id, completed: !note.completed })"
            class="text-cyan-500 mt-0 rounded focus:border-cyan-500 focus:ring-cyan-500 border-cyan-300 h-9 w-9"
          />
          <button [@click](http://twitter.com/click)="deleteNote({ id: note.id })">
            <span class="flex items-center pl-3">
              <svg
                class="h-9 w-9 text-red-500 group-hover:text-red-400"
                xmlns="[http://www.w3.org/2000/svg](http://www.w3.org/2000/svg)"
                fill="none"
                viewBox="0 0 24 24"
                stroke="currentColor"
              >
                <path
                  stroke-linecap="round"
                  stroke-linejoin="round"
                  stroke-width="2"
                  d="M19 7l-.867 12.142A2 2 0 0116.138 21H7.862a2 2 0 01-1.995-1.858L5 7m5 4v6m4-6v6m1-10V4a1 1 0 00-1-1h-4a1 1 0 00-1 1v3M4 7h16"
                />
              </svg>
            </span>
          </button>
        </div>
      </div>
      <div v-else>ไม่มีงาน</div>
    </div>
  </div>
</template>

<script lang="ts">
  import { defineComponent, ref, reactive, onMounted, watch } from 'vue'
  import axios from 'axios'
  import { Note, NoteUp, NoteIn, NoteDl } from '@/types/Notes.ts'

export default defineComponent({
    name: 'Notes',
    setup() {
      const notes = ref<Note[]>([])
      const newNotes = reactive<NoteIn>({ text: '', completed: false })
      const showCompleted = ref(false)

const fetchNotes = () => {
        axios.get(`/api/notes/?showCompleted=${showCompleted.value}`).then((res) => {
          notes.value = res.data
        })
      }

const saveNote = () => {
        if (newNotes.text.length > 0) {
          axios.post('/api/notes/', newNotes).then((res) => {
            console.log(res.data)
            newNotes.text = ''
            newNotes.completed = false
            fetchNotes()
          })
        }
      }

const updateNote = (note: NoteUp) => {
        axios.put('/api/notes/', note).then((res) => {
          console.log(res.data)
          fetchNotes()
        })
      }

const deleteNote = (id: NoteDl) => {
        axios.delete('/api/notes/', { data: id }).then((res) => {
          console.log(res.data)
          fetchNotes()
        })
      }
      onMounted(() => {
        fetchNotes()
      })

watch(showCompleted, () => {
        fetchNotes()
      })
      return {
        notes,
        fetchNotes,
        newNotes,
        saveNote,
        updateNote,
        deleteNote,
        showCompleted
      }
    }
  })
</script>

<style></style>
เพิ่ม router
src/router/index.ts
import Notes from '../views/Notes.vue'
const routes: Array<RouteRecordRaw> = [
  ...
  {
    path: '/notes',
    name: 'Notes',
    component: Notes
  }
...
]
เพิ่ม Link ใน Menu src/App.vue
const menus = [{ name: 'Home' }, { name: 'About' }, { name: 'Notes' }]

หน้าเริ่มต้นจาก code ด้านบน

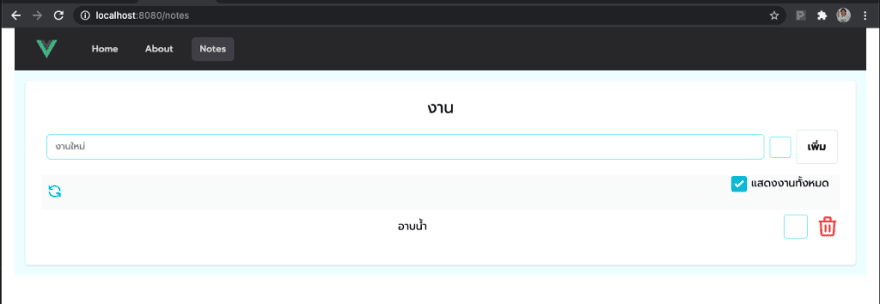
เพิ่มงานใหม่

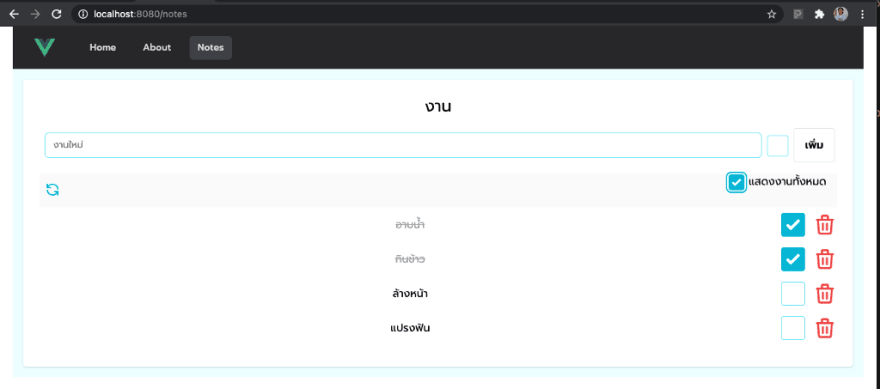
ลองแกะๆ ทำความเข้าใจกันดูนะครับ ช่วง UI ไม่ได้บรรยายไว้ มัวแต่นั่งเล่น tailwindCSS จนปวดหลังไปหมด T_T

Top comments (0)