
EDIT: As of 2023-02-09, Twitter's API is no longer Free. This article is no longer an effective way to learn coding or develop new skills. I am so sad because Twitter bots are one of the first ways I had fun writing code.
This article will stay up only because it's my first, and it marks an important part of my career change.
RIP Shania Bot.
- Pj
So, you’ve got a bot, and you want it to run for longer than the time you run it in your terminal to make sure it works, but you’re not sure what to do. Do you deploy to AWS? GCP? Azure? Turn your laptop on and keep it running there forever and ever and ever and just never close your terminal?

If those sound tricky, or like it might eat up your electric bill (or just your bills in general), then you’ve come to the right place! I’ve got three alternatives to traditional cloud providers to talk to you about: Render, Heroku, and Linode. These three services can give you a variety of options when it comes to where you want your code to run from and how you want it to be deployed.
NOTE: I am new to tech and programming, likely similar to you if you’re checking this article out. This article is more like “sharing what I’ve learned recently” than “expert giving you advice on how to deploy.” The only thing I can confidently say is that I have done all the things I’m telling you in this article, so at the very least, we’re in the same boat. So join me in discovering these providers and what they can do to help us run bots that post Super Nintendo music or Taking Back Sunday songs.

Render
Render is the one I’m newest to, but I’m already loving the options I have to run code here. There’s an impressive amount of options for services they provide, but I’m most interested in Cron Jobs for my bots. Cron Jobs requires a credit card, HOWEVER I am pretty sure this will end up costing about 75 cents a month. If cost is an issue, there are free ways to run bots on Render, but this article is talking about a paid one (albeit a cheap one). Let’s talk about what we have here.
Cron Jobs
My bots are usually written such that they are always on and any functions that make them tweet at a certain time are written with a cron job or schedule package like node-schedule. In fact, my bots in Javascript are only possible with the node-schedule package. And I’m so new to Python that I haven’t found a great way to recreate that package correctly. Granted, I’ve been doing this work as a hobby, so I’m sure there’s a way to do it, but I only have so much time between all my super cool other hobbies, so we’ll just say I’m a bad programmer and move on.

This is why I was so excited to find a GUI interface on Render that makes Cron Jobs way easier than I ever thought they could be. AND it works out of the box with GitLab. So let’s talk about how to Cron Job your bot.

You can sign up for an account with a GitLab, Google, or GitHub account or with an email and password of your choice. I signed up using GitLab since I’ll be using GitLab repos to provide the code for these web services. After allowing Render to connect to your account, you’ll verify with an emailed link, and then it’s time to choose your service!


Select Cron Job and then connect it to a specific repo. You’ll probably be asked to connect to your GitLab account again and then you should see a list of projects available. Select the one with your bot in it. Let’s talk about these options you’re given on the next page.

First off, name your Cron Job. This will be so you can distinguish it from the other services you may have on Render. The same name as your repo will be ok. For the environment, I‘m selecting Python3 since that’s what my bots need in order to run. Select a region you prefer. I always pick one closest to me, but it’s not a huge decision. Select the branch that will run when your cron job fires; in my case main is the best choice. This dropdown is based on the branches you have in your connected repo. The next line is automagically filled in based on your environment selected. Since we picked Python3, pip install -r requirements.txt is filled in here. You know what this means, right?

That means you need a requirements.txt file in your repo somewhere, and it needs to list the dependencies for your project. A good way of knowing what the dependencies are is to check what you imported at the beginning of your python file. For my bots, I need Tweepy, config, and Python-dotenv Requirements.txt looks like this for Divas, my Twitter Bot Collection.
tweepy
python-dotenv
config
After that comes the actual schedule for your cron job. This means you need to know how to format a cron job. This is the exact moment where I google “How to run a cron job command” so I can know what to say to you. I’ll be back soon.

Ok, after a quick google search and about 40 minutes of being distracted by Tik-Tok, here’s how to format cron expressions.
Cron expressions are a way of expressing a certain schedule of sorts. It is certainly more complicated than I’m going to make it here, but let’s talk about what you need to know. The expression consists of six to seven fields separated by white space that indicate the schedule. There are certain characters that represent different values for these fields and it’s important to know at least a few of them. Here’s an example of a cron expression that represents on Tuesdays at 12:47:15 pm UTC.
15 47 12 ? * TUE *
So, from this we can tell that the first number is seconds, the second number is minutes, the next is hours, but then we have a question mark. And an asterisk. The question mark is in the “day of month” or “date” field. A question mark means “no specific value” while the asterisk means “all possible values.” This is sort of like the difference between “doesn’t matter” and “every time.” So, that question mark means the day of the month isn’t important because two fields later we define the day to fire as “TUE” meaning Tuesday. The asterisk in the fifth field, the month field, means every month. And the final asterisk is the year field, and that too means every year. There are other special characters you can learn about here and for those of you who are like me and just want to be able to pick from a generator to make your cron expression, here you go!
So, now that you’re a cron expression expert like me, input when you want your job to fire in the next space on the form. NOTE: I noticed that the cron expression for Render is only five fields long. I’m not sure what it excludes, but I do know that when you input your expression, directly underneath it tells you in English when the run command will happen. That's super helpful, thanks Render!
The last thing you put in is the run command, which in my case is python3 bot_file.py. This runs the file as the main file and will execute whatever is in the file.
The final step is deciding which plan you’re going to need. This ranges from 512 MB of RAM for 0.016¢/min to 8GB for 0.405¢/min. For our bots, we only need the tiniest amount since it’s just running one Python file.
There is a button for advanced options, with options like environment variables or secret files. These are both great ways for us to keep our Twitter API keys hidden, so it’s suggested that you utilize these in order to keep your bots from getting hacked. Click the button at the bottom to create your cron job!
From here, you’ll be able to see your build, and once it succeeds you can test it with the Trigger Run button at the top right of the page. Note: Twitter API limits exact duplicates of tweets twice in a row in 24 hours, so if you test your bot twice in a row, you’ll get an error the second time.
Heroku
One great way to host your code is Heroku. Heroku is free until November 2022, and more information about student plans should be coming soon. You can set up an account here.
Heroku operates off of what they call Dynos. Each Dyno is like a place for your code to run the same way it does on your local machine. In order to do that, we're going to create a dyno, give it some instructions, and finally connect our code repository in GitLab to the Dyno on Heroku.
Let's go!
New Heroku app
Go ahead and create a new app in Heroku once you're logged in. Name it and turn it on! Something important to do here is add a procfile to your repo. These docs will help you do that, but really all you need to include is worker: npm startas a single line in a file called procfile. In the resources tab, you'll need to make sure worker not web is selected. Often this isn't there at first. When you have the procfile and deploy the first time, the option should show up and then you can turn off web and turn on worker. This stack overflow answer was helpful when I was figuring this out.
Once you've done so, there's some instructions on how to deploy. If you're using Github, you can connect your repo to this and make it so when your main branch is updated, the code pushes to Heroku! Another method is to use the CLI (command Line Interface) and manually deploy your code. You're going to follow the instructions provided by Heroku to deploy your code! First, you should add your keys as environment variables to Heroku.
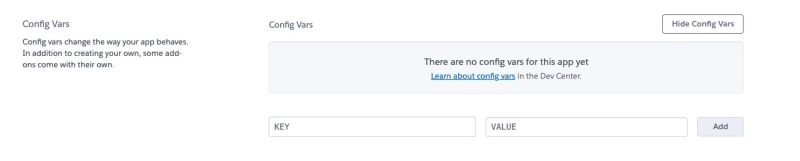
Find the settings tab, and then click the "config vars" button. Just like you did in Render, you’ll add the key name and the value here. This way, your project has access to your keys and can post to the twitter account!
NOW, Heroku has your keys, your repository is up to date, and you are ready to go. The instructions provided by Heroku will tell you how to get started, but the page itself also has some CLI instructions. These are the instructions from the app page about how to deploy to heroku using the command line.
Install the Heroku CLI
Download and install the Heroku CLI.
Type the following into the command line once it's installed to log in and follow the prompts on screen.
$ heroku login
Existing Git repository
For existing repositories, simply add the heroku remote by entering the following into the command line inside the local repository folder.
$ heroku git:remote -a name-of-dyno
In your terminal when you're ready to push to heroku, type git push heroku main. If the remote is setup correctly, it should start a new version on heroku and deploy your code!
Advanced method
This article has more information for using GitLab CI/CD to automatically deploy your code to Heroku. It's exactly what I used when I set up my CI/CD for my bots, so I will just link to it here since it did a much better job than I could at explaining the process.
Linode
Linode is a great option, it essentially works like a virtual machine where you can run your code. It’s the expensive option here, but is still cheap at $5/month. The reason I like Linode is because of how similar it is to running on your local machine and the process for putting your files on Linode feels very straight foward once you have the right app.
After signing up for a Linode account, the home page will look like this.
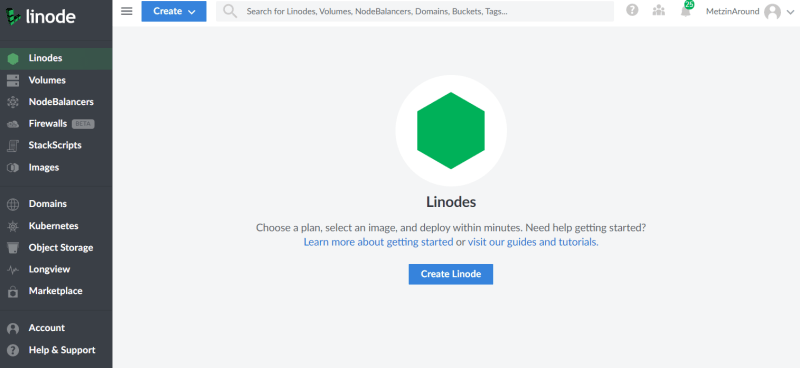
Create a Linode, and pick Ubuntu’s most recent version (or your preferred version) from the first dropdown menu. Select the region closest to you and then choose Nanode, the smallest option. It’s only $5 a month and has more than enough space and RAM for your Twitter bot and any other projects you’d want on it. When it asks for an Ubuntu label, name it after your project. Create a root password and click create. Make sure to remember the root password as you’ll have to use it every time to get into the Linode.
Once it boots up it’s time to get inside and clean up a bit.
Installing, Updating, and Preparing for the bot.
Linode provides a LISH console to use to access your Linode. On the top right of the Linode homepage, you’ll see a link for “Launch LISH Console.”
Click that and you have access to the Ubuntu instance you just created. You can also SSH into it from any terminal using the SSH access text just below the LISH.
Once you’re in, you should run “apt update” to check for updates available, and then “apt dist-upgrade.” It's recommended to make a new username for Linux so you're not running everything through the root, but in this case, all you're doing is a Twitter bot, so it's not hugely important. If you'd like to do it the right way, you can run make a new user and give it admin rights by following this video.
If your code is on Github, you can use git to clone your file, or you can use the GUI interface of Filezilla to transfer your code to the Linux instance. Since this is a beginner tutorial, let’s use Filezilla to transfer our files.

Using Filezilla
Here's how Filezilla looks once you open it.
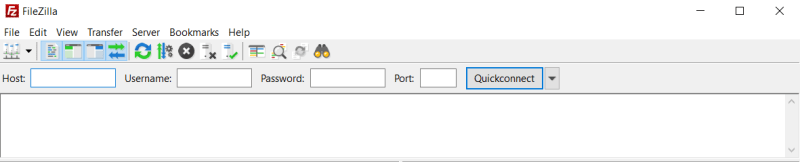
Inside Filezilla, you can see input fields for Host, Username, Password, and Port. Host is the IP Address for your nanode, username should be "root" or whatever username you set up earlier, and password is what you set at the beginning. Use “22” as the port number. Upon connecting, you’ll get a message saying the key is unknown. This is normal, but you should double-check that the IP Address is correct. If it is, check the box to remember your Linode on Filezilla.
Go to the directory where you’re keeping the files for your Twitter bot. You’ll need the .env, config.js, the package.json, package-lock.json, the node_modules folder, and the index file for your bot. My index file is called snes.js. The files I’m moving over are highlighted in the following picture.

Once you highlight the files you want to transfer, you can click and drag your files to the right where you can see your Linux machine's files. Once you’ve transferred the files, you can use the LISH console or any terminal with an SSH connection to run your bot the same way you would from a terminal in Visual Studio Code. Type "npm run develop" and your code will start up using the .env variables you set up earlier. This makes the bot run and it will continue running on the server as long as the server remains uninterrupted.
Thanks
There’s three great options for hosting bots! Let me know in the comments which one is your favorite or any other options you might have!

Top comments (0)