
There is nothing new in saying that startups leverage Big Data and AI to develop more innovative business models. As a result, Big Data and AI matters have been ubiquitous in executive and technical forums. But they have often been discussed at such a high level that folks end up missing details on such companies' building blocks.
In this blog post, I’ll cover one of the modern companies’ most valuable building blocks: the ability to process data in real-time, which enables data-driven decision-making in industries like retail, media & entertainment, and finance. For example:
- Behavior and purchase analysis enable better-targeted offerings and recommendations on the fly, providing customers with a more personalized experience.
- Leads tracking drives sales teams to focus on the most efficient marketing channels instead of spending time with the less performant ones.
- Expenditure patterns analysis enables financial institutions to detect fraud before it happens, effectively preventing losses.
But what if the company you work for is not in the real-time data era? First of all, you are not alone. Many companies still process data in batch jobs, which may imply 1, 7… 30 days of analytic data latency. It happens with companies of all sizes but does not mean there are no low-hanging fruits if the company aims to take a step further.
One might think a company would need significant engineering effort to assemble a real-time analytics pipeline, including modernizing transactional systems and setting up an event streaming platform, but it is not always the case. Change Data Capture (aka CDC), for instance, brings a painless approach for moving data around, especially from transactional databases to data lakes. I’m going to demonstrate how it works in a moment.
What is Change Data Capture?
By definition, Change Data Capture is an approach to data integration that is based on the identification, capture, and delivery of the changes made to enterprise data sources (source: Wikipedia). It addresses problems related to moving data safely, reliably, quickly, and consistently around the enterprise. A common characteristic of most Change Data Capture products is to have a low impact on the source databases, especially those that rely on log scanning mechanisms.
Change Data Capture serves a variety of purposes:
- Minimal effort data streaming triggered by transactional database changes.
- Real-time database replication to support data warehousing or cloud migration.
- Real-time analytics enablement as data is transferred from transactional to analytic environments with really low latency.
- Enable database migration with zero downtime.
- Time travel log recording for debugging and audit purposes.
There are many Change Data Capture solutions out there. Debezium is probably the most popular open-source solution, frequently used with Apache Kafka to enable event streaming. HVR has been available for over a decade and is still under active development. It can be deployed in the leading cloud providers, but I wouldn’t say it’s a cloud-native solution as it requires a thorough setup. Arcion and Striim, on the other hand, are newer technologies that have cloud and self-hosted deployment models.
At this point, I guess you are wondering how Change Data Capture works, so let’s see some hands-on stuff.
A hands-on guide to Change Data Capture using Arcion
For illustration purposes, think about a retail company that has plenty of invoice data in its transactional environment and is not leveraging such data to make informed decisions. They aim to invest in data analytics but their on-premises data center would not support such additional workloads, so they decided to evaluate more appropriate cloud solutions – starting from Snowflake. They want to unlock analytic capabilities with the least development effort possible, given they are still evaluating cloud offerings. Real-time database replication has a good fit for this use case.
I will need some retail invoices to demonstrate how it works, and there are a couple of sample retail datasets freely available on Kaggle. I’m going to use Online Retail II UCI as it will work well for our purposes and easily allow us to use the raw data to create a one-to-one copy of the data into our data lake, created in Snowflake. This would effectively create a bronze layer approach to our data lake.
MySQL will be used as the source. It is a widely used, yet, easy-to-set-up relational database, so most people will follow what I am doing and might be able to replicate the steps with other databases.
Snowflake will be used as the target data warehouse due to its huge presence in the market. Almost half of the Fortune 500 use it (source: Snowflake Fast Facts 2022 Report) and, again, readers might be able to replicate the steps with other data warehouses.
I’m also going to use Arcion because it offers cloud-native deployment options along with OLTP and data warehouse connectors support, resulting in a straightforward setup process.
MySQL setup
- Create the source database
CREATE DATABASE arcion_cdc_demo;
USE arcion_cdc_demo;
- Create the source table
CREATE TABLE IF NOT EXISTS transactions (
  transaction_id BIGINT NOT NULL AUTO_INCREMENT,
  invoice VARCHAR(55) NOT NULL,
  stock_code VARCHAR(55) NOT NULL,
  description VARCHAR(255),
  quantity DECIMAL(9,3) NOT NULL,
  invoice_date DATETIME NOT NULL,
  price DECIMAL(10,2) NOT NULL,
  customer_id DECIMAL(9,1),
  country VARCHAR(255),
  PRIMARY KEY (transaction_id)
);
- Create a user for replication matters
CREATE USER `cdc-replication-agent`@`%`
  IDENTIFIED WITH mysql_native_password BY `<password>`;
- Grant the user only the minimal required privileges
GRANT REPLICATION SLAVE, REPLICATION CLIENT
  ON *.*
  TO `cdc-replication-agent`@`%`;

GRANT SELECT
  ON arcion_cdc_demo.transactions
  TO `cdc-replication-agent`@`%`;
- Allow external network access to MySQL (port 3306 by default)
This step depends on the infrastructure that hosts the MySQL server and is detailing it is out of scope oth the present blog post. If external network access is not allowed for any reason, please consider setting up Arcion’s Replicant agent in the MySQL network instead of using Arcion Cloud.
- Load data into the source table
LOAD DATA LOCAL INFILE '/tmp/online_retail_II.csv'
  INTO TABLE transactions
  FIELDS TERMINATED BY ','
  OPTIONALLY ENCLOSED BY '"'
  IGNORE 1 ROWS
  (invoice, stock_code, description, quantity, invoice_date, price, @customer_id, country)
  SET customer_id = NULLIF(@customer_id, '');
- Set Binary Log format to ROW
You will also need to ensure that the MySQL instances Binary Logging format (binlog_format) is set to ROW in order to support CDC with Arcion. This can be done many ways depending on how and where the instance is deployed. Here is an example of how to do it when running MySQL on Amazon RDS.
Snowflake setup
- Create the target database
CREATE DATABASE demo;
USE demo;
- Create the target schema
CREATE SCHEMA arcion_cdc;
USE demo.arcion_cdc;
- Create the target table
CREATE TABLE IF NOT EXISTS transactions (
  transaction_id NUMBER,
  invoice VARCHAR(55),
  stock_code VARCHAR(55),
  description VARCHAR(255),
  quantity NUMBER(9,3),
  invoice_date TIMESTAMP_NTZ(9),
  price NUMBER(10,2),
  customer_id NUMBER(9,1),
  country VARCHAR(255)
);
- Create a role and a user for replication matters
CREATE ROLE dataeditor;

CREATE USER cdcreplicationagent
  PASSWORD = '<password>';

GRANT ROLE dataeditor
  TO USER cdcreplicationagent;

ALTER USER IF EXISTS cdcreplicationagent SET DEFAULT_WAREHOUSE = COMPUTE_WH;

ALTER USER IF EXISTS cdcreplicationagent SET DEFAULT_ROLE = dataeditor;
- Grant the role with the required privileges
GRANT DELETE, INSERT, SELECT, UPDATE
  ON TABLE demo.arcion_cdc.transactions
  TO ROLE dataeditor;
GRANT ALL PRIVILEGES ON WAREHOUSE COMPUTER_WH TO ROLE dataeditor;

GRANT CREATE DATABASE ON ACCOUNT TO ROLE dataeditor;
Arcion Cloud CDC setup
With our data source and target created, we will now log into Arcion Cloud to set up our replication pipeline to enable CDC. You can sign up and log into Arcion here.
Once logged into Arcion Cloud, we will land on the Replications screen. Here, we will click on the New Replication button in the middle of the screen.

Next, we will select our replication mode and write mode. A few options are available to suit your needs. For replication modes, Arcion supports:
- Snapshot (the initial load)
- Full (snapshot + CDC)
For write modes, Arcion supports:
- Replacing
- Truncating
For our purposes here, we will select the replication mode as Full and the write mode as Truncating. You will also see that I have named the replication “MySQL to Snowflake”.

Once the Name is populated and the Replication and Write Modes are selected, click Next at the bottom of the screen.

We are then brought to the Source screen. From here we will click the Create New button.

We then will select MySQL as our source.

And then scroll to the bottom of the page and click Continue.

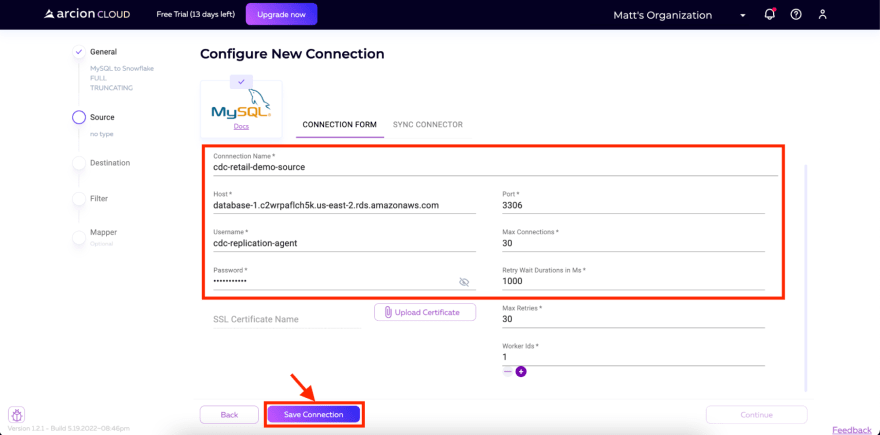
Now, we can add in our MySQL instance details. These details include:
- Connection Name
- Host
- Port
- Username
- Password
All other fields will be defaulted. For username and password we will use the users created in the script we ran earlier against our MySQL instance.
Once the connection is saved, we will want to pull in the schema from the database. On the next page, we will be prompted to click the Sync Connector button. Click the button and Arcion Cloud will connect to our MySQL instance and pull down the schema.

Once completed, the UI in Arcion Cloud will display the retrieved schema. Then we will click Continue in the bottom right corner of the screen to move to the next step.

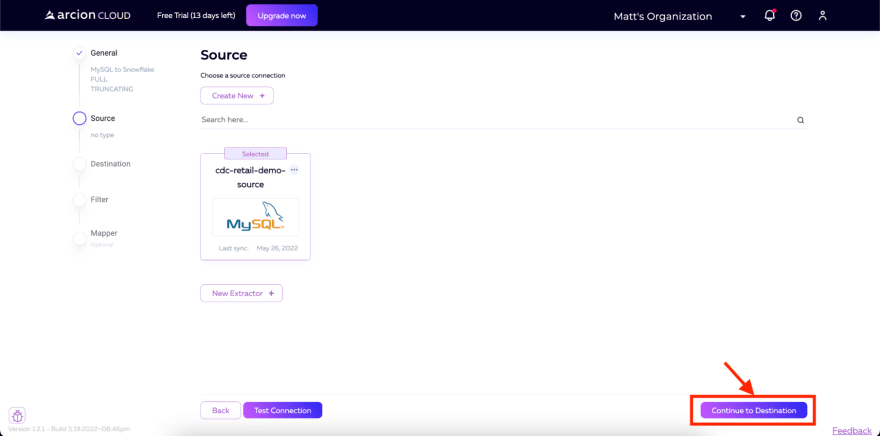
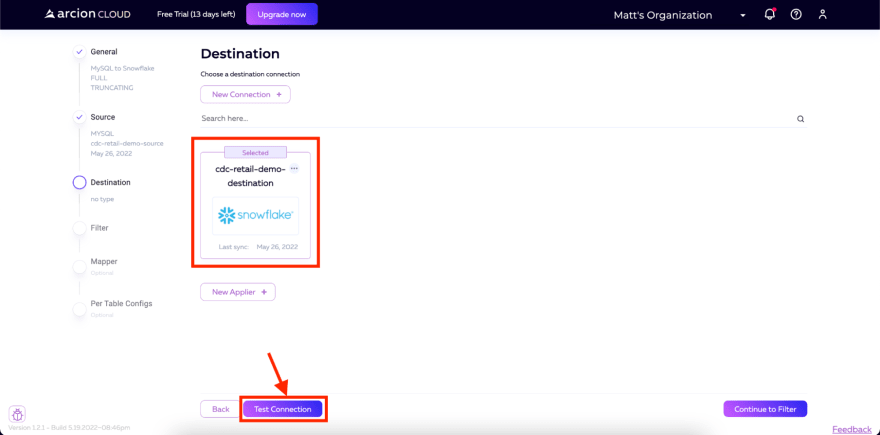
We now have our data source correctly configured. This will be displayed on the next screen as well as a Test Connection button. To ensure that everything is working correctly, we will click the Test Connection button.

The results should look like this once the test is done running. You can click the Done button to exit.

With our test successful, we can now click Continue to Destination in the bottom right corner of the screen to move to the steps where we set up our destination.
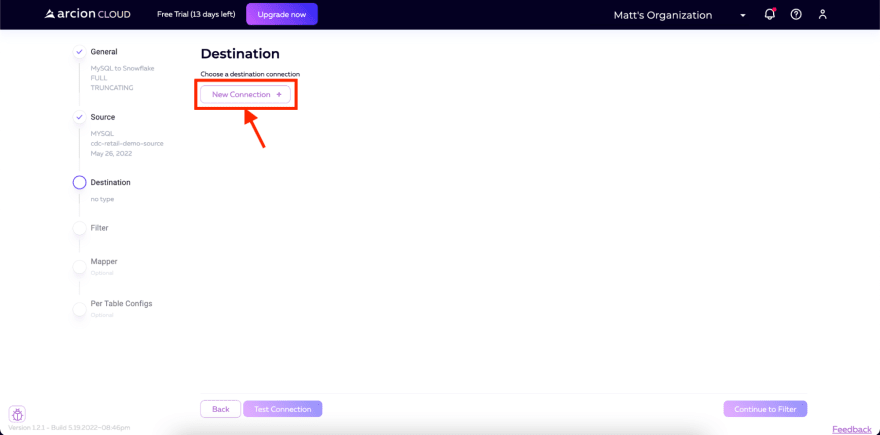
On the Destination screen, we will click New Connection to start the set up of our Snowflake connector.
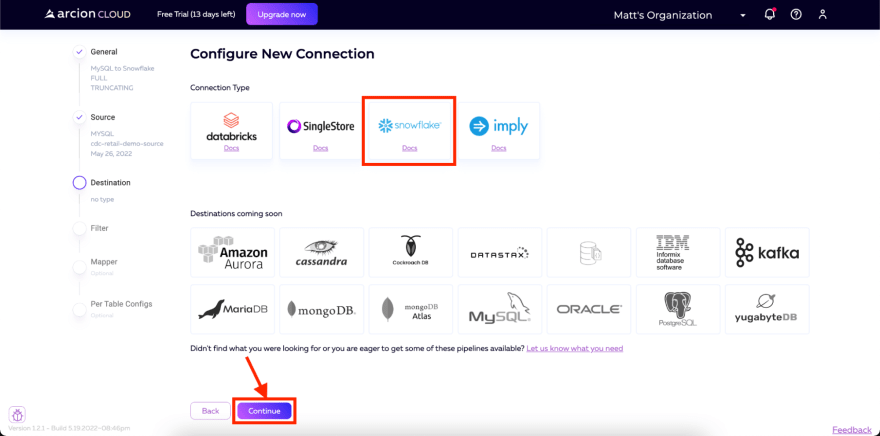
Then, select Snowflake as your Connection Type and click Continue.
On the next screen, input your connection details. These details include:
- Connection Name
- Host
- Port
- Username
- Password
All other fields will be defaulted. For username and password we will use the users created in the script we ran earlier against our Snowflake instance.

On the next screen, we will sync the connector. Click Sync Connector and wait for the process to complete.

Once complete, you will see the schema loaded onto the screen. We can then click Continue in the bottom right corner of the screen.

Our last step in configuring the connection with Snowflake is to test the connection. We will click the Test Connection button and wait for the results to return to Arcion Cloud.
You should see that all tests have passed to make sure Arcion has access to everything required in order to create the connection.
Note: if Host Port Reachable does not pass, ensure that you have not included “https://” on the URL for your Snowflake connection. This can cause that check to error out.

Now, we can click Continue to Filter to begin the Filter configuration for our pipeline.

On the Filters screen, we will check the Select All checkbox so that all of our tables and columns will be replicated over from the source to the destination.

Optionally you can also click on the Map Tables and Per Table Configs (Applier Configuration Docs, Extractor Configuration Docs) buttons to add further configuration. For our purposes, we will leave these as their default values. After this, you will click Start Replication.

The replication will then begin.

Once the initial data is loaded, the pipeline will continue to run, monitor for changes, and apply those changes to the destination. The idle pipeline will still show RUNNING in the top right of the screen but will show a row replication rate of 0 until new data is written to the source. You’ll also notice that the Phase description of the pipeline will now show Change Data Capture instead of Loading Snapshot Data.

If we start adding data to the MySQL instance (for example, by running our load script again) we will see that Arcion detects this and will then sync that data over to Snowflake in real-time.

What’s next?
With that, we have successfully set up a CDC-enabled data pipeline with Arcion. Our initial data from MySQL has been synced over to Snowflake and future data will be moved over to Snowflake in real-time.
The nature of this real-time data movement into Snowflake can power many use cases which require instant access to data that is in sync with one or multiple data sources or primary databases. For retail enterprises, near-instant inventory and supply chain management, better customer experience, and product recommendations can now be powered by this pipeline and the data that is instantly synced over to Snowflake. This new functionality is unlocked in a matter of a few clicks.
Arcion Cloud allows us to set up these pipelines in a matter of minutes, with minimal configuration, and minimal support and maintenance once the pipeline is running. To get started, sign up for an Arcion Cloud account (free 14-day trial) to create and use CDC-enabled data pipelines.

Top comments (0)