Most often you start out learning Terraform using your own computer for both running Terraform and for storing your state file (i.e. the local backend). You could move the state to a backend in the cloud, perhaps an Azure storage account, and you can run Terraform in a CI/CD environment, perhaps GitHub Actions. There is another option available for Terraform: Terraform Cloud.
Terraform Cloud is a cloud platform specifically for running Terraform, and it works very well when you collaborate within a team, or between many teams.
This lesson covers all of part 9 of the Terraform Certified Associate exam curriculum. This part of the curriculum is outlined below:
| Part | Content |
|---|---|
| 9 | Understand Terraform Cloud capabilities |
| (a) | Explain how Terraform Cloud helps to manage infrastructure |
| (b) | Describe how Terraform Cloud enables collaboration and governance |
The certification exam does not go into much detail of Terraform Cloud, so in this lesson I will just highlight the main parts of what this cloud platform offers.
Terraform Cloud
Like the name suggests, Terraform Cloud is a platform for running Terraform in the cloud.
There are a number of features that make this platform attractive when working in a team or when collaborating among several teams. In this section I will go through a few of the most prominent features.
To illustrate some of the features I have created a new public GitHub repository at https://github.com/mattias-fjellstrom/terraform-cloud-sales-application. This is a simple application consisting of two Terraform files. The main part of the configuration is contained in main.tf:
terraform {
  required_providers {
    azurerm = {
      source = "hashicorp/azurerm"
    }
  }
}

provider "azurerm" {
  features {}
}

resource "azurerm_resource_group" "rg" {
  name     = "rg-sales-application-${var.environment}"
  location = "West Europe"
}

resource "azurerm_storage_account" "stg" {
  name                     = "stgsalesapp${var.environment}"
  resource_group_name      = azurerm_resource_group.rg.name
  location                 = azurerm_resource_group.rg.location
  access_tier              = "Hot"
  account_tier             = "Standard"
  account_kind             = "StorageV2"
  account_replication_type = var.account_replication_type
}
I have also defined two variables in a separate file named variables.tf:
variable "account_replication_type" {
  type = string
}

variable "environment" {
  type = string
}
When you sign up for Terraform Cloud the first thing you must create is an organization. This is the main container for everything you do in Terraform Cloud.
In your Terraform Cloud organization you can create projects. A project is a container for workspaces. Projects are a relatively new feature of Terraform Cloud (as of 2023), so they might not appear in the certification exam just yet.
Each organization has at least one project, known as the default project. Each workspace you create must belong to a project. In the following image we can see that I have two projects, one named Default Project1 and one named Sales Application:

A workspace is an instance of your application. A workspace has a Terraform configuration, and a given set of values for your variables, among other things. When you create a workspace you choose a type of workflow. There are three kinds available:
- Version control workflow. This workflow is connected to a git repository where your Terraform configuration is stored and runs can be triggered through pull-requests and merges. This is probably the most common workflow type.
- CLI-driven workflow. In this workflow you trigger runs using the CLI from your local computer or from a deployment pipeline.
- API-driven workflow. In this workflow you use the Terraform API to trigger runs, this is a more advanced use-case where you want to integrate Terraform into a larger pipeline of some sort.
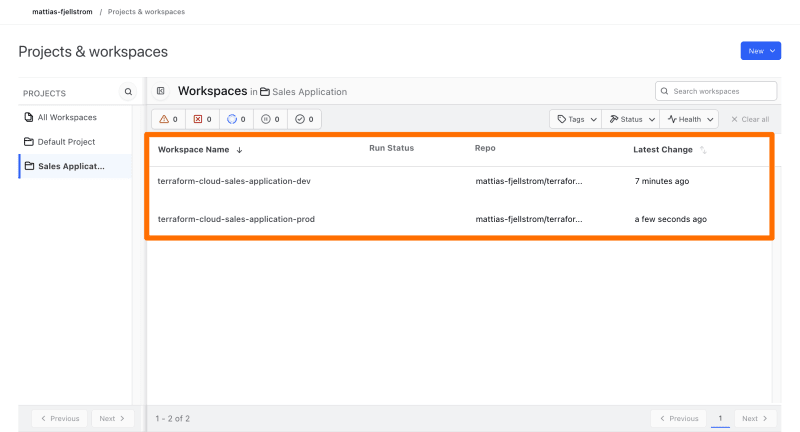
I will create two workspaces that are both connected to my git repository I mentioned previously. I create one workspace for a development environment, and another workspace for a production environment:
For each environment I configure the values for my Terraform variables that I have defined in variables.tf, these variables are named environment and account_replication_type. Apart from those two variables I also configure environment variables for authenticating to Azure to be able to create resources in my Azure subscription2. Variables allow me to customize the workspace for a given environment I want to create:

Once I have configured my workspace I can trigger a run. You can configure when Terraform should run, e.g. when there is a new commit, or trigger on every commit, etc. In this case I trigger a manual run via the UI:

We can see that Terraform has run terraform plan for us and it is currently waiting for me to approve the plan before it proceeds to terraform apply. This behavior can also be configured, for your production environment you might want to require explicit approvals while in a development environment you do not.
Once I approve the plan I can follow the progress of my resources being created:

On the workspaces page I get a good overview of what is happening in my workspaces. In the following image I can see that the production workspace is currently being applied, and there is a small lock icon indicating that the state for this configuration is in a locked state:

While we are on the topic of state, the state file is stored in Terraform Cloud automatically unless I explicitly specify a different backend block in my configuration. I can inspect my state file, and each version of my state file, in Terraform Cloud:

This has been a short demonstration of how Terraform is run in Terraform Cloud. If you are a single developer using Terraform Cloud you might not notice the benefits, but as your team grows it will require more coordination and then the overview and administration possibilities provided by Terraform Cloud is of great help.
Other capabilities
There are much more you can do with Terraform Cloud. I will list just a few of these features below.
Teams
I can set up teams and administer access to projects and workspaces using these teams. This allows you to set up a governance structure for your organization.
Registry
I can publish my own Terraform modules and providers to my Terraform Cloud organization, allowing users in my organization to safely access them. You can think of this as your own private Terraform registry built into Terraform Cloud.
Run triggers
You can set up rules that automatically trigger a run in a workspace after another workspace had a successful run.
Sentinel
You can integrate your Terraform Cloud environment with Sentinel. Sentinel is Hashicorp's policy-as-code framework. This allows you to set up governance around what types of resources can be created and how these are allowed to be configured. Sentinel uses HCL, just like Terraform. This is an advanced topic, but you might see Sentinel being mentioned in questions related to Terraform Cloud on the exam.
Summary
In this lesson we looked at what Terraform Cloud is, and the various capabilities that it offers. In summary we learned:
- The highest scope in Terraform Cloud is an organization, which in turn contains one or more projects, which in turn contains zero or more workspaces.
- An organization has at least one project, the default project.
- We can connect a Terraform Cloud workspace to a git repository and trigger runs on commits to this repository.
- We can configure values for Terraform variables and environment variables in a workspace.
As I mentioned above, when I did the certification exam there was hardly any question concerning Terraform Cloud. If you do not feel like signing up for a Terraform Cloud account and experiment then you will most likely be fine as far as the certification exam is concerned. But I do recommend trying out this platform because it works very well!
This has been the last part of my certification course. For anyone who has gone through this course I hope it has been useful, and I hope that the relatively short extent of this course lessens your worry about the certification exam, because it is relatively easy to pass!
-
You can rename the default project to something more meaningful. ↩
-
Details about how you authenticate to Azure can be found in the
azurermprovider documentation, note that there are several different ways of authenticating to Azure. In my case I used a service principal with a client secret. ↩

Top comments (0)