
I recently stumbled on the new Magic authentication service, which offers a straightforward solution for handling passwordless authentication in web applications. Magic has an example in its documentation that demonstrates how to use it in a typical full-stack Node.js app with Express and Passport, but I wanted to see how easy it would be to use it to authenticate users with a GraphQL API backed by Apollo Server.
After some research and experimentation, I managed to get a basic working example up and running. In this post, I'll show you how to integrate Magic-based authentication with Apollo Server, as well as NeDB to store user data.
In this tutorial, we will:
- Create a Magic account and obtain API keys
- Set up Express, Apollo Server, and NeDB
- Use Magic's Node.js Admin SDK and its browser SDK to handle user authentication
- Create custom middleware to parse tokens from Magic and forward the information contained within to the Apollo Server context
- Add authorization to the API with GraphQL Shield
TL;DR You can find the complete code in this repo.
Sign Up for Magic
Before we write any code, we'll need to create a Magic account to obtain API keys to use with our app. Magic has a free tier that allows up to 250 active users for your app and you don't need a credit card to sign up. You can create your new Magic account here: https://dashboard.magic.link/signup
The authentication flow you go through to create your Magic account will be exactly what users will experience when they authenticate with our demo app later on. In short, after entering your email into the sign-up form, you'll receive an email containing a link to log in. After you click the link, you can go back to the tab where you originally signed up and you'll see that you are now magically (sorry, I couldn't resist 😉) authenticated and can view the dashboard:
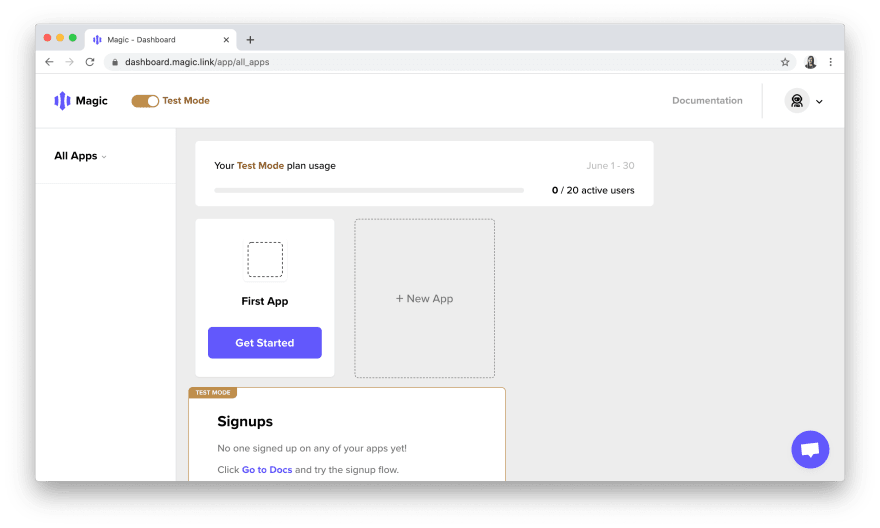
You'll see that there's already an app created in your account called "First App." Click the "Get Started" button to get its API keys:
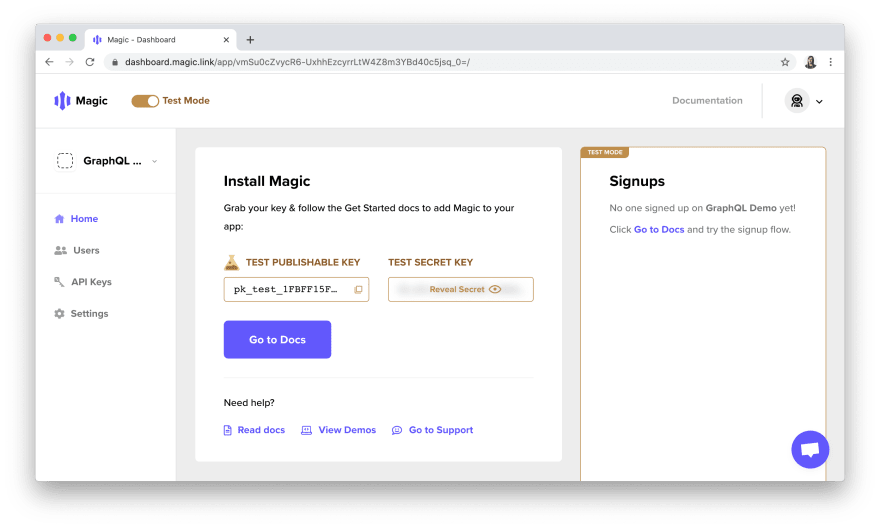
Tip! If you want to change the name of the app to something more relevant, then click on "Settings" in the lefthand menu and update the app name there:

It's important to pick a relevant app name because users will see this name in the email that they receive from Magic to log into the app.
Keep the test keys handy as we'll need to add them to a .env file shortly.
Installfest
Now that we have a Magic account, we can set up our project. We'll begin by creating a new directory for it:
mkdir graphql-magic-auth-demo && cd graphql-magic-auth-demo
Next, we'll create a package.json file:
yarn init --yes
Now we can install some initial dependencies:
yarn add @magic-sdk/admin@1.1.0 apollo-server-express@2.14.2 dotenv@8.2.0 \
esm@3.2.25 express@4.17.1 graphql@15.0.0 nedb-promises@4.0.3
Note: I ran into node-gyp errors when I tried installing the @magic-sdk/admin package with npm initially, but had no issues when I used Yarn.
We'll also install Nodemon as a development dependency:
yarn add -D nodemon@2.0.4
Here's what all of these packages will be used for:
-
@magic-sdk/admin: This is the library provided by Magic for Node.js that will allow us to leverage Decentralized ID Tokens to authenticate users with our GraphQL API. You can read more about its API here. -
apollo-server-express: To facilitate integrating Node.js middleware with our server, we'll use the Apollo/Express integration. -
dotenv: We'll use this package to load some Magic API keys as environment variables. -
esm: This package is a "babel-less, bundle-less ECMAScript module loader" that will allow us to useimportandexportin Node.js without any hassle. -
express: Again, we'll use Express to add some middleware to our server. -
graphql: Apollo requires this library as a peer dependency. -
nedb-promises: NeDB is a lightweight, MongoDB-like database that we'll use to store some metadata about users after they authenticate with Magic. Thenedb-promiseslibrary provides a promise wrapper for NeDB's callback-based CRUD methods. You can view the NeDB documentation here. -
nodemon: Nodemon will automatically reload our application when files change in the project directory.
Next, we'll create some subdirectories to organize our app's files:
mkdir config data graphql
We'll need files to create a new instance of Magic and a database store for our user metadata:
touch config/magic.js config/users.js
NeDB can be used as an in-memory or persisted database, but we'll opt for persisting the data in a users.db file in the data directory:
touch data/users.db
Next, we'll add some files to organize our API-related code:
touch graphql/resolvers.js graphql/typeDefs.js
And lastly, we'll need .env and index.js files in the root directory too:
touch .env index.js
The current directory structure will now look like this:
graphql-magic-auth-demo
├── config /
|   └── magic.js
|   └── users.js
├── data /
|   └── users.db
├── graphql /
|   └── resolvers.js
|   └── typeDefs.js
├── node_modules/
|   └── ...
├── .env
├── package.json
├── yarn.lock
Set Up Express and Apollo Server
With our Magic API keys and a scaffolded project directory ready to go, we can set up a basic GraphQL API using Apollo Server and Express and configure our database. Once these pieces are in place, we'll add a Magic-based authentication layer on top of them.
We'll begin by copying and pasting the secret key from the Magic dashboard into our .env file. We'll also set NODE_ENV and PORT variables:
MAGIC_SECRET_KEY=sk_test_XXXXXXXXXXXXXXXX
NODE_ENV=development
PORT=4000
To use Magic with our API, we'll need to instantiate a new Magic object from the Node.js Admin SDK. We'll do that in config/magic.js, passing our secret key into the constructor:
import { Magic } from "@magic-sdk/admin";

export default new Magic(process.env.MAGIC_SECRET_KEY);
Next, we'll create a Datastore to persist the user data in config/users.js:
import Datastore from "nedb-promises";
import path from "path";

export default Datastore.create({
  autoload: true,
  filename: path.resolve(__dirname + "/../data/users.db")
});
If you're familiar with MongoDB, then you can think of a NeDB Datastore as the rough equivalent of a collection. The CRUD methods we'll use on the Datastore object will closely resemble MongoDB's as well. We set autoload to true here to automatically load the users.db datafile upon creation.
Next, we'll create the initial type definitions for our GraphQL API in graphql/typeDefs.js:
import { gql } from "apollo-server-express";

const typeDefs = gql`
  type User {
    id: ID!
    email: String!
    lastLoginAt: String!
  }

  type Query {
    user(id: ID!): User!
    users: [User]
  }
`;

export default typeDefs;
Above, we have an object type called User that will represent a user account. We also add user and users queries to the schema to query a single user by their ID (which will correspond to their Magic token's "issuer" value) or the full list of all users.
We'll also add the corresponding resolvers for the schema in graphql/resolvers.js:
import { ApolloError, ForbiddenError } from "apollo-server-express";
import magic from "../config/magic";
import users from "../config/users";

const resolvers = {
  Query: {
    user(root, { id }, context, info) {
      return users.findOne({ issuer: id });
    },
    users(root, args, context, info) {
      return users.find({});
    }
  }
};

export default resolvers;
In this file, we import the users datastore object so we can call its findOne and find methods in our two query resolvers. Like MongoDB, the first argument to these methods is an object specifying the fields you wish to match on. An empty object will query all documents.
For the user query we search for a single user document using the id argument from the GraphQL query, which will correspond to the issuer field inside of the NeDB document.
Note that we also imported some predefined errors from Apollo Server and our magic object into this file to use in our resolvers later on.
With our type definitions and resolvers in place, we can scaffold our GraphQL API server with Apollo and Express in index.js:
import { ApolloServer } from "apollo-server-express";
import express from "express";

import resolvers from "./graphql/resolvers";
import typeDefs from "./graphql/typeDefs";

/* Express */

const port = process.env.PORT;
const app = express();

/* Apollo Server */

const server = new ApolloServer({
  typeDefs,
  resolvers
});

server.applyMiddleware({ app });

/* Kick it off... */

app.listen({ port }, () =>
  console.log(`Server ready at http://localhost:${port}${server.graphqlPath}`)
);
To start up the API, we'll update package.json by adding a scripts property with a dev script to start the application with Nodemon:
{
  // ...
  "scripts": {
    "dev": "nodemon -r esm -r dotenv/config index.js"
  }
}
We use the -r (or --require) flag when running Node.js to preload the esm and dotenv modules (as is required by the esm package). Now we can run yarn dev and see GraphQL Playground running at http://localhost:4000.
Get a Token from Magic
At this point, we've run into a bit of chicken-egg problem.
We can only obtain a DID token for a user from Magic using the loginWithMagicLink method from the auth module in their browser SDK. We'll need this token to send along with the Authorization header from GraphQL Playground (just as you would with a JSON web token).
However, we're only going to concern ourselves with building the back-end application in this tutorial and use GraphQL Playground as a client for testing purposes. But we can't obtain a DID token from Magic to test authenticating our API requests in GraphQL Playground unless we use their client-side library and go through their web/email authentication flow... 🤔
As a solution, we'll build a bare-bones login page that will allow us to sign up or login users through Magic. Once the new user is created in Magic, we'll render their DID token at this route so we can copy and paste it into GraphQL Playground. With this token in hand, we'll be able to create our own login mutation to handle the remainder of the sign-up and login process within the context of our application (i.e. add user-related data to NeDB).
We'll use EJS to create a template to render a login page at the /login route in our Express app:
yarn add ejs@3.1.3
Next, we'll create views directory in our app:
mkdir views
And a login.ejs file inside of it:
touch views/login.ejs
Now we'll add the following code to views/login.ejs:
<html>

<head>
  <title>GraphQL + Magic Demo</title>
  <meta charset="UTF-8" />
  <meta name="viewport" content="width=device-width, initial-scale=1" />
  <script src="https://cdn.jsdelivr.net/npm/magic-sdk/dist/magic.js"></script>
  <script>
    const magic = new Magic("<%= MAGIC_PUBLISHABLE_KEY %>");

    const render = async (token) => {
      let html;
      if (!token) {
        html = `
          <h1>Please sign up or login</h1>
          <form onsubmit="handleLogin(event)">
            <input type="email" name="email" required="required" placeholder="Enter your email" />
            <button type="submit">Send</button>
          </form>
        `;
      } else {
        html = `
          <h1>Token</h1>
          <pre style="white-space: pre-wrap; word-wrap: break-word">${token}</pre>
          <button onclick="handleLogout()">Logout</button>
        `
      }
      document.getElementById("app").innerHTML = html;
    };

    const handleLogin = async event => {
      event.preventDefault();
      const email = new FormData(event.target).get("email");
      if (email) {
        const didToken = await magic.auth.loginWithMagicLink({ email });
        render(didToken);
      }
    };

    const handleLogout = async () => {
      await magic.user.logout();
      render();
    };
  </script>
</head>

<body onload="render()">
  <div id="app">Loading...</div>
</body>

</html>
Note: I adapted the above code from the Magic's full-stack Node.js reference example.
This template loads the Magic Browser JS SDK and then uses a MAGIC_PUBLISHABLE_KEY variable (which we will define shortly in our .env file) to instantiate a new Magic object. We can then call the loginWithMagicLink method exposed in the magic object's auth module to sign up or log in a user when they submit their email address through the form.
For convenience's sake during testing, you can also log a user out by clicking the "Logout" button here once they're authenticated, but we'll eventually add a logout mutation to our GraphQL API that will handle this action as well.
Next, we'll update the .env file by copying and pasting the publishable key for this app from the Magic dashboard as the MAGIC_PUBLISHABLE_KEY variable:
MAGIC_PUBLISHABLE_KEY=pk_test_XXXXXXXXXXXXXXXX # NEW!
MAGIC_SECRET_KEY=sk_test_XXXXXXXXXXXXXXXX
NODE_ENV=development
PORT=4000
Now we can add the /login route to our Express app in index.js:
// ...

/* Express */

const port = process.env.PORT;
const app = express();

app.set("views"); // NEW!
app.set("view engine", "ejs"); // NEW!

app.get("/login", function (req, res) {
  res.render("login", {
    MAGIC_PUBLISHABLE_KEY: process.env.MAGIC_PUBLISHABLE_KEY
  });
}); // NEW!

// ...
We can now visit the login form at http://localhost:4000/login:
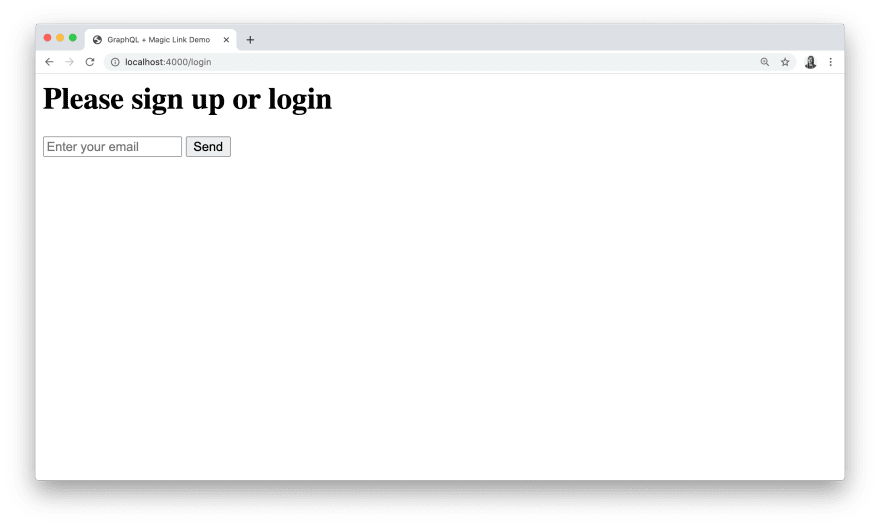
Enter your email into the form. You'll see that the authentication process for our app will work exactly like the one during our initial Magic account sign-up. After completing the Magic authentication process, we'll be able to see our token rendered at http://localhost:4000/login instead of the form:
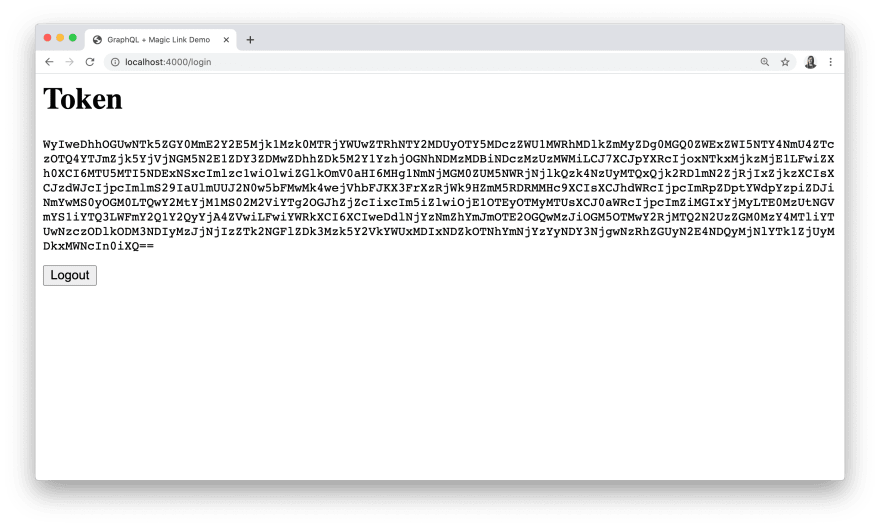
Now we can copy and paste this token to use in the Authorization header in GraphQL Playground, prefixing the value with Bearer and a single space:

This token may remind you of a JWT. Like a JWT, it's a Base64-encoded. However, instead of containing period-delimited header, payload, and signature sections, it's a tuple representing a proof and a claim. (I encourage you to take a look at the Magic docs for more details on DID tokens.)
One more important note! Magic tokens are only valid for 15 minutes, so you'll need to obtain a new token for use in GraphQL Playground whenever it expires.
Create Middleware to Process the Token and Add It to the Apollo Server Context
Now that we can obtain our new user's DID token from Magic and send it along with an API request, we need a way to handle the Authorization header once it reaches our server.
The Magic docs say that it's up to us to use the Admin SDK to validate the DID Token, so we'll create some custom Express middleware to do just that. Once we have validated the incoming token, we'll add the decoded user information to the req object on a user property. If you've ever used the express-jwt middleware, we're going to being coding something that roughly analogous to that for DID tokens.
First, we'll update our code in index.js with some new imports:
import { ApolloServer } from "apollo-server-express";
import { SDKError as MagicSDKError } from "@magic-sdk/admin"; // NEW!
import express from "express";

import magic from "./config/magic"; // NEW!
import resolvers from "./graphql/resolvers";
import typeDefs from "./graphql/typeDefs";

// ...
Next, after we create our Express app we'll add a didtCheck function to index.js that will serve as our DID token-checking middleware:
// ...

/* Express */

const port = process.env.PORT;
const app = express();

// ...

/* Magic Middleware */

const didtCheck = function (req, res, next) {
  if (!!req.headers.authorization) {
    try {
      const didToken = magic.utils.parseAuthorizationHeader(
        req.headers.authorization
      );
      magic.token.validate(didToken);

      req.user = {
        issuer: magic.token.getIssuer(didToken),
        publicAddress: magic.token.getPublicAddress(didToken),
        claim: magic.token.decode(didToken)[1]
      };
    } catch (error) {
      res.status(401).send();

      return error instanceof MagicSDKError
        ? next(error)
        : next({ message: "Invalid DID token" });
    }
  }
}; // NEW!

app.use(didtCheck); // NEW!

// ...
In the code above, we wrap our DID token-checking code in a conditional to see if an authorization header was sent. We don't want to throw an error here if a DID token wasn't sent in the header because we want to provide some unauthenticated access to our app (specifically, to the /login route and GraphQL Playground at /graphql).
But fear not! We will later add middleware to our GraphQL API that will check if users are authenticated and protect our API and user data on a per-query and per-mutation basis.
Inside the try/catch block, we first confirm that the DID token header is in the correct shape and extract the token value from the header using the parseAuthorizationHeader method (this method will throw an error the Authorization header value is not in the Bearer ${token} format).
Next, we validate the token using the Magic's validate method (it will also throw an error if the token is not authentic or it has expired) and add the valid token's user details to the req object under a user property.
We'll need to make one more update to index.js here to attach the req.user object to the Apollo Server context so we can access this user information inside of our resolver functions:
// ...

/* Apollo Server */

const server = new ApolloServer({
  typeDefs,
  resolvers,
  context: ({ req }) => {
    const user = req.user || null;
    return { user };
  } // NEW!
});

// ...
For reference, the user object we just attached to the context will have the following shape:
{
  issuer: 'did:ethr:0x56cc0c4eC95d...',
  publicAddress: '0x56cc0c4eC95dc6...',
  claim: {
    iat: 1591302692,
    ext: 1591303592,
    iss: 'did:ethr:0x56cc...',
    sub: 'ifKoHiIfQBv7L9l...',
    aud: 'did:magic:382fd...',
    nbf: 1591302692,
    tid: '0fe7f5a4-14c0-4...',
    add: '0x7e6636fabbf91...'
  }
}
The issuer field will be particularly useful to uniquely identify each user in our application.
Create Login and Logout Mutations
Our next step will be to create login and logout mutations. While we saw how to sign up and log in/out users using Magic's browser's SDK in login.ejs earlier, these mutations will handle authentication more generally in our application.
Specifically, when a user sends a login mutation with a valid DID token from Magic, we'll see if we can find a matching document in the database. If we can't, then we'll create a new document for the user in NeDB containing their issuer value, email address, and the time they last logged in. If the user already exists, we'll update their document with a current value for their last login time.
When logging out, we'll call the logoutByIssuer method provided by the Magic Admin SDK and return a boolean from the logout resolver.
First, we'll update our graphql/typeDefs.js file with the new mutations and a new AuthPayload type:
import { gql } from "apollo-server-express";

const typeDefs = gql`
  type AuthPayload {
    user: User
  } # NEW!

  type User {
    id: ID!
    email: String!
    lastLoginAt: String!
  }

  type Query {
    user(id: ID!): User!
    users: [User]
  }

  type Mutation {
    login: AuthPayload
    logout: Boolean
  } # NEW!
`;

export default typeDefs;
Next, we'll add the login resolver to graphql/resolvers.js:
// ...

const resolvers = {
  // ...
  Mutation: {
    async login(root, args, { user }, info) {
      const existingUser = await users.findOne({ issuer: user.issuer });

      if (!existingUser) {
        const userMetadata = await magic.users.getMetadataByIssuer(user.issuer);
        const newUser = {
          issuer: user.issuer,
          email: userMetadata.email,
          lastLoginAt: user.claim.iat
        };
        const doc = await users.insert(newUser);

        return { user: doc };
      } else {
        if (user.claim.iat <= user.lastLoginAt) {
          throw new ForbiddenError(
            `Replay attack detected for user ${user.issuer}}.`
          );
        }
        const doc = await users.update(
          { issuer: user.issuer },
          { $set: { lastLoginAt: user.claim.iat } },
          { returnUpdatedDocs: true }
        );

        return { user: doc };
      }
    }
  } // NEW!
};

export default resolvers;
The login mutation above extracts the user from the context and uses its issuer value to query the database for an existing user. If it can't find one, then it creates a new user document and returns an object in the shape of the AuthPayload type.
If a matching user document does exist, then we first check to make sure the time the DID token was issued at (the claim's iat value) is greater than the value of the last recorded login time saved in the database (to protect against replay attacks). If everything checks out, then we update the lastLoginTime in the user document to the claim's current iat value and return the document in the AuthPayload.
The logout mutation will be more straightforward to implement. We call Magic's logoutByIssuer method to do this and return true after its promise resolves:
// ...

const resolvers = {
  // ...
  Mutation: {
    // ...
    async logout(root, args, { user }, info) {
      try {
        await magic.users.logoutByIssuer(user.issuer);
        return true;
      } catch (error) {
        throw new ApolloError(error.data[0].message);
      }
    } // NEW!
  }
};

export default resolvers;
As a final update to the resolvers, we'll need to map the issuer field in the user document to the id field of the User type:
// ...

const resolvers = {
  User: {
    id(user, args, context, info) {
      return user.issuer;
    }
  }, // NEW!
    // ...
};

export default resolvers;
With this code in place, we can test our new mutations. First, we'll try testing login in GraphQL Playground. Be sure to obtain a fresh DID token from the /login route and add it to the "HTTP Headers" panel first:
mutation {
  login {
    user {
      id
      email
      lastLoginAt
    }
  }
}
Here's the mutation response:
{
  "data": {
    "login": {
      "user": {
        "id": "did:ethr:0x56cc0c4eC95dc69dC98752141B96D9f7fcF21f92",
        "email": "mandi@email.com",
        "lastLoginAt": "1591306801"
      }
    }
  }
}
In data/users.db, we should be able to see that a new user document was successfully added as well:
{"issuer":"did:ethr:0x56cc0c4eC95dc69dC98752141B96D9f7fcF21f92","email":"mandi@email.com","lastLoginAt":1591306801,"_id":"FlkUvCgHadAfiy79"}
We can also try running the logout mutation now:
mutation {
  logout
}
That mutation will provide the following response:
{
  "data": {
    "logout": true
  }
}
Now that we have some data in our database, we can also test out the users query too:
query {
    users {
    id
    email
    lastLoginAt
    }
}
Here's the query response:
{
  "data": {
    "users": [
      {
        "id": "did:ethr:0x56cc0c4eC95dc69dC98752141B96D9f7fcF21f92",
        "email": "mandi@email.com",
        "lastLoginAt": "1591306801"
      }
    ]
  }
}
Lastly, we can query a single user by the ID (i.e. their DID token's issuer value):
query {
  user(id: "did:ethr:0x56cc0c4eC95dc69dC98752141B96D9f7fcF21f92") {
    id
    email
    lastLoginAt
  }
}
And here's that query response:
{
  "data": {
    "user": {
      "id": "did:ethr:0x56cc0c4eC95dc69dC98752141B96D9f7fcF21f92",
      "email": "mandi@email.com",
      "lastLoginAt": "1591306801"
    }
  }
}
Lock Down the GraphQL API
Now that we can authenticate users using Magic and log them in and out within the context of our application, we need to protect the queries and mutations in our API so that only authenticated users can send these requests.
There are different schools of thought on how to add a permissions layer to a GraphQL API, but my go-to option is usually GraphQL Shield. I like this package because it offers an intuitive interface for adding authorization rules on a per-type or per-field basis and keeps these rules abstracted away from the type definitions and resolvers as a separate middleware layer.
We'll begin by installing that package along with graphql-middlware to our project:
yarn add graphql-middleware@4.0.2 graphql-shield@7.3.0
Next, we'll add a permissions.js file to the graphql directory:
touch graphql/permissions.js
In graphql/permissions.js, we'll add a rule to make sure that the authenticated user information has been successfully add to the Apollo Server context:
import { rule, shield } from "graphql-shield";

const hasDidToken = rule()((parent, args, { user }, info) => {
  return user !== null;
});
A GraphQL Shield rule has all of the same parameters as a resolver function, so we can destructure the user object from the context parameter as we would in a resolver, and then check that the user is not null, otherwise we will return false to throw an authorization error for this rule.
Next, we'll set the permissions for the types in our schema by calling the shield function in graphql/permissions.js:
import { rule, shield } from "graphql-shield";

const hasDidToken = rule()((parent, args, { user }, info) => {
  return user !== null;
});

const permissions = shield(
  {
    Query: {
      users: hasDidToken,
      user: hasDidToken
    },
    Mutation: {
      login: hasDidToken,
      logout: hasDidToken
    }
  },
  { debug: process.env.NODE_ENV === "development" }
); // NEW!

export default permissions; // NEW!
Alternatively, we could use a wildcard to set Query: { "*": hasDidToken } and Mutation: { "*": hasDidToken } inside the rules object passed into shield, but we may wish to set more nuanced rules for the various queries and mutations in the future so we'll opt for explicitly adding hasDidToken for each.
For our new permissions to have any effect, we'll need to add them as middleware to Apollo Server in index.js. Do that, we'll need to update the imports in that file as follows:
import { ApolloServer, makeExecutableSchema } from "apollo-server-express"; // UPDATED!
import { applyMiddleware } from "graphql-middleware"; // NEW!
import { SDKError as MagicSDKError } from "@magic-sdk/admin";
import express from "express";

import magic from "./config/magic";
import permissions from "./graphql/permissions"; // NEW!
import resolvers from "./graphql/resolvers";
import typeDefs from "./graphql/typeDefs";

// ...
As a final step, we'll need to add the permissions as middleware to our GraphQL API. Do do that, we'll do some slight refactoring, passing our typeDefs and resolvers into the newly imported makeExecutableSchema. Then we'll the schema property in the ApolloServer constructor to the return value of calling applyMiddleware with the schema and permissions as arguments (rather than passing the typeDefs and resolvers into the constructor directly):
// ...

/* Apollo Server */

const schema = makeExecutableSchema({ typeDefs, resolvers }); // NEW!

const server = new ApolloServer({
  schema: applyMiddleware(schema, permissions), // UDPATED!
  context: ({ req }) => {
    const user = req.user || null;
    return { user };
  }
});

server.applyMiddleware({ app });

// ...
If we go back and test our queries and mutations in GraphQL Playground now, we'll see that we get a "Not Authorised!" error if we try running any of them without a valid DID token submitted in the Authorization header.
Summary
In this tutorial, we built out a Node.js app using Express, Apollo Server, and NeDB. We also created a Magic account and used our API keys to add authentication to our GraphQL API.
To lock down our GraphQL API, we had to create some custom middleware to validate the DID token provided by Magic and then forward it on to the Apollo Server context. We also had to set up GraphQL Shield to add basic permissions-checking to our API using the decoded DID token.
You can find the complete code for this tutorial on GitHub.
As a final point to keep in mind, please note that I left out persisting any sessions on the server, which would likely be something you would want to consider in the context of a real app. Check out express-session and/or Passport for more guidance on this.
While putting tougher this tutorial, I found these resources particularly helpful and I'd encourage you to take a look too if you'd like to learn more about Magic authentication in Node.js apps:
- Magic Docs - Full Stack Node.js
- Magic Authentication For Passport JS
- Simple Auth Setup for Your React App
Photo credit: Sharon McCutcheon


Top comments (2)
This is a great and super helpful article. Thanks a lot!
Thanks, glad you enjoyed it!