Introduction
This article demonstrates how to register, login, and update the user data in SQLite. We perform CRUD operations with SQLite DB in Xamarin.Forms and can easily store and retrieve objects from the local database.
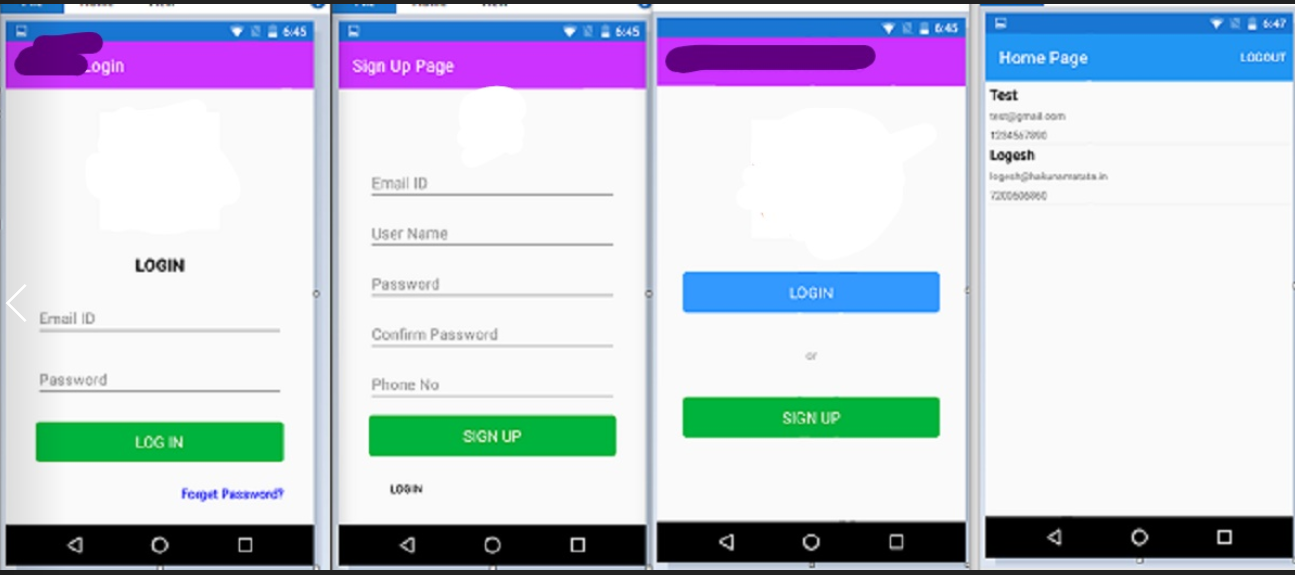
Output:
Prerequisites
- Visual Studio 2019
- This sample project is targeted only for Android and iOS.
Step 1:
You can create a new Xamarin.Forms application by going to File >> New and choose C# language. Then, select Xamarin.Forms App and click Create. In the next window, enter your application and solution name and then click the Create button to create the project.
(Eg: Project name —_ SqliteLoginDemo_)

Step 2:
After the project creation, add the SQLite Nuget Package to your project.
- Package Name: SQLite.Net-PCL
For that, open the Solution Explorer and select your Solution. Right-click and select "Manage NuGet Packages for the Solution." In the popup window, click navigate to the "Browse" tab and click browse "SQLite.Net-PCL" and select the following NuGet packages and select your project, then install it.
Step 3:
Now, add Interface named ISQLiteInterface in Shared Project. For that, go to Solution Explorer and right click to select Add >> Class and followed by select Interface and give name as ISQLiteInterface. and double click to open the interface class and this interface code is given below. One method is called ISQLiteConnection, which will return the database path connection from native applications.
Step 4:
Next, we are going to create a SQLite DB path in Android and iOS. For that, expand SqliteLoginDemo.Android project and create a class named ISQLiteDbInterface_Android.cs and also follow the same steps for iOS to create an interface named ISQLiteDbInterface_iOS.cs. The platform-specific code is given below. In the class, we add metadata code above the namespace because this class is derived for Dependency Service.
Android: ISQLiteDbInterface_Android.cs
IOS : __ISQLiteDbInterface_iOS.cs
Step 5:
Now, go to 'create a model' from the shared project. For that, go to Solution Explorer >> SQliteDemo(Shared) >> Right click and select Add >> class and give the class name and click Create. The class contains five fields, the first field is Primary key and AutoIncrement. The other fields are username, password, and phone number.
User.cs
Step 6:
After that, create another Helper class named UserDB.cs. In this class, we are creating a new private SQLiteConnection. The Interface return DB path is stored in this SQLiteConnection. The queries are written based on LINQ methods. There is no need to write SQL queries. The GetUser method will return all users from the database. The GetSpecificUser method passes an id parameter to return that specific user. The AddUser method will add the new user. If the user id already exists, it will return 'already exists.' The updateUser method is used for updating the existing user data like a forgotten user password. The deleteUser method is used to delete the specific user. The last one is LoginValidate
method, which is used to check if the user exists or not.
UserDB.cs
Step 7:
Finally, go to the UI design of the application. The app pages are Main Page, Login Page, Sign Up Page, Home Page. First, design the MainPage of the app. This page contains three visual elements.
1 — Image: This is the logo of the app
2 — Button: Login
3 — Button: Sign Up
This page code is given below.
MainPage.xaml
Step 7.1:
Now, open the code behind the main page. Add the following code. Here, we implemented a two-click event to navigate to another page.
MainPage.xaml.cs
Step 8:
After that, create another ContentPage named RegisterPage. This page contains different visual elements for registering or adding new user data to the database, and this design page consumes some user data validation behavior like email validation and password validation.
- Entry — Email Id
- Entry — User name
- Entry — Password
- Entry — Confirm Password
- Entry — Mobile number
- Button — Sign up
- Button — Login: If you already exist, go to Login Page RegistrationPage.xaml
Step 8.1:
Afterward, open the code behind RegisterPage. This class code is given below. In this page code, the logic is to check the database for whether the user is already registered or if you need to add a new user. If the user clicked the signup button, first check that the entered data is valid or invalid and then check the database for if the user is already registered or not. If the user is not registered, add the new user data, otherwise, it will return that user already registered.
RegistrationPage.xaml.cs
Step 9:
Next, create a new ContentPage named LoginPage. The LoginPage design contains different visual elements.
- Entry: Mail id
- Entry: Password
- Button: Validate entered data in the above field.
- Button: Forget Password
LoginPage.xaml
Step 9.1:
Now, open the code behind LoginPage, and this class implemented different event functions. The login event implementation checks whether the user Credentials are correct or not. If the user exists, go to the Home Page.
LoginPage.xaml.cs
Step 10:
In this step, create a new ContentPage named homepage. In this page, we designed a simple ListView to add the registered user data from the database, and this page code is given below.
HomePage.xaml
Step 10.1:
After that, open the code behind the home page. Here, we bind the user data from the database.
HomePage.xaml.cs
Output:

Conclusion
I hope you learned how to perform a CRUD operation using Xamarin.Forms. Find the full source code on GitHub. Thank you, and if you have any suggestions to improve my article, please comment.

Top comments (0)