Background
So I have been doing React for 8 months now and I can say with some confidence that I am comfortable in making and structuring React apps.
But, I was not sure If I can say that about Vanilla JS because I entered the world of Web development with React. So I had this epiphany to understand some basics and started a campaign for myself called 30-days-of-Vanilla-JS.
I strongly think that you learn by action and result oriented tasks so I keep looking for new mini-projects(1-4 hours) I can build.
State Management System similar to React.
It is Day 3 of this campaign and I want to build a state Management system similar to React but very bare-bones. But it should follow one-way data flow. I initially had very less clue how I would build it but as I went on it with it, it became easier.
We are going to take a simple app so that we can focus on state management system, so we will be building a todo App as show below
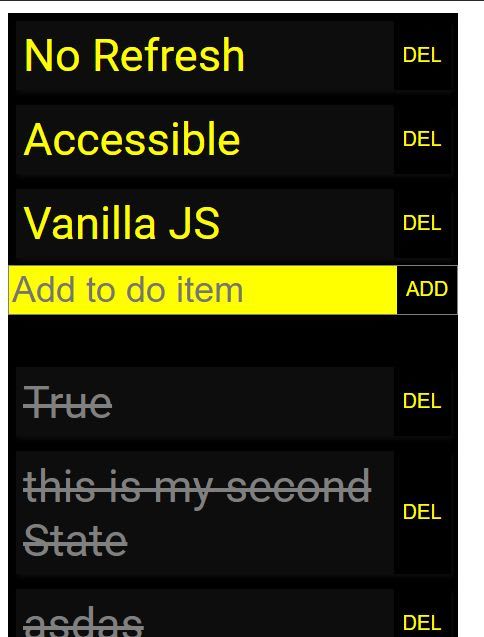
So If I can build it, any beginner can. Let's get started.
Design

Now below is the one way flow I was trying to build and there are 3 things that we need to do:
Catch user Actions.
Dispatch those user actions to set a new state
As soon as the state is set rebuild the view.
Let's start in reverse order. Let us first build a mechanism so that our page know when the state has been updated and it rebuilds itself.
State
First thing we need is an event that will be fired as soon as the state is updated. So let us create an event as show below :
let stateUpdated = new Event('stateUpdate');
Once, we have the event, we will need to define a state and state setter.
function StateManager(initialState) {
    this.state =  initialState
}
We define a function/class called StateManager which takes in an initial state for a component and sets it.
Now let's us write method which will take in the new state.
function StateManager(initialState) {
    this.state =  initialState
    //
    const setStateInternal = (newState) => {
        console.log(`In the setting. Setting state now with value ${JSON.stringify(newState)}.`)
        this.state = newState;
        console.log(`New state is ${JSON.stringify(this.state)}`);
    }
}
For now I have kept the state setter internal as I don't want anyone to directly call this method, because remember, our setter needs to dispatch the event as well so the components gets updated/regenerated.
function StateManager(initialState) {
    this.state =  initialState
    //
    const setStateInternal = (newState) => {
        console.log(`In the setting. Setting state now with value ${JSON.stringify(newState)}.`)
        this.state = newState;
        console.log(`New state is ${JSON.stringify(this.state)}`);
    }


    // public state setter.
    this.setState = new Proxy(setStateInternal, {
        apply: function(target, thisArgs, argumentList){
            console.log(arguments)
            console.log('Now setting the state');
            target(...argumentList);
            let eventFired  = dispatchEvent(stateUpdated);
            console.log(`Event Fired : ${eventFired}`);
        }
    });


}
Checkout this.setState above, it is a proxy for the setStateInternal to dispatch the event (second last line). We simply call dispatchEvent function to dispatch the event that we created in the first step.
In case you are not aware of proxy, you can check out this tutorial.
In one line, proxy is a kind of middle-ware for Javascript objects, Let's say if you are calling a function or setting a property of an object you can do an action before/after that function call or property assignment.
This could have been achieved without Proxy as well easily but I wanted to learn and use it so here it is.
Alternatively, you can have function which will just call setStateInternal and dispatches the event as show above in second last line.
Now, the definition of out state is complete and we should have a way for each component to create it's own state as shown below :
function createState (initialState) {
    console.log('initializing state')
    let tempState = new StateManager(initialState);

    return tempState;
};
Above function will create a new instance for the state everytime it is called with state and setState as public members.
Our state.js is now completed.
Since, i am building a todo app, i would call my new file as
todo.js
Let's first create different views/components within our JS files as shown below :
- TODO_ITEM
This will be our lowest level component which will represent one TODO_ITEM.
 const TODO_NEW_ITEMS = (item, deletionAction) => {
     console.log(`In todo items : ${item}`)
     return `
        <div id="todo-item" class= "todo-item" data-id=${item.id}>
            <p id='todo-text'>${item.value}</p>
            <button id="delTodo" onclick=${deletionAction}(this)>DEL</button>
        </div>
     `
 }
It takes the item details and deletionAction/completionAction from our state. We will find that out soon. But in a nutshell it returns a view/string representation of HTML.
Are you getting JSXy feeling yet? I was ecstatic when I wrote this piece of code.
Notice () after deleteAction in above code. Remember, in HTML, we need to call the function and not just pass the reference like in React.
Similarly, we will write a component/view of competed items.
 const TODO_COMPLETED_ITEMS =(item) => {
     return `
        <div id="todo-completed-item" class= "todo-completed-item" data-id=${item.id}>
            <p id='todo-completed-text'>${item.value}</p>
        </div>
     `
 }
It is not exactly following DRY principle but since I was under time constraint, I went ahead with separate declarations.
Now it is time to write the Completed TODO_COMPONENT
const TODO_PAGE = (state) => {

    return ` <div class="todo-container">
    <div class="todo-items">
    ${
        state.items.map(item=>{
            if (!item.completed){
                return TODO_NEW_ITEMS(item, state.events.deleteTodo);
            }

        }).join('\n')
    }
    </div>
    <form class="todo-input-container" action='javascript:' ">
      <div class="todo-input">
        <input id="newTodo" type="text" name="newTodo" value="${state.currentItem}"  placeholder="Add to do item" onkeyup="${todoState.state.events.recordTodo}(this)" />
      </div>
      <div class="todo-add">
        <button type='button' id="addTodo" name="addTodo" onclick="${todoState.state.events.insertTodoItem}(this)" >ADD</button>
      </div>
    </form>
    <div class='todo-completed'>
    ${
        state.items.map(item=>{
            if (item.completed){
                return TODO_COMPLETED_ITEMS(item);
            }

        }).join('\n')
    }
    </div>
  </div>`
 }
I know it is a lot but let us break it part by part.
a. TODO_PAGE takes in complete state as an input
b. It has a section for new todo Items as shown below so it looks in the items property of state and loops it and call our TODO_NEW_ITEMS component.
Similarly at the end of above code, we have todo Completed Items component code as well.
<div class="todo-items">
    ${
        state.items.map(item=>{
            if (!item.completed){
                return TODO_NEW_ITEMS(item, state.events.deleteTodo);
            }

        }).join('\n')
    }
    </div>
c. The next piece of code is the the text-box to write Todo component and button to submit it to the todo item list.
 <form class="todo-input-container" action='javascript:' ">
      <div class="todo-input">
        <input id="newTodo" type="text" name="newTodo" value="${state.currentItem}"  placeholder="Add to do item" onkeyup="${todoState.state.events.recordTodo}(this)" />
      </div>
      <div class="todo-add">
        <button type='button' id="addTodo" name="addTodo" onclick="${todoState.state.events.insertTodoItem}(this)" >ADD</button>
      </div>
    </form>
Now that we have defined our components, it is time to define our initial state and actions.
We know that out state should have below properties
items : List of todo-Items with the text, an identifier and whether it has been completed or not.
events : list of actions/events that need to be performed. Because as you see in the above code, we need to pass action to the components as well.
currentItem : What current Item that user is trying to save.
target : The element on which our action has taken place. As we go further, I will explain why this is required. For now, may be you can ignore it.
So below will be the code for initial state and remember that todoState below is not a state but our StateManager Object. It has 2 members state and todoState:
let todoInitialstate = {
    items: [],
    currentItem: '',
    events: {
        recordTodo: 'recordTodo',
        insertTodoItem:'insertTodoItem',
        deleteTodo: 'deleteTodo',
    },
    target:{}
};

let todoState= createState(todoInitialstate);
As you can see above, there are 3 events are are required.
- recordTodo -> This is to maintain what the user is typing when she is trying to add Todo. Below will be the simple code for it. For people familiar with React it is a cake walk.
function recordTodo(target) {
    //todoItemsSpace.appendChild(todoItem(event.target.value));
    // state.currentItem = event.target.value;
    console.log(`event fired with state value ${JSON.stringify(todoState.state)}`);
    console.log(target)
    // updateState(state);
    // rough.innerHTML = event.target.value
    todoState.setState({
        ...todoState.state,
        currentItem : target.value,
        target: target
    })
}
One thing you will notice that, it take target as an input and not the event. this is because how HTML and JavaScript work. There are 2 ways to attach an event
a. When you attach it in HTML as I have done above. This method gives target HTML element to the JavaScript function if you pass this within HTML
b. When you add event listener with addEventListener function in JavaScript, then you get Event as the parameter.
Please correct if I am missing something here but this is what I observed.
Also, in the last line of above code, we will simple call set state and it will set the appropriate state and fire the event. We will see how we will refresh this component by listening to stateUpdate event.
- insertTodo
function insertTodoItem(target){
    console.log('insertTodoItem')
    console.log('Adding todo npow.')


    let id = Date.now();
    let tempState = todoState.state;
    tempState.items.push({
        id: id,
        value: tempState.currentItem,
        completed: false
    })

    tempState.currentItem = '';
    tempState.target = target;
    todoState.setState(tempState);

}
Just bear with me, we are almost done. We have created the state, State Manager, components and actions.
Now is the time to see how we can regenerate the the view. You remember, we generate the view when stateUpdate event is fired. So let us listen to that first.
window.addEventListener('stateUpdate', generateView);
Now that we are listening to this event, let us define generateView function.
function generatePage(){

    let main_Page =  TODO_PAGE(todoState.state);

    document.getElementById('root').innerHTML = main_Page;

    let element = todoState.state.target;
    if(element.type == 'text'){
        document.getElementById(element.id).setSelectionRange(element.selectionStart, element.selectionEnd)

        document.getElementById(element.id).focus();
    }
}
First line gets the HTML string of the TODO_PAGE component.
In Second line, we find the root Element in our HTML file and just render this HTML string. Our HTML page is very similar to react which I will share below.
From third line, we can see that I use target and I promised you, I will explain why we need target. Consider a scenario,
What happens when you set innerHTML
I am trying to add a todo component and as I type, it will fire recordTodo action which will update the state and will in turn re-render the view as can be seen by code above.
Now as page is re-renders, we will lose the focus on the text box in which we were typing our todo item. Not only we need to maintain the focus, but also, we need to restore the cursor position so that page seems smooth and flicker-less.
Therefore, I just reset that focus back to that element where event actually occurred and I also restore that cursor position.
That's it. We are done. Below is the minimal HTML file :
index.html
_____________________________

<html>
    <head>
        <title>Todo - State Managed App</title>
        <script async src='./state.js'></script>
        <script  async src='./todo.js'></script>
        <link rel= 'stylesheet' type='text/css' href="./index.css" />
    </head>

    <body>
        <div id='root'>

        </div>
    </body>
</html>
To see the whole code, please visit my 30-days-of-Vanilla-JS repo. You can star it to follow my 30 days of Vanilla JS ideas in case you are beginner like me.
In case you are a guru, do support me by suggesting some ideas of mini-projects that can be completed in 1-4 hours and will have something to learn.

Top comments (5)
Nice
As part of your mini project I would recommend playing with MutationObservers and IntersectionObesevers (like create your own image lazy loader)
Thank you much Adrien for reading this post.
And thank you for this fantastic idea. Currently I am making a Rich Text editor which is taking more than I expected.
But next week I will be doing something related to DOM observers and Image Lazy loading.
Text editors look simple at first sight but are really really complex ultimately.
One nice project is to add support for emoji in a textarea ( :muscule: ) and/or @mention
Exactly my thought.. i thought they were simple but I have spent almost 6 hours understanding the Range and Selection objects. Now I am making progress.
And Yes, I am adding emoji support but @ mention is a great idea..
Hi! The delete button for the completed todo doesn't seem to work. I cloned from Github but same issue there. Tried to fix it but couldn't do it. Anyone has an idea what to do?