
One of the reasons that we love Django is because it comes with many built-in modules that make web development faster than other frameworks. Django takes care of much of the hassle of web development, so we can focus on writing our app without reinventing the wheel. However, some project requirements differ from the default model that Django provides. In this project, we’ll explore how to use a customized user model in Django to better fit specific needs while using the TDD(Test-Driven Development) methodology to ensure our code is reliable and bug-free.

In this series, we will build a complete blog application following this ERD. In this tutorial, our focus will be on setting up the development environment and installing the required packages. If you find this content helpful, please like, comment, and subscribe to stay updated when the next part is released.
In this article, I’m using Linux. For Mac users, the commands will be the same. If you’re using Windows, I’ll be providing both the Linux/Mac and Windows commands where there are differences,so you can follow along easily regardless of your operating system.
Prerequisites
Have a basic understanding of Django
Have a basic Knowledge of Python
PostgreSQL installed on your machine
Okay, let’s get started !!
First, let's create a project directory and move to the directory where we want our code to be. I named my directory blog_app_series. You can name yours whatever you want
$ mkdir blog_app_series && cd blog_app_series
I- Create a Virtual Environment
To follow Django's best practices we will create a virtual environment to isolate any dependencies and modules.
Many tools are available to create a virtual environment in Python, such as conda, virtualenv, and Python’s venv module. We will create and activate our virtual environment using ‘venv’ since it’s included in Python’s standard library from Python 3.3; therefore no need to install any external tools.
# macOS/Linux
$ python3 -m venv .venv
$ source .venv/bin/activate

# Windows
$ python -m venv .venv
$ .venv\Scripts\Activate.ps1
In the code above we have created and activated a virtual environment named “.venv”, the naming doesn’t matter it can be named anything (“blog_env”, “myenv”, “venv”); however, there is growing consensus in Python community that “.venv” is the clearest approach.
If you see (.venv) prefixed to your command prompt, the virtual environment is active.
II- Install Django
Now, let's install Django in the virtual environment that we created.
Make sure you have the (.venv) prefixed to your command prompt and enter the command below:
# macOS/Linux
(.venv) $ python3 -m pip install django

# windows
(.venv) $ python -m pip install django
This will install the last version of Django. We can run ‘pip freeze’, to check the Django’s version installed in our virtual environment.
(.venv)$ pip freeze
asgiref==3.8.1
Django==5.1.1
sqlparse==0.5.1
III- Create our project
Now that Django is installed, the next step is to create our project using the management command django-admin startproject <project_name> .. This creates the skeleton of a new Django project.
Including the period ., at the end of the command, it is optional but tells Django to set up the new project in the current directory instead of creating a new one.
(.venv)$ django-admin startproject blog_app .
With the above command, we create a new project called ‘blog_app’. Our file structure will then look like this.
.venv/
blog_app/
    __init__.py
    asgi.py
    settings.py
    urls.py
    wsgi.py
manage.py
To check if everything worked successfully, let’s run the runserver command.
# macOS/Linux
(.venv) $ python3 manage.py runserver
(.venv) $ python manage.py runserver
If you open your browser to 127.0.0.1:8000 you should see the following screen:

That means we’ve set up everything correctly and can move on to the next step.
IV- Setting up Postgres database
By default, Django uses SQLite as the local database. However, this can be easily switched to any of the supported databases, such as PostgreSQL, MariaDB, MySQL, or Oracle. For this project, we will be using PostgreSQL, though you are welcome to choose any database that suits your needs. Django’s ORM (Object-Relational Mapping) ensures that the code remains consistent across different database backends, offering flexibility without requiring changes to your application code.
1. Create a PostgreSQL database for our project
- let's open our Vs Code (VisualStudio Code). You can use any IDE or Text Editor of your desire
- Then open the Vs Code terminal, because it’s more convenient to run the code in the same terminal
- Activate the virtual environment in Vs Code, if it has not been activated yet.
# macOS/Linux
$ source .venv/bin/activate

# Windows
env/Scripts/activate
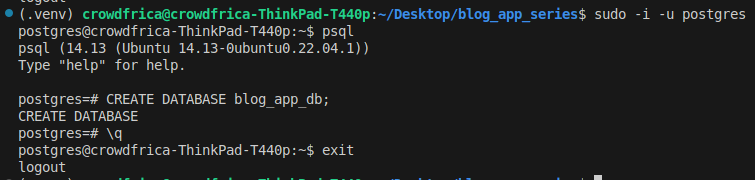
- let’s create our database on the local machine. For macOS and Linux, you can use the following command:
# macOs/Linux
$ sudo -i -u postgres
postgres@user:~$ psql
postgres=# CREATE DATABSE blog_app_db;
postgres=# \q # to exit or quit the session
postgres@user:~$ exit # to logout from the postgres user```
In the code above, we switch to the Postgres user and connect to the PostgreSQL database to create a new database named `blog_app_db`
for Windows users, you can use pgAdmin to create your database.
### 2. Connect the database to our Django application
- Navigate to the `blog_app/settings.py` file and scroll down to the DATABASE configurations.
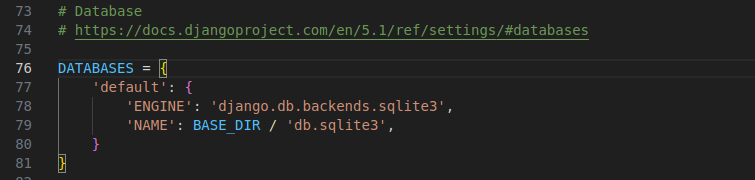
- Replace the default SQLite3 database configuration with PostgreSQL settings.
```DATABASES = {
'default': {
'ENGINE': 'django.db.backends.postgresql',
'NAME': 'blog_app_db',
'USER': 'postgres',
'PASSWORD': 'your_db_password',
'HOST': '127.0.0.1',
'PORT': '5432',
}
}
_NAME: The name of the database we previously created.
_USER: The database username (default is Postgres).
_PASSWORD: The password for the database. This can be omitted if no password is set for your local database.
_ HOST: The database host. This can be omitted on your local machine, as Django will default to localhost or the IP address 127.0.0.1.
_ PORT: The PostgreSQL port. This can also be omitted on your local machine, as Django will default to port 5432 which is the default port for the Postgres database.
Here is my database configuration.

Finally, we will need to install the PostgreSQL database connector library called “**psycopg2**”, which allows Django to establish a connection with the database.
(.venv) $ pip install psycopg2
- Start the server to make sure everything is working correctly
Now, let’s start the server using the runserver command to ensure everything is working correctly (please do not run migrations at this stage). If you still see the ‘The install worked successfully! Congratulations!’ page, means everything is set up correctly, and we are good to go.
V- Add a home page and an about page to our application
- Create a templates directory to store our templates
Let’s create a templates directory at the root of our project to store our templates.
(.venv) blog_app_series$ mkdir templates
and then tell Django where to find our templates by updating the TEMPLATES configuration in settings.py.
# blog_app/settings.py
TEMPLATES = [
    {
        ...
        "DIRS": [BASE_DIR/"templates"],  # new
        ...
    }
]
- Create tests for our templates
As stated at the beginning of this tutorial, we will be following the Test-Driven Development (TDD) methodology to ensure our code is reliable and free of bugs. To get started, let’s create the ‘tests.py’ file within the ‘blog_app’ directory.
# blog_app/tests.py

from django.test import TestCase
from django.urls import reverse

class AppTemplateTests(TestCase):
  def test_home_template(self):
    """Render home.html and response status is 200"""
    response = self.client.get(reverse('home'))
    # Test if response status is ok
    self.assertEqual(response.status_code, 200)
    # Test if the correct template is used
    self.assertTemplateUsed(response, 'home.html')
    # Test if we have an h1 tags with a text
    seff.assertContains(response, '<h1>This the home page</h1>')

  def test_about_template(self):
    """Render about.html and response status is 200"""
    response = self.client.get(reverse('about'))
    # Test if response status is ok
    self.assertEqual(response.status_code, 200)
    # Test if the correct template is used
    self.assertTemplateUsed(response, 'about.html')
    # Test if we have an h1 tags with a text
    self.assertContains(response, '<h1>This the about page</h1>')
let’s run the tests with this command
# macOs/Linux
(.venv) $ python3 manage.py test

# Windows
(.venv) $ python manage.py test

From the terminal output, we can see that all our tests are failing, which is what we are expecting at this stage since we have not created the templates yet.
3. Create the URLS for the home, and about pages
At this stage, we will include both the views and URLs in the blog_app/urls.py file for simplicity. Let's start by importing TemplateView at the top of the file and defining a path that renders the appropriate template.
# blog_app/urls.py
from django.contrib import admin
from django.urls import path
from django.views.generic import TemplateView

urlpatterns = [
    path('admin/', admin.site.urls),
    path('', TemplateView.as_view(template_name='home.html'), name='home'),
    path('about/', TemplateView.as_view(template_name='about.html'), name='about'),
]
Next, we’ll create the home.html and about.html templates as referenced in the code above. However, to adhere to the DRY (Don't Repeat Yourself) principle, we'll first create a layout template to serve as a wrapper for these pages
- Create a layout for our application ‘templates/layout.html’ file
<!-- templates/layout.html -->

<!DOCTYPE html>
<html lang="en">
<head>
  <meta charset="UTF-8">
  <meta name="viewport" content="width=device-width, initial-scale=1.0">
  <title>{% block page %}{% endblock %} | Blog App</title>
  <link href="https://cdn.jsdelivr.net/npm/bootstrap@5.3.3/dist/css/bootstrap.min.css" rel="stylesheet" integrity="sha384-QWTKZyjpPEjISv5WaRU9OFeRpok6YctnYmDr5pNlyT2bRjXh0JMhjY6hW+ALEwIH" crossorigin="anonymous">
</head>
<body>
  <nav class="navbar navbar-expand-lg navbar-dark bg-primary">
    <div class="container-fluid">
      <a class="navbar-brand" href="{% url 'home' %}">Blog App</a>
      <button class="navbar-toggler" type="button" data-bs-toggle="collapse" data-bs-target="#navbarScroll" aria-controls="navbarScroll" aria-expanded="false" aria-label="Toggle navigation">
        <span class="navbar-toggler-icon"></span>
      </button>
      <div class="collapse navbar-collapse" id="navbarScroll">
        <ul class="navbar-nav me-auto my-2 my-lg-0 navbar-nav-scroll" style="--bs-scroll-height: 100px;">
          <li class="nav-item">
            <a class="nav-link active" aria-current="page" href="{% url 'home' %}">Home</a>
          </li>
          <li class="nav-item">
            <a class="nav-link" href="{% url 'about' %}">About</a>
          </li>
        </ul>
        <form class="d-flex">
          <input class="form-control me-2" type="search" placeholder="Search" aria-label="Search">
          <button class="btn btn-outline-light" type="submit">Search</button>
        </form>
      </div>
    </div>
  </nav>
  {% block content %}
  {% endblock %}
  <footer></footer>
  <script src="https://cdn.jsdelivr.net/npm/bootstrap@5.3.3/dist/js/bootstrap.bundle.min.js" integrity="sha384-YvpcrYf0tY3lHB60NNkmXc5s9fDVZLESaAA55NDzOxhy9GkcIdslK1eN7N6jIeHz" crossorigin="anonymous"></script>
</body>
</html>
This template defines the structure and the styling of our web application. We use Bootstrap for responsive design and include a navigation bar with two navigation links: ‘Home’ and ‘About’. The links are generated dynamically using Django’s {% url 'home' %} and {% url 'about' %} template tags, which refer to the name of the URL patterns defined in the ‘blog_app/urls.py’ file.
The {% block page %}{% endblock %} is a placeholder for the page name of each page that uses the layout, and the {% block content %}{% endblock %} is a placeholder for the main content of each page that extends this layout.
- Next, navigate to the ‘templates’ directory and create two new files: ‘home.html’ and ‘about.html’.
<!-- templates/home.html -->

{% extends 'layout.html' %}

{% block page %}
  Home
{% endblock %}

{% block content %}
  <h1>This the home page</h1>
{% endblock %}
<!-- templates/about.html -->

{% extends 'layout.html' %}

{% block page %}
  About
{% endblock %}

{% block content %}
  <h1>This the about page</h1>
{% endblock %}
Both ‘home.html’, and ‘about.html’ templates inherit from the ‘layout.html’ template and customize only the page title and content block.
Now let’s run the tests we created previously to confirm that all our pages are rendering correctly.
# macOs/Linux
(.venv) $ python3 manage.py test

# Windows
(.venv) $ python manage.py test

All the tests are successful, but we can still check the results in our browser by running our server.
# macOS/Linux
(.venv) $ python manage.py runserver

# Windows
(.venv) $ python manage.py runserver
if you open your browser and navigate to 127.0.0.1:8000, you should see the text “This the home page”

and when you navigate to the About page, you should see the text “This the about page”

This article has covered a lot of ground, so we’ll wrap it up for now to keep things concise. In the next part, we’ll continue by implementing the authentication functionality, where I’ll guide you through setting up secure user login and registration with Django. Stay tuned for the next part.
** If you found this helpful, don’t forget to like and leave a comment. Your feedback is always appreciated!**


Top comments (0)