
In this tutorial, we’ll deploy a ready-made Django web app to Azure Web Service and connect the back-end to Azure PostgreSQL for the app to write data to the database.
End Goal
The sample Django repo is a polls web application where a user selects a question and selects one of the options as their answers. The app will record the votes in the PostgreSQL database and display them to the user. A demo of the end state is as shown:
Prerequisites
- An Azure subscription is required. If you don't have an Azure subscription, create a free Azure account before you begin.
- Basic knowledge of Django, PostgreSQL, Git commands
Agenda
- Fork and clone the sample repo of Django Web App
- Provision PostgreSQL Flexible Server in Azure
- Connect to PostgreSQL Flexible Server and create a database
- Provision the web app using Azure App Services
- Connect the app to Azure PostgreSQL
- Deploy app code from Github to Azure App Services
- Run Django database migrations to establish schema on Azure PostgreSQL database
- Test the app by creating a poll question
- Make changes to the app codes and redeploy
Fork and Clone Sample Repo
Navigate to https://github.com/Azure-Samples/djangoapp and fork the repository into your own GitHub account.
Provision PostgreSQL Flexible Server in Azure
- Open the Azure portal.
- Search for and select Azure Database for PostgreSQL
- Select Create > Flexible Server > Create.
-
On the Flexible Server page, enter the following information:
Field Value Subscription Select your desired Azure Subscription Resource Group Create a new resource group eg. DjangoPostgres-Tutorial-rg Server Name A name for the database server that's unique across all Azure Region Select a location near you Workload Type Development Compute + Storage Leave as default. Burstable, B1ms Availability Zone, High Availability, PostgreSQL version Leave as default Admin Username, Password Enter credentials for an administrator account on the database server. Record these credentials as you'll need them later in this tutorial. Note: do not use the $ character in the username or password as it will conflict with web app environmental variables later on Select Next: Networking >, and on that page set Connectivity method to Public access, and then under Firewall rules check the box for Allow public access from any Azure service within Azure to this server.
Select Review + Create, then Create. Azure takes a few minutes to provision the database server.
After provisioning is complete, select Go to resource to open the overview page for the database server.
Connect to Azure Postgres and Create a Database
Open the Azure Cloud Shell from the Azure portal by selecting the Cloud Shell icon at the top of the window.
In the Cloud Shell, run the following command:
psql --host=[server-url].postgres.database.azure.com --port=5432 --username=[user-name] --dbname=postgres
Replace [server-name] and [user-name] with the names used in the previous section.
When the shell connects successfully, you should see the prompt postgres=>. This prompt indicates that you're connected to the default administrative database named "postgres". (The "postgres" database isn't intended for app usage.)
Run the command below in postgres to create a database called pollsdb that your app will connect to later:
CREATE DATABASE pollsdb;
If the database is created successfully, the command should display CREATE DATABASE. To verify that the database was created, run:
\c pollsdb
Exit postgres by entering the command exit
Provision the Web App Infrastructure in Azure
Open Azure Portal > Search for App Services > Create
Enter the following information:
| Field | Value |
|---|---|
| Subscription | Select the subscription you want to use if different from the default. |
| Resource group | Select the "DjangoPostgres-Tutorial-rg" group you created in the previous section. |
| App name | A name for your web app that's unique across all Azure. |
| Publish | Select Code. |
| Runtime stack | Select Python 3.8 from the drop-down list. |
| Region | Select a location near you. |
| Linux Plan | The portal will populate this field with an App Service Plan name based on your resource group. If you want to change the name, select Create new. |
| Sku and size | Select Change size > Dev/Test > Select B1 > Apply. You can scale the plan later for better performance. |
Select Review + Create, then select Create. Azure takes a few minutes to provision the infrastructure for the web app. Once done, select Go To Resource.
Connect Azure App Service to Azure Postgres
Configure the environment variables on Azure App Service to connect to Azure Postgres. On the App Service page, scroll down and select Configuration > Application Settings.
Click New Application Setting with the following:
| Setting name | Value |
|---|---|
| DBHOST | The URL of the database server from the previous section; that is, the [server-name].postgres.database.azure.com. |
| DBNAME | pollsdb |
| DBUSER | The administrator user name used when you provisioned the database. |
| DBPASS | The administrator password you created earlier. |
Save your settings.

Deploy App to Azure App Service from Github Repo
With the database and connection settings in place, you can now configure the Azure App to deploy code directly from a GitHub repository.
On the same Azure App Service > Scroll down to Deployment section > Select Deployment Center.
In the Source control, select GitHub. Follow the sign-in prompts to use your current GitHub login.
In the GitHub section, select the following values:
| Field | Value |
|---|---|
| Organization | The GitHub account to which you forked the sample repository. |
| Repository | djangoapp |
| Branch | Select flexible-server branch |
| Workflow Option | Add a workflow |
Select Save to trigger the build and deployment workflow. Go to Actions in your GitHub repository for djangoapp to monitor progress. Azure will deploy the code and start the app.

Move to the next steps once the build is complete.

Run Django Database Migrations
What remains is to establish the necessary schema in the database itself. Do this by "migrating" the data models in the Django app to the database.
On the same App Service page, scroll down to Development Tools on the left handle > select SSH > Enter the lscommand to show the app's files. Since the app server is hosted on Azure, you are now connected to the server via SSSH.

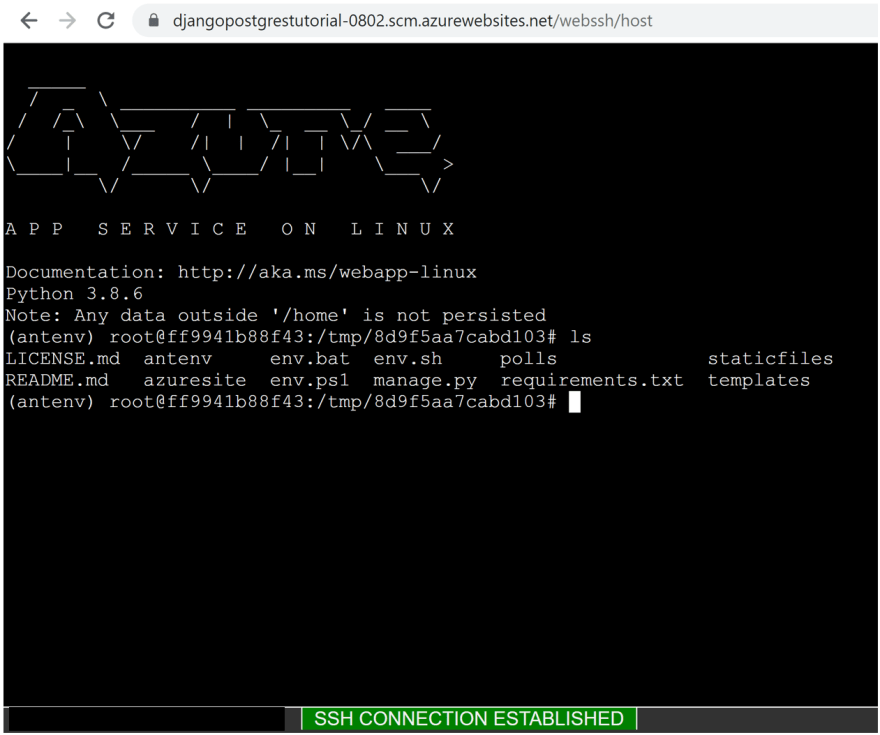
In the console, run database migrations:
python manage.py migrate
Create a administrator login for the app.
python manage.py createsuperuser
The createsuperuser command prompts you for Django superuser (or admin) credentials, which are used within the web app. For the purposes of this tutorial, use the default username root, press Enter for the email address to leave it blank, and enter password321 for the password.
Create a poll question in the App
You're now ready to run a quick test of the app to demonstrate that it is working with the PostgreSQL database.
In the browser window or tab for the web app, return to the Overview page, then click on the URL for the web app.

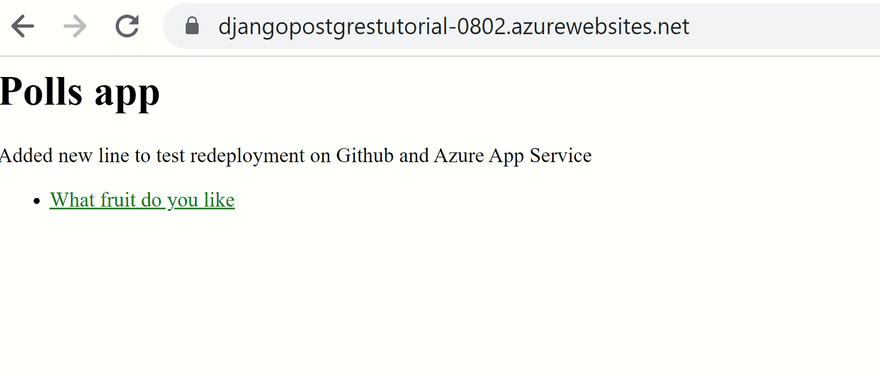
The app should display the message "Polls app" and "No polls are available" because there are no specific polls yet in the database.
Sign in using the Django superuser credentials from the previous section (rootand password321).
Under Polls, select Add next to Questions and create a poll question with some choices.

Browse back to the home page to confirm that the questions are now presented to the user. Test out the app, vote for different options, and you will see the database is being updated.
Update the App codes and Redeploy automatically
Azure automatically redeploys your app code whenever you commit changes to the GitHub repository. However, if you change Django app's data models, you must migrate those changes to the database:
- Connect to the web app again via SSH as previously
- Run the migrations again with
python manage.py migrate
Resources
About the Sample Django Web App
The sample web app is created by following Django documentation tutorial here.


Top comments (0)