
This post gives a step by step guide to setting up vue.js using webpack. You’ll need to have node installed on your computer, you’ll also need a basic knowledge of how vue works, and of course a code editor.
Creating a folder and a package json file
Installation of dependencies
File/Folder structure
Configure webpack to use babel loader, and vue loader
Write scripts to start your server
Loaders, Plugins, and Code Splitting
Final webpack configuration and Observation
Creating a folder and a package json file
In your terminal, use the mkdir command to create a project folder and use the cd command to change directory into the folder created.

In the file you created, run the command npm init –y to create a package.json file
Installation of dependencies
Now that we have a package.json file to keep track of our dependencies, we can go ahead to install them.
- Dependencies: first we install vue, vue-router and core-js as dependencies. Run
npm install vue vue-router core-js --savethis would install the three packages as dependencies. - Dev-dependencies: Now we install webpack, webpack-cli, webpack-dev-server, babel-loader, @babel/core, @babel/preset-env, vue-loader, vue-template-compiler. Run
npm install webpack webpack-cli webpack-dev-server babel-loader @babel/core @babel/preset-env vue-loader vue-template-compiler -Dthis would install all these packages as dev-dependencies. Our package.json file should look like this after the installation process ```
{
"name": "vue-webpack-setup",
"version": "1.0.0",
"description": "",
"main": "index.js",
"scripts": {
"test": "echo \"Error: no test specified\" && exit 1"
},
"keywords": [],
"author": "",
"license": "ISC",
"dependencies": {
"core-js": "^3.6.5",
"vue": "^2.6.12",
"vue-router": "^3.4.3"
},
"devDependencies": {
"@babel/core": "^7.11.6",
"@babel/preset-env": "^7.11.5",
"babel-loader": "^8.1.0",
"vue-loader": "^15.9.3",
"vue-template-compiler": "^2.6.12",
"webpack": "^4.44.1",
"webpack-cli": "^3.3.12",
"webpack-dev-server": "^3.11.0"
},
}
## File/Folder structure <a name="p-3"></a>
Our folder structure would be similar to the default folder structure we get when using the vue cli to create a project. So lets create a public folder and an src folder in the root of our project. In the public folder, add a **favicon.ico** file and create an **index.html** file. In the **index.html** file, add this boilerplate
<!DOCTYPE html>
Vue app
<!-- built files will be auto injected -->
In our src folder lets create an **App.vue** file and a **main.js** file.
N.B: **App.vue** file starts with a capital letter.
In our **App.vue** file, add this code
Home|
>About
>
// @import url("https://fonts.googleapis.com/css2?family=Roboto:wght@300;400;500&display=swap");
// :root {
// --font: Roboto, sans-serif;
// --textColor: #374961;
// --linkActiveColor: #41b783;
// }
// #app {
// font-family: var(--font);
// -webkit-font-smoothing: antialiased;
// -moz-osx-font-smoothing: grayscale;
// text-align: center;
// color: var(--textColor);
// .logo {
// width: 20%;
// }
// }
// .nav {
// padding: 30px 0 100px 0;
// a {
// font-weight: 500;
// color: var(--textColor);
// margin: 0 5px;
// }
// a.router-link-exact-active {
// color: var(--linkActiveColor);
// }
// }
the scss style is commented out because we don't have a loader to process **.scss** files yet.

In our **main.js** file, add this code
import Vue from "vue";
import App from "./App.vue";
import router from "./router";
new Vue({
router,
render: (h) => h(App),
}).$mount("#app");
Now we create three folders in our src folder namely, assets, router, views. In the assets folder, lets add an image and call it **logo.png**. In the router folder, create an **index.js** file and add this code in the **index.js** file
import Vue from "vue";
import VueRouter from "vue-router";
import Home from "../views/Home.vue";
Vue.use(VueRouter);
const routes = [
{
path: "/",
name: "Home",
component: Home,
},
{
path: "/about",
name: "About",
component: () =>
import(/* webpackChunkName: "about" */ "../views/About.vue"),
},
];
const router = new VueRouter({
mode: "history",
routes,
});
export default router;
notice how we imported the about component in the router, this kind of import tells webpack to lazyload the about component.

In our views folder, lets create a file called **Home.vue**.
N.B: File names should start with capital letter.
Now, let's add this code in our **Home.vue** file
<!--  -->
-->
<h1>👋Hello world🌎</h1>
the image is commented out because we don't have a loader to process such file yet.

then add this to our **About.vue** file
This is the about page
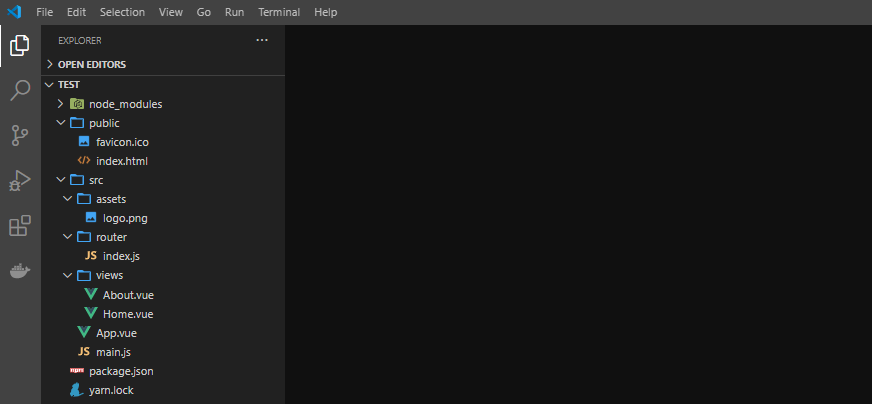
If done correctly, we should have a folder structure that looks like this
## Configure webpack to use babel loader and vue loader <a name="p-4"></a>
Babel loader helps transpile ECMAScript 2015+ code into JavaScript that can be run by older JavaScript engines. While vue loader helps transform vue components into plain JavaScript module.
To configure webpack to use these loaders, we need to create two files namely, **babel.config.js**, and **webpack.config.js**.
In the **babel.config.js** file lets add this code
module.exports = {
presets: [
[
"@babel/preset-env",
{
useBuiltIns: "usage",
corejs: 3,
},
],
],
};
@babel/preset-env helps to detect browsers we want to support so babel loader knows how to go about transpiling our JavaScript code. we would need to add a browserslist option in our **package.json** file so babel knows what browsers we want to support. So in our **package.json** file, let's add
"browserslist": [
"> 1%",
"last 2 versions",
"not dead"
]
Ideally you would want to compile as little code as possible, so support only relevant browsers. The useBuiltIns and corejs options are for polyfill imports, you can read more about it [here](https://babeljs.io/blog/2019/03/19/7.4.0).
In our **webpack.config.js** file lets add this code
const { VueLoaderPlugin } = require("vue-loader");
const path = require("path");
module.exports = {
entry: {
main: "./src/main.js",
},
output: {
path: path.resolve(__dirname, "dist"),
},
module: {
rules: [
{
test: /.js$/,
exclude: /node_modules/,
use: {
loader: "babel-loader",
},
},
{
test: /.vue$/,
loader: "vue-loader",
},
],
},
plugins: [
new VueLoaderPlugin(),
],
resolve: {
alias: {
vue$: "vue/dist/vue.runtime.esm.js",
},
extensions: ["*", ".js", ".vue", ".json"],
},
};
From the code above we import VueLoaderPlugin from vue-loader and the path module which we will be using to configure our entry and output point so webpack will know where to start compiling from and where to put our compiled code after compiling. You can read more about VueLoaderPlugin [here](https://vue-loader.vuejs.org/guide/#vue-cli).

In the code above we see a module option where we define some rules, the first rule tells webpack to use babel loader to transpile all files having a **.js** extension excluding everything in the node_modules folder, while the second rule tells webpack to apply the vue loader to any file with a **.vue** extension.

The resolve option in the code above has an alias and extension key value pair, alias has a value which defines a vue alias and helps us import vue packages without using relative path, while extension has a value which tells webpack how to resolve imports and enables us import files without the extension, you can read more about it [here](https://webpack.js.org/configuration/resolve/#resolveextensions).
## Write scripts to start your server <a name="p-5"></a>
To see our setup work, we’ll need to write scripts in our **package.json** file to run the webpack-dev-server. So go into the **package.json** file and add these to the scripts object.
"build": "webpack --mode production",
"start": "webpack-dev-server --mode development"
Now we can go back to our terminal and run `npm run start` to start up webpack development server, our project should compile successfully else you can go through the steps again or drop a comment, I’ll be glad to help you out.

N.B: We won't be able to view our project in the browser yet because we haven't configured the htmlWebpackPlugin and webpack doesn't know where to insert our bundle files.
## Loaders, Plugins, and Code Splitting <a name="p-6"></a>
Loaders and plugins are third-party extensions used in handling files with various extensions. Just like we used vue-loader to handling files with **.vue** extension, we have loaders and plugins for **.scss** files, **.html** files, images, etc.

Basically when you import/require files or modules, webpack tests the path against all loaders and passes the file to whichever loader passes the test. you can read more about loaders [here](https://webpack.docschina.org/loaders/)

In this post, we will make use of file-loader, sass-loader, css-loader, style-loader, CleanWebpackPlugin, MiniCssExtractPlugin, htmlWebpackPlugin, autoprefixer. To install these loaders and plugin, we run `npm install file-loader sass sass-loader css-loader style-loader postcss postcss-loader autoprefixer clean-webpack-plugin html-webpack-plugin mini-css-extract-plugin -D`
* file-loader: The file-loader is used to process files like images, videos, fonts. To use file-loader, insert this code into **webpack.config.js** file
  {
    test: /\.(eot|ttf|woff|woff2)(\?\S*)?$/,
    loader: "file-loader",
    options: {
      name: "[name][contenthash:8].[ext]",
    },
  },
  {
    test: /\.(png|jpe?g|gif|webm|mp4|svg)$/,
    loader: "file-loader",
    options: {
      outputPath: "assets",
      esModule: false,
    },
  },
* working with **.css** and **.scss** files: For webpack to correctly process **.css** and **.scss** files, the order in which you arrange loaders is important. first we need to import MiniCssExtractPlugin and autoprefixer in our **webpack.config.js** file like this

`const MiniCssExtractPlugin = require("mini-css-extract-plugin");`

`const autoprefixer = require("autoprefixer");`

then we add this code to the module of our **webpack.config.js** file
  {
    test: /\.s?css$/,
    use: [
      "style-loader",
      MiniCssExtractPlugin.loader,
      "css-loader",
      {
        loader: "postcss-loader",
        options: {
          plugins: () => [autoprefixer()],
        },
      },
      "sass-loader",
    ],
  },
we also need to enable the MiniCssExtractPlugin in the plugin section of our **webpack.config.js** file like this.
new MiniCssExtractPlugin(),
sass-loader: The sass-loader is first used to process all **.scss** files and compiles them to **.css** files.

postcss-loader: After sass-loader is done converting **.scss** files to **.css** files, postcss-loader and autoprefixer is then used to process the **.css** files and add vendor prefix to the css postcss.

css-loader: The css-loader then helps to return the css in **.css** files that are imported or required in the project.

style-loader: style-loader takes the css returned by css-loader and inserts it into the page.

MiniCssExtractPlugin: The MiniCssExtractPlugin helps create a separate css file from **.css** file imports, it is helpful for code splitting.

* htmlWebpackPlugin: this plugin helps to automatically generate an **index.html** file and inserts our JavaScript bundle into the html body. To use the htmlWebpackPlugin, we first import it into our **webpack.config.js** file like this

`const htmlWebpackPlugin = require("html-webpack-plugin");`

then enable the plugin in the plugin section by adding this code
new htmlWebpackPlugin({
  template: path.resolve(__dirname, "public", "index.html"),
  favicon: "./public/favicon.ico",
}),
* CleanWebpackPlugin: This plugin helps to erase outdated bundle files so it can be replace with the recent file while building. To use this plugin we first import it into our **webpack.config.js** file like this

`const { CleanWebpackPlugin } = require("clean-webpack-plugin");`

then enable the plugin in the plugin section by adding this code
new CleanWebpackPlugin(),
Now we can uncomment the image tag in the **Home.vue** file and also the scss style in the **App.vue** file, start our development server and view our project in the browser.
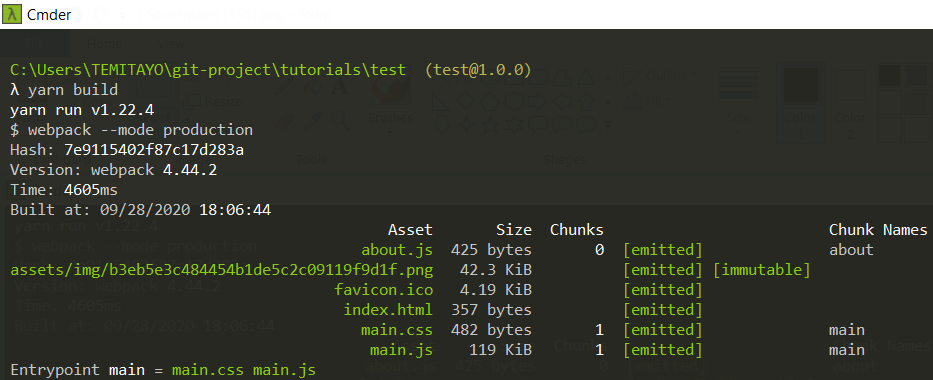
The image above shows our bundle size when we build our project, presently our bundles does not have a random hash which helps with browser cache and we also need to split our code further by creating a vendor chunk and a runtime chunk.
To hash our css bundles, we pass an object
`{
filename: "[name].[contenthash:8].css",
chunkFilename: "[name].[contenthash:8].css",
}`
as params to the MiniCssExtractPlugin.
To hash our files we need to add
`name: "[name][contenthash:8].[ext]",`
to the options object of our file loader.
To hash our bundles we need to add
`filename: "[name].[contenthash:8].js",`
`chunkFilename: "[name].[contenthash:8].js",`
in our webpack output section.
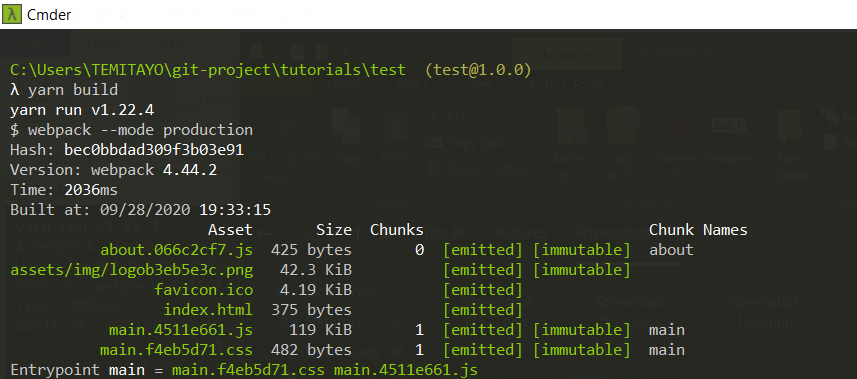
If we build our project now, our bundles would have a random hash.
* Code Splitting is an optimization technique used in reducing bundle size into smaller chunks, which helps to reduce the load time of our app. To configure webpack to split our bundle into chunks, we need to add an optimization section to our **webpack.config.js** file.
optimization: {
moduleIds: "hashed",
runtimeChunk: "single",
splitChunks: {
cacheGroups: {
vendor: {
test: /[\/]node_modules[\/]/,
name: "vendors",
priority: -10,
chunks: "all",
},
},
},
}
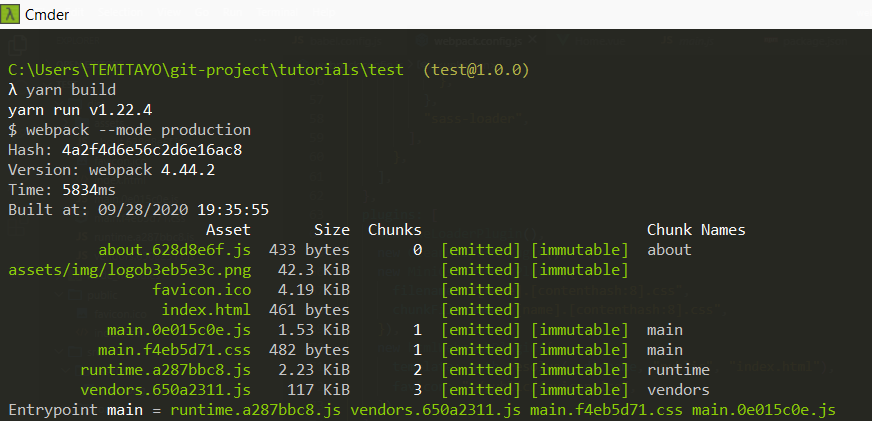
The code above tells webpack to create a runtime chunk, vendor chunk from our node_modules folder, and hash them. Now we should see a runtime bundle and a vendor bundle when we build the project again.
## Final webpack configuration and Observation <a name="p-7"></a>
Our final **webpack.config.js** file should look like this
const { VueLoaderPlugin } = require("vue-loader");
const htmlWebpackPlugin = require("html-webpack-plugin");
const MiniCssExtractPlugin = require("mini-css-extract-plugin");
const { CleanWebpackPlugin } = require("clean-webpack-plugin");
const autoprefixer = require("autoprefixer");
const path = require("path");
module.exports = {
entry: {
main: "./src/main.js",
},
output: {
filename: "[name].[contenthash:8].js",
path: path.resolve(dirname, "dist"),
chunkFilename: "[name].[contenthash:8].js",
},
module: {
rules: [
{
test: /.js$/,
exclude: /node_modules/,
use: {
loader: "babel-loader",
},
},
{
test: /.vue$/,
loader: "vue-loader",
},
{
test: /.(eot|ttf|woff|woff2)(\?\S*)?$/,
loader: "file-loader",
options: {
name: "[name][contenthash:8].[ext]",
},
},
{
test: /.(png|jpe?g|gif|webm|mp4|svg)$/,
loader: "file-loader",
options: {
name: "[name][contenthash:8].[ext]",
outputPath: "assets/img",
esModule: false,
},
},
{
test: /.s?css$/,
use: [
"style-loader",
MiniCssExtractPlugin.loader,
"css-loader",
{
loader: "postcss-loader",
options: {
plugins: () => [autoprefixer()],
},
},
"sass-loader",
],
},
],
},
plugins: [
new VueLoaderPlugin(),
new CleanWebpackPlugin(),
new MiniCssExtractPlugin({
filename: "[name].[contenthash:8].css",
chunkFilename: "[name].[contenthash:8].css",
}),
new htmlWebpackPlugin({
template: path.resolve(dirname, "public", "index.html"),
favicon: "./public/favicon.ico",
}),
],
resolve: {
alias: {
vue$: "vue/dist/vue.runtime.esm.js",
},
extensions: ["*", ".js", ".vue", ".json"],
},
optimization: {
moduleIds: "hashed",
runtimeChunk: "single",
splitChunks: {
cacheGroups: {
vendor: {
test: /[\/]node_modules[\/]/,
name: "vendors",
priority: -10,
chunks: "all",
},
},
},
},
devServer: {
historyApiFallback: true,
},
};
You can checkout the repo [here](https://github.com/lavikara/basic-vue-boilerplate)
* Observation: After I was done with the setup, I created a fresh vue3 project using the vue-cli and compared the bundle size of the vue3 project with the one I just set up and realised there wasn't a significant difference in the bundle size of both project.

This goes to show that there's really no point going through the stress of setting up your webpack. Except you absolutely need to change something, just use the vue-cli.

I should also add that setting up webpack yourself is not a bad idea because in the end, no knowledge is lost.👌


Top comments (18)
hi
tnx for post
I have issue even use your repo when take build version
in local no page content showing and when run xampp for local server , page content loaded but not showing logo.png as well as not nav menu routing work correctly
and when click on about link see below error in console :
 http://localhost/about.a1c31bf5.js net::ERR_ABORTED 404 (Not Found)

ChunkLoadError: Loading chunk 0 failed.

(error: http://localhost/about.a1c31bf5.js)
so how fix them ?
and notice that I got problem when doing tutorial but solved !
pls remind users in tutorial when installing to use special version's together :
"webpack": "^4.44.1",
"webpack-cli": "^3.3.12",
"webpack-dev-server": "^3.11.0"
tnx
Yes, i will update the article. Thanks
Hi Temi,
Your github repo works like charm, and I laughed so hard when I read the last 'observation' bit, because I came here, because my team told me webpack is better than cli so I should use that. Maybe that observation can also go to the top of the article. <3
Aside from helping people learn how to setup with webpack, that myth is the main reason I wrote this article. A lot of people tend to push their opinion as best practice... always find out why before accepting it.
I think you forgot to add install in here, but I am not sure.
npm file-loader sass sass-loader css-loader style-loader postcss postcss-loader autoprefixer clean-webpack-plugin html-webpack-plugin mini-css-extract-plugin -D
thanks for noting this.
I think the webpack config code should go under module/rules?
Update: Just saw you have a repo, maybe it would be useful to put it in top of the article? So if someone lame like me gets stuck, they can just check the repo?
😂😂 the idea is to have people read all the way to the end.
why?
Hi, thanks for the post very interesting.
I tried to reproduce your workflow but using latest packages.
I had to modify:
optimization.moduleIds:"deterministic"
And
{
test: /.s?css$/,
use: [
"style-loader",
MiniCssExtractPlugin.loader,
"css-loader",
{
loader: "postcss-loader",
options: {
postcssOptions: {
plugins: [autoprefixer()]
}
},
},
"sass-loader",
],
},
But even with this changes I got 4 warnings as:
hmmmm, i'll have to look into this
Hi! Got this when running server: Error: Cannot find module 'webpack-cli/bin/config-yargs'. config:
"webpack": "^5.44.0",
"webpack-cli": "^4.7.2",
"webpack-dev-server": "^3.11.2"
Repo: github.com/dgloriaweb/vue-webpack-...
Update: tried to change "serve": "webpack serve" as they recommended, but there's another error:
[webpack-cli] Failed to load 'D:\Dokumentumaim\Projects\Vue\Webpack\vue-webpack-setup\webpack.config.js' config
[webpack-cli] Error: vue-loader requires @vue/compiler-sfc to be present in the dependency tree.
Upate2: I've installed npm i @vue/compiler-sfc and server is running, but gives all sorts of weird info in the CL. And in the browser I see the folder list.
most of the errors you'll get (if other things are done correctly), are usually due to webpack dependencies (webpack, webpack-cli, webpack-dev-server) not being compatible with each other. you'll need to use versions that are compatible with each other. running npm install would install the latest versions and this might not be compatible with each other. You can use the exert versions on the repo to avoid this problem.
nice post
Really good post. Thanks!
Nice, do you know how to use it vuetify?
No i don't, i've actually never used vuetify.
Great post, thank you!
I'm having a problem to compile sass, thou. It´s like sass-loader isn´t working.
Had this kind of issue already?