Step 1: iOS App
I'm going to assume you have Xcode installed.
Step 1.1: Install CocoaPods
CocoaPods is a package handler for Xcode. We will be using it to install Alamofire, which a Swift library for making HTTP requests. We will need HTTP call support as we will call our server to store the EEG samples.
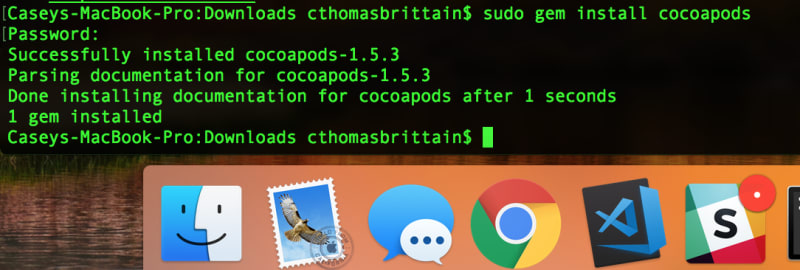
sudo gem install cocoapods
After you hit Return it will prompt for your password
Step 1.2: Setup Xcode Project
Now, let's setup a project folder. This is main folder where all the iOS app code will live. It's a bad habit, but I usually put mine on the Desktop.
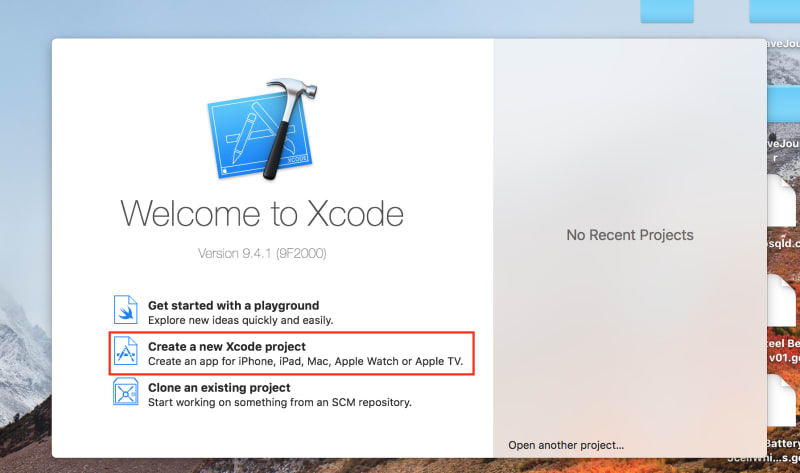
Open Xcode and select "Create a new Xcode proejct"
Then select "Single View App" and click "Next"
Let's call the project MindWaveJournaler and click "Next"

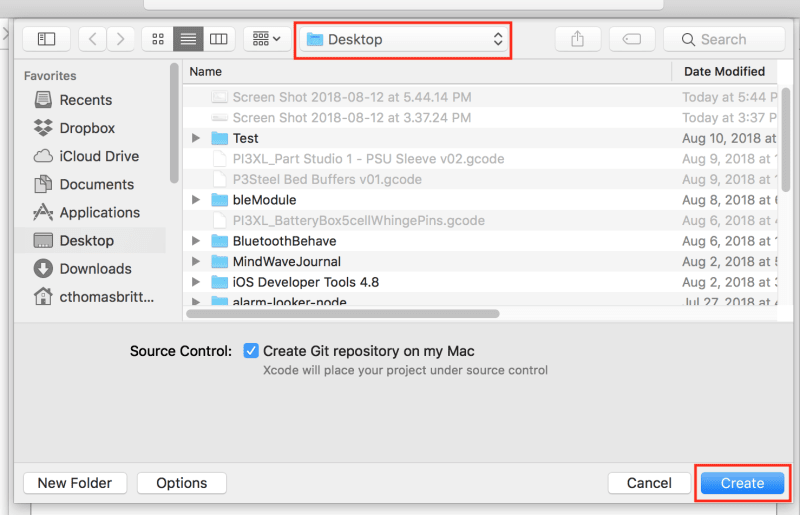
Choose your Desktop as location for the project and click "Create"
Step 1.3: Development Environment Setup
You've created a Project Folder, but we have to setup the project folder to be used with CocoaPods. After, we will use CocoaPods to install Alamofire.
Back in the terminal, type:
cd ~/Desktop/MindWaveJournaler
pod init
This creates a Podfile in the root folder of our project. We can list CocoaPod packages in the Podfile and run pod install in the same directory, this will cause CocoaPods to install all the packages we listed.
Sadly, we are really only doing this for Alamofire right now. But, later, when we start building on to this app it will allow us to quickly access third-party frameworks.
Ok, back to typing:
open -a Xcode Podfile
This will open the Podfile for editing in Xcode. Now let's insert the our desired pod information.
Copy information below and paste it into your file:
# Uncomment the next line to define a global platform for your project
platform :ios, '11.4'

target 'MindWaveJournaler' do
  # Comment the next line if you're not using Swift and don't want to use dynamic frameworks
  use_frameworks!

  # Pods for MindWaveJournaler
  pod 'Alamofire', '~> 4.7'

  target 'MindWaveJournalerTests' do
    inherit! :search_paths
    # Pods for testing
  end

  target 'MindWaveJournalerUITests' do
    inherit! :search_paths
    # Pods for testing
  end

end
You may notice the only changes we made were
platform :ios, '11.4'
...
pod 'Alamofire', '~> 4.7'
These lines tell CocoaPods which version of iOS we are targetting with our app (this will silence a warning, but shouldn't be required). The other, is telling CocoaPods which version of Alamofire we'd like to use on this project.
Ok, now let's run this Podfile.
Back in the same directory as the Podfile type:
pod install
You should see CocoaPods do its thing with output much like below.
Step 1.4: Install NeuroSky iOS SDK
NeuroSky has a "Swift SDK." Really, it's an Objective-C SDK which is "bridged" into Swift. Essentialy, this means we won't be able to see what's going on the SDK, but we can use functions from the pre-compiled binaries.
I've not been impressed with NeuroSky's website. Or the SDK. It does the job, but not much more.
Anyway, the SDK download is annoyingly behind a sign-up wall.
Visit the link above and click on "Add to Cart"
Then "Proceed to Checkout"
Lastly, you have to enter your "Billing Information." Really, this is only your email address, last name, street address, city, and zip.
(Really NeuroSky? This is very 1990.)
Eh, I made mine up.
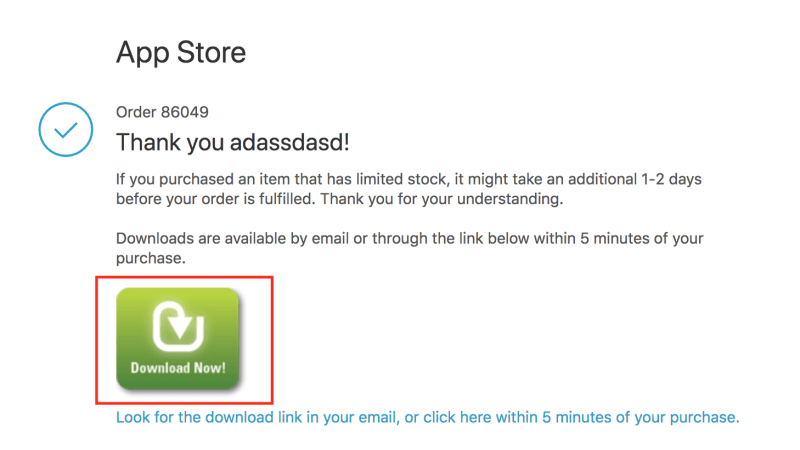
Anyway, after your enter information click, then click "Continue to PayPal" (What? I just provided my information...) You should be rewarded with a download link. Click it and download the files.
Unzip the files and navigate lib folder
iOS Developer Tools 4.8 -> MWM_Comm_SDK_for_iOS_V0.2.9 -> lib
Copy all files from the lib folder into the main directory of the MindWaveJournaler project folders.
Step 1.5: Workspace Setup
CocoaPods works by creating a .xcworkspace file. It contains all the information needed to compile your project with all of the CocoaPod packages installed. In our case the file will be called MindWaveJournaler.xcworkspace. And every time you want to work on your project, you must open it with this specific file.
It can be a bit confusing because Xcode created a .xcodeproj file which is tempting to click on.

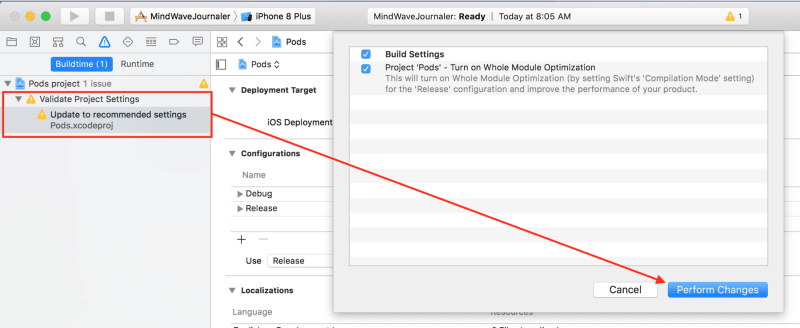
Go ahead and open the MindWaveJournaler.xcworkspace file. The workspace should open with one warning, which we will resolve shortly.
But first, another caveat. CoreBluetooth, Apple's Bluetooth LE Framework, only works when compiled for and run on an actual device. It does *not work in the iOS Simulator.* Once upon a time it did, if your Mac had the hardware, however, my version of the story is Apple didn't like having to support the confusion and dropped it.
Moving on. Click on the yellow warning. Then click on the warning in the sidebar. This should create a prompt asking if you'd like to make some changes. This should automatically make some tweaks to the build settings which should make our project mo' betta.
This should silence the warning and make your project error free. Go ahead and hit Play button and let it compile to the simulator (we aren't testing the Bluetooth, so it's ok). Everything should compile correctly, if not, just let me know the specifics of your problems in the comments.
Step 1.5: Enable Secure HTTP Request
There are still a few tweaks we need to make to the Xcode workspace to get everything working.
First, open the ViewController.swift file and add import Alamofire right below import UIKit. If auto-complete lists Alamofire as an option you know the workspace is detecting its presence. Good deal.
Now, for Alamofire to be able to securely make HTTP request an option needs to be added to the Info.plist file. I scratched my head as to why the HTTP calls were not being made successfully until Manab Kumar Mal's StackOverflow post:
Thanks, buddy.
Ok, following his instructions open up the Info.plist file in your MindWaveJournaler folder. Now add an entry by right-clicking and selecting Add Row. Change the Application Category to NSAppTransportSecurity and make sure it's set as dictionary. Now, click the plus sign by the new dictionary and set this attribute as NSAllowsArbitraryLoads, setting the type bool, and the value as YES.
Step 1.5: Setup Objective-C Bridge Header for MindWave SDK
There's a few other bits of housekeeping, though. As I mentioned earlier, the MindwAve SDK is in an Objective-C precompiled binary. It is usable in a Swift project, but requires setting up a "bridge header" file.
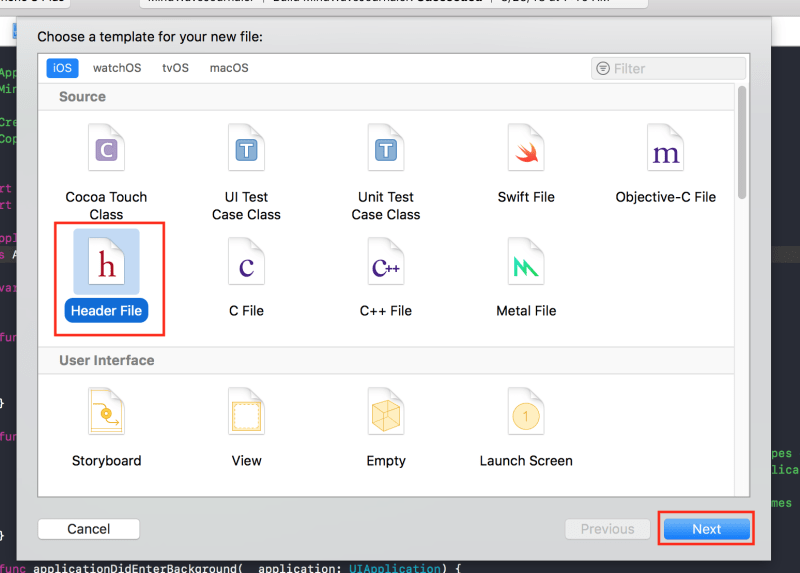
Start by creating the bridge header file. Go to File -> New -> File...
Then select Header and click Next.
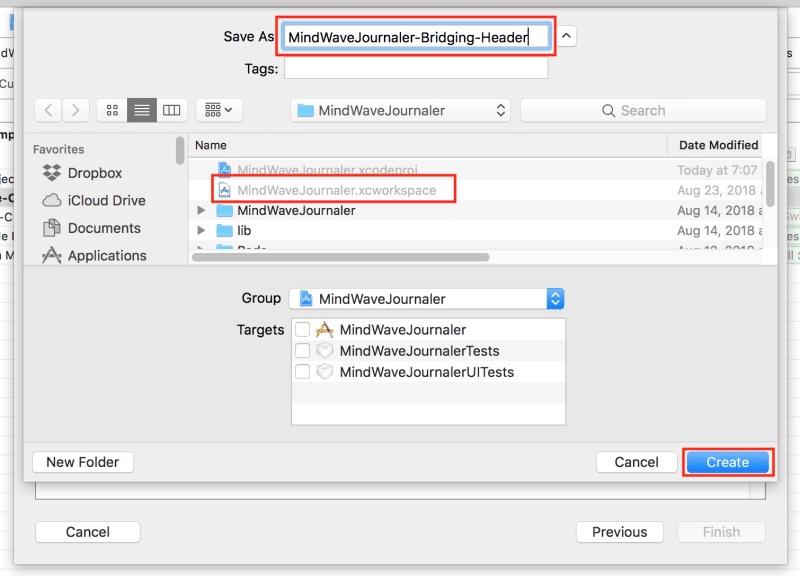
Name the file YourProjectName-Bridging-Header and make sure the file is saved to the same folder which contains the .xcworkspace file, then click Create.
The header file should automatically open. Copy and paste the following to the bottom of the header file.
#import "MWMDevice.h"
#import "MWMDelegate.h"
#import "MWMEnum.h"
My entire file looked like this once done.
MindWaveJournaler-Bridging-Header.h
//
//  MindWaveJournaler-Bridging-Header.h
//  MindWaveJournaler
//
//  Created by Casey Brittain on 8/3/18.
//  Copyright © 2018 Honeysuckle Hardware. All rights reserved.
//

#ifndef MindWaveJournaler_Bridging_Header_h
#define MindWaveJournaler_Bridging_Header_h

#endif /* MindWaveJournaler_Bridging_Header_h */

#import "MWMDevice.h"
#import "MWMDelegate.h"
#import "MWMEnum.h"
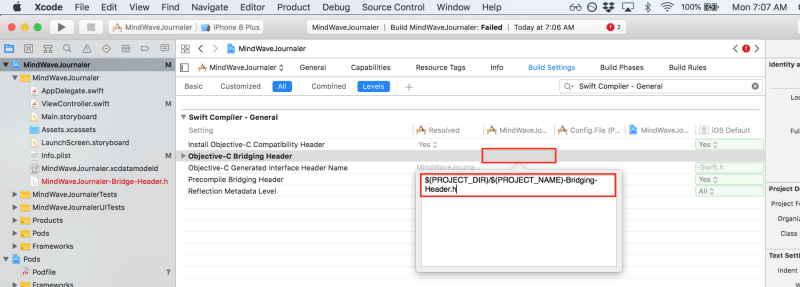
Let's tell the Swift compile we have a header file. In Xcode go to Project File -> Build Settings -> All then in the search box type Swift Compiler - General (if you don't include the hyphen and spaces it wont find it).
Double-click on the line Objective-C Bridging Header directly underneath the name of your project (see red box in image). Copy and paste the following into the box and click off to save the change.
$(PROJECT_DIR)/$(PROJECT_NAME)-Bridging-Header.h
This creates a relative path to your Bridging-Header file. In a little bit we are going to try to compile, if you get errors around this file not being found, then it's probably not named per our naming scheme (YourProjectName-Bridging-Header) or it wasn't saved in the same folder as the .xworkspace file. No worries, if you have troubles just leave me a comment below.
One last thing to do before we're ready to code. We still need to import the MindWave SDK into our project.
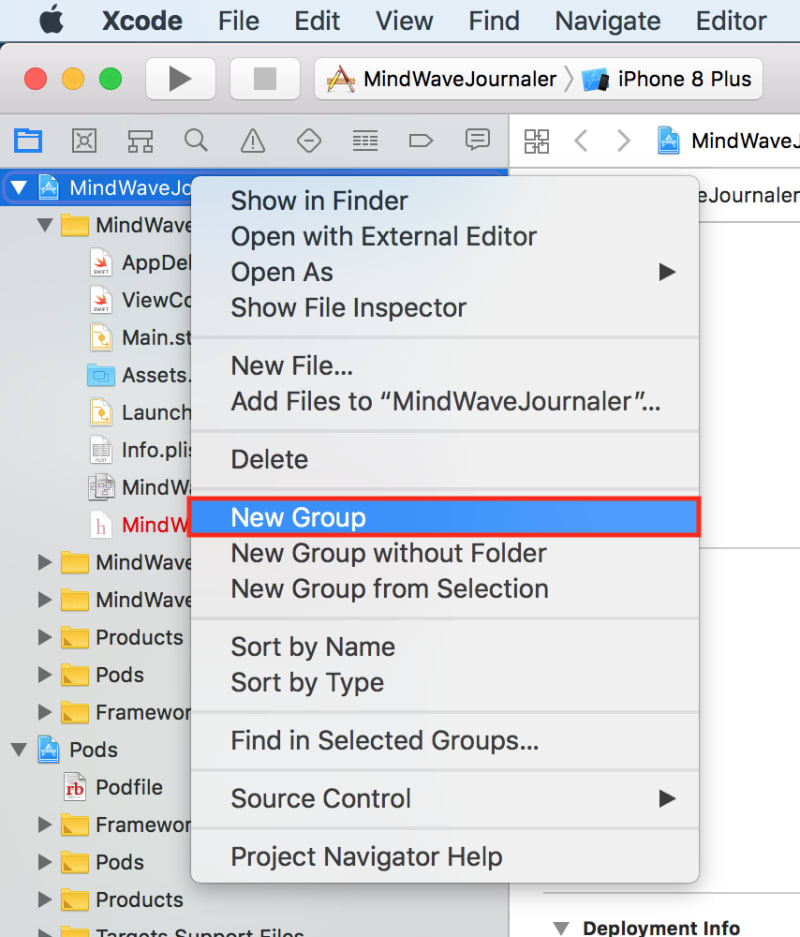
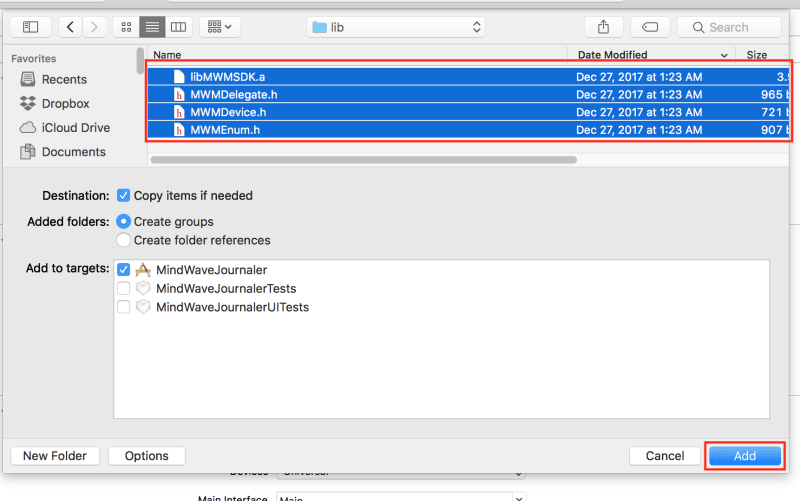
Right click on your project file and select New Group. Name the group MindWave SDK. Now right click on the folder you created and select Add Files to "MindWave SDK".... Navigate to the lib folder containing the MindWave SDK and select all files inside it.
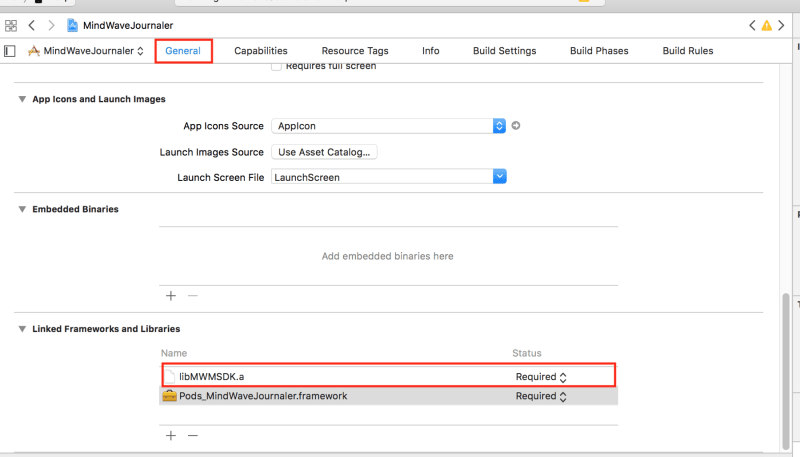
When you add the SDK, Xcode should automatically detect the binary file (libMWMSDK.a) and create a link to it. But, let's make sure, just in case. Click on your project file, then go to the General tab.
It needs to be linked under the Build Phases tab as well, under Linked Frameworks and Libraries.
That's it. Let's test and make sure your app is finding the SDK appropriately.
Open the ViewController file and under viewDidLoad() after the existing code, type:
let mwDevice = MWMDevice()
mwDevice.scanDevice()
Watch for autocomplete detecting the existince of the MindWave SDK
Now for the true test, Compile and Run. But, before we do, please be aware--this will only work on an actual iOS device. If you try to run it in the iOS simulator it will fail. It actually fails on two accounts, first, CoreBluetooth will not work in the iOS simulator, second, the MindWave SDK binaries were compiled specifically ARM architecture.
Ok! Enough preamble. Connect and select your iOS device and hit Run.
If all goes well you should see two things. A blank white screen appear on your phone and concerning message in the Xcode console.
The CoreBluetooth error has to do with firing up the iOS Bluetooth services without checking to make sure the iOS BLE is turned on and ready to go. This is a good thing, it probably means the MindWave SDK has been foudn and is functioning properly.
If you get any other errors, let's chat. I'll help if I can.
This is part of a series, which I'm writing with care as I've time. I'll get the next part out ASAP.











Top comments (0)