Hello, Today we'll see, how we can easily create a music player using HTML, CSS and JS only. No other library. Our music player has modern looking designs, with cool animations like play/pause animation, disk rotating animation and pulse animation. Our music player has working forward/backward buttons with seek-able song slider.
To see demo or you want full coding tutorial video for better understanding. You can watch the tutorial below.
Video Tutorial
I appreciate if you can support me by subscribing my youtube channel.
Code
Before we start writing our code. Although it's not a Nodejs app but we should see its folder structure at least.
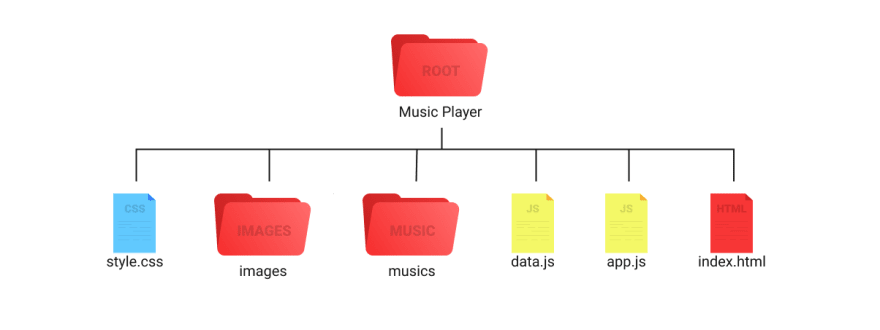
So, now let's start designing our music player.
First, of course write basic HTML template inside index.html file and link style.css, app.js to it. Then make a music player container.
<div class="music-player">
</div>
*{
    margin: 0;
    padding: 0;
    box-sizing: border-box;
}

body{
    width: 100%;
    height: 100vh;
    display: flex;
    justify-content: center;
    align-items: center;
    background: #5f7a61;
    font-family: 'roboto', sans-serif;
}

.music-player{
    width: 350px;
    height: 550px;
    border-radius: 20px;
    background: rgba(255, 255, 255, 0.08);
    box-shadow: 0 40px 100px rgba(255, 255, 255, 0.1);
    padding: 30px;
    overflow: hidden;
    color: #d5eebb;
}
Output
Now make song name, artist name.
<!-- Inside music player element -->
<h1 class="music-name">song one</h1>
<p class="artist-name">artist</p>
And of course style them.
.music-name,
.artist-name{
    text-align: center;
    text-transform: capitalize;
}

.music-name{
    font-size: 40px;
    font-weight: 500;
    margin-bottom: 10px;
}

.artist-name{
    font-size: 20px;
}
here " , " (comma) is used to give same style to more than one element.
Output

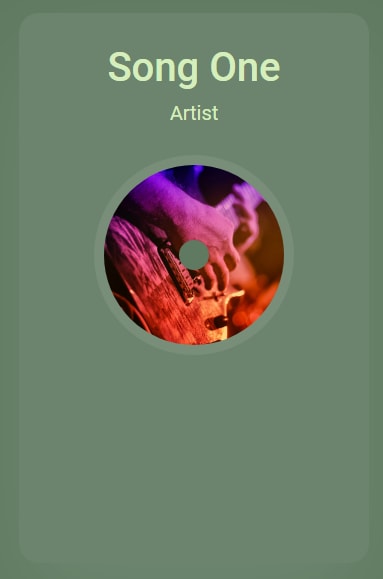
Great! Now make disk/cover image of the song. For that we use just a single div and will give background-image to set song cover image.
<div class="disk"></div>
Remember all the elements we are adding inside
music playercontainer.
.disk{
    position: relative;
    display: block;
    margin: 40px auto;
    width: 180px;
    height: 180px;
    border-radius: 50%;
    background-image: url('images/cover\ 1.png');
    background-size: cover;
    box-shadow: 0 0 0 10px rgba(255, 255, 255, 0.08);
}
here, I am using
box-shadowto create outer circle for the disk.
Output

But, how we make a hole at the center. For that, we'll use ::before pseudo element. You can find more about it here.
.disk::before{
    content: '';
    position: absolute;
    top: 50%;
    left: 50%;
    transform: translate(-50%, -50%);
    width: 30px;
    height: 30px;
    border-radius: 50%;
    background: #5f7a61;
}
Output
Hmm! It looking great. Now, make seek bar for the music player of course.
<div class="song-slider">
    <input type="range" value="0" class="seek-bar">
</div>
.song-slider{
    width: 100%;
    position: relative;
}

.seek-bar{
    -webkit-appearance: none;
    width: 100%;
    height: 5px;
    border-radius: 10px;
    background: #7fc8a9;
    overflow: hidden;
    cursor: pointer;
}

.seek-bar::-webkit-slider-thumb{
    -webkit-appearance: none;
    width: 1px;
    height: 20px;
    box-shadow: -400px 0 0 400px #d5eebb;
}
-webkit-appearance: this is used to hide all the default styles of the element done by browser.-webkit-slider-thumb: this will select the thumb or head of the slider, that we drag.
Output

Make music current time and duration element now.
<div class="song-slider">
    <input type="range" value="0" class="seek-bar">
    <span class="current-time">00:00</span>
    <span class="song-duration">00:00</span>
</div>
.current-time,
.song-duration{
    font-size: 14px;
}

.song-duration{
    position: absolute;
    right: 0;
}
Output

Now, make controls. We'll make play button icon with CSS and forward/backward button will be the images.
<div class="controls">
    <button class="play-btn">
        <span></span>
        <span></span>
    </button>
</div>
.controls{
    width: 60%;
    display: flex;
    justify-content: space-between;
    align-items: center;
    margin: auto;
    margin-top: 20px;
}

.play-btn{
    position: relative;
    width: 60px;
    height: 60px;
    border-radius: 50%;
    background: #d5eebb;
    cursor: pointer;
    border: none;
}

.play-btn span{
    position: absolute;
    top: 50%;
    left: 25%;
    transform: translateY(-50%);
    width: 10px;
    height: 30px;
    border-radius: 2px;
    background: #5f7a61;
    transition: .5s;
    clip-path: polygon(0 0, 100% 0, 100% 100%, 0% 100%);
}

.play-btn span:nth-child(2){
    left: 55%;
    transform-origin: center;
}
If you notice here, in the
spanselector, I am setting defaultclip-path, this is because I want smooth transition when using clip-path for that I need to define a default value as well. And the the value of clip path is just a rectangle.
Output

Now I want to make this pause logo to a play logo. For that I'll use an extra class pause.
.play-btn.pause span:nth-child(2){
    transform: translateY(-50%) scaleY(0);
}

.play-btn.pause span:nth-child(1){
    width: 35%;
    left: 53%;
    transform: translate(-50%, -50%);
    border-radius: 0;
    clip-path: polygon(0 0, 100% 50%, 100% 50%, 0% 100%);
}
When you have some thing like this
.class.classor.class#idor#id.classhave multiple selector without space. This means you are selecting the elements when having both classes/ids.What we did in the above CSS is, when the play icon have
pauseclass, we are scaling down its 2nd span to 0 making it fully disappear. And using clip-path to make a triangle shape for the first span.
Output

Output when toggling the
play-btnelement'spauseclass from chrome inspector.
Now make pulse animation and add it to play-btn when having pause class.
.play-btn.pause{
    animation: pulse 2s linear infinite;
}

@keyframes pulse{
    0%{
        box-shadow: 0;
    }
    50%{
        box-shadow: 0 0 0 5px rgba(255, 255, 255, 0.1);
    }
    100%{
        box-shadow: 0 0 0 5px rgba(255, 255, 255, 0.4);
    }
}
Add pause class to the play-btn element as default. Great! Now make forward/backward buttons.
<div class="controls">
    <button class="btn backward-btn"><img src="images/pre.png" alt=""></button>
    <button class="play-btn pause">
        <span></span>
        <span></span>
    </button>
    <button class="btn forward-btn"><img src="images/nxt.png" alt=""></button>
</div>
.btn{
    width: 40px;
    height: 40px;
    background: #d5eebb;
    border-radius: 50%;
    display: flex;
    justify-content: center;
    align-items: center;
    border: none;
    cursor: pointer;
}
Output

Now the last animation we want is disk rotation. For that make an animation.
@keyframes rotate{
    0%{
        transform: rotate(0);
    }
    100%{
        transform: rotate(360deg);
    }
}
But how to give this animation. Give this animation as default to .disk element. But set its animation-play-state to paused. animation-play-state is used to set animation state. In this case we want animation to be paused at start.
And change the state to running, when disk element have class play.
.disk{
    // previous styles
    animation: rotate 20s linear infinite;
    animation-play-state: paused;
}

.disk.play{
    animation-play-state: running;
}
We are done with designing the player. Now, let's make this player function.
Before writing JS, make sure you do these things.
- Make an audio source. We of course need an audio source to play the music. For that just make an empty audio element at the very start and give it a id so we can access it in JS.
<audio src="" id="audio"></audio>
- And 2nd thing is, make sure you add
data.jsfile beforeapp.jsbecause, our data is indata.jsbut we can only access it inapp.jsif we import it beforeapp.js.
Now we can write JS.
Initialize a variable to store current music index. Set it default value to 0.
let currentMusic = 0;
Now select each and every element that we need to add some behaviour.
const music = document.querySelector('#audio');

const seekBar = document.querySelector('.seek-bar');
const songName = document.querySelector('.music-name');
const artistName = document.querySelector('.artist-name');
const disk = document.querySelector('.disk');
const currentTime = document.querySelector('.current-time');
const musicDuration = document.querySelector('.song-duration');
const playBtn = document.querySelector('.play-btn');
const forwardBtn = document.querySelector('.forward-btn');
const backwardBtn = document.querySelector('.backward-btn');
Once you are done selecting all the elements. make a function to setup the music.
// setup music

const setMusic = (i) => {
    seekBar.value = 0; // set range slide value to 0;
    let song = songs[i];
    currentMusic = i;
    music.src = song.path;

    songName.innerHTML = song.name;
    artistName.innerHTML = song.artist;
    disk.style.backgroundImage = `url('${song.cover}')`;

    currentTime.innerHTML = '00:00';
    setTimeout(() => {
        seekBar.max = music.duration;
        musicDuration.innerHTML = formatTime(music.duration);
    }, 300);
}
Here, we are setting up the song. Thing to notice here is,
-
setTimeout- I am using this because, there is a slight time difference in setting up the music and accessing it. Which causing an error while accessing its duration. -
formatTime- This is a function that we'll create next. This function will take time as an argument, and return us the formatted value. For instance is we pass -formatTime(120)then it will return02:00.
Don't forget to call the setMusic once with 0 as an argument.
setMusic(0);
Create format time function.
// formatting time in min and seconds format

const formatTime = (time) => {
    let min = Math.floor(time / 60);
    if(min < 10){
        min = `0${min}`;
    }
    let sec = Math.floor(time % 60);
    if(sec < 10){
        sec = `0${sec}`;
    }
    return `${min} : ${sec}`;
}
Now we can add click event to our play button.
playBtn.addEventListener('click', () => {
    if(playBtn.className.includes('pause')){
        music.play();
    } else{
        music.pause();
    }
    playBtn.classList.toggle('pause');
    disk.classList.toggle('play');
})
element.classNamereturns its classes andincludesmethod is used to find a particular string is inside the text or not.
Now make seek bar update to song's current time after every 500ms.
// seek bar
setInterval(() => {
    seekBar.value = music.currentTime;
    currentTime.innerHTML = formatTime(music.currentTime);
}, 500)
This will update the seek bar after every 500ms.
Now, we also want to jump in between song time. For that add change event to the seek bar.
seekBar.addEventListener('change', () => {
    music.currentTime = seekBar.value;
})
We are almost done. Now create forward/backward click events.
// forward and backward button
forwardBtn.addEventListener('click', () => {
    if(currentMusic >= songs.length - 1){
        currentMusic = 0;
    } else{
        currentMusic++;
    }
    setMusic(currentMusic);
    playMusic();
})

backwardBtn.addEventListener('click', () => {
    if(currentMusic <= 0){
        currentMusic = songs.length - 1;
    } else{
        currentMusic--;
    }
    setMusic(currentMusic);
    playMusic();
})
And yes, if you see we have playMusic function. Its purpose in life is to play music every time.
const playMusic = () => {
    music.play();
    playBtn.classList.remove('pause');
    disk.classList.add('play');
}
And the last thing, to make song forward when the current song end. Code this inside 500ms interval.
setInterval(() => {
    seekBar.value = music.currentTime;
    currentTime.innerHTML = formatTime(music.currentTime);
    if(Math.floor(music.currentTime) == Math.floor(seekBar.max)){
        forwardBtn.click();
    }
}, 500)
And that's it. Great Job! we are done with our music player. I hope you understood each and everything. If you have doubt or I missed something let me know in the comments.
Articles you may find Useful
I really appreciate if you can subscribe my youtube channel. I create awesome web contents.

Download the assets, Source Code, Donate me on Paypal
My next upcoming tutorials which you might don't want to miss.
- Fully working e-commerce website - Fullstack
- Responsive Personal Portfolio
- Visiting card designer with download feature.
Your donation really motivates me to do more amazing tutorials like this. Support me on patreon, Buy me a coffee, Donate me on paypal
Thanks For reading.


Top comments (12)
Why not listen for
timeupdateevent on the audio element instead of usingsetInterval.Yes for end of song seems like a better way. Especially long songs, more deviation
Well I didn't knew about that. Thanks for telling this event☺️
It's best to consult the doc for stuff like that
I would also suggest tracking the play/pause state against a variable instead of relying on css classes to determine the current state.
Yup! We can use
music.pausedas a condition instead of checking for play class both will work☺️Hi, I am new to HTML/CSS and am creating this project, however the "play" button is in the top left hand side of the container and not the centre, despite me checking the code multiple times I can not figure out why, and my code is exactly the same as yours, any suggestions would be appreciated!
The problem: cdn.discordapp.com/attachments/904...
Code: cdn.discordapp.com/attachments/904...
The pre and nxt buttons don't even show up exactly how your's shows up. For me they are just very narrow white lines. Where did you get those images from?
I created those arrows while designing the music player in figma. But you can use font awesome or you can download arrow image from google
Oh ok coo, I gotta check out figma. I actually went to Google and looked through the images but then I stopped and thought to myself that images from there won't work for the button. Also if you don't mind answering how do you memorize sush very long lines of code across different languages? It reminds me of really long math problems. It just seems like so much to memorize especially all the different numbers for the sizes of the various elements.
No programming is not about memorizing things. I don't memorize any line. Its just practice which made everything easy for us. If you are talking about how I record my tutorial in that case I use a second screen which show me what to code. So there is no memorizing 😅
I want to ask, to make a list of songs like rytmp3 is it also possible to make it like the way above?