
This tutorial is the eighth chapter of our implementation of an Airbnb clone in React Native. In the previous chapter, we successfully implemented the “Forgot Password” feature with Firebase. In case you need to get caught up, here are links to parts 1–7: and inspired by React native real estate template by Instamobile
- AirBnB Clone with React Native Part 1: Home Screen UI
- AirBnB Clone with React Native Part 2: Login Screen UI
- AirBnB Clone with React Native Part 3: Email Authentication with Firebase
- AirBnB Clone with React Native Part 4: Login error notifications
- AirBnB Clone with React Native Part 5: Loading Modal Implementation
- AirBnB Clone with React Native Part 6: Animated Checkmarks
- AirBnB Clone with React Native Part 7: “Forgot Password?” with Firebase
In part 8, we’re going to continue where we left off by implementing the Firebase Facebook Login feature for iOS. Facebook login is one of the most used social login features for both websites and mobile applications.
These social logins make it easier for users to log in from their social media accounts. They won’t have to do the work of filling out long registration forms. With just a click of a button, users can log in with their social credentials.
We might remember that in the first part of this tutorial series, we added the Facebook login button to the Login screen. Here, the idea is to add functionality to that button using Firebase’s Facebook login system so that users can log in by just clicking the button.
Note that this tutorial provides guidance for setting up Firebase Facebook login for iOS only. For a look at the comparable implementation on Android, check out this tutorial
Looking for new ways to elevate your mobile app’s user experience? With Fritz AI, you can teach your apps to see, hear, sense, and think. Learn how and start building with a free account.
Setting up the Facebook SDK package
First, we’re going to install the Facebook SDK, which provides us with components and an API to implement Facebook login and other features. In order to do that, we need to install the react-native-fbsdk package into our project using the following command:
After installing the package, we need to run the following command to link the package with the native part of our React Native project:
Now we need to navigate to the ‘./ios/’ directory in our project command prompt and run the following command:
Here, cd ios is used to enter the iOS directory, and pod install will configure the dependencies with the iOS app.
Configuring iOS files
In this step, we need to update some iOS files with Facebook App IDs and the app name. For this, we can follow the instructions provided in the documentation of the Facebook developer console for iOS.
Next, we open our project in Xcode and then open the info.plist file. Then, we need to copy the code from the following code snippet into the info.plist file:
Then, we need to replace the app-id and app-name with the proper values as shown in the screenshot below:

The last file we need to configure is the appdelegate.m file. Once opened, we need to copy the code from Facebook’s documentation (linked above) and paste it into the appdelegate.m file. After this, move the code provided in the following code snippet into our appdelegate.m file:
Next, we need to import FBSDKCorkit.h into our appdelegate.m file, as highlighted in the screenshot below:

The next revolution in mobile development? Machine learning. Don’t miss out on the latest from this emerging intersection. Sign up for weekly updates from our crew of mobile devs and machine learners.
Configuring the Login Button
Here, we’re going to configure the Facebook login button, which we’ve already added to our LoggedOut.js file from the first part of this tutorial series.
Now we need to go to the LoggedOut.js file of our React Native project. Import the LoginManager component from the react-native-fbsdk package, as shown in the code snippet below:
import { LoginManager,AccessToken } from 'react-native-fbsdk';
Since we already have the Facebook Login button, we don’t need to implement it. We just need to add the functionality to the button.
To do this, we’re going to create a function called FacebookLogin(), which will contain the configuration for the login. We need to copy the code from the Firebase documentation and paste it inside the FacebookLogin() function, as shown in the code snippet below:
Here, we’ve implemented the FacebookLogin() function as an asynchronous function. First, we activate the Facebook login. Then, we’ll get an access token in return, which we save to Firebase. And when Firebase returns the login credentials, we manually authenticate to Firebase. And after ensuring that everything is a success, we navigate to the Home screen.
Next, we need to add the FacebookLogin() function to the onPress event of the RoundedButton component, which represents the Facebook login button:
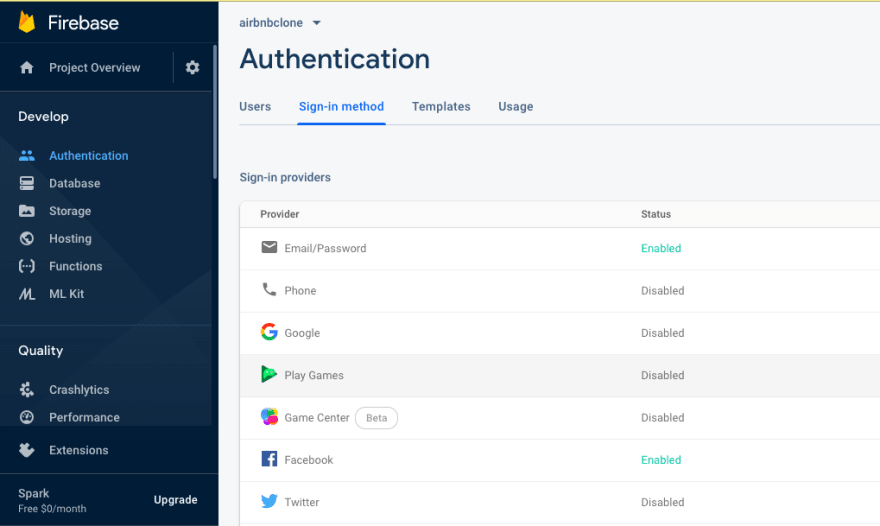
Lastly, we need to enable the Facebook Login feature on Firebase, as shown in the screenshot below:
Now, if we re-run the project in the iOS emulator for testing, we’ll get the following result:

As we can see, when we press the Facebook Login button, we’re redirected to the Facebook interface in order to ensure that we do indeed want to continue with the selected Facebook account. Then, after we press ‘Continue’, we’re successfully logged in with our Facebook account and redirected to the Home screen.
And that’s it! We’ve now successfully implemented the Firebase Facebook Login feature (for iOS) in our AirBnB Clone with React Native tutorial series.
Conclusion
In this part of our AirBnB clone tutorial series, we learned how to implement Facebook login with Firebase in React Native for iOS. First, we installed the Facebook SDK package. Then, we went step-by-step in configuring the native iOS files in order to integrate them with Facebook IDs. Then, we used the component from the Facebook SDK package to configure the Facebook login button.
The implementation of Facebook login on Android is available in another tutorial (not included in this series). For the next part in our series, we’ll learn how to implement sessions after a successful login.
Editor’s Note:Heartbeat is a contributor-driven online publication and community dedicated to exploring the emerging intersection of mobile app development and machine learning. We’re committed to supporting and inspiring developers and engineers from all walks of life.
Editorially independent, Heartbeat is sponsored and published byFritz AI, the machine learning platform that helps developers teach devices to see, hear, sense, and think. We pay our contributors, and we don’t sell ads.
If you’d like to contribute, head on over to ourcall for contributors. You can also sign up to receive our weekly newsletters (Deep Learning Weekly andHeartbeat), join us onSlack, and follow Fritz AI onTwitter for all the latest in mobile machine learning.

Latest comments (0)