
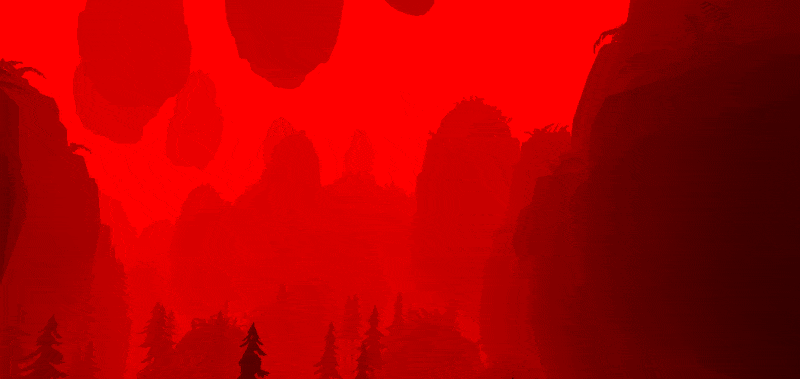
Idea and inspiration
Idea for this 3D scene comes from the magnificent Zhangjiajie National Forest Park in China. You can clearly see where the inspiration originates from - this majestic real life location also has grassy rock pillars covered in dense clouds and when observed from above, their bottom parts are disappearing in dense fog. To improve the magical feeling to the scene, we decided to make some rocks float mid-air. This additional inspiration comes from the map Gateway to Na Pali from my favorite game Unreal. This location has floating rocks in the distant background and is placed inside a huge floating rock itself. We decided to create a scene which would have a lot of similar floating islands densely packed in one area.
AI generated concept art
We also tried to use Stable Diffusion to generate some concept art for the scene in hope AI will hallucinate some unusual points of view or might incorporate some details which we may find fitting the scene. However, all images appeared to be virtually identical. AI created a series of rather dull images - the same rocks in the same fog without any additional details. We only used a couple of them as a reference for vivid sunrise color palettes which could as well be picked from any other sources.
Scene composition
To create this scene we’ve used and reused some stylized hand-painted 3D models from packs we’ve purchased quite some ago for our previous projects. No new assets were purchased for this project. Scene uses just 3 rock models, some generic ferns and trees, and birds flying in the sky.
Render order is the following: depth pre-pass, rocks, birds, sky, soft cloud particles.
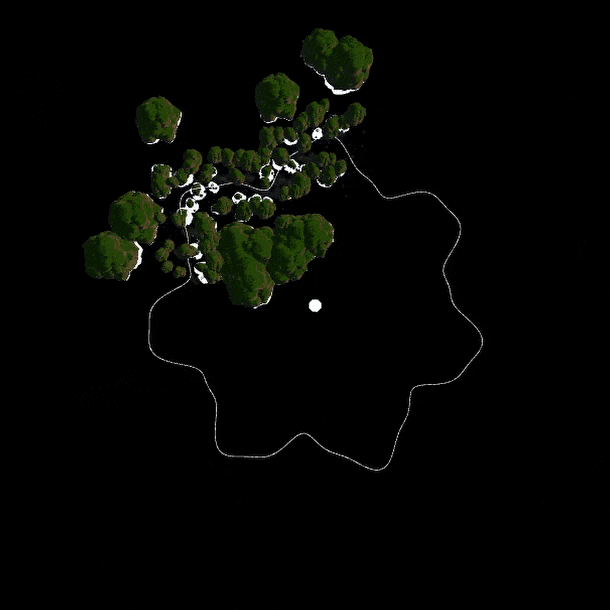
Camera path and objects placement
To make an impression of an endless random scene there were 2 options: a true random scene and a looped generated path. The first option requires object placement on the fly in front of the camera which means these positions have to be transferred to GPU dynamically. So a better option is to generate a static looped path once and draw objects along it as the camera moves.
You can find a function to generate a base spline in the positionOnSpline function in ObjectPlacement.ts file. It creates a circular looped path for the camera with oscillating radius. A couple of harmonics are applied to randomize the circle radius so it appears random but is still perfectly looped. Then, all objects are placed around this path - trees are under the camera, rocks above and to the sides.
Object positions and rotations are stored in typed Float32Array in the form of textures on GPU.
drawInstances method in Renderer.ts renders objects visible only from a certain point on the spline. Because of scene simplicity there's no need to use frustum culling - objects are drawn at a certain distance in front and back of the camera. This visibility distance is slightly larger than fog start distance so the new objects appear fully covered in fog and don't pop. Instances are ordered front-to-back so when drawn they make use of Z-buffer culling.
Only rocks and trees models are placed this way alongside the camera path. Bird flocks use hand-picked linear paths to cover the whole area of the scene with minimal paths.
Here is camera path visualized with only a subset of objects rendered in its vicinity:
Fog cubemaps
Initial implementation used fog of uniform color which looked rather bland. To add more color variation from different directions (like sun halo) we decided to use cubemaps for fog. This allows great flexibility for the artist (my brother) - he can completely change the look of the whole scene by creating a cubemap and tweaking a couple of colors in the scene preset. Cubemaps were initially created as equirectangular images since it is easy to paint them. Then we used an online tool to convert an equirectangular source image to 6 cubemap faces, and a simple ImageMagick script to fix their rotations to suit our coordinate system (Z-up).
You can find cubemap fog implementation in static constants from FogShader.ts. All fog shaders use them. Final fog coefficient used by vertex shader for color mixing also contains the height fog coefficient.
In the web demo UI you can adjust different fog parameters - start distance, transition distance, height offset and multiplier. Also, changing the scene time of day is done by using a different cubemap texture and a couple of colors for each preset.
Interestingly, after implementing this I’ve found out that fog cubemaps are widely used in Source engine, and of course this technique has also been incorporated in some indie games too.
Grass on rocks
To make rocks less dull we also apply grass texture on top of them. This technique is commonly used to simulate surfaces covered by snow or soaked with the rain. Grass texture is mixed with rock texture based on vertex normal. You can play around with the grassAmount slider in UI to see how it affects grass spread on rocks.
Source code of shader which applies grass texture on top of rocks is in FogVertexLitGrassShader.ts.
Soft clouds shader
Clouds are not instanced but are drawn one by one because transformation matrices for these objects have to be adjusted to always face the camera. There’s not that many of them so this doesn’t add too many draw calls. Actually, if GPU state is not changed (no uniforms are updated, blending mode switched, etc.) then even non-instanced rendering is quite fast on modern mobile and desktop GPUs. For test purposes we had a quick and dirty visualization of a camera spline with non-instanced rendering of 5000 small spheres and it caused no slowdowns.
There’s also one minor trick in this shader. As the camera flies through clouds, they can be abruptly culled by a near clipping plane. To prevent this, there is a simple smoothstep fading applied to fade right in front of the camera. You can find code in FogSpriteShader.
Result
You can see a live web demo here and if you like to have it on the home screen of your Android phone you can get a live wallpaper app on Google Play.
Source code is available on GitHub, feel free to play around with it.
As always, the web demo is heavily optimized for the smallest data size and Android app for the best efficiency and performance. Web version uses WebP for textures which offer better compression than PNG, better image quality than JPEG and support alpha channel even with lossy compression. Mipmaps are generated for all textures. The total gzipped size of the web demo is just 374 kB so you can copy it to a floppy disk to show to friends who have no Internet :)

Oldest comments (1)
thank for sharing