
Introduction
Have you ever wondered if there was a better way to manage, monitor, or secure your distributed microservices without adding extra modules to your code? Well, there is a way. It is called a Service Mesh.
This is the first part of the series on Using Istio, a Service Mesh, with Amazon Elastic Kubernetes Service (EKS). This guide will explain what a Service Mesh and Istio are and show you how to use Istio, a Service Mesh, with Amazon Elastic Kubernetes Service (EKS). You will use Flux to deploy various Kubernetes Services and Applications, including Istio, and supporting applications and microservices to Amazon Elastic Kubernetes Service (EKS).
You can access the code in my GitHub Repository.

Before we begin, let's define what Service Mesh and Istio are.
What is a Service Mesh?
A service mesh is a dedicated infrastructure layer for facilitating service-to-service communications between microservices, often in a cloud-based application. It's designed to handle a high volume of network-based inter-process communication among application infrastructure services using application programming interfaces (APIs).
Here's a breakdown of the key components and concepts of a service mesh:
Sidecar Proxy: In a typical service mesh, each microservice is paired with a lightweight network proxy that intercepts network communication. This proxy, often called a "sidecar," intercepts all network communication to and from the service.
Data Plane: The collection of sidecar proxies that intercept and control the network traffic between services make up the data plane. They are responsible for features like service discovery, health checking, routing, load balancing, authentication, authorization, and observability.
Control Plane: This is the administrative layer of the service mesh that provides the management capabilities. It allows operators to configure the proxies in the data plane and apply policies. It's also where the service mesh’s intelligence resides, as it controls the behavior of the proxy servers.
Service Discovery: Service meshes can dynamically recognize the addition of new services and the removal of old ones, adapting to the changes in the infrastructure.
Traffic Management: It can intelligently control the flow of traffic and API calls between services, handling load balancing, routing, and circuit breaking.
Security: Service meshes can handle encryption in transit and enforce security policies, like mutual TLS (mTLS), for service identity verification and secure communication.
Observability: Provides monitoring, logging, and tracing of service interactions, which is vital for diagnosing issues and understanding system behavior.
Policy Enforcement: It allows operators to apply organizational policies related to security, compliance, and governance across all service communications.
Examples of Service Meshes:
Istio: One of the most popular service mesh solutions, Istio is designed to connect, secure, control, and observe services. It works with Kubernetes but can also be adapted to integrate with other environments. It provides robust traffic management, security features, and observability.
Linkerd: Known for its simplicity and ease of use, Linkerd is a lightweight service mesh that offers core service mesh features like service discovery, routing, failure handling, and metrics. It's designed to be as transparent as possible and can be used with Kubernetes and other frameworks.
Consul: Consul by HashiCorp provides a full-featured control plane with service discovery, health checking, and a service mesh. It can be used with Kubernetes or virtual machines and is known for its cross-datacenter functionality.
AWS App Mesh: This service mesh provided by AWS makes it easy to manage and communicate between microservices across multiple types of compute infrastructure. App Mesh standardizes how your services communicate, giving end-to-end visibility and helping to ensure high availability for your applications.
Service meshes are helpful because they offload common functionalities from the application code, allowing developers to focus on the business logic rather than the complexities of networking. However, they also add a new layer to the infrastructure stack, which can increase complexity and the operational burden if not managed properly.
What is Istio?
Istio is an open-source service mesh that helps organizations run distributed, microservices-based applications more securely, reliably, and efficiently. It's designed to connect, monitor, and secure microservices, providing tools to manage traffic flows between services, enforce policies, and aggregate telemetry data. Google, IBM, and Lyft originally developed it and are now part of the Cloud Native Computing Foundation (CNCF). Istio is platform-independent but often associated with Kubernetes, commonly used to orchestrate containers that host microservices.
Here's a brief overview of what Istio can do:
Traffic Management: Istio provides advanced routing capabilities, allowing for A/B testing, canary releases, and more. It does this by managing the flow of traffic and API calls between services, which is crucial in a microservices architecture. It enables request retries, fault injection, and traffic splitting for increased resilience and control.
Security: Istio enhances security by providing inter-service authentication and authorization without requiring changes to the application. It manages certificates and keys and ensures encrypted communication between services with mutual TLS (mTLS), helping to reduce the risk of man-in-the-middle attacks.
Observability: It offers insights into the behavior of the services, including monitoring, logging, and tracing of the communications, which helps in understanding the performance and issues in the applications.
Policy Enforcement: Istio allows you to enforce policies regarding access control and resource usage across your microservices without modifying the services themselves.
Service Discovery: Istio supports service discovery mechanisms, making it easier for services to find and communicate with each other in a dynamic environment.
Istio achieves these features by deploying a special sidecar proxy (Envoy proxy) alongside each service instance. These proxies intercept and control all network communication between microservices, and they are managed by Istio's control plane, which provides the necessary rules for the proxies.
Istio’s service mesh architecture is composed of:
Data Plane: Consisting of intelligent proxies (Envoy) deployed as sidecars that mediate and control all network communication between microservices.
Control Plane: Manages and configures the proxies to route traffic and enforces policies at runtime.
Istio is designed to work on various environments, including on-premises, cloud-hosted, and hybrid environments, and it can run with services written in any language.
Istio operates at the platform layer, providing the infrastructure necessary to manage the interactions between microservices, while the application code remains unaware of Istio’s existence. It is typically used in Kubernetes environments but can also be used with other orchestration solutions. Its control plane architecture is responsible for managing the overall configuration and behavior of the service mesh.
By decoupling development concerns from operational challenges, Istio provides a uniform way to secure, connect, and monitor microservices.
Technologies we are going to use:
- HashiCorp Terraform
- Istio
- Flux
- GitHub
- Amazon Elastic Kubernetes Service (EKS)
- Amazon Elastic Container Registry (ECR)
- AWS Key Management Service (KMS)
- Amazon Route 53
- AWS Certificate Manager (ACM)
- Amazon Virtual Private Cloud (Amazon VPC)
- IAM policies and roles
Prerequisites
Before you begin, make sure you have the following before starting:
- An active AWS account. You can create a new AWS account here.
- AWS CLI installed and configured. Instructions can be found here.
- Terraform installed. Instructions can be found here.
- Helm installed. Instructions can be found here.
- Kubernetes CLI (kubectl). Instructions can be found here.
- Flux CLI. Instructions can be found here.
- A GitHub Personal Access Token. Instructions can be found here.
Architecture Overview
Amazon Elastic Kubernetes Service (EKS)
# Create AWS EKS Cluster
module "eks" {
  source  = "terraform-aws-modules/eks/aws"
  version = "~> 19.15"

  cluster_name                    = local.eks_cluster_name
  cluster_version                 = local.eks_cluster_version
  cluster_endpoint_private_access = true
  cluster_endpoint_public_access  = true

  cluster_addons = {
    kube-proxy = {
      most_recent                 = true
      resolve_conflicts           = "OVERWRITE"
      resolve_conflicts_on_update = "OVERWRITE"
    }
    vpc-cni = {
      most_recent                 = true
      resolve_conflicts           = "OVERWRITE"
      resolve_conflicts_on_update = "OVERWRITE"
      service_account_role_arn    = module.vpc_cni_ipv4_irsa_role.iam_role_arn
    }
    aws-ebs-csi-driver = {
      most_recent                 = true
      resolve_conflicts           = "OVERWRITE"
      resolve_conflicts_on_update = "OVERWRITE"
      service_account_role_arn    = module.ebs_csi_irsa_role.iam_role_arn
    }
    coredns = {
      most_recent                 = true
      resolve_conflicts           = "OVERWRITE"
      resolve_conflicts_on_update = "OVERWRITE"
    }
  }

  vpc_id     = module.vpc.vpc_id
  subnet_ids = module.vpc.private_subnets

  depends_on = [module.vpc]
}
...
AWS Certificate Manager (ACM)
# Create SSL Certificate using AWS ACM for Bookinfo
resource "aws_acm_certificate" "bookinfo" {
  domain_name       = "bookinfo.${local.public_base_domain_name}"
  validation_method = "DNS"

  lifecycle {
    create_before_destroy = true
  }
}

# Validate SSL Certificate using DNS for Bookinfo
resource "aws_route53_record" "bookinfo_validation" {
  for_each = {
    for dvo in aws_acm_certificate.bookinfo.domain_validation_options : dvo.domain_name => {
      name   = dvo.resource_record_name
      record = dvo.resource_record_value
      type   = dvo.resource_record_type
    }
  }

  allow_overwrite = true
  name            = each.value.name
  records         = [each.value.record]
  ttl             = 60
  type            = each.value.type
  zone_id         = local.route53_zone_id
}

# Retrieve SSL Certificate ARN from AWS ACM for Bookinfo
resource "aws_acm_certificate_validation" "bookinfo" {
  certificate_arn         = aws_acm_certificate.bookinfo.arn
  validation_record_fqdns = [for record in aws_route53_record.bookinfo_validation : record.fqdn]
}
...
Amazon Virtual Private Cloud (Amazon VPC)
# Create AWS VPC and Subnets
module "vpc" {
  source  = "terraform-aws-modules/vpc/aws"
  version = "~> 5.0.0"

  private_subnets     = [for k, v in local.azs : cidrsubnet(local.vpc_cidr, 4, k)]
  public_subnets      = [for k, v in local.azs : cidrsubnet(local.vpc_cidr, 8, k + 48)]

  name                 = local.vpc_name
  cidr                 = local.vpc_cidr
  azs                  = local.azs
  enable_nat_gateway   = true
  single_nat_gateway   = true
  enable_dns_hostnames = true
  enable_dns_support   = true

  create_flow_log_cloudwatch_iam_role             = true
  create_flow_log_cloudwatch_log_group            = true
  enable_dhcp_options                             = true
  enable_flow_log                                 = true
  flow_log_cloudwatch_log_group_retention_in_days = 7
  flow_log_max_aggregation_interval               = 60

  public_subnet_tags = {
    "kubernetes.io/cluster/${local.eks_cluster_name}" = "shared"
    "kubernetes.io/role/elb"                          = 1
  }

  private_subnet_tags = {
    "kubernetes.io/cluster/${local.eks_cluster_name}" = "shared"
    "kubernetes.io/role/internal-elb"                 = 1
  }
}
IAM policies and roles
# Create IAM Role for AWS ALB Service Account
module "load_balancer_controller_irsa_role" {
  source  = "terraform-aws-modules/iam/aws//modules/iam-role-for-service-accounts-eks"
  version = "~> 5.0"

  role_name                              = "${local.eks_iam_role_prefix}-aws-load-balancer-controller"
  attach_load_balancer_controller_policy = true

  oidc_providers = {
    ex = {
      provider_arn               = module.eks.oidc_provider_arn
      namespace_service_accounts = ["kube-system:aws-load-balancer-controller"]
    }
  }
}
...
Amazon ALB
Amazon ALBs will automatically be created when you deploy the various apps using Flux as the deployment tool. This will be discussed in part 2 of this article.
Amazon Route 53
When you deploy the various apps using Flux, the public domains you will use will be registered automatically on Amazon Route 53. This will be discussed in part 2 of this article.
We just finished reviewing the architecture that will be created by Terraform code. Several of the code blocks from above are just snippets of code. Please see the git repo for the complete code.
Setup and Deploy Infrastructure
Follow these steps to set up the environment.
- Set variables in "locals.tf". Below are some of the variables that should be set.
- aws_region
- aws_profile
- tags
- public_base_domain_name
- Update Terraform S3 Backend in provider.tf
- bucket
- key
- profile
- dynamodb_table
-
Navigate to the Terraform directory
cd terraform -
Initialize Terraform
terraform init -
Validate the Terraform code
terraform validate -
Run, review, and save a Terraform plan
terraform plan -out=plan.out -
Apply the Terraform plan
terraform apply plan.out -
Review Terraform apply results
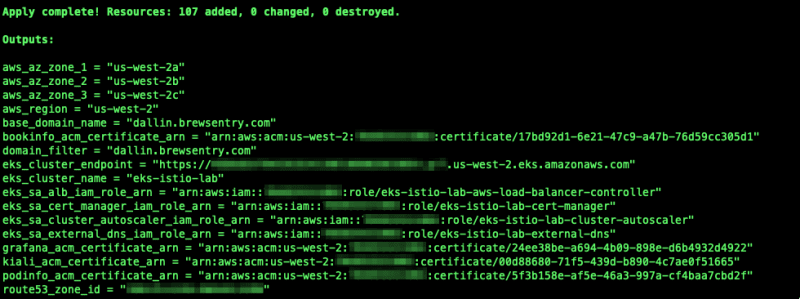
After completing the above steps, you should have a running and working Amazon EKS Cluster.
Please stay tuned for part two of the series, where we will complete the following tasks.
- Configure access to Amazon EKS Cluster
- Run the configure.sh script to configure the Flux Repository
- Install Flux to the Amazon EKS Cluster
- Review the Addons and Applications managed by Flux
- Discuss the Istio Components and Addons used by Istio
- Review how Istio works with Applications and Microservices

Top comments (0)