Azure virtual machine offers users to create their own office space on the go. its highly secured, offers developers a quick and easy way to create a computer with specific configurations required to code and test an application. Following these steps creates a Linux,and windows virtual machine.
CREATING AZURE WINDOWS VIRTUAL MACHINE.
1 login to azure website www.portal.azure.com create an account
2 Select create a resource.

3 From the Create a resource window, select virtual machine.

4 The next window that opens is the create a virtual machine. In Basic Menu bar, highlighted, these are some sections under it.
- project details - The option comprises the Subscription, and Resource group which are important and compulsory. A Subscription is required for every user of Azure, and the resource group is like a container that holds different resources. We named the Resource group for this practical 'Raphealazureclass'.
 2 Instance detail- The options provided are Virtual machine name, Regions, Availability-options, Security-type, Image, Size and more.
The Name is what we name our machine. The Region in Azure is which datacenter our machine is located.
2 Instance detail- The options provided are Virtual machine name, Regions, Availability-options, Security-type, Image, Size and more.
The Name is what we name our machine. The Region in Azure is which datacenter our machine is located.
 Availability option drop down button when selected provides us some options, in this practical we choose Availability zone. We have zone1,2,3. In a zone we have three (3) or more data centers located in a region. The more zone you choose the better, the more costly.
 select zone 1 for this practical.
 image is referring to the operating system. Since we are installing windows operating system, choose it from the drop-down menu.
 3 Administrator account - It is made up of the username and password.

4 Inbound port Rules- We are leaving it as default for this practical, note for creating a windows virtual machine we are using RDP 3389.

5 licensing - Select the box and click.

Next, we move to the Monitoring menu, Select Diagnostics tab, boot diagnostic and disable.

6 We click on Review and Create and wait for the machine to be provisioned.

7 When it shows 'Validation passed', then click the 'create' button.

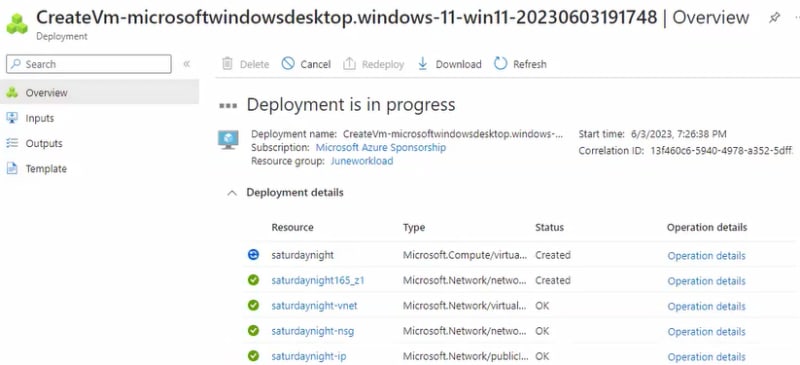
8 The Virtual machine is being created , we just wait for the machine to create all necessary resources it needs to work.
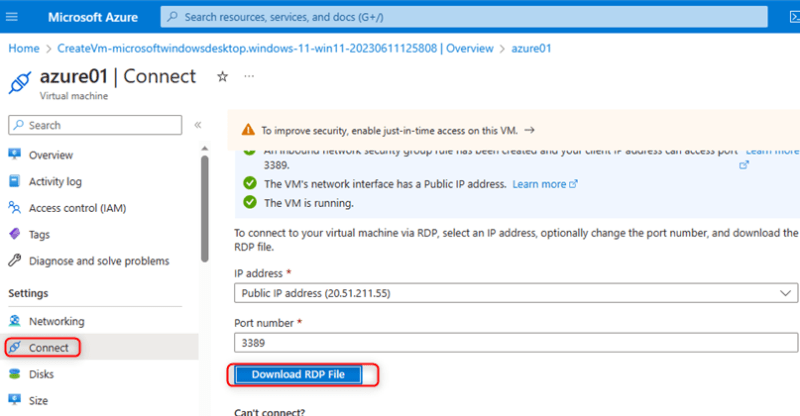
8 The Virtual Machine created is now ready. To access the machine, look at the left pane, Select settings. On the window open, select Download RDP.
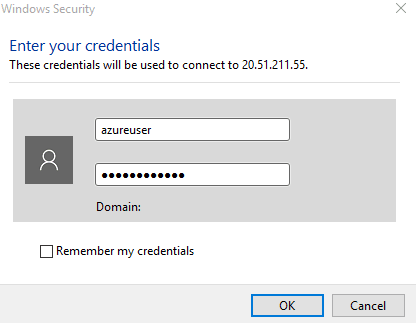
9 Now, your RDP has been downloaded you sign into your Virtual Machine using your Username and Password. Remember while creating our machine we used 'Azureuser'
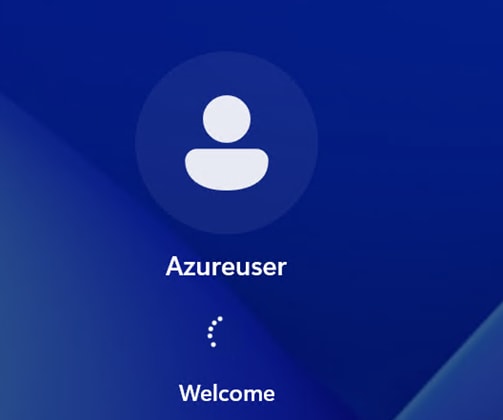
10 Finally our Machine is ready.
This guide shows you a step-by-step process to creating a windows machine.


Top comments (0)