
I recently completed a project that required me to send validation errors generated in the model schema to the user. Validation errors are generated when a user's input does not conform to the rules set to save such data. For example, if I set a password to not be more than 6 characters while signing up, a validation error is thrown when the user tries to set a password less than 6 characters.
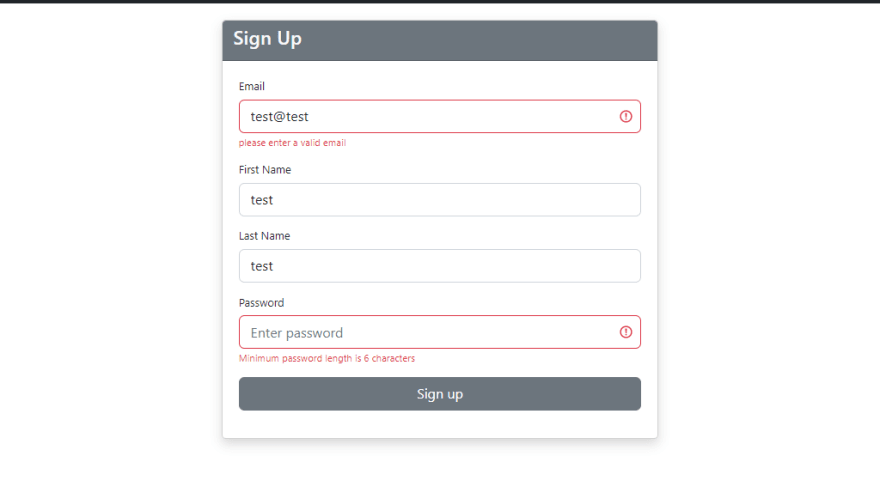
The picture above summarizes what we are trying to achieve in this article. We will be working on just this page to achieve this. The link to the whole project is here and is still a work in progress as of the time of publishing this article.
Let's get started
Prerequisite
To follow through, you will need basic understanding of the following:
Since we are going to try to render errors from the server to our views, we must have a basic understanding of Express.js in setting up a server.
Setting your Model to send out Errors
Mongoose allows us to design our Schema by defining certain properties that help to validate the kind of data that is sent by the user.
npm install mongoose
const mongoose = require("mongoose")
const { Schema } = mongoose
const { isEmail } = require("validator")

const AuthSchema = new Schema({
  email: {
    type: String,
    required: [true, "Please enter an email"],
    unique: true,
    lowercase: true,
    validate: [isEmail, "please enter a valid email"]
  },
  firstName: {
    type: String,
    required: [true, "Please enter your first name"],
    capitalize: true
  },
  lastName: {
    type: String,
    required: [true, "Please enter your last name"],
    capitalize: true
  },
  password: {
    type: String,
    required: [true, "Please enter password"],
    minlength: [6, "Minimum password length is 6 characters"]
  }
})
Taking the email field for example in the above code, it has several properties with set values but we are going to look at the required and the validate properties whose values are in an array. The second element of the array represents the error message.
| Property | Error message returned | What triggers error message |
|---|---|---|
| required | please enter an email | when email field is left empty |
| validate | please enter a valid email | when email an invalid email is supplied |
Handling the Error that comes from Mongoose
Before the error is passed on to a controller, we need to have a function that modifies the error in order to make it easier to use down the line.
const handleErrors = (err) => {
  let errors = { email: "", firstName: "", lastName: "", password: "" }

  // duplicate error
  if (err.code === 11000) {
    errors.email = "the email is already in use"
    return errors
  }

  //validation errors
  if (err.message.includes("auth validation failed")) {
    // destructuring inside the forEach, similar to (err) => {err.properties}
    Object.values(err.errors).forEach(({ properties }) => {
      errors[properties.path] = properties.message
    })
  }
  return errors
}

module.exports = handleErrors
The function above handles the long error message returned from by mongoose, exacts everything we need and converts them into a more readable object.
Sending the Errors to the View(s)
Upon receiving the error message, the sign up controller sends the error message(should there be one) to the views. Let's talk about the sign up controller but before then, let's look at these concepts:
Session: A session is generated and saved on the server side when a request is sent from the client side. The session has a unique ID that is sent, along with any data it holds, to the client side to be stored in a cookie. This cookie is then sent with every subsequent request to the server. This process is accomplished using the express-session middleware package. This video does a good job of illustrating this concept.
Locals: The
res.localsproperty is an object that contains response-local variables, which are only available to the view(s) rendered during that request/response cycle. This means that any variables that are attached to theres.localsobject will not be available to other requests or views. It's a way to pass data from the server-side to the client-side to be used in the views. This concept is often used in template engines such as EJS and Jade to render dynamic content on the client-side.
Having talked about both concepts, let's see how they help with sending error messages to the view(s)
npm install express express-session
const express = require("express")
const session = require("express-session")

const app = express()


app.use(
  session({
    secret: process.env.SESSION_SECRET,
    saveUninitialized: true,
    resave: false
  })
)

app.use((req, res, next) => {
  res.locals.content = req.session.content
  delete req.session.content
  next()
})

// set teplate engine as EJS
app.set("view engine", "ejs")
The express-session middleware gives us access to the req.session. The req.session object gives us access to the session data and the ability to set new properties on it. In the example you provided, the req.session is used to set a content property, which is then passed to the res.locals.content property for use in rendering views. The req.session.content is deleted after it is assigned to res.locals.content.
It is important to note that res.locals is only available to the view(s) rendered during that request/response cycle.
Let's now talk about the sign-up controllers.
module.exports.signupPost = async (req, res) => {
  const { email, firstName, lastName, password } = req.body
  try {

    const user = await User.create({ email, firstName, lastName, password })
    res.status(200).json(user)

  } catch (err) {

    const errors = handleError(err)
    req.session.content = {
      email: email,
      firstName: firstName,
      lastName: lastName
    }

    res.render("pages/signup", {
      title: "Signup Page",
      error: errors,
      content: req.session.content
    })

  }
}
The above code is only an abstract of the entire project. Let's focus on the catch block as that is where our errors will be caught and passed on to the view(s).
req.session.content from our explanation above assigns the data stored in it i.e email, first_name and last_name to res.locals.content. This allows us to get back the previously inputted field along with our error message as we have in image at the beginning of this article.
res.render takes two parameters, the first parameter is the path to the EJS file to be rendered while the second parameter takes all the variables containing the data to be used to run the page dynamically.
This is where our error is rendered after been handled by our error handling function (handleError) described above.
The View
The view combines our understanding of HTML, bootstrap and EJS which are prerequisites to understanding this article.
<%- include("layout/authheader")  %>

<div class="container">
    <div class="row">
        <div class="col-lg-6 mx-auto mt-4">
            <div class="card shadow">
                <div class="card-header bg-secondary">
                    <h3 class="text-light">Sign Up</h3>
                </div>
                <div class="card-body p-4">
                    <form action="/signup" method="post" id="add-form" enctype="application/x-www-form-urlencoded">
                        <div class="mb-3">
                            <label for="email" class="form-label">Email</label>
                            <input type="email" name="email" class="form-control form-control-lg <%= error.email ? 'is-invalid' : '' %> " value="<%= content ? content.email.toString() : '' %>" placeholder="Enter email" required />
                            <% if (error.email !== "") { %>
                             <div class="invalid-feedback">
                                <%= error.email %>
                             </div>
                            <% } %>
                        </div>
                        <div class="mb-3">
                            <label for="firstName" class="form-label">First Name</label>
                            <input type="text" name="firstName" class="form-control form-control-lg <%= error.firstName ? 'is-invalid' : '' %> " value="<%= content ? content.firstName.toString() : '' %>" placeholder="Enter first name" required />
                            <% if (error.firstName !== "") { %>
                                <div class="invalid-feedback">
                                   <%= error.firstName %>
                                </div>
                               <% } %>
                        </div>
                        <div class="mb-3">
                            <label for="lastName" class="form-label">Last Name</label>
                            <input type="text" name="lastName" class="form-control form-control-lg <%= error.lastName ? 'is-invalid' : '' %> " value="<%= content ? content.lastName.toString() : '' %>" placeholder="Enter last name" required />
                            <% if (error.lastName !== "") { %>
                                <div class="invalid-feedback">
                                   <%= error.lastName %>
                                </div>
                               <% } %>
                        </div>
                        <div class="mb-3">
                            <label for="password" class="form-label">Password</label>
                            <input type="password" name="password" class="form-control form-control-lg <%= error.password ? 'is-invalid' : '' %> " placeholder="Enter password" required />
                            <% if (error.password !== "") { %>
                                <div class="invalid-feedback">
                                   <%= error.password %>
                                </div>
                               <% } %>
                        </div>
                        <div class="mb-3 d-grid">
                            <input type="submit" name="submit" value="Sign up" class="btn btn-secondary btn-lg" />
                        </div>
                    </form>
                </div>
            </div>
        </div>
    </div>
</div>

<%- include("layout/footer")  %>
The above code shows a simple HTML form styled with bootstrap. The boostrap link and script are contained in the layout/authheader and layout/footer respectively. This can be checked in the project source code.
        <div class="mb-3">
            <label for="email" class="form-label">Email</label>
            <input type="email" name="email" class="form-control form-control-lg <%= error.email ? 'is-invalid' : '' %> " value="<%= content ? content.email.toString() : '' %>" placeholder="Enter email" required />
            <% if (error.email !== "") { %>
                <div class="invalid-feedback">
                    <%= error.email %>
                </div>
            <% } %>
        </div>
Taking the email input field for example, a ternary operator <%= error.email ? 'is-invalid' : '' %> is used to change the border color of the box should there be any error.
When a post request is sent, this code first checks if there is an error message for the email field (if errors.email exists), and if so, it displays the error message using the <div> tag.
Another thing to quickly note is that when there's no error message, an error is raised by EJS, so to avoid this, we have to render the same page(when a get request is sent for the page) with error set as an empty string as shown below.
module.exports.signupGet = (req, res) => {
  res.render("pages/signup", {
    title: "SignUp Page",
    error: "",
    content: ""
  })
}
That's it! You now know how to render validation errors from your Mongoose model to your views. You can also customize this process to fit your specific needs by modifying the handleErrors function and the way you pass the errors to the views.

Latest comments (0)