
This is my inaugural blog post which will cover my experiences completing the Cloud Resume Challenge.
First off, big thanks to Forrest Brazeal for coming up with an instructive, engaging challenge to help anyone (regardless of experience) get more hands-on with AWS cloud services! To see the full steps/descriptions for the challenge, head over to https://cloudresumechallenge.dev/instructions/.
In the spirit of the challenge, I will try to not make this a walk-through and more about my experiences going through the steps and problem solving any (many) errors I ran into. So, without further ado, I will jump into the blog!
Step 1: Certification
The first requirement for the challenge was to have the AWS Cloud Practitioner certification. Luckily, I had received this certification earlier this year in April 2020 so checked that off immediately. I also decided to become more familiar with AWS services by studying and taking the AWS Solutions Architect – Associate exam in October 2020 (will have another blog post on that certification experience).

Step 2: HTML
I keep my resume in word format handy and try to update it every couple of months (as I expect many of you do too) but have never thought about putting it in HTML format. HTML (HyperText Markup Language) is the most basic building block of every web page. It defines the static website content that is displayed and can be viewed for any website through the “View page source” right click option.
After looking through the provided example, I was able to put together a rudimentary version of my resume that could be viewed as a webpage. Now, this wasn’t anything spectacular and was pretty much just a couple of lists put together to link the different parts of a resume – that’s where CSS comes in.
Step 3: CSS
CSS (Cascading Style Sheets) is used to control presentation, formatting, and layout of web documents. It essentially lets you change how your webpage looks. I went through some of the CSS tutorials on https://www.w3schools.com/css/ and looked at a few other examples as well. As I am not a front-end web developer, I used my resources (Google) to find a template that I could use as a baseline for my resume and then added some personal touches to it utilizing what I had learned on HTML and CSS.
Step 4: Static S3 Website
This is where the AWS fun starts! To get things kicked off, I had to deploy my HTML resume online using an Amazon S3 static website. Static just means that the content doesn’t change based on server-side scripting (PHP, ASP.NET, etc.). This may sound super complicated, but the Amazon documentation is incredibly helpful and walks you through everything you need to do step-by-step. There are two ways to interact with AWS services – the AWS Management Console directly and programmatically using AWS SDKs. I chose the AWS Management Console as my coding knowledge needed to improve before I’m using the command line to make any service updates. I created my S3 bucket, configured it for static hosting, and uploaded my HTML resume. Once configured for static hosting, you are provided a URL endpoint which returns the html document which was uploaded (http://bucket-name.s3-website.Region.amazonaws.com). Boom, I now had a website to call my own! Onto the next step!

Step 5: HTTPS
Without getting into a huge discussion on internet security, communication protocols, OSI model, etc. – HTTPS is used for secure communication over the internet. It utilizes digital certificates from trusted third parties to add a layer of encryption to protect internet traffic between the server (in this case the S3 bucket) and the client (user accessing the website). This protects the user from illegitimate websites and bad actors trying to take advantage of unsuspecting internet users.

To setup HTTPS, you can use Amazon CloudFront (content delivery network) which caches content at edge locations to improve the speed at which users can access the content around the globe. There are multiple other benefits of using a CDN which is defined in the following blog. There are also stacks available to help create CloudFront distributions based on your current setup (existing S3 bucket, ACM certificate, etc.).
After creating my CloudFront distribution using the S3 bucket as the origin, I confirmed the ability to access the resume webpage through the CloudFront URL. This was also very well documented, and I was able to follow step-by-step through the Amazon documentation.
This didn’t necessarily complete the HTTPS requirement, but you’ll find out why – just continue reading!
Step 6: DNS
Personally, I would have put this step before HTTPS as creating DNS certificates needs the FQDN for your website which then is associated with a CloudFront distribution and is also the process provided by the Amazon documentation. Route 53 is Amazon’s cloud Domain Name System (DNS) web service. It allows us to purchase a domain name (example.com) and use that as our website URL rather than the S3 bucket or CloudFront distribution URL from earlier. I chose to get the Engebreth.com domain using Route 53. Again, the Amazon documentation for this is extremely straightforward and walks through the exact steps needed to purchase a domain name and then link that with your current static website/CloudFront distribution using hosted zones in Route 53.
I did the steps a little out of order as I was following the documentation and learning along the way:
- Purchased domain name through Route 53
- Setup hosted zone for Engebreth.com
- Created a redirect entry for www.engebreth.com to funnel everything to Engebreth.com (this came from the AWS documentation)
- Created CloudFront distribution
- Requested public certificate through Amazon Certificate Manager (for both Engebreth.com and *.engebreth.com for any potential subdomains in the future)
- Updated CloudFront distribution to include certificate information and to only use HTTPS for displaying website content

I ran into an issue where my certificate was not being validated and it was because within the certificate request, you must select the option to create an CNAME record entry in the Route 53 hosted zone. I spent longer than I’d like to admit trying to troubleshoot this as it’s only available in the “Step 5: Validation” portion of the certificate request and then ACM will create the entry for you.
Once the certificate was associated with the CloudFront distribution, I updated the DNS entries to use Engebreth.com as an alias for the distribution URL which means that whenever someone enters the Engebreth.com URL – my S3 website will be displayed through the CF distribution rather than having to type in the CF distribution URL. The signed certificate and CF distribution will force users to access the site through HTTPS (if a user attempts to use HTTP -> they are forwarded to the HTTPS address). Now my site was secured using HTTPS!

Step 7: JavaScript
Unfortunately, the straight-forward Amazon documentation came to a halt at the DNS step. Being unfamiliar with JavaScript, I went through the codeacademy JS tutorial to find out how I could use it to display a visitor counter on my site.

Actually, I left this part until the end as I had no idea how to set this up until I had the back-end resources configured and working. I figured out that I needed to make an API call with the JS code and then format the API response (number from the DynamoDB table) to display in the webpage.
I ran into a few display issues in which the Javascript would not show the count number and instead showed [object][object]. This was because the Lambda function was returning a JSON object instead of the value of the attribute. I made small changes to the JS and Lambda functions until I finally got it working properly (each update made a call to the API and incremented the counter number to where I figured it out at around 170 calls…).
Step 8: Database
In order to have a visitor counter on the website, I needed to use a database to store the counter. As recommended in the challenge, I used Amazon’s DynamoDB which is their non-relational database service. In the management console, I created a DynamoDB table and created an item within the table for the visitor count.
Step 9: API
The challenge then requires you to use an API that accepts a request from the web page and then communicates with the database. I used AWS’s API Gateway to create a RESTful API that takes a GET request (this does not update anything and instead just returns data) and returns the Lambda function output. It is key to also remember that you need to enable CORS within the API.

Cross-Origin Resource Sharing (CORS) allows browsers to make HTTP requests to servers with a different domain/origin and this is required for the step to work.
Step 10: Python
Besides taking a python course in college, I did not have much if any experience with the programming language or really programming languages in general. I ended up struggling with this for quite a bit until I decided I needed to solidify the basics before trying to complete this challenge.

I bought the Jose Portilla Udemy course “2020 Complete Python Bootcamp from Zero to Hero in Python” and completed the entire course including additional exercises and projects. Once I felt comfortable with the syntax, I then turned back to the challenge.
I quickly realized that the work I had put into learning Python was paying off as all I had left was to research the boto3 library which is the Amazon SDK for Python. This allows users to interact with and make changes to AWS services. This step combined the API Gateway and DynamoDB steps by using the API call as the event that executes the Lambda function and then iterating the count value within the DynamoDB table and returning the updated value.
Step 11: Tests

Testing examples were included rather briefly in the Python Udemy course, so I had to do some additional digging to figure out what I needed to test and how I was going to test it. I’m sure there are other tests that could be run, but I settled on using the unittest library to test the ability of the Lambda function to call a DynamoDB table and confirm the returned count value.
Through research, I found the moto library – which allows you to create mock AWS services in order to facilitate your tests. Using this library, boto3, and my unit testing Python knowledge I was able to write my test script and successfully run it locally by executing the .py test file. The test created a mock DynamoDB table with an appropriate attribute and value (that aligned with my Lambda function) and then executed the Lambda function with expected outcome of the object body > 0 (the initial value I set for the item).
Step 12: Infrastructure as Code
It is best practice to define your cloud resources in a template (in this case AWS Serverless Application Model (SAM)) rather than clicking around the AWS management console. This allows you to quickly deploy said resources based on the template file rather than going into every service and manually creating what you need. This is called infrastructure as code and is a key feature of scaling cloud infrastructure.

I walked through the SAM CLI documentation on the AWS site as well as reading through the GitHub site. The best place to go is the “Getting started” section on the AWS documentation site as it walks you through installing the AWS SAM CLI, setting up your AWS credentials, and then deploying an actual template for a Hello World application. I took the extra step to install Docker which allows for local application testing rather than having to deploy the services directly in AWS. To add to this, I walked through the Docker tutorial documentation to setup a container and perform updates to the container in order to get a feel for it (I have since bought a Docker Udemy course which is coming up on my to-do list). When you initially run the sam build command, it allows you to select sample templates that are already available (Hello World app being one of them). This made it very straightforward to create the folders/file structure necessary for deploying the application.
The key file is the template.yaml file which is how you define the AWS resources needed for your application. There is a separate folder to add your Lambda .py file as well as your test .py file. Creating the YAML file was the first challenge I reached as the AWS documentation is very spread out (it kind of has to be because of how many things you can do with SAM). I ended up watching quite a few Youtube videos and the most helpful one for me was the “Getting started with AWS SAM | Serverless” series from FooBar Serverless. The presenter laid out the steps needed and while the resources were different and they used Node JS instead of Python, I was able to take enough away that I successfully made my YAML file.
Now – building/deploying the application proved to be the next significant challenge.

I used sam local commands to perform initial testing which utilizes docker containers. Then it was time to deploy the resources to my AWS account. Using SAM templates deploys resources through CloudFormation, and luckily you can go into the console (or view from your terminal – I was using VS Code) to view any errors that might have occurred. From there, I used trial and error, viewing the errors and correcting my files until the CloudFormation stack deployed successfully. I ended up changing the DynamoDB table name because you can’t create a CloudFormation stack that defines a new DynamoDB table which has already been created on the AWS account.
Step 13: Source Control
Now that I had setup my serverless resources in IaC, I needed to setup a repository for that code which I could use to make updates and have it automatically update my AWS stack/resources whenever a change was made. This was done through GitHub repositories, so I created a private repository for both my backend and frontend code.

Step 14: CI/CD (Back end)
Continuous Integration and deployment is heavily utilized in DevOps and allows you to centralize all parts of your application and run it through the same processes with results that are easily accessed. There are many tools used for CI/CD such as Jenkins or Travis, but for this challenge I used GitHub Actions as suggested as it allowed me to keep my code and workflows all within GitHub.
This was definitely a learn as you go process as the workflow YAML files have a different setup than the YAML SAM templates and have a whole new set of components that work together to run jobs. The Actions tab in GitHub lets you commit changes to your repository and then review the steps/tasks within the job as well as any errors that occurred. Similarly to deploying my SAM template, this was a trial and error situation as can be seen by how many commits I have to the repository (75+ lol). It took some time setting up the files in the correct folders and setting up the required tests. I then had to make updates to the Python files to change data types once the response was received from the API GET method request. I can’t express the feeling of joy when the GitHub Actions finally completed successfully and I checked the AWS console to see that the small updates I made were deployed.

One thing to note - it is incredibly important to utilize GitHub Secrets so that you don’t expose any AWS credentials to the public. Secrets allows you to set a variable and assign it a value (your AWS access keys) and then call that variable within your GitHub Action workflows. This keeps your access keys safe while still allowing you to use them within GitHub Actions.
Step 15: CI/CD (Front end)
This last part was fairly straightforward after completing the backend section. I uploaded my S3 files to the GitHub repository, setup an Action to push any file updates to the S3 bucket, and invalidated the CloudFront cache to be able to view the updates made in my web browser once the cache was repopulated with the current files.
Checkout my website at https://Engebreth.com.
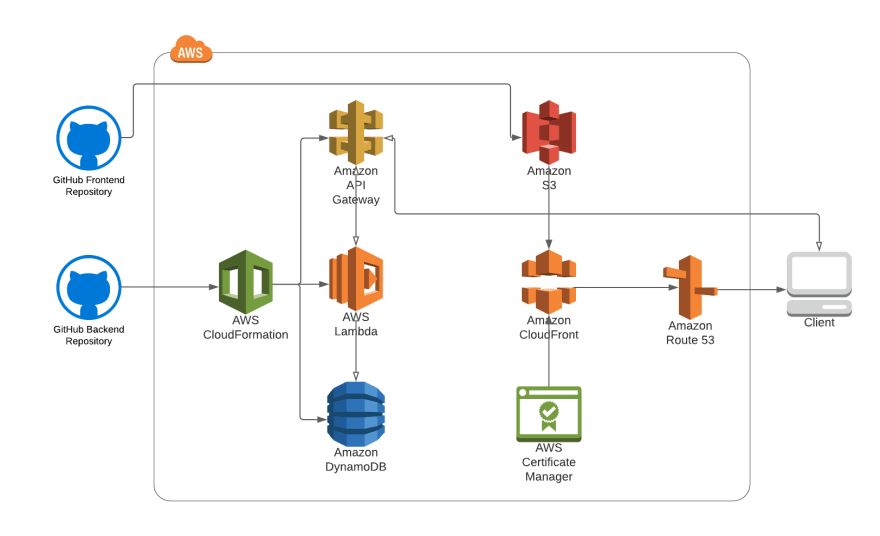
Here is a final architecture diagram for my project:
Step 16: Blog post!!!

This blog post now closes out the last step of the Cloud Resume Challenge. Thanks again to Forrest for putting this together! Overall, this was an incredibly educational and fun challenge which let me get hands-on with a lot of different AWS services. I was able to get familiar with the AWS console as well as with the CLI. It definitely took its fair share of late nights and weekends to figure it all out but was 100% worth it. I’ll be making my GitHub repositories public soon and then I’ll update this post to include those links.
I plan on continuing the ACG challenges to continue my cloud learning and to get exposed to different approaches to solving unique problems. I’ll be blogging my different projects here to hopefully add some insight or aid in other’s quests of completing said challenges.
I come from the security side of things, so will also be putting together a series of blogs on my experiences with studying/taking a broad range of IT certification exams (from CISSP to AWS Solutions Architect – Associate).

Top comments (0)