If you haven't read the last post, I recommend you to check it out here, else many things in this post will not make sense.
In the previous post, we created database and user registration for our application and now in this post we'll add Twilio API to send SMS to users whenever they register successfully and we'll also add external API call to get the coronavirus data to send to our users. Lots of work to do!! So, let's get started.
Using Twilio API
Twilio provides many services ranging from SMS and Chat to AI Bots, Programmable SMS API being one of them. Using the Programmable Twilio SMS API we can add SMS service in our web application and that's exactly what we'll doing.
To use the Twilio SMS API,we need to create an account on Twilio website and buy a twilio number with SMS support. Twilio provides free number with some limitations. But luckily, As a part of #DevTwilioHackathon they are providing Free 20\$ credits using the promo code DEVHACK20. So I went ahead and bought a number with this promo code. And now if we go to the console on the twilio website, we can get 'ACCOUNT SID' and 'AUTH TOKEN' which will be used to connect to the Twilio API in future. Copy that and paste it into the .env file in our project directory as we don't want anyone to be able to see it.

To use the twilio API in our application, we'll need Twilio Helper Library and we can download it using the following code in the terminal.
$ npm install twilio
Now, Twilio provides code snippets to connect to it's various APIs in many different programming language, And we'll use it to connect to the twilio api in our app.Let's go to the users.js file in our project directory and add some code to connect to the API.
const accountSid = process.env.ACCOUNT_SID;
const authToken = process.env.AUTH_TOKEN;
const client = require('twilio')(accountSid, authToken);
client.messages
.create({
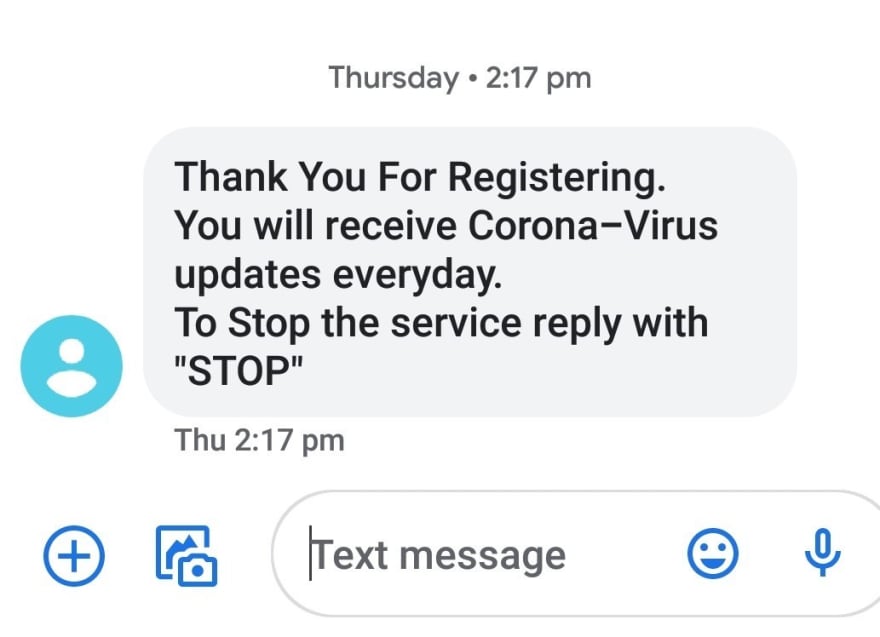
body: 'Thank you for your registration. You will receive Corona-Virus updates everyday.To stop the service reply with "STOP"',
from: process.env.PHN_NUM,
to: // user's mobile number (with country code).
})
.then(message => console.log(message.sid));
We'll add this snippet in the /users/add_user route, so that whenever a new user gets added to the database, we'll send the SMS to the user. Here is the sample SMS that our application sends to the user.
Getting Data From The External API
Now, we want to send corona virus case updates to our users but where do we get the data from? And there comes the External API. There are so many Corona Virus datasets available publically online. I've used the api.covid19india.org to get the data as it is crowdsourced and it is based on the data declared by the State Governments so it's a reliable source of data and also, it gets updated every 5 minutes, so we'll get latest updates.And also, this api requires no authentication at all.
In node.js, we cannot use fetch as we do in the client-side javascript, but there is an npm package to our rescue called node-fetch. So let's install it.
$ npm install node-fetch
Now, let's add a new file in our project directory called script.js and let's add some code in it to get the data from the api and use it.
const fetch = require("node-fetch");

const get_data = async () => {
  cases = {};
  await fetch("https://api.covid19india.org/data.json")
    .then((res) => {
      return res.json();
    })
    .then((data) => {
      data_array = data.statewise;
      total_obj = data_array.filter((data) => data.state === "Total")[0];
      gj_obj = data_array.filter((data) => data.state === "Gujarat")[0];
      mh_obj = data_array.filter((data) => data.state === "Maharashtra")[0];

      cases.total_cases = total_obj.confirmed;
      cases.total_new = total_obj.deltaconfirmed;
      cases.mh_total = mh_obj.confirmed;
      cases.mh_new = mh_obj.deltaconfirmed;
      cases.gj_total = gj_obj.confirmed;
      cases.gj_new = gj_obj.deltaconfirmed;
    })
    .then();
  return cases;
};
Okay, let me explain it a little bit. Here, we are fetching the state wise data from the api and it returns array of objects in which there are many properties like, total cases, new cases, total deaths, new deaths, total recovered,etc. We want to find the total cases and new cases in states. Here i've shown only 2 states (Gujarat & Maharashtra) but we can do the same for any state and can get the same data for all the states of India. So i've created an object called 'cases' and in this object I've added 6 keys namely, 'total_cases', 'total_new', 'mh_total', 'mh_new', 'gj_total', 'gj_new' and their values gives the number of 'Total Cases in India', 'New Cases in India', 'Total Cases in Maharashtra','New Cases in Maharashtra', 'Total Cases in Gujarat', 'New Cases in Gujarat' respectively.
Sending Message To The Users According To Their State
We want to send a distinct message to the user according to his/her state.i.e, if the user registered with the state 'Gujarat' then we want to send updates of cases in Gujarat and in India and for users of Maharashtra, we want to send updates of cases in Maharashtra and in India. So to do that we'll create two different messages to send to the user and for all the users in our database we'll check the state and send the according message to them.Let's create a new function get_users to get the users mobile numbers and divide them into different arrays according to their state.
const User = require("../models/User"); // To retrieve users from the Database.

const get_users = async () => {
  let numbers = {};

  // Getting all the active users from the Database
  const active_users = await User.find({
    active: true,
  });

  // Getting an array of numbers of Active Users in Gujarat
  guj_users_num = active_users
    .filter((user) => user.state === "Gujarat")
    .map((user) => user.number);

  // Getting an array of numbers of Active Users in Gujarat
  mh_users_num = active_users
    .filter((user) => user.state === "Maharashtra")
    .map((user) => user.number);

  numbers.MH = mh_users_num;
  numbers.GJ = guj_users_num;

  return numbers;
};
So, as we can see we first get all the active users from our database and insert their mobile numbers in different arrays and add that arrays to the 'numbers' object with the corresponding key.
Now, let's create a new function send_msg() to create and send message to our users using the Twilio API.
const send_msg = async () => {
  // Getting Users' Mobile Numbers And Data From API.
  const users_num = await get_users();
  const cases_data = await get_data();

  // Message For Gujarat Users
  const gj_msg = `Total Cases In India: ${cases_data.total_cases} \n Total Cases In Gujarat: ${cases_data.gj_total} \n New Cases In India: ${cases_data.total_new} \n New Cases In Gujarat: ${cases_data.gj_new} \n #StayHome #StaySafe`;

  // Message For Maharashtra Users
  const mh_msg = `Total Cases In India: ${cases_data.total_cases} \n Total Cases In Maharashtra: ${cases_data.mh_total} \n New Cases In India: ${cases_data.total_new} \n New Cases In Maharashtra: ${cases_data.mh_new} \n #StayHome #StaySafe`;

  // Sending Messages To Users In Gujarat
  users_num.GJ.forEach((user) => {
    client.messages
      .create({
        body: gj_msg,
        from: process.env.PHN_NUM,
        to: "+91" + user,
      })
      .then((msg) => console.log(msg.sid))
      .catch((err) => console.log(err));
  });

  // Sending Messages To Users In Maharashtra
  users_num.MH.forEach((user) => {
    client.messages
      .create({
        body: mh_msg,
        from: process.env.PHN_NUM,
        to: "+91" + user,
      })
      .then((msg) => console.log(msg.sid))
      .catch((err) => console.log(err));
  });
};
Scheduling Automatic SMS
We have our message ready with us to send to users but how do we schedule it to send automatically at a specific time? Cron Jobs! The node-cron package helps us schedule the job to perform at a specific time.So, let's install this npm package and use it to schedule our send_msg function to send SMS automatically everyday.
$ npm install node-cron
const cron = require("node-cron");

const tasks = cron.schedule("0 9,20 * * *", () => {
  send_msg();

  modules.exports = tasks;
});
The schedule method of cron module takes two arguments, first the pattern of time that we want to schedule and second is the function that we want to schedule. I've set time to 9a.m. and 8p.m. Everyday.
Read More About Cron Patterns Here.
And now we'll have to call the method tasks.start() in our app.js file when the server starts like this.
const script = require("./script");

app.listen(process.env.PORT || 3000, () => {
  script.tasks.start();
});
And that's it.Now when we deploy our application on server, it will send sms to the users automatically everyday at 9 a.m. and 8 p.m. using the data retrieved by the external api. Here is what this message looks like.

And Bingo! We've created a fully functional application which registers users and sends them cases updates daily automatically. Now in the next post, we'll add functionality to receive sms to users in case they want to stop the service and then we'll deploy our application on heroku server.
Full Code Can Be Found Here:
 jamesshah
/
covid19-updates
jamesshah
/
covid19-updates
Simple web app to send daily covid-19 cases updates to users.
Thank You For Reading.


Top comments (0)