This weekend's project is a news aggregator bot that pulls articles from the New York Times, summarizes them with OpenAI's GPT-3, makes a text-to-speech recording with AWS Polly, and finally sends the email-recording combo via Sendgrid's API-- All written in Rust. I call it AI Newsie. The GitHub repo is here.
Here's how to set it up, and get it running on your very own AWS account (among other things) all for free!


Configuring and Deploying AI Newsie
To use the bot, one would need the following:
- A Sendgrid API key - for sending emails
- A NYT API key - For grabbing news stories
- An OpenAI API Key - For processing and summarizing the news stories
- An AWS account:
- For access to AWS Polly (text-to-speech) and
- AWS Lambda (deploying the bot)
1. Setting up Sendgrid
- Sign up for Sendgrid and setup a sender identity and take note of your sendgrid sender email address. The most straightforward verfication route is Single Sender Verification.

- After setting up a sender identity, create an API key by navigating to Settings -> API Keys -> Create API Key. Take note of this API key (not to be confused with the API Key ID) as it is hidden soon after generation.
2. Setting up NYT API
- Create a NYT developer account here.
- Navigate to the My Apps page by clicking the dropdown at the upper left corner of the page and selecting "Apps".
- Create an API key in the "API Keys" section by clicking "Add Key". Copy the API Key under the "Key" header.
- Under the "APIs" section, ensure "Article Search API" is enabled.
- Below that, hit the "Save" Button.

3. Setting up OpenAI API
- Create an account here.
- Navigate to the API Keys page by clicking your account in the top left corner of the page and selecting "View API Keys".
- Create a new API key by clicking the "Create new secret key" button. Take note of the newly generated key.

4. Setting up AWS
- If you haven't already, setup an AWS account here.
- Navigate to the AWS Lambda service page by searching "Lambda" in the search bar at the top of the page.
- Click "Create Function" and select the "Author from scratch" option.

- Create a name for the new function, e.g. "NewsBot".
- For the "Runtime" section, select "Provide your own bootstrap on Amazon Linux 2", and under "Archictecture", select "arm64".
- Under the "Change Default Execution Role" section, make sure "Create a new role with basic Lambda permissions" is selected.

- Click "Create Function".
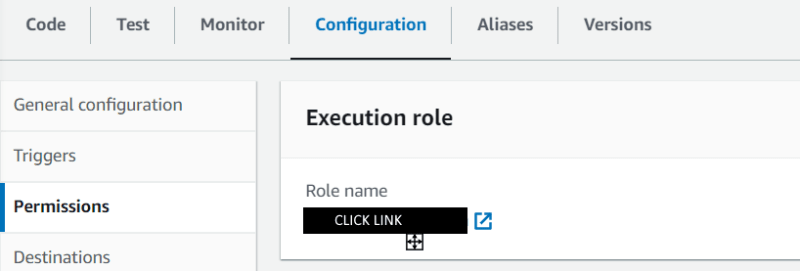
- Add AWS Polly permissions for the bot by navigating to the "Configuration" section -> clicking "Permissions", then clicking the link under Role Name in the "Execution Role" header.
- In the "Permissions" tab, click the "Add Permissions" button, then select "Attach Policy".

- Search for and select "AmazonPollyReadOnlyAccess" in the permissions search bar, then click "Add Permissions".

- Back to the Lambda Functions page, under the "Configuration" tab, select "Environment Variables".
- Configure the environment variables as follows, by clicking the "Edit" button:

- Click the "Save" button after setting environment variables.
- Under the "General Configuration" menu, click "Edit" and change the timeout to "2min 0sec", and save.


- Grab a pre-built bootstrap from here, and download bootstrap.zip from the latest version. Alternatively, you can build your own bootstrap from the repository, but that is beyond the scope of this post.
- Back to your AWS Lambda function, in the "Code" section, scroll down and click "Upload From" -> ".zip file".

- Once the zip has been uploaded, test your function works by navigating to the "Test" tab and clicking the "Test" button. The function should send your AI-generated email to your desired destination, via your sendgrid sender email.


- Check the Log Output to confirm the bot ran as expected.
- Finally, you can schedule the bot to run daily by navigating to the "Triggers" section of the "Configuration" tab and clicking "Add Trigger".
- Then, select EventBridge, -> "Create a new rule" and configuring "Rule Name" as "Daily_Newsletter", "Rule Description" as "Run the newsbot daily", and "Schedule Expression" as "rate(1 day)", then click "Add".

Conclusion
The services used in this project are offered under freemium/capped payment models, and so as long as your usage of these services (as the AI Newsie does) is under the stated limits, it will cost nothing to run the bot monthly. OpenAI gives $18 in free credits on creating a new account for three months, for example.
Thanks for reading. Comments and PRs welcome!


Top comments (0)