
Don't you love a great light show at a concert? I know I do, and oh, how I miss going to and playing concerts already!
I play in a band myself and we're always striving to deliver the best show we can with the limited possibilities a small, obscure local band has available.
We have a small stage light setup that we bring to our shows to complement the venue's setup. Our fixtures are controlled from a set in Ableton Live, programmed to a click track, so the light show is synchronized to the music.
Obviously, we're on a forced break right now, so I wanted to take the time to up our setup a notch!
TL;DR: If you're not in a band or don't care about synchronization, you can skip most of the work and buy a complete LED Goggle Kit. I found this only now while writing the post, but where's the fun in that anyway?
The Bodypack
The overall plan is to add RGB LEDs to my costume and synchronize them to the rest of the light show and the music.
Requirements
The requirements are as follows
- Programmable from Ableton Live: Everything is controlled via Ableton Live. I don't just want some random blinking lights on me, everything has to work together!
- Wireless Communication: The rest of our light fixtures are placed somewhere on the stage and controlled via DMX over cable. But we ourselves are running around the stage. Therefore, the communication has to work without a cable!
- Wireless Power: Again - no cables!
Sneak Peek
Here's a sneak peek of what I came up with:

- Two Adafruit Neopixel rings with individually controllable RGB LEDs
- Raspberry Pi Zero with custom Elixir code to receive OSC messages sent by Ableton Live over Wifi
- A USB Power bank
Alright, lets dig into the details of how this all works, and how you too can add some more LEDs to your band's stage show!
Let's get building
Alright, first things first - the hardware!
LEDs
The most important components are the LEDs. I want RGB LEDs and they need to be individually programmable. In fact, this whole idea started when I learned about WS2812 type LEDs by accident.
They usually come in long strips that you can cut at any point to your required length, but Adafruit took it a step further and offers a lot of different shapes and sizes under their NEOPIXELS brand.
For this specific project, I decided to get two 16 LED rings because they fit perfectly on my goggles (as I've learned now, thats not by accident - Adafruit also offers a complete set with the exact same goggles and LED rings to go together).
Control
Next, we need a means to control these LEDs. Neopixels are originally intended to be used with Adafruit's own Microcontroller boards, an Arduino or something similar.
However, I already had some unused Raspberry PIs laying around that I wanted to make use of.
This tutorial on how to control WS2812 LEDs with a Raspberry Pi was exactly what I needed to get started.
Power
The last pice is a way to power everything. Most tutorials just use a (socket) power supply, but I want to be mobile!
The Raspberry Pi is powered via USB, the NeoPixels require 5V, the same voltage that USB delivers, so that matches up. I'm going to use a USB Power bank.
But wait, here's a problem: These LEDs actually need a lot of power, especially when you'r buying a dense strip and the number of LEDs adds up.
Each single LED draws up to 60mA when fully powered (20mA per color).
I did not find reliable information about how much current the Pi can drive, answers are ranging from 200mA to (1A - however the Pi needs itself).
In any case, thats (far) less than 16 LEDs, and I want to drive 2 Rings with 16 LEDs each.
The second important factor of course is how long you can power the LEDs with the battery...
After some search I found a massive Power bank with
- 2 USB ports - 1 for the Pi and 1 for the LEDs
- 3A max - enough for 50 LEDs
- 15600mAh - enough to deliver those 3A for more than 5 hours
One detail to keep in mind: Most power banks turn off if they are "not used", i.e. if "no" current is drawn. The Raspberry Zero seems to draw so little current, that this is actually a problem.
However, the LEDs always draw some current, even when dark. I don't have exact numbers, but found that the bias current of 32 LEDs plus the Raspberry is enough to keep the power bank from turning off.
Putting it all together
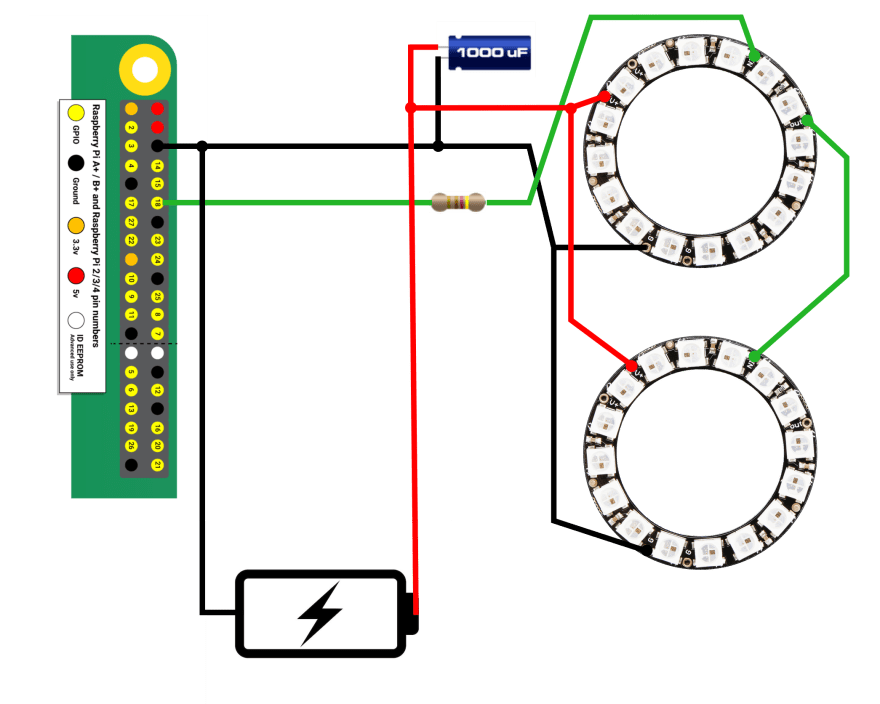
Connecting everything is easy, but not trivial. The things you'll need to watch out for:
- The Pi and the LEDs are powered by different USB Ports, but they need a common
ground - The Data is sent on
GPIO 18of the Pi's GPIO pins. - A
470Ωresistor should be placed on the data line as close to the first LED as possible - LEDs can be chained together, from
Outof one toInof the next - It's always a good idea to add a decoupling capacitor between
+5Vandgroundclose to the first LED to help with sudden power draw when switching the LEDs
With that being said - here's the finished circuit:
Let's get hackin'
Alright, next step - controlling the LEDs!
RPI-WS2812-Server
RPI-WS2812-Server is a great program to actually drive the LEDs via PWM.
Follow the instructions to setup, and you're ready to play around.
For example, to achieve the effect in the sneak peek, use the following commands:
sudo ./ws2812svr

setup 1,32,3;
init;
brightness 1,15;
rainbow 1,2;
do; rotate 1; render; delay 25; loop 150;
The first line sets up the program. We have 1 channel with 32 LEDs, and the NeoPixels (at least the ones I have) need the WS2811_STRIP_GBR configuration. Then it's necessary to call init.
Next, turn down the brightness a bit - at full brightness these LEDs are really bright!
rainbow sets up the nice color gradient, 1 is the channel and 2 means we want 2 repetitions - so each ring has a full gradient.
The last line defines a loop that rotates the colors by 1, renders the new pattern and waits for 25ms before repeating the same process. After 150 iterations (or 3,75sek) the loop finishes.
Eventually, we want this program to run automatically when we power up the Bodypack, so make sure to follow the Steps to run Ws2812-Server as a Service.
The program can even start up its own TCP server, so - out of the box - you can control the LEDs over the network.
Assuming you have left the default port of 9999 and know the IP address, you can use netcat to do so:
netcat 192.168.1.149 9999

fill 1,32,00ff00;
render;
That might already be all you need, but I want to control the LEDs via OSC so I can control them from Ableton Live.
Receiving OSC
Open Sound Control is a protocol for networking between computers, synthesizers and other multimedia devices. Its more flexible than MIDI with a free naming scheme for parameters and much higher resolution. Also, OSC messages can be sent via Network.
I've decided to build an Elixir service that runs on the Pi. It receives OSC messages via UDP and translates them to WS2812 commands which are finally passed on to RPI-WS2812-Server.
The basic structure is based on GenStage.
- A UDP server that receives UDP packages and parses them into OSC messages - this is a GenStage
producer. - A
producer_consumerthat translates OSC messages to WS2812 commands. This is the place to let your imagination run wild! In my first proof of concept, I have just implemented "global" brightness, red, green and blue commands. They allow me to control the color and brightness of both rings as one unit, but only that. In the future I want to add a lot more detail. - A TCP server is the
consumerthat connects to the WS2812 TCP server to send the translated commands over.
If you're interested, you can find the code on github, but beware: this is just a first proof of concept version with all the configuration hardcoded and no customization support yet.
Let's get creative
This is where we can get creative and program our light show!
For our "normal" fixtures, we use DMXIS to control the lights via DMX512. Its a USB to DMX interface that comes with a VST plugin that you can use in any DAW to program your DMX devices via Midi and automations.
My DAW of choice is Ableton Live. The Connection-Kit pack contains a device that can send OSC messages.

With this device set up, its possible to draw automations for the various parameters - exactly the same as with the DMXIS plugin.
Finally, here's an example of a programmed part:
Summary
In this article I've described the implementation of a mobile, programmable LED system that can be used in costumes on stage and be synchronized to a programmed light show.
As of today, this project is in a working proof of concept state and if you're interested in building something similar yourself, you can take this as a starting point - the code is shared on github.
In the next steps, I want to implement some animations that actually make use of the possibility to control each individual LED, but I have not yet decided how exactly this should work.
Later, I want to make the elixir service more configurable and work on some additional LED configurations for the other band members.


Top comments (0)