Basic connection between arduino and raspberry pi through WiFi
The Hardware is
- Esp8266 with arduino sdk
- Raspberry pi 3b+
System requirements
- arduino-cli
- picocom
- python3
Configurations for Raspberry Pi
- Install raspbian
- Enable ssh server
- Upgrade system
- Configure keys for ssh server
- Configure the raspberry pi as hotspot
- Install python3 and set as default python interpreter
- Copy server code
Configurations for ESP8266
- Install esp8266 for arduino
- Copy the code and upload to esp8266 board
Raspberry Pi Setup
Download raspbian buster lite from official repository
$ curl -LO http://downloads.raspberrypi.org/raspbian_lite/images/raspbian_lite-2020-02-14/2020-02-13-raspbian-buster-lite.zip
Write to sd card
$ unzip -p 2020-02-13-raspbian-buster-lite.zip | sudo dd of=/dev/mmcblk0 status=progress
Connect the raspberry pi via Ethernet and HDMI, startup the system and access with user=pi and password=raspberry. Enable ssh service
$ sudo systemctl enable --now ssh
Check what is the ip address and logout from the system
$ ip addr show eth0 # copy ip address
$ exit
Connect via ssh
$ ssh pi@{ip_address}
Add user with the same privileges and groups to pi user, generate password and delete the pi user
$ sudo useradd -m -s /bin/bash --groups $(groups pi | cut -d ' ' -f 4- --output-delimiter ',') new-user
Create password to new-user
$ sudo passwd new-user
Add new-user to sudoers file
$ echo "new-user ALL=(ALL) NOPASSWD: ALL" | sudo tee /etc/sudoers.d/010_new-user-nopasswd
Login to new user
$ su new-user
Check if sudo works
$ sudo apt update
Check groups
$ groups new-user
If everything works, logout and access to new-user with ssh, first logout
$ exit
Generate keys to new-user and copy to raspberry pi
$ ssh-keygen -f ~/.ssh/rpi-key
Copy public key to raspberry pi
$ ssh-copy-id -i ~/.ssh/rpi-key.pub new-user@{raspberry-pi-ip}
Now access to new-user on raspberry pi
$ ssh new-user@{raspberry-pi-ip}
Remove pi user
$ sudo userdel -rf pi
Update and upgrade the system
$ sudo apt update && sudo apt upgrade -y
Reboot the system
$ sudo reboot
Setup hotspot
Create an access point in raspberry pi

 Diagram                                  +- RPi ---------+
                                      +---+ 192.168.10.15 |          +- ESP8266 ---+
                                      |   |     WLAN AP   +-)))  (((-+ WLAN Client |
                                      |   | 192.168.7.1   |          | 192.168.7.x |
                                      |   +---------------+          +-------------+
                                      .
                                      .
                              .
                 +- Router -----+     |
                 | Firewall     |     |   +- PC#2 --------+
(Internet)---WAN-+ DHCP server  +-LAN-+---+ 192.168.10.11 |
                 | 192.168.10.1 |     |   +---------------+
                 +--------------+     |
                                      |   +- PC#1 --------+
                                      +---+ 192.168.10.10 |
                                          +---------------+
Install required packages
$ sudo apt-get -y install hostapd dnsmasq netfilter-persistent iptables-persistent
Enable wireless access point
$ sudo systemctl unmask hostapd
$ sudo systemctl enable hostapd
Define the wireless interface IP configuration
Configure wlan0 interface in /etc/dhcpcd.conf
Add the following lines
  interface wlan0
    static ip_address=192.168.7.1/24
    nohook wpa_supplicant
Enable ip forwarding in /etc/sysctl.conf and uncomment the following line
net.ipv4.ip_forward=1
Allow traffic between clients on this foreign wireless network
$ sudo iptables -t nat -A POSTROUTING -o eth0 -j MASQUERADE
Make persistent changes
$ sudo netfilter-persistent save
Configure the DHCP and DNS services for the wireless network
First create a backup
$ sudo mv /etc/dnsmasq.conf /etc/dnsmasq.conf.orig
Edit /etc/dnsmasq.conf and add the following lines
  interface=wlan0
  dhcp-range=192.168.7.2,192.168.7.40,255.255.255.0,24h
  domain=wlan
  address=/gw.wlan/192.168.7.1
Set WiFi country
Localization Options -> Change WLAN Country -> choose your country -> finish
$ sudo raspi-config
Ensure wireless operation
$ sudo rfkill unblock wlan
Configure access point in /etc/hostapd/hostapd.conf
Add the following lines
  country_code=MX
  interface=wlan0
  ssid=rpi-hotspot
  hw_mode=g
  channel=8
  macaddr_acl=0
  auth_algs=1
  ignore_broadcast_ssid=0
  wpa=2
  wpa_passphrase=rasp-p@s2w0rd
  wpa_key_mgmt=WPA-PSK
  wpa_pairwise=TKIP
  rsn_pairwise=CCMP
Reboot the system and check connection with new access point
Install python3 and set as default interpreter
$ sudo apt install -y python3
$ sudo rm /usr/bin/python
$ sudo ln -s /usr/bin/python3 /usr/bin/python
Copy pythonServer to raspberry pi
ESP8266 Configurations
Install required packages
- arduino-cli
- picocom
Install esp8266 arduino core
First add additional boards in ~/Arduino/arduino-cli.yml and add the following lines
# arduino-cli.yaml
board_manager:
  additional_urls:
    - http://arduino.esp8266.com/stable/package_esp8266com_index.json
Update index
$ arduino-cli --config-file ~/Arduino/arduino-cli.yml core update-index
Search esp8266 boards
$ arduino-cli --config-file ~/Arduino/arduino-cli.yml core search esp8266
Install esp8266 boards
$ arduino-cli --config-file ~/Arduino/arduino-cli.yml core install esp8266:esp8266
Compile and upload the sketch, assuming that port of esp8266 is /dev/ttyUSB0
$ arduino-cli compile -b esp8266:esp8266:nodemcuv2 -u -p /dev/ttyUSB0 arduinoClient/
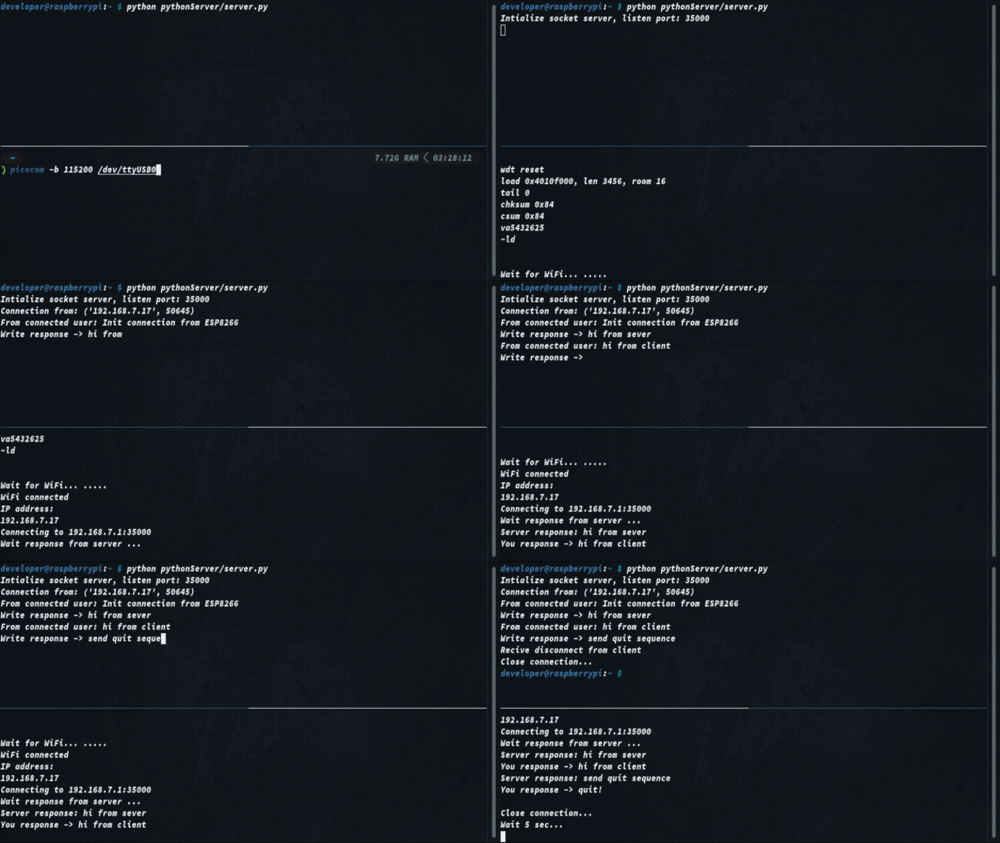
Test communications
Init server in raspberry pi
$ python ~/pythonServer/server.py
Init serial monitor for esp8266 board
$ picocom -b 115200 /dev/ttyUSB0
Raspberry pi output
  Intialize socket server, listen port: 35000
  Connection from: ('192.168.7.17', 59552)
  From connected user: Init connection from ESP8266
  Write response -> hi from server
  From connected user: hi from client
  Write response -> send quit sequence
  Recive disconnect from client
  Close connection...
Arduino output
  Wait for WiFi... .....
  WiFi connected
  IP address:
  192.168.7.17
  Connecting to 192.168.7.1:35000
  Wait response from server ...
  Server response: hi from server
  You response -> hi from client
  Server response: send quit sequence
  You response -> quit!


Top comments (0)