So, one day you're working away at WidgetsDirect, the leading supplier of widget and widget accessories, when your boss asks you to develop the new customer facing portal to allow the client base to access the next generation of Widgets..... and he wants you to use Angular 1.x to read into the department's Caché server.
There's only one problem: You've never used Angular, and don't know how to make it talk to Caché.
This guide is going to walk through the process of setting up a full Angular stack which communicates with a Caché backend using JSON over REST.
Part 1 - Setup
To start fresh, we will create a Namespace for our new application - WIDGETDIRECT, and set this up with Code and Data databases, and appropriate Security roles.
Our next step is to set up 2 Applications to serve web content; one for the Angular web content and one to serve the REST content
Our web content application is a standard CSP application, with a location on the local storage to the static web content
However, our REST application is set up a little different, and has a Dispatch class specified rather than a CSP Files Physical Path. This application is entirely driven by Classes
Our final set up step is to create our REST.Dispatch class, so that our application can serve some content. Create a Caché class and have it extend from %CSP.REST.
An empty REST class won't do anything useful, so we need to add a Route which maps a URL expression (and an HTTP verb, but we'll come back to this later) to a ClassMethod. Any expression beginning with : signifies a parameter to the classmethod, by position.
This will now take any request to widgetsdirect/rest/<name> and will return a personalised Hello World message based on the Name value passed in. We can test this by accessing the URL using a browser (which will use an HTTP Get to retrieve the content)
Congratulations you have just created your first Caché REST service!
Part 2 - Creating our Web Front End
We usually don't want to have our customers directly interacting with a REST service, so we now need to add a page to our Web application. Create a standard CSP page. We'll give it the Widgets Direct title, and add some script references. The first is the Angular runtime, to allow us to utilise the Angular framework, and the second is our own Module and Controller code. Finally, we will display the value of "message" in the Angular scope, so we put {message} in the body of the page, then we save as "Welcome.csp".
When we view as HTML, we get...
This clearly isn't what we want, so we are clearly needing some more setup. First, we need our Module and Controller code, so we need to create the javascript we mentioned in our Welcome page. We will define our Angular Module as "WidgetsDirect" and attach our first Controller "PageController" to the module. We will also pass in some useful Angular functionality to the controller, such as the $scope and the $http methods to allow us to send and receive HTTP content. When our controller is referenced, it will set the value of $scope.message (which we are displaying on the page) to the string "Hello Scope!"
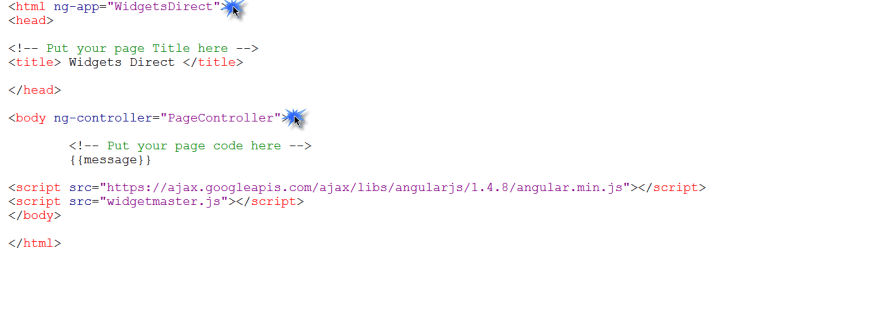
We will need to tell our Welcome.csp page that it is using both the Module and the Controller, in order to allow the page to see the correct $scope. We specify the ng-app at the html top level, and specify the controller at the body level in this example. Everything inside of the tags will now be able to reference our Controller data and code.</p>
If we now reload our Welcome.csp page in a browser, we should see
This is great! We now have our page talking to our Angular scope. However, we're not talking to Caché yet. Let's complete the chain, and have the controller look up our REST service, and assign the data returned to the message variable. To do this, we use the $http service, which provides us with an easy way to send and consume the results of an HTTP Get. We will pass in our own name for the parameter in the URL request. We have 2 functions following the return of the request, the first deals with Success return codes (where we expect valid data), and the second deals with any error conditions)
We will look a little bit closer at the response objects in later articles, but for now we will just copy the value of the data element into the message storage. If we hard refresh our browser to get the latest version of the Javascript, we should now see:
SUCCESS! You have now implemented a page which incorporates a full Angular stack to Caché. In a rush of excitement, you send the link to your boss to review this fantastic page! (next lesson
_This article is part of a multi-part series on using Angular on top of Caché REST services. The listing of the full series can be found at the Start Here


Top comments (0)