Not so long ago, I posted my first article about updates to Voximplant Kit, a smart and flexible tool for customer experience automation. Our team continues to improve the product using JointJS. And today I’m happy to tell you how our newly created live call logging feature works. What does “live logs” mean? Are they somehow dangerous:)? Let’s find out!
Previously, Voximplant Kit users could only listen to call recordings to analyze the call results. We wanted to create something else to make this process plain sailing. Since we are dealing with a low-code/no-code product, text logs are not the solution we're looking for. So we decided to visualize call logs.
How it works
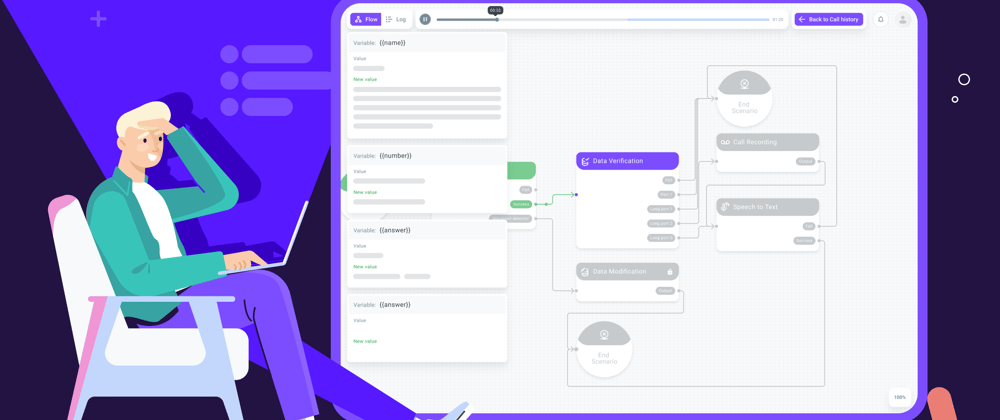
All call results are now available as a sequence of blocks used in the call. The visual editor animates and highlights these blocks just like it does in the demo mode. The only difference is that the path the client took is highlighted in advance.
To see a particular call log, go to the outbound or inbound call history tab or to the report of a particular campaign and click "View log info". Then click “Start scenario”, and the editor will show you what was happening in the call step by step.

Playback control
Start/stop controls (1) are to pause and resume playback. Rewind/fast forward (2) – to move you to the beginning of the previous or next block. You can also click on the timeline to start playback from a specific point in time, as is typical in most media players.
If your scenario includes an audio recording, it will be played along with moving from block to block. The audio recording is colored differently on the timeline (3).

A list of passed blocks with their timestamps is also available:

Spoiler:
Here, in the “Log” tab, we plan to show the details of each block. They will help us understand why a particular port was chosen and whether there were errors. For example, for a speech recognition block, we will see recognition results and errors.
Complex blocks, such as DialogFlowConnector, IVR, ASR, etc., will be of greatest interest here.
Variables
Changed variables are displayed on the left as pop-up notifications in chronological order. That is, if we move to the “Data modification” block, the variables that have been changed there will immediately pop up. If we move far from it (more than 4s on the timeline) – the variables will disappear until we are again in the interval where the change has occurred:

Lifehack
Live call logs remain their original form even after the scenario is changed or deleted. This means that you won't have any problems restoring the scenario from its log if you need it.
You can play around with the logs yourself after creating a Voximplant Kit account.
What’s inside?
Let's see how live logs are implemented in the code. Let's say right away, JointJS helped us with animating and highlighting only. The rest is our creativity.
Getting timepoints
When opening a specific call log, the server gives us a list of all used blocks with their timestamps (date and time when the client entered each block) and a list of variables changed during the call. In other words, there are two arrays of objects we will use: log_path and log_variables.
Also, the server response has the link to the audio and its duration, if the call was recorded.

Knowing the timestamps, we can calculate the timepoints (in milliseconds) for all used blocks and changed variables. The start point (0 ms) is the time we enter the first block. If we entered the second block in 5 seconds after the call started, then the timepoint of the second block is 5000 ms. Using these timepoints, we calculate the full log duration.
Looking for matches
After pressing the play button, the timeline starts updating every 10 ms. At each update, we check if the current time coincides with one of the timepoints:
const found = this.timePoints.find((item) => item === this.playTime);
If there is a match, we will look for all the blocks with the timepoint = current time + 600 ms (the time required to animate the transition from one block to another).
Here’s the full code of the updatePlayTime() method:
updatePlayTime(): void {
    const interval = 10;
    let expected = Date.now() + interval;

    const tick = () => {
        const drift = Date.now() - expected;
        const found = this.timePoints.find((item) => item === this.playTime);
        this.$emit('update', {
            time: this.playTime,
            found: found !== undefined
        });

        if (this.playTime >= this.duration) {
            this.isPlay = false;
            this.playTime = this.duration;
            clearTimeout(this.playInterval);
            this.$emit('end', this.playTime);
            return;
        }

        expected += interval;

        this.playTime += 0.01;
        this.playTime = +this.playTime.toFixed(2);

        this.updateProgress();

        this.playInterval = window.setTimeout(tick, Math.max(0, interval - drift));
    };

    this.playInterval = window.setTimeout(tick, 10);
}
Also, every 90 ms we check the matches for the current time and timepoints of the changed variables + 4000 ms (the time during which the variable change notification is shown).
Selecting blocks
After all the matches have been found, we add blocks to the queue to highlight them and animate the links between them.
If there are several blocks with timepoint = current time + 600 ms, we animate the transition directly to the last block:
if (i === blocks.length - 1) {
    await this.selectBlock(blocks[i], 600, true, true);
It's needed because there are blocks that are processed very quickly. For example, “Data Verification”, “Data Modification”, etc. – several blocks can be passed at a time. We still need to show them but do not want to slow down the animation too much, so we animate the transition straight to the last block.
Check the method code below:
async onUpdateTimeline({
    time,
    found
}) {
    this.logTimer = time * 1000; // convert to ms
    this.checkHistoryNotify();

    if (!found) return;

    // Select the group of blocks from the first found point + 600ms
    const blocks = this.callHistory.log_path.filter((item) => {
        return item.timepoint >= this.logTimer && item.timepoint < this.logTimer + 600;
    });

    if (blocks.length) {
        this.editor.unselectAll();

        for (let i = 0; i < blocks.length; i++) {
            if (i === blocks.length - 1) {
                await this.selectBlock(blocks[i], 600, true, true);

                const cell = this.editor.getCellById(blocks[i].idTarget);
                this.editor.select(cell);
            } else {
                await this.selectBlock(blocks[i], 0, false, true);
            }
        }
    }
}
We do it over and over again: if there is a match, we highlight the block; if the block is already in the queue, we do nothing:
async selectBlock(voxHistory, timeout = 700, animate = true, animateLink = true) {
    const inQueue = this.selectQueue.find((item) => item[0].targetId === voxHistory.idTarget);

    if (!inQueue) this.selectQueue.push(arguments);

    return this.exeQueue();
}
Rewinding
Rewinding works the same way: when the user clicks on the timeline, we get the time to rewind to and mark as not selected all blocks with the timepoint greater than the current time:
const forSelect = this.callHistory.log_path.filter((item) => {
    const time = accurate ? item.accurateTime : item.timepoint;
    return time <= this.logTimer;
});
After that, we animate the transition to the last block.
The full code of the onRewind() method:
async onRewind({
    time,
    accurate
}: RewindData, animation = true) {
    this.editor.unselectAll();
    this.stopLinksAnimation();
    this.checkHistoryNotify(true);

    const forSelect = this.callHistory.log_path.filter((item) => {
        const time = accurate ? item.accurateTime : item.timepoint;
        return time <= this.logTimer;
    });

    for (let i = 0; i < forSelect.length; i++) {
        if (i === forSelect.length - 1) {
            await this.selectBlock(forSelect[i], 600, animation, false);
            const cell = this.editor.getCellById(forSelect[i].idTarget);
            this.editor.select(cell);
        } else {
            await this.selectBlock(forSelect[i], 0, false, false);
        }
    }

    if (this.isPlay) this.restartAnimateLink();

    this.onEndTimeline();
}
Playing audio
Turning audio on/off is even easier. If the current time coincides with the start time of the recording, the audio starts playing. The updatePlayer() method is responsible for this:
updatePlayer() {
    if (this.playTime >= this.recordStart && this.player.paused && !this.isEndAudio) {
        this.player.play();
        this.player.currentTime = this.playTime - this.recordStart;
    } else if (this.playTime < this.recordStart && !this.player.paused) {
        this.player.pause();
    }
}
That’s it! JointJS methods + creativity of our developers. This is how live logs have been implemented. Test them out yourself if you haven't done it yet :)
It's great if you like this series of articles about Voximplant Kit insides. The most interesting and challenging is yet to come. Stay tuned!


Top comments (2)
Good work guys am new at using voximplant, is there a webinar on how to make voice bot with voximplant. Would appreciate if you get back to me asap
Hi! Sorry for the slow reply! Are you still interested in creating a voice bot?
I'd recommend that you watch this video:
youtube.com/watch?v=fFq499S3yzk
To use Voximplant Kit with Dialogflow, read
voximplant.com/kit/docs/howtos/usi...
In case you want to create a voice bot using Voximplant platform (not Voximplant Kit) along with Dialogflow, please watch this video: youtube.com/watch?v=SfynpK6YZ6o
and check the articles here: voximplant.com/docs/howtos/integra...