At this point we are almost done with our version of Musical NFT platform. What we still need to do is to allow credit card buyers to buy our NFTs with credit card and to deploy our app somewhere live.
Let's start with Stripe integrations fore credit card buyers. Update credit_card_user.html doc with buy button and Buy NFT name. Now creadit_card_user.html file inside root templates folder should look something like this
 <table class="table  table-hover">
        <thead class="table-dark">
        <tr>
            <th scope="col">Name</th>
            <th scope="col">Email</th>
            <th scope="col">Total no. NFTs</th>
            <th scope="col">Means of payment</th>
            <th scope="col">Buy NFT</th>
        </tr>
        </thead>
        <tbody>
        <tr>
            <td> {{ customer.first_name }} {{ customer.last_name }} </td>
            <td> {{ customer.email }} </td>
            <td> {{ customer.total_no_of_nfts }} </td>
            <td><form action="" method="post">
                {%csrf_token%}
                {{orderForm.as_p}}
                <input type="submit" value="Save" class="btn btn-secondary">
            </form>
            </td>
            <td>
            <form action="" method="post">
                <label for="NFT">Number of NFTs</label>
                {%csrf_token%}
                <input  type="number" id="NFT" ><br>
                </form>
                <input  id="creditCard" type="submit" value="Buy" class="btn btn-secondary">
                </td>
            </tr>
        </tbody>
        </table>
        {% for card in metadata%}
        {% if forloop.counter0|divisibleby:3 %} <div class="row">{%  endif %}
        <div class="card m-5 p-2" style="width: 18rem;">
            {% load static %}
            <img src="{% static 'nft/'%}{{card.cover_file_name}}"  class="card-img-top" alt="..." width="50" height="200"/>
            <div class="card-body">
            <h5 class="card-title">{{card.name}}</h5>
            <br>
            <p class="card-text">{{card.description}}</p>
            </div>
        </div>
        {%  if forloop.counter|divisibleby:3 or forloop.last %}</div> {%  endif %}
        <br>
        {% endfor %}
        <p> credit card </p>
Let's pip install stripe python library.
(env)$pip install stripe==5.5.0
Next, register for a Stripe account (if you haven't already done so) and navigate to the dashboard. Click on "Developers":
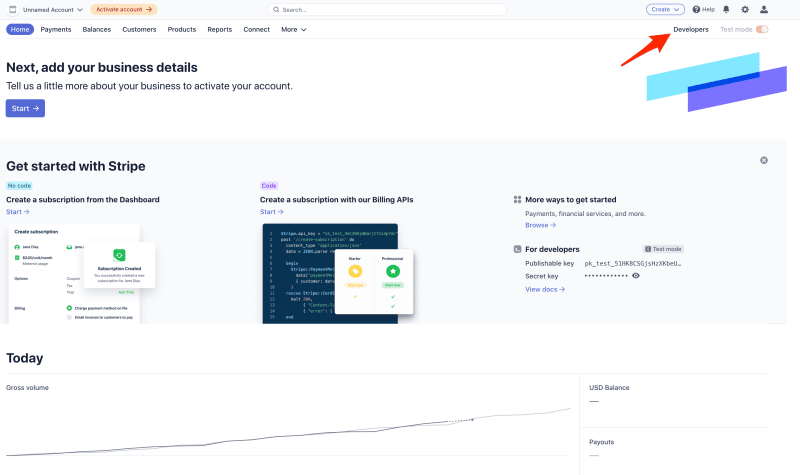
Then click on "API keys":

Each Stripe account has four API keys: two for testing and two for production. Each pair has a "secret key" and a "publishable key". Do not reveal the secret key to anyone; the publishable key will be embedded in the JavaScript on the page that anyone can see.
Currently the toggle for "Viewing test data" in the upper right indicates that we're using the test keys now. That's what we want.
Add to your .env file STRIPE_SECRET_KEY and pass there your secret keys from Stipe. Then at the end of Django settings.py add this to two new lines of code
STRIPE_SECRET_KEY = env("STRIPE_SECRET_KEY")
STRIPE_PUBLISHABLE_KEY = "pk_test_51MgCeMHGy7fyfctt4TIWxu6ev25bm5180LalTib2YAx2YmBe3IAWNxPHDMSUzn0tx7K4Mrq8aoKIQyzHc8TRWRGG00p8ePmfug" # here your publishable key
Finally, you'll need to specify an "Account name" within your "Account settings" at https://dashboard.stripe.com/settings/account:

Next, we need to create a product to sell.
Click "Products" and then "Add product":
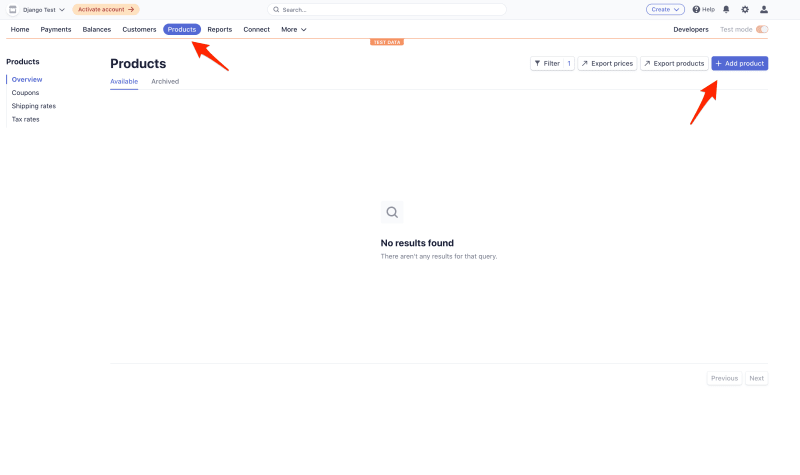
Add a product name, enter a price, and select "One time":
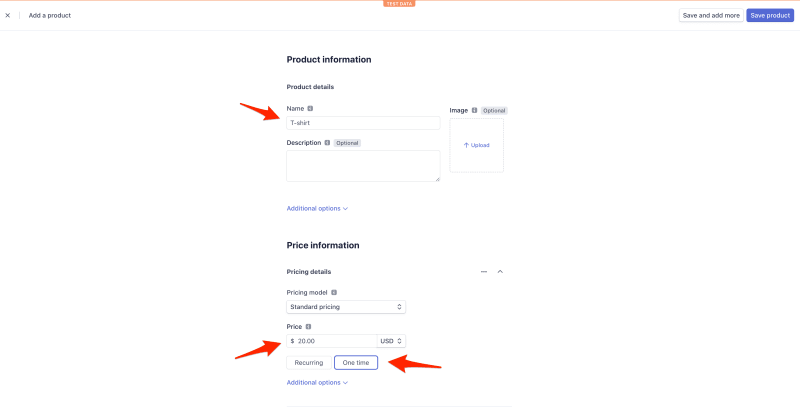
Click "Save product".
Now flow should go something like this:
After the user clicks the purchase button we need to do the following:
Get Publishable Key
1) Send an XHR request from the client to the server requesting the publishable key
2) Respond with the key
3) Use the key to create a new instance of Stripe.js
Create Checkout Session
1)Send another XHR request to the server requesting a new Checkout Session ID
2)Generate a new Checkout Session and send back the ID
3)Redirect to the checkout page for the user to finish their purchase
4) Redirect the User Appropriately:
Redirect to a success page after a successful payment
Redirect to a cancellation page after a cancelled payment
Confirm Payment with Stripe Webhooks
1)Set up the webhook endpoint
2)Test the endpoint using the Stripe CLI
3)Register the endpoint with Stripe
Let's start => Get Publishable key:
Updated version of base.html:
    {% load static %}
    <!doctype html>
    <html lang="en">
    <head>
        <meta charset="utf-8">
        <meta name="viewport" content="width=device-width, initial-scale=1">
        <title>Muscial NFT</title>
        <link href="https://cdn.jsdelivr.net/npm/bootstrap@5.3.2/dist/css/bootstrap.min.css" rel="stylesheet" integrity="sha384-T3c6CoIi6uLrA9TneNEoa7RxnatzjcDSCmG1MXxSR1GAsXEV/Dwwykc2MPK8M2HN" crossorigin="anonymous">
        <script src="https://js.stripe.com/v3/"></script>  <!-- new -->
        <script type="text/javascript" src="{% static 'connect_wallet.js' %}"></script>
        <link rel="shortcut icon" type="image" href="{% static 'favicon.ico' %}" >
        <!-- <script type="module" src="{% static 'call_sc.js' %}"></script> -->
    </script>

    </head>
    <body onload="checkMetaMaskState()">
    <body>
        {% include "navbar.html"%}
        <div class="container ">
        <br/>
        <br/>
        {% if messages %}
        {% for message in messages%}
        <div class="alert alert-warning alert-dismissible fade show" role="alert">
            {{ message }}
            <button type="button" class="btn-close" data-bs-dismiss="alert" aria-label="Close"></button>
        </div>

        {% endfor%}
        {% endif %}

        {% block content %}
        {% endblock content %}
        </div>
        </body>
        <script src="https://cdn.jsdelivr.net/npm/bootstrap@5.3.2/dist/js/bootstrap.bundle.min.js" integrity="sha384-C6RzsynM9kWDrMNeT87bh95OGNyZPhcTNXj1NW7RuBCsyN/o0jlpcV8Qyq46cDfL" crossorigin="anonymous"></script>
        <script src="https://cdn.ethers.io/scripts/ethers-v4.min.js"
        charset="utf-8"
        type="text/javascript"></script>
        <script type="text/javascript" src="{% static 'call_sc.js' %}"></script>
        <script type="text/javascript" src="{% static 'stripe_integration.js' %}"></script>
        </html>
Inside our authentication app folder views.py, create new class StripeConfigView + we should add few new imports as well as one new method to handle XHR request:
 #new imports
    from django.conf import settings # new
    from django.http.response import JsonResponse # new
    from django.views.decorators.csrf import csrf_exempt # new

    class StripeConfigView(TemplateView): # new

        @csrf_exempt
        def get(request):
            stripe_config = {'publicKey': settings.STRIPE_PUBLISHABLE_KEY}
            return JsonResponse(stripe_config, safe=False)
Now update our authentication app level urls.py:
 from django.urls import path

    from .views import HomeView, LogoutUser, RegisterUser, StripeConfigView

    urlpatterns = [
        path("", HomeView.as_view(), name="home"),
        # path("login/", LoginUser.as_view(), name="login"),
        path("logout/", LogoutUser.as_view(), name="logout"),
        path("register/", RegisterUser.as_view(), name="register"),
        path("config/", StripeConfigView.as_view(), name="stripe_config"), # new
    ]
Next, use the Fetch API to make an XHR (XMLHttpRequest) request to the new /config/ endpoint in static/stripe_integrations.js:
 // new
    // Get Stripe publishable key
    fetch("/config/")
    .then((result) => { return result.json(); })
    .then((data) => {
    // Initialize Stripe.js
    const stripe = Stripe(data.publicKey);
    });
Include stripe.js in head tag of our base.html just bellow bootstrap
`<script src="https://js.stripe.com/v3/"></script>`
With this we close down first item from our list:
Get Publishable Key
Send an XHR request from the client to the server requesting the publishable key
Respond with the key
Use the key to create a new instance of Stripe.js
What still needs to be done =>
Create Checkout Session
Send another XHR request to the server requesting a new Checkout Session ID
Generate a new Checkout Session and send back the ID
Redirect to the checkout page for the user to finish their purchase
Redirect the User Appropriately
Redirect to a success page after a successful payment
Redirect to a cancellation page after a cancelled payment
Confirm Payment with Stripe Webhooks
Set up the webhook endpoint
Test the endpoint using the Stripe CLI
Register the endpoint with Stripe
Create Checkout Session
Moving on, we need to attach an event handler to the button's click event which will send another XHR request to the server to generate a new Checkout Session ID.
inside authentication/views.py crete new CreateCheckoutSession
 class CreateCheckoutSession(TemplateView): # new

    @csrf_exempt
    def get(self, request):
        number_of_nfts = request.GET.get("number")
        domain_url = 'http://localhost:8000/'
        stripe.api_key = settings.STRIPE_SECRET_KEY
        try:
            # Create new Checkout Session for the order
            # Other optional params include:
            # [billing_address_collection] - to display billing address details on the page
            # [customer] - if you have an existing Stripe Customer ID
            # [payment_intent_data] - capture the payment later
            # [customer_email] - prefill the email input in the form
            # For full details see https://stripe.com/docs/api/checkout/sessions/create

            # ?session_id={CHECKOUT_SESSION_ID} means the redirect will have the session ID set as a query param
            checkout_session = stripe.checkout.Session.create(
                success_url=domain_url + 'success?session_id={CHECKOUT_SESSION_ID}',
                cancel_url=domain_url + 'cancelled/',
                payment_method_types=['card'],
                mode='payment',
                line_items=[
                    {
                        'price_data': {
                            'currency': 'usd',
                            'unit_amount': 2000,
                            'product_data': {
                                'name': 'MusicalNFT',
                            },
                            },
                            'quantity': number_of_nfts,
                    }
                ]
            )
            return JsonResponse({'sessionId': checkout_session['id']})
        except Exception as e:
            return JsonResponse({'error': str(e)})
Here we pick up fron front-end number of NFTs user wants. Then we defined a domain_url, assigned the Stripe secret key to stripe.api_key (so it will be sent automatically when we make a request to create a new Checkout Session), created the Checkout Session, and sent the ID back in the response. Take note of the success_url and cancel_url. The user will be redirected back to those URLs in the event of a successful payment or cancellation, respectively. We'll set those views up shortly.
Don't forget to import stripe into views.py
import stripe
Add to authentication urls.py
 from django.urls import path

    from .views import HomeView, LogoutUser, RegisterUser, StripeConfigView, CreateCheckoutSession

    urlpatterns = [
        path("", HomeView.as_view(), name="home"),
        path("logout/", LogoutUser.as_view(), name="logout"),
        path("register/", RegisterUser.as_view(), name="register"),
        path("config/", StripeConfigView.as_view(), name="stripe_config"),
        path('create-checkout-session/', CreateCheckoutSession.as_view(), name = "create_checkout_session"), # new
    ]
XHR Request
Add the event handler and subsequent XHR request to static/stripe_integrations.js:
 // Get Stripe publishable key
    fetch("/config/")
    .then((result) => { return result.json(); })
    .then((data) => {
    // Initialize Stripe.js
    console.log("stripe config")
    const stripe = Stripe(data.publicKey);

    // Event handler
    document.querySelector("#creditCard").addEventListener("click", () => {
    // Get Checkout Session ID
    // pass input values to backend
    let num = Number(document.getElementById("NFT").value);

    fetch(`/create-checkout-session?` + new URLSearchParams({number: `${num}`}))
    .then((result) => { return result.json(); })
    .then((data) => {
        console.log(data);
        /// Redirect to Stripe Checkout
        return stripe.redirectToCheckout({sessionId: data.sessionId})
    })
    .then((res) => {
        console.log(res);
        });
    });
    });
Here, after resolving the result.json() promise, we called redirectToCheckout with the Checkout Session ID from the resolved promise.
Navigate to user profile page on button click you should be redirected to an instance of Stripe Checkout (a Stripe-hosted page to securely collect payment information) with the NFT product information:

We can test the form by using one of the several test card numbers that Stripe provides. Let's use 4242 4242 4242 4242. Make sure the expiration date is in the future. Add any 3 numbers for the CVC and any 5 numbers for the postal code. Enter any email address and name. If all goes well, the payment should be processed, but the redirect will fail since we have not set up the /success/ URL yet.
To confirm a charge was actually made, go back to the Stripe dashboard under "Payments":
To review, we used the secret key to create a unique Checkout Session ID on the server. This ID was then used to create a Checkout instance, which the end user gets redirected to after clicking the payment button. After the charge occurred, they are then redirected back to the success page.
Ok, at this point we resolve first two items from our list: 1) Get publishable key and 2) Create Checkout session. What still need to be doe is to 3) Redirect User based on success or failure of transaction. And after that, finaly, 4) confirm payment over Stripe webhook, 5) minti new NFT to platform to custodial wallet and 6) database bookeeping staff (to keep all things in the sync).
To redirect user after transacrtion success or failure we can make two additional templates: canceled.html and success.html in project root templates folder
success.html
 <!DOCTYPE html>
    <html>
    <head>
        <meta charset="utf-8">
        <meta name="viewport" content="width=device-width, initial-scale=1">
        <title>Django + Stripe Checkout</title>
        <link href="https://cdn.jsdelivr.net/npm/bootstrap@5.3.2/dist/css/bootstrap.min.css" rel="stylesheet" integrity="sha384-T3c6CoIi6uLrA9TneNEoa7RxnatzjcDSCmG1MXxSR1GAsXEV/Dwwykc2MPK8M2HN" crossorigin="anonymous">
    </head>
    <body>
        {% block content%}
        <section class="section">
        <div class="container">
            <p>Your payment succeeded!</p>
            <a href="{% url 'home' %}"> Return to user profile page </a>
        </div>
        </section>
        {% endblock content%}
    </body>
    <script src="https://cdn.jsdelivr.net/npm/bootstrap@5.3.2/dist/js/bootstrap.bundle.min.js" integrity="sha384-C6RzsynM9kWDrMNeT87bh95OGNyZPhcTNXj1NW7RuBCsyN/o0jlpcV8Qyq46cDfL" crossorigin="anonymous"></script>
    </html>
And then canceled.html
  <!DOCTYPE html>
    <html>
    <head>
        <meta charset="utf-8">
        <meta name="viewport" content="width=device-width, initial-scale=1">

        <title>Django + Stripe Checkout</title>
        <link href="https://cdn.jsdelivr.net/npm/bootstrap@5.3.2/dist/css/bootstrap.min.css" rel="stylesheet" integrity="sha384-T3c6CoIi6uLrA9TneNEoa7RxnatzjcDSCmG1MXxSR1GAsXEV/Dwwykc2MPK8M2HN" crossorigin="anonymous">

    </head>
    <body>
        {% block content %}
        <section class="section">
        <div class="container">
            <p>Your payment was cancelled.</p>
            <a href="{% url 'home' %}"> Return to user page </a>
        </div>
        </section>
        {% endblock content %}
    </body>
    <script src="https://cdn.jsdelivr.net/npm/bootstrap@5.3.2/dist/js/bootstrap.bundle.min.js" integrity="sha384-C6RzsynM9kWDrMNeT87bh95OGNyZPhcTNXj1NW7RuBCsyN/o0jlpcV8Qyq46cDfL" crossorigin="anonymous"></script>
    </html>
Then inside authenticaiton views.py add this two new classes:
  class SuccessView(TemplateView):
        template_name = 'success.html'


    class CancelledView(TemplateView):
        template_name = 'cancelled.html'
This two templates will be used to redirect user to correct page from inside our CreateCheckoutSession class.
If tx was succesfule user should see something like this

but before that we need to update our urls.py with two additional paths
  # payments/urls.py
    from django.urls import path

    from . import views

    urlpatterns = [
        path('', views.HomePageView.as_view(), name='home'),
        path('config/', views.stripe_config),
        path('create-checkout-session/', views.create_checkout_session),
        path('success/', views.SuccessView.as_view()), # new
        path('cancelled/', views.CancelledView.as_view()), # new
    ]
Ok, refresh the web page at http://localhost:8000/. Click on the payment button and use the credit card number 4242 4242 4242 4242 again along with the rest of the dummy info. Submit the payment. You should be redirected back to http://localhost:8000/success/.
To confirm a charge was actually made, go back to the Stripe dashboard under "Payments":
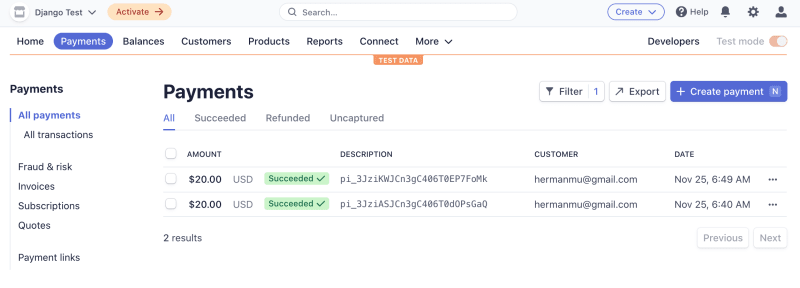
To review, we used the secret key to create a unique Checkout Session ID on the server. This ID was then used to create a Checkout instance, which the end user gets redirected to after clicking the payment button. After the charge occurred, they are then redirected back to the success page.
At this point we have just few more things to add to finish credit card functionaliy. Precasly three more things: 1) confirm payment over Stripe webhook; 2) minti new NFT to custodial wallet ones confirmaton arrive over wevhook and 3) user database bookeeping.
Ok, webhooks! Our app works well at this point, but we still can't programmatically confirm payments and run smart contract related code if a payment was successful. One of the easiest ways to get notified when the payment goes through is to use a callback or so-called Stripe webhook. We'll need to create a simple endpoint in our application, which Stripe will call whenever an event occurs (e.g., when a user buys a NFT). By using webhooks, we can be absolutely sure the payment went through successfully (and based on that mint new NFT to custodial wallet and asisgne ownership to the user in our Postgres database). In order to use webhooks, we need to:
Create Stripe request handler inside our views.py
Test the endpoint using the Stripe CLI
Register the endpoint with Stripe
Create a new view functon called stripe_webhook which prints a message every time a payment goes through successfully (more about code in comments and bellowe code):
  from django.http.response import JsonResponse, HttpResponse

    # payments/views.py
    @csrf_exempt
    def stripe_webhook(request):
        stripe.api_key = settings.STRIPE_SECRET_KEY
        endpoint_secret = settings.STRIPE_ENDPOINT_SECRET
        payload = request.body
        sig_header = request.META['HTTP_STRIPE_SIGNATURE']
        event = None

        try:
            event = stripe.Webhook.construct_event(
                payload, sig_header, endpoint_secret
            )
        except ValueError as e:
            # Invalid payload
            return HttpResponse(status=400)
        except stripe.error.SignatureVerificationError as e:
            # Invalid signature
            return HttpResponse(status=400)

        # Handle the checkout.session.completed event
        if event['type'] == 'checkout.session.completed':
            # Mint new NFT
            result = contract_interface.mint_nft("ipfs://uri.test")
            suc, result = contract_interface.event()
            if suc:
                try:
                    # if tx was sucesfule update custodial wallet related DB as well as user
                    c1 = Customer.objects.get(eth_address=result.args.owner)
                    if result.args.numberOfNFT not in c1.nft_ids:
                        # update custodial wallet information db
                        c1.nft_ids.append(result.args.numberOfNFT)
                        c1.total_no_of_nfts += 1
                        c1.save()
                        # update customer db
                        user = event["data"]["object"]["customer_details"]["name"]
                        name, last = user.split()
                        c2 = Customer.objects.get(first_name=name, last_name=last)
                        c2.nft_ids.append(result.args.numberOfNFT)
                        c2.total_no_of_nfts += 1
                        c2.save()
                        print("Payment success!)
                except Exception as e:
                    print (e)
        return HttpResponse(status=200)
And then update urls.py
  from django.urls import path

    from . import views

    urlpatterns = [
        path('', views.HomePageView.as_view(), name='home'),
        path('config/', views.stripe_config),
        path('create-checkout-session/', views.create_checkout_session),
        path('success/', views.SuccessView.as_view()),
        path('cancelled/', views.CancelledView.as_view()),
        path('webhook/', views.stripe_webhook), # new
    ]
Logic here is that over our webhook we are listen for request from Stripe. Then ones we get that request we are checking if sender is authroized, if type is completed and there is no any error alonge the way. Only if this is the case we assigne custodial wallet user and assigne id from newly minted NFT as well as increase total number of NFTs we have in custodial wallet. Then we query our database for user who acctualy pay this NFT with his card and then update his nft_ids field and total_no_of_nfts. Because he payed with credit card we minted new NFT to custodial wallet not to his one (he don't have one). But also in db we made record about the fact that he is owner of this NFT minted to custodial wallet.
Now let's test our webhook.
We'll use the Stripe CLI to test the webhook.
Once downloaded and installed, run the following command in a new terminal window to log in to your Stripe account:
$ stripe login
This command should generate a pairing code:
    Your pairing code is: peach-loves-classy-cozy
    This pairing code verifies your authentication with Stripe.
    Press Enter to open the browser (^C to quit)
By pressing Enter, the CLI will open your default web browser and ask for permission to access your account information. Go ahead and allow access. Back in your terminal, you should see something similar to:
   > Done! The Stripe CLI is configured for Django Test with account id acct_<ACCOUNT_ID>
    Please note: this key will expire after 90 days, at which point you'll need to re-authenticate.
Next, we can start listening to Stripe events and forward them to our endpoint using the following command:
$ stripe listen --forward-to localhost:8000/webhook/
This will also generate a webhook signing secret:
> Ready! Your webhook signing secret is whsec_xxxxxxxxxxxxxxxxxxxxxxxxxxxxxx (^C to quit)
In order to initialize the endpoint, add the secret to the settings.py file:
    STRIPE_SECRET_KEY = env("STRIPE_SECRET_KEY")
    STRIPE_PUBLISHABLE_KEY = "pk_test_51MybU0KtroSirNQXi4fuyC99SsypbcWbqLZtfYtGWTUmwTyoNkPaPvu7vy2twd5JjyzHTaL9EirWX7GsFJV3xFsj00xVvZo3C8"
    STRIPE_ENDPOINT_SECRET=env("STRIPE_ENDPOINT")
Make sure that you have in your root .env STRIPE_ENDPOINT_SECRET variable
Stripe will now forward events to our endpoint. To test, run another test payment through with 4242 4242 4242 4242. In your terminal, you should see the Payment was successful. message.
Once done, stop the stripe listen --forward-to localhost:8000/webhook/ process.
Finally, after deploying your app, we will register the endpoint in the Stripe dashboard, under Developers > Webhooks. This will generate a webhook signing secret for use in your production app.
With this basically we have also credit card buyer covered. And what's left in this moment is deployment of our platform somewhere live. And as you can guess this will be topic of our final blog post...
Code can be found in this repo
p.s. Huge thanks to tesdrive.io for all knowledge they share!


Top comments (1)