
One of my customers asked me to help them with a simple dashboard concept that would display series of availability and response times of the CRUD (Create, Read, Update, Delete) operations of the various data services exposed on the IBM Dedicated Cloud. By coincidence it also became a good example on how you can use CRUD operations on those data services accessed from a Java Open Liberty server on a local machine, as well as bound in the cloud, through the VCAP configuration file.
This tutorial instructs you on how to check the response times of services hosted on IBM Cloud. This is a simple tool that can also show you how to do the basic CRUD operations in your Java application/microservice on strategic datasources like Cloudant, IBM Message Hub, MongoDB, Elastic Search, and more.
This particular how-to post is an example on using *Databases for MongoDB * that is hosted and managed on IBM Cloud. The approach shown here is to generate a JSON response file with the report from accessing CRUD operations and provide the time needed to access each and every operation, in addition to the total operation time. The example of the response file you will try to create can be seen below.
{
"service": "mongodb",
"operations": [{
"type": "create",
"response_time": 30,
"response_code": 200,
"desc": {
"visitor id": "594ddeee34a639002645674d"
}
},
{
"type": "read",
"response_time": 25,
"response_code": 200,
"desc": {
"visitor id": "594ddeee34a639002645674d"
}
},
{
"type": "update",
"response_time": 49,
"response_code": 200,
"desc": {
"visitor id": "594ddeee34a639002645674d"
}
},
{
"type": "delete",
"response_time": 28,
"response_code": 200,
"desc": {
"deleted visitor id": "594ddeee34a639002645674d"
}
}
],
"response_code": 200,
"desc": "operations implemented CRUD/CRUD"
}
Learning objectives
After completing this tutorial, the reader will know how to:
* Track service response times
* Run Java Open Liberty server locally and also in the cloud
* Connect Java Open Liberty server to the exposed service
Prerequisites
Before you start you will need the following software on your machine:
* Git
* Cloud Foundry CLI
* Maven
You'll also need:
* An IBM Cloud - cloud.ibm.com account (note that we'll be using non-lite tier services)
* An IDE. In this example I use Eclipse with IBM Cloud plugin to deploy the application to the cloud.
Estimated time
Doing the entire lab takes about 20 minutes to 60 minutes for those who would set the environment up for the first time.
Steps
Step 1. Clone the sample app
- Clone the https://github.com/blumareks/BluemixTestDashboard GitHub repository.
git clone https://github.com/blumareks/BluemixTestDashboard
- Change the directory to where the sample app for MongoDB is located. In order to do it use the instructions below:
cd BluemixTestDashboard/GetStartedJavaMongoDb
That's good enough for now. We'll next provision a few resources on IBM Cloud and get back to the cloned repo.
Step 2. Create the cloud services
Log in to the IBM cloud.ibm.com console.
Search the \ **Catalog* * for
**Databases for MongoDB**and `Liberty for Java `.
Create both the
Liberty for Javasample app and theDatabases for MongoDBservice.-
Once the two are created, bind the MongoDB service with the Liberty for Java app.
- Click the *Connections* tab of the Liberty for Java service, and then click the *Create connection* button.

- Select the **Databases for MongoDB** service.

- Click the *Connect* button.
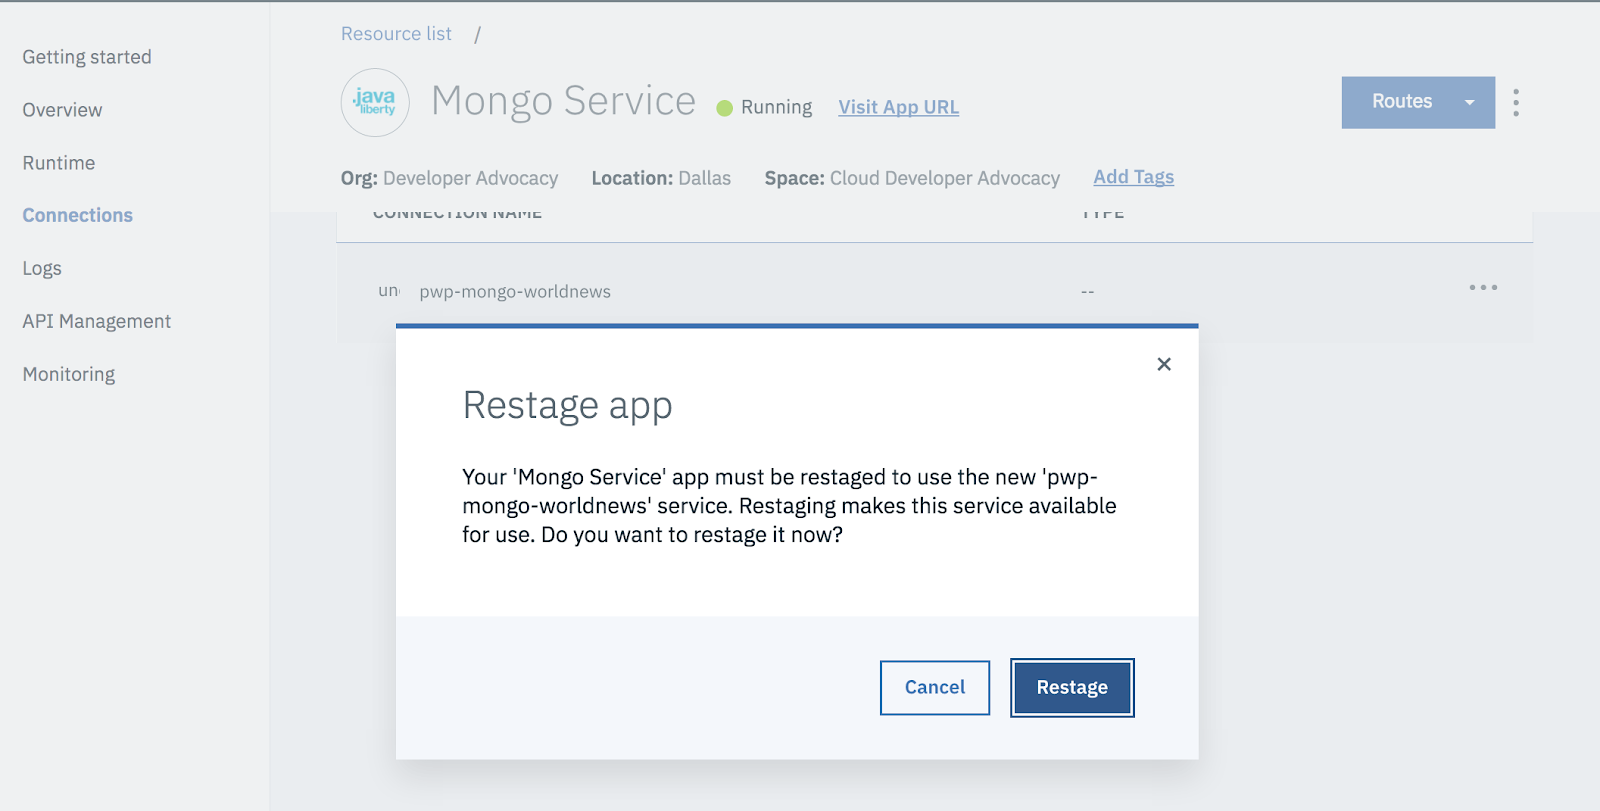
This action will initiate a restaging process of the Liberty for Java service.
Step 3. Connect JVM system properties for TLS/SSL to Databases for MongoDB
Go to the **Service Credentials** tab in the
Databases for MongoDB
service.-
From the menu, select **View Credentials**.
The connection credentials from the VCAP file will look like this:
{
"connection": {
"cli": {
"arguments": [
[
"-u",
"ibm_cloud_[characters removed]",
"-p",
"[characters removed]",
"--ssl",
"--sslCAFile",
"b226140c-3543-11e9-837a-ae06e730b715",
"--authenticationDatabase",
"admin",
"--host",
"replset/4ffb04cb-473b-4895-879e-becf8fb4ac40-0.d7deeff0d58745aba57fa5c84685d5b4.databases.appdomain.cloud:31676,4ffb04cb-473b-4895-879e-becf8fb4ac40-1.d7deeff0d58745aba57fa5c84685d5b4.databases.appdomain.cloud:31676"
]
],"bin": "mongo",
"certificate": {
"certificate_base64": "[characters removed]",
"name": "[characters removed]"
},
"composed": [
"mongo -u ibm_cloud_[characters removed] -p [characters removed] --ssl --sslCAFile b226140c-3543-11e9-837a-ae06e730b715 --authenticationDatabase admin --host replset/4ffb04cb-473b-4895-879e-becf8fb4ac40-0.d7deeff0d58745aba57fa5c84685d5b4.databases.appdomain.cloud:31676,4ffb04cb-473b-4895-879e-becf8fb4ac40-1.d7deeff0d58745aba57fa5c84685d5b4.databases.appdomain.cloud:31676"
],
"environment": {},
"type": "cli"
},
"mongodb": {
"authentication": {
"method": "direct",
"password": "[characters removed]",
"username": "ibm_cloud_[characters removed]7"
},
"certificate": {
"certificate_base64": "[characters removed]",
"name": "b226140c-3543-11e9-837a-ae06e730b715"
},
"composed": [
"mongodb://ibm_cloud_[characters removed]:[characters removed]@4ffb04cb-473b-4895-879e-becf8fb4ac40-0.d7deeff0d58745aba57fa5c84685d5b4.databases.appdomain.cloud:31676/ibmclouddb?authSource=admin",
"mongodb://ibm_cloud_[characters removed]:[characters removed]@4ffb04cb-473b-4895-879e-becf8fb4ac40-1.d7deeff0d58745aba57fa5c84685d5b4.databases.appdomain.cloud:31676/ibmclouddb?authSource=admin"
],
"hosts": [
{
"hostname": "4ffb04cb-473b-4895-879e-becf8fb4ac40-0.d7deeff0d58745aba57fa5c84685d5b4.databases.appdomain.cloud",
"port": 31676,
"protocol": "mongodb"
},
{
"hostname": "4ffb04cb-473b-4895-879e-becf8fb4ac40-1.d7deeff0d58745aba57fa5c84685d5b4.databases.appdomain.cloud",
"port": 31676,
"protocol": "mongodb"
}
],
"path": "/ibmclouddb",
"query_options": {
"authSource": "admin"
},
"scheme": "mongodb",
"type": "uri"
}
},
"instance_administration_api": {
"deployment_id": "crn:v1:bluemix:public:databases-for-mongodb:us-south:a/[characters removed]:[characters removed]::",
"instance_id": "crn:v1:bluemix:public:databases-for-mongodb:us-south:a/[characters removed]:[characters removed]::",
"root": "https://api.us-south.databases.cloud.ibm.com/v4/ibm"
}
} Scroll down, and notice that the connection is SSL-enabled. If you do not have a credential file, create one using the defaults. Copy over the entire json. You will need the following parts:
"certificate": {
"certificate_base64": "[characters removed]",
"name": "b226140c-3543-11e9-837a-ae06e730b715"
},
URL: the first link from "composed": [
"composed": [
"mongodb://ibm_cloud_[characters removed]:[characters removed]@4ffb04cb-473b-4895-879e-becf8fb4ac40-0.d7deeff0d58745aba57fa5c84685d5b4.databases.appdomain.cloud:31676/ibmclouddb?authSource=admin",
"mongodb://ibm_cloud_[characters removed]:[characters removed]@4ffb04cb-473b-4895-879e-becf8fb4ac40-1.d7deeff0d58745aba57fa5c84685d5b4.databases.appdomain.cloud:31676/ibmclouddb?authSource=admin"
],
and from the same "composed" you can take the secondary URL (the second one from hosts)
"hosts": [
{
"hostname": "4ffb04cb-473b-4895-879e-becf8fb4ac40-0.d7deeff0d58745aba57fa5c84685d5b4.databases.appdomain.cloud",
"port": 31676,
"protocol": "mongodb"
},
{
"hostname": "4ffb04cb-473b-4895-879e-becf8fb4ac40-1.d7deeff0d58745aba57fa5c84685d5b4.databases.appdomain.cloud",
"port": 31676,
"protocol": "mongodb"
}
],

We'll need to set several JVM system properties in our application to ensure that the client is able to validate the TLS/SSL certificate presented by the server:
  \* `javax.net.ssl.trustStore`: The path to a trust store containing the certificate of the signing authority.
  \* `javax.net.ssl.trustStorePassword`: The password to access this trust store.
Note that the trust store is typically created with the keytool command-line program provided as part of the JDK. For example:
keytool -importcert -trustcacerts -file -keystore -storepass
Go back to the **Databases for MongoDB** console and get the SSL certificate encoded_64 available on the **Credentials** page. You will need to **decode64 it**. I used https://www.base64decode.org service to do it. When you decode the copied certificate, then you can use it in the next step.
Save the SSL certificate in a file:
cat > mongodbcert.crt
The content should look like:
-----BEGIN CERTIFICATE-----
LS0tLS1CRUdJTiBDRVJUSUZJQ0FURS0
[... removed couple lines ...]
VSVElGSUNBVEUtLS0tLQo
-----END CERTIFICATE-----
- Use the
keytoolcommand to create the MongoDB keystore for your system. Note that you may want to consider changing the password to something more appropriate.
keytool -importcert -trustcacerts -file ./mongodbcert.crt -keystore ./mongoKeyStore -storepass aftereight
- When done, place the
mongoKeyStorein this path of your cloned repository:
GetStartedJavaMongoDb/src/main/resources/mongoKeyStore
- You might want to comment the lines for in the IBM Cloud connection, and switch it to a local store thru uncommenting the following lines in the file
MongoDbVisitorStore.javacloned from github in the following location:BluemixTestDashboard/GetStartedJavaMongoDb/src/main/java/wasdev/sample/store

Furthermore for the local Liberty and MongoDB tests you want to define the MongoDB URL in the local file here: /BluemixTestDashboard/GetStartedJavaMongoDb/src/main/resources/mongo.properties . For that use the previously captured elements from json:
- URL
- Part of the host2;
- add
&ssl=trueat the end of the URL.
It should look somehow like that:
mongo_url=mongodb://ibm_cloud_[characters removed]:[characters removed]@4ffb04cb-473b-4895-879e-becf8fb4ac40-0.d7deeff0d58745aba57fa5c84685d5b4.databases.appdomain.cloud:31676,4ffb04cb-473b-4895-879e-becf8fb4ac40-1.d7deeff0d58745aba57fa5c84685d5b4.databases.appdomain.cloud:31676/ibmclouddb?authSource=admin&ssl=true
- From the project root directory, run Maven (ensure it's installed by running
mvn --version) in a terminal:
mvn install
The document after the mvn install is going to be locally stored at this location:
/your-path-to-the-target/GetStartedJavaMongoDb/target/TestJavaMongo-1.0-SNAPSHOT/WEB-INF/classes/mongoKeyStore
Or on IBM Cloud (after a cf push command):
/home/vcap/app/wlp/usr/servers/defaultServer/apps/myapp.war/WEB-INF/classes/mongoKeyStore
A typical application will also need to set several JVM system properties to ensure that the client presents a TLS/SSL certificate to the MongoDB server:
* javax.net.ssl.keyStore: The path to a key store containing the client's TLS/SSL certificates.
* javax.net.ssl.keyStorePassword: The password to access this key store.
Step 4. Running locally on Open Liberty with Databases for MongoDB in the IBM Cloud
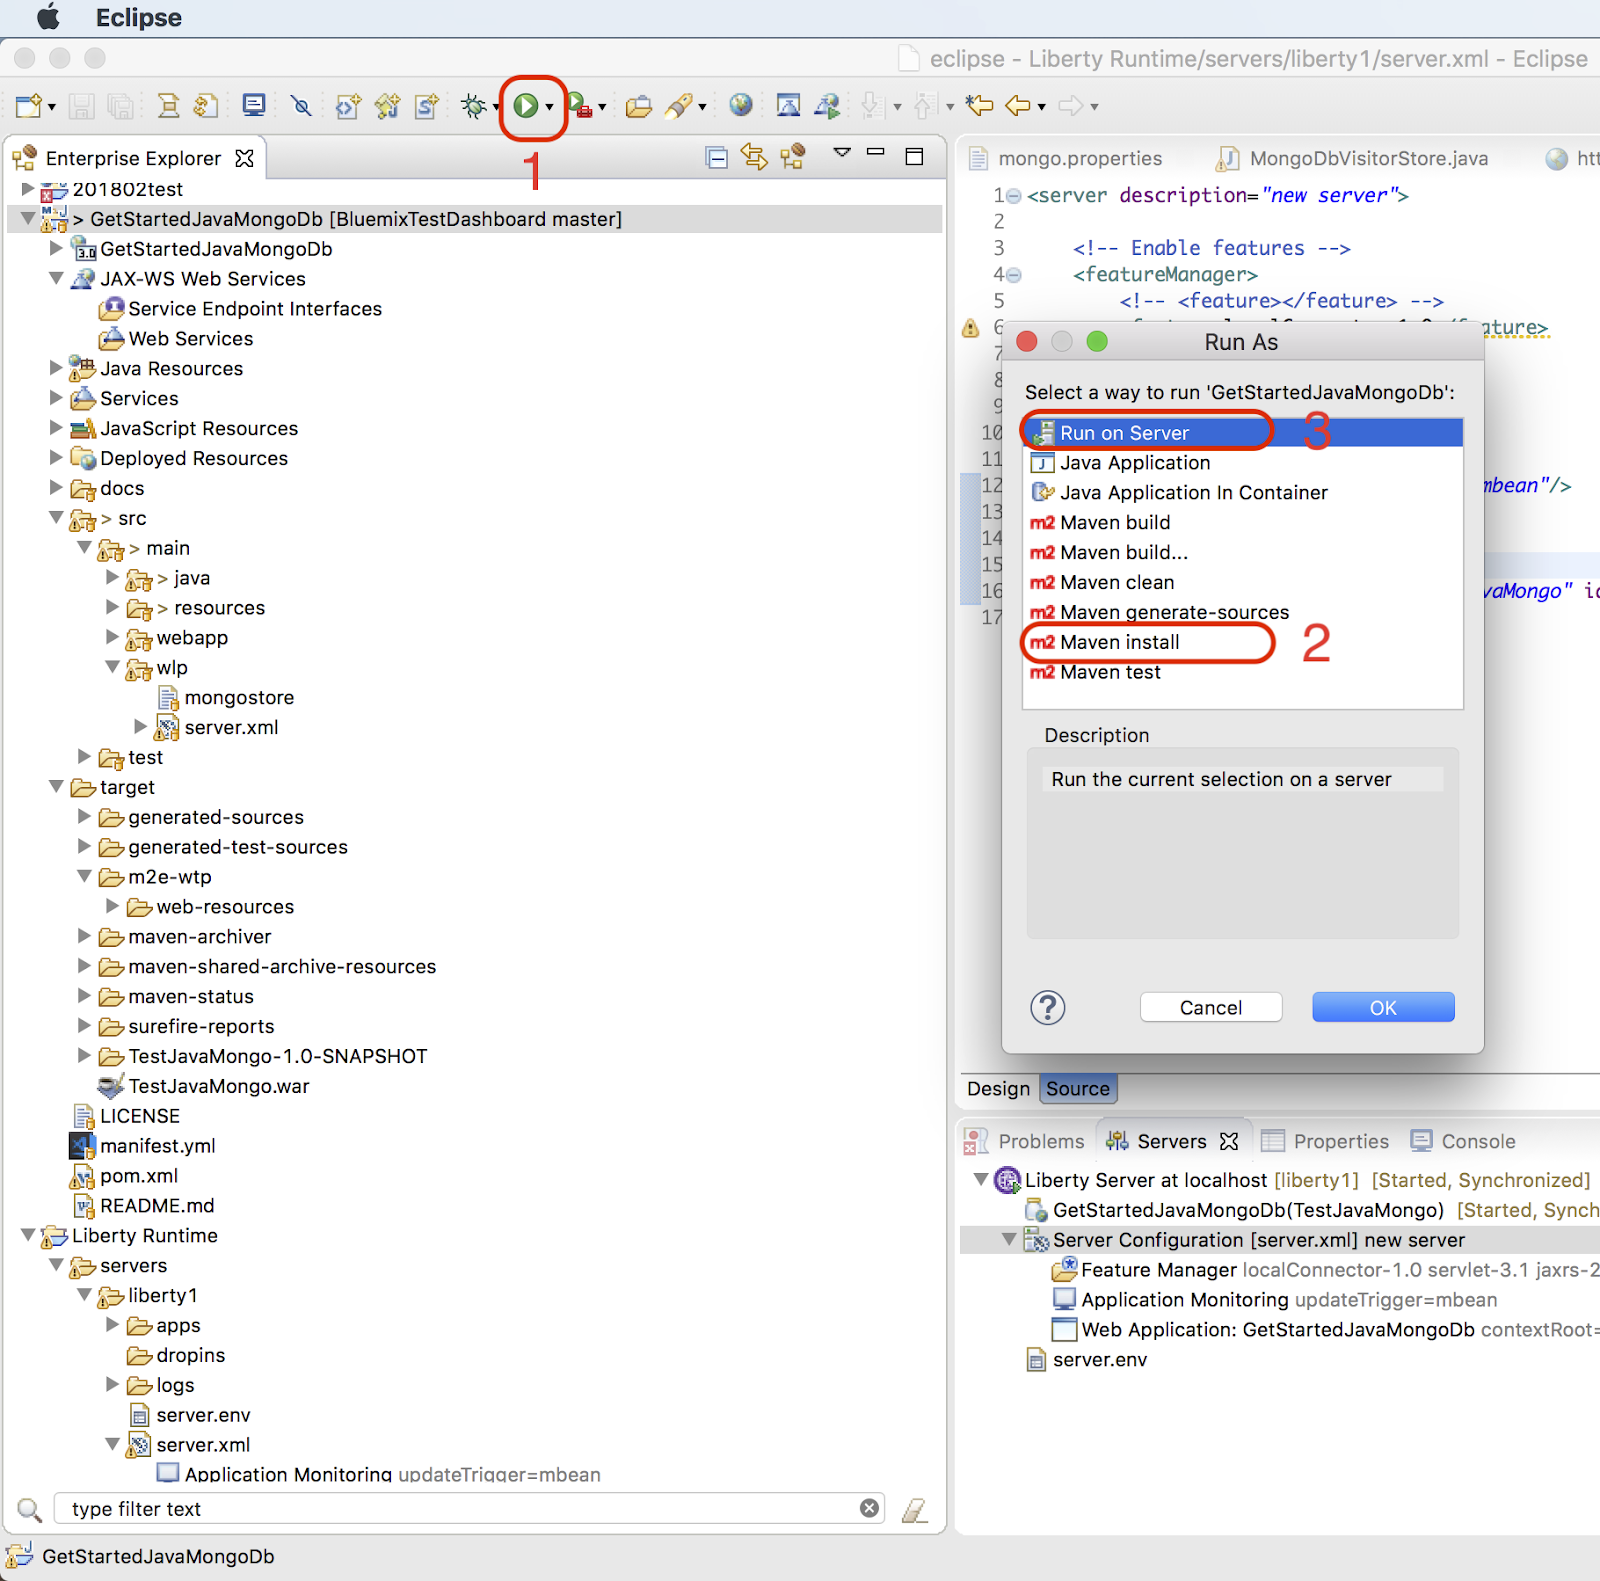
In order to test and run the service locally, you might need to install the JAXRS-2.0 feature on the local server. I am using Eclipse IDE for that purpose. The server configuration screen with added JAXRS-2.0 looks like the image below:
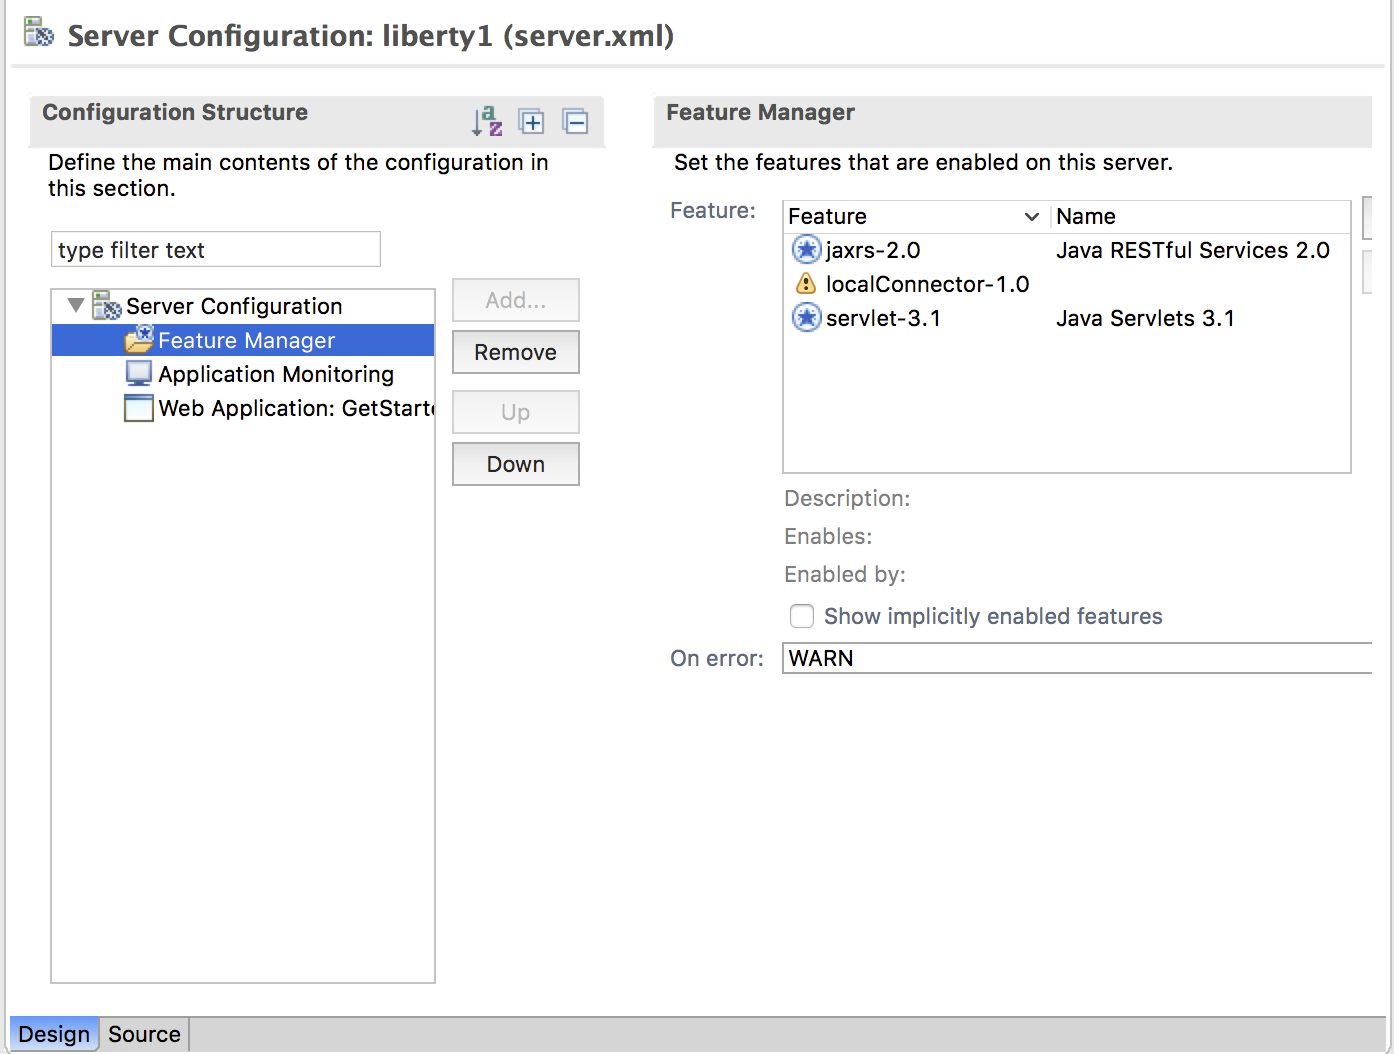
The source of the local Liberty server managed by Eclipse IDE looks like this:
<!-- Enable features -->
localConnector-1.0
servlet-3.1
jaxrs-2.0
After building the project with the mvn install command, you are able to run it on the above configured local server.
The following image shows the results after calling the service locally:
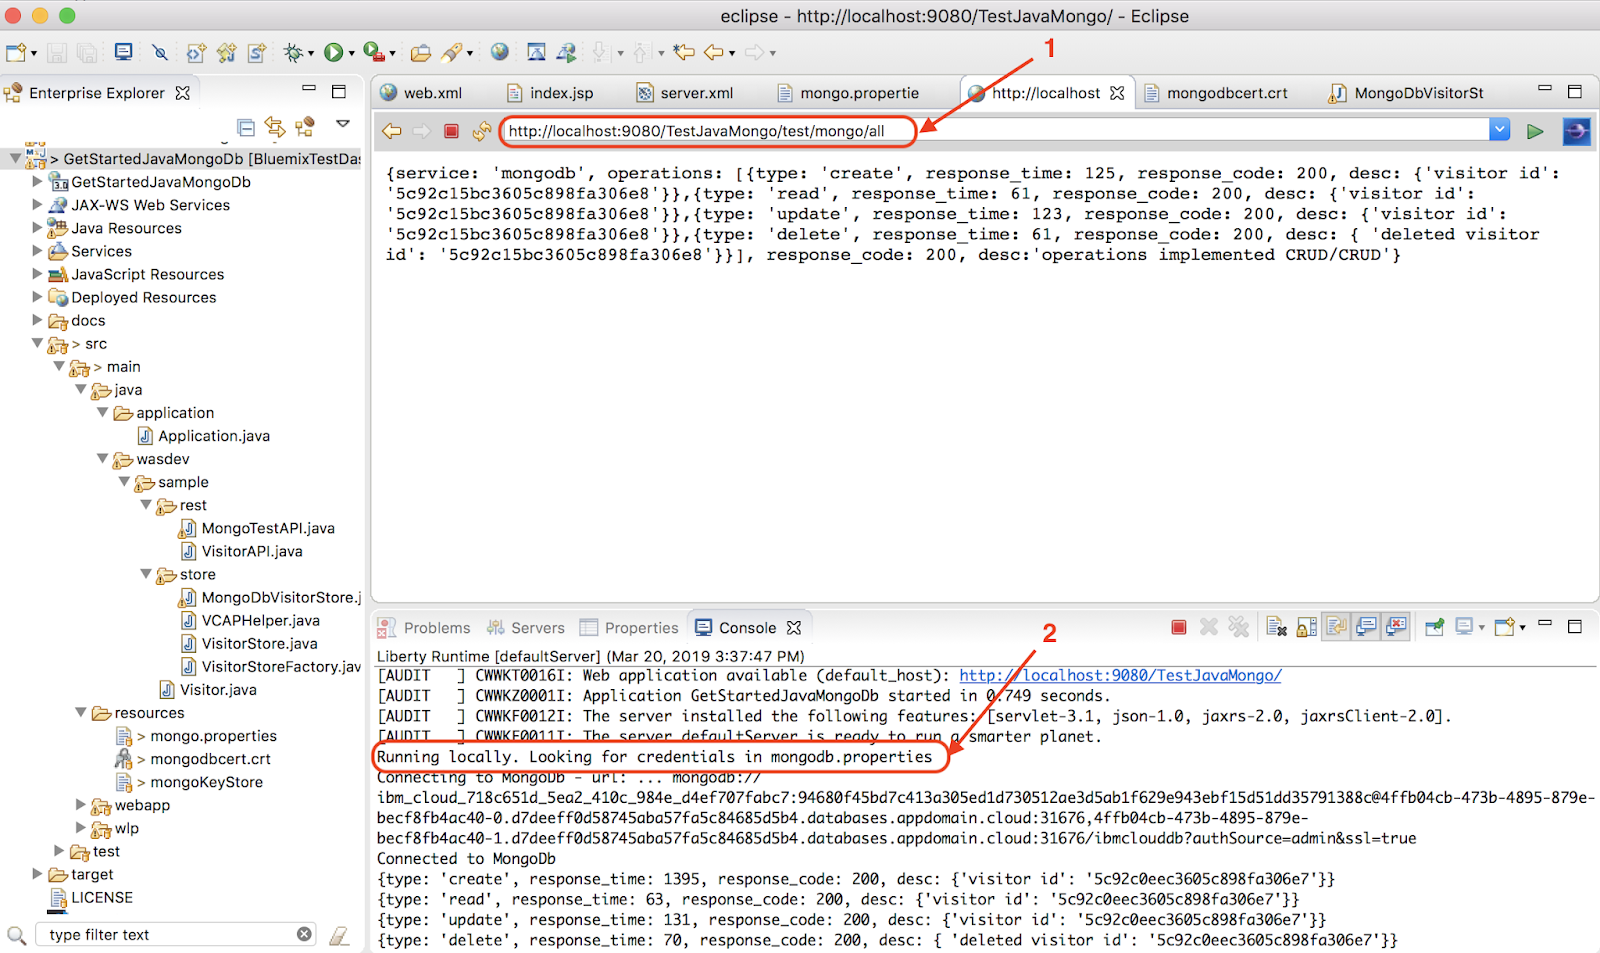
There is a round-trip time of about five seconds for the first call (we needed to create the DB and run everything remotely), which is not very impressive. But the next step would show running the same service in IBM Cloud, and the response times will be at least 10x better. Below are my results, but please keep in mind that the following calls were faster because our services were already provisioned and a connection established.
{
"service": "mongodb",

"operations": [{

        "type": "create",

        "response\_time": 386,

        "response\_code": 200,

        "desc": {

            "visitor id": "5aec8faf17683ad076f4fc58"

        }

    },

    {

        "type": "read",

        "response\_time": 303,

        "response\_code": 200,

        "desc": {

            "visitor id": "5aec8faf17683ad076f4fc58"

        }

    },

    {

        "type": "update",

        "response\_time": 579,

        "response\_code": 200,

        "desc": {

            "visitor id": "5aec8faf17683ad076f4fc58"

        }

    },

    {

        "type": "delete",

        "response\_time": 164,

        "response\_code": 200,

        "desc": {

            "deleted visitor id": "5aec8faf17683ad076f4fc58"

        }

    }

],

"response\_code": 200,

"desc": "operations implemented CRUD/CRUD"
}
Step 5. Running Open Liberty with Databases for MongoDB in the IBM Cloud
There are at least two ways you can deploy and run this service in the cloud. You can either manually adjust the Cloud Foundry files and run it with the Cloud Foundry CLI, or use the IBM Cloud connector for Eclipse. In this tutorial, we use the Cloud Foundry CLI.
-
Download CLI from IBM Cloud.
- Go to the Liberty service.
- Selecting the **Getting started** tab.
- Download the Command Line Interface:
As soon as the CLI is installed, you can run the version command:
ibmcloud --version
ibmcloud version 0.6.6+d4d59ab5-2018-03-20T07:49:59+00:00
- Set your access point. (Note that the API access point depends on the cloud location in US, EU, AU, and so on.)
ibmcloud api https://api.
- Log in to the service. (Note that if you are using a federated login, use
ibmcloud login -ssoinstead.)
ibmcloud login -u
- After you log in, you can interactively select the org and space to use.
ibmcloud target --cf
- Now edit the Cloud Foundry configuration file manifest.yml. The file should have the name of the application (your Liberty service) and the bound Databases for MongoDB service.
In this example it looks like this:
applications:
- name:
random-route: true
path: target/TestJavaMongo.war
memory: 256M
instances: 1
name: test-java-mongodb
host: test-java-mongodb
Update the location of the MongoDB keystore in the cloud in the java class file:
MongoDbVisitorStore.javaYou can now build the app for the cloud with Maven:
mvn clean
mvn install
After the mvn commands complete without errors, you are ready to push your app to thr cloud. It will take a few minutes — just enough to get a cup of coffee. :-)
ibmcloud app push
Consider looking at the logs of the document — on the dashboard of the service (see the **Logs** tab), or use the CLI in the terminal:
ibmcloud app logs
But check this out - the CRUD operation in the IBM Cloud is 100x faster than the first call, and 10x faster than the remote call from your local machine.
{
"service": "mongodb",

"operations": [{

        "type": "create",

        "response\_time": 12,

        "response\_code": 200,

        "desc": {

            "visitor id": "5aecb5b0705978002421614a"

        }

    },

    {

        "type": "read",

        "response\_time": 18,

        "response\_code": 200,

        "desc": {

            "visitor id": "5aecb5b0705978002421614a"

        }

    },

    {

        "type": "update",

        "response\_time": 11,

        "response\_code": 200,

        "desc": {

            "visitor id": "5aecb5b0705978002421614a"

        }

    },

    {

        "type": "delete",

        "response\_time": 8,

        "response\_code": 200,

        "desc": {

            "deleted visitor id": "5aecb5b0705978002421614a"

        }

    }

],

"response\_code": 200,

"desc": "operations implemented CRUD/CRUD"
}
Summary
I hope you enjoyed reading this tutorial! My next tutorial will be about adding an app to read, parse, and store the results. Stay tuned, and please follow me on Twitter @blumareks or on Medium for more updates!
This blog post was originally posted at https://blumareks.blogspot.com/

Top comments (1)
Very informative article Excellent and well-explained. The proper use of words and the words are supported by images. Your mentioned tool for the base64 decode is great. But have a look at that tool url-decode.com/tool/base64-decode as well. It will help you out in your future.