Amazon Aurora Serverless is an on-demand, auto-scaling configuration for Amazon Aurora. It automatically scales compute capacity up or down based on your application's needs.
An Aurora Serverless DB cluster resides in the private subnet of Amazon VPC. You can’t give an Aurora Serverless DB cluster a public IP address. You can only access it from within a VPC.
If you want to access your Amazon Aurora Serverless DB cluster from MySQL Workbench, one way to do this is via an SSH tunnel through a bastion host (jump box).
In this post, I will share the steps for setting up a bastion host using an Amazon EC2 instance. Then use MySQL Workbench to connect to the bastion host via an SSH tunnel.
Solution Overview
The following diagram illustrates the solution architecture:

For this, you will perform the following steps:
- Setup networking configurations in Amazon VPC
- Create and launch an Amazon EC2 instance
- Configure MySQL Workbench
Prerequisites
You should have the following prerequisites:
- Amazon Aurora Serverless DB cluster with MySQL-compatible edition
- MySQL Workbench installed in your local machine
Steps
Step 1: Setup networking configurations in Amazon VPC
- Open the Amazon VPC console
A. Security Group
Create a security group for Amazon EC2 within the same VPC where your Amazon Aurora Serverless DB cluster resides and add the following inbound rule:
Type: SSH
Protocol: TCP
Port Range: 22
Source: Enter the IP address of your local machine or choose My IP

Update your DB cluster’s security group and add the following inbound rule:
Type: MySQL/Aurora
Protocol: TCP
Port Range: 3306
Source: Enter the Amazon EC2 security group ID

B. Internet Gateway
- Create an Internet Gateway and attach it to your VPC
C. Subnet
- Create subnets in the same Available Zone (AZ) as the subnet group of your DB cluster
D. Route Table
- Create a routing table
- Associate the created subnets in the routing table
- Add a route in the routing table that directs internet-bound traffic to the internet gateway

Note: If a subnet is associated with a route table that has a route to an internet gateway, it is now a public subnet.
Step 2: Create and launch an Amazon EC2 instance
- Open the Amazon EC2 console and choose Launch instances
- Select an Amazon Machine Image (AMI). In this example, I will choose an Amazon Linux 2 AMI

Choose an Instance Type. For this, I will choose t2.micro

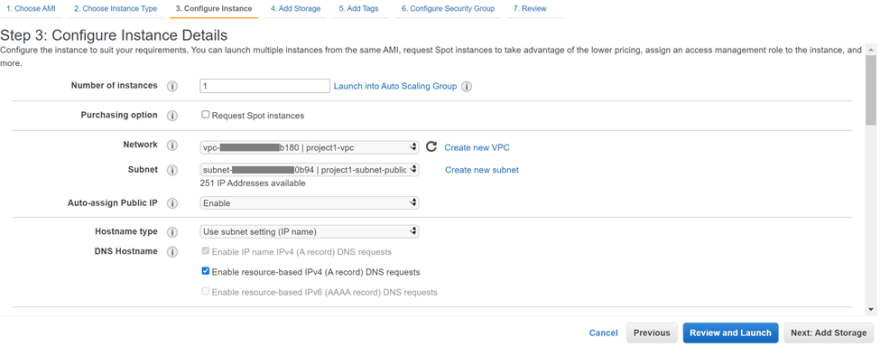
Choose Next: Configure Instance Details and make sure to use the following settings:
Network: Choose the VPC that the Amazon Aurora Serverless DB cluster uses
Subnet: Choose a public subnet (the subnet that has an internet gateway in its routing table)
Auto-assign Public IP: Enable
Choose Next: Add Storage and modify storage as needed
Choose Next: Add Tags and add tags as needed
Choose Next: Configure Security Group and select the security group created earlier for EC2

Choose Review and Launch
Choose Launch
Create a new key pair and download it

After downloading the key pair, click on Launch Instances
Navigate to the launched instance and wait until it's in Running state. Take note of the public IP address of the instance

Step 3: Configure MySQL Workbench
Open MySQL Workbench, and choose the ⊕ sign beside MySQL Connections to set up a new connection

In Setup New Connection, enter a name for your connection and select Standard TCP/IP over SSH for the Connection Method
In the Parameters section, enter the following settings:
SSH Hostname: Enter the public IP address of your EC2 instance
SSH Username: Enter the username for your EC2 instance. In our example, we will use "ec2-user" (this is the default username for EC2 Linux machines)
SSH Key File: Select the private key (.pem file) that was downloaded when the EC2 instance was created
MySQL Hostname: Enter the Aurora Serverless DB cluster endpoint
MySQL Server port: Enter 3306
Username: Enter the username that you use to connect to your of the Aurora Serverless DB cluster
Password: Enter the user’s password of your Aurora Serverless DB cluster

Click on Test Connection
If this is the first time you are connecting to the EC2 host, you will get the following error message:

Click OK
After the test is successful, choose OK

Note: If you receive an error when you test the connection, check if you configured the network correctly.In the Setup New Connection, choose OK again to save the connection
Congratulations! You are now able to connect to your Amazon Aurora Serverless MySQL DB cluster from MySQL Workbench.

Top comments (0)