Terraform is an open-source and cloud-agnostic Infrastructure as Code (IaC) tool. Terraform uses declarative configuration files. The configuration files are written in Hashicorp Configuration Language (HCL).
Terraform Features:
- Installable modules
- Plan and predict changes
- Dependency graphing
- Terraform registry with 1000+ providers
Installing Terraform and VS Code
We will be using VS Code to write Terraform code. We will also be installing the VS Code extension for Terraform for syntax highlighting.
Installing VS Code
- VS Code: VS Code can be downloaded from https://code.visualstudio.com/download
- VS Code Extensions:
Installing Terraform
Terraform is distributed as a single binary. Below are the steps to download and install Terraform on Windows.
Download Link: https://developer.hashicorp.com/terraform/install

- Download the zip file from the above link
- Create a
terraformdirectory in theC:drive
- Copy
terraform_1.6.5_windows_amd64.zipfromDownloadsfolder toC:\terraform. - Unzip
terraform_1.6.5_windows_amd64.zip.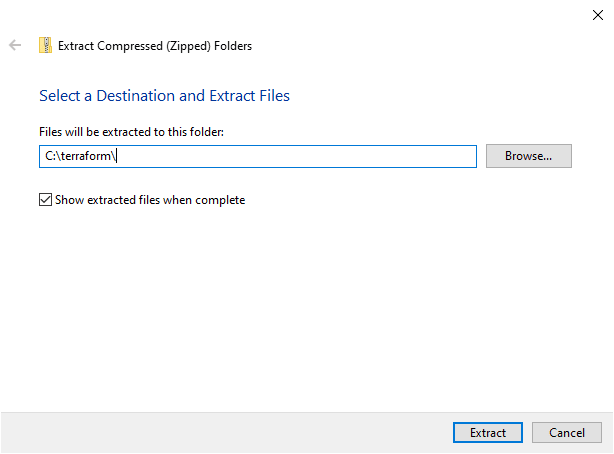
- Adding terraform binary to Windows
Path.
Searching for environment variables in windows search 
System Properties 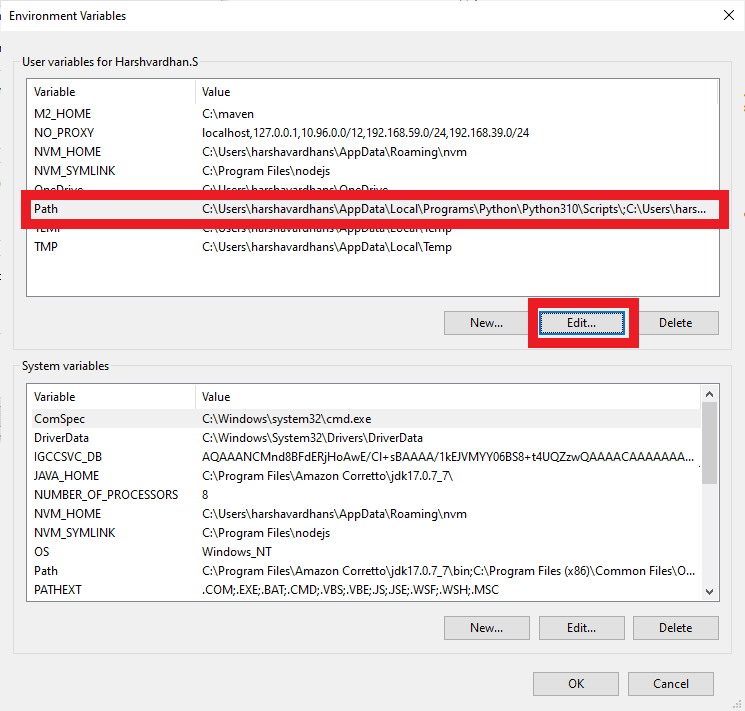
Environment Variables 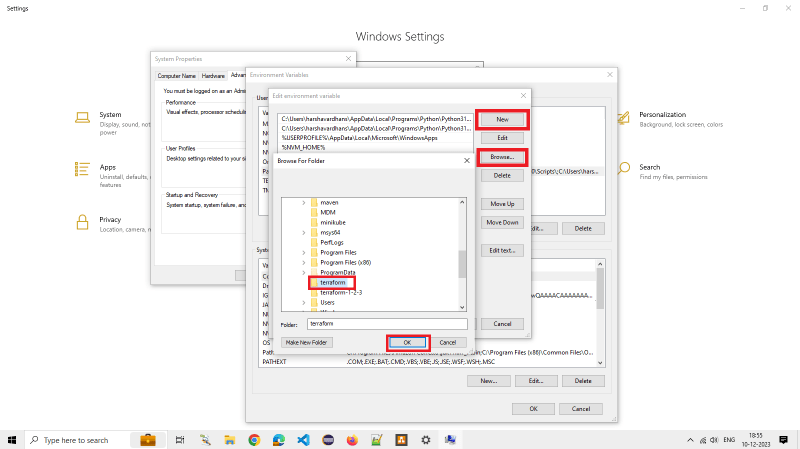
Edit Environment Variable 
Added Terraform to pathenvironment variable - Verify the terraform installation with the following commands
terraform -help
terraform -version

Configuring AWS Provider and Init
Create a hcl file called as providers.tf and paste the below code in it.
terraform {
  required_providers {
    aws = {
      source = "hashicorp/aws"
    }
  }
}

provider "aws" {
  region = "us-west-2"
}
Terraform init
Run the terraform init command to initialize the terraform directory to download and install the aws provider.
terraform init

Creating a VPC resource
VPC is a logically isolated section of the AWS Cloud where we can launch AWS resources. A VPC consists of the following resources.
- Security Groups: Acts as a firewall at the instance level.
- Subnets: A logical partition of the VPC into multiple smaller network segments.
- NACLs (Network Access Control Lists): Acts as the firewall at the subnet level.
- Route Tables: Determine where network traffic from subnets is directed.
- Internet Gateway: Enable access to the Internet.
//     aws resource  logical name
//          |           |
//          V           V
resource "aws_vpc" "mtc_vpc" {
  cidr_block           = "10.123.0.0/16"
  enable_dns_hostnames = true
  enable_dns_support   = true

  tags = {
    Name = "dev"
  }
}
Subnets
Subnets are a logical partition of the VPC into multiple smaller network segments. Subnets can be public or private.
resource "aws_subnet" "mtc_public_subnet" {
    // Reference the VPC using the id
    vpc_id = aws_vpc.mtc_vpc.id
    cidr_block = "10.12.0.0/24"
    map_public_ip_on_launch = true
    availability_zone = "us-west-2a"

    tags = {
        name = "dev-public"
    }
}
Internet Gateway
- Allows resources (e.g. EC2 Instances) in a VPC to connect to the Internet.
- Must be created separately from a VPC
- One VPC can only be attached to one IGW and vice versa.
- Internet Gateways on their own do not allow Internet access route tables must also be edited.
resource "aws_internet_gateway" "mtc_internet_gateway" {
    vpc_id = aws_vpc.mtc_vpc.id

    tags = {
        Name= "dev-igw"
    }
}
Route table
We need to create a route table to route traffic from our subnet to internet gateway.
resource "aws_route_table" "mtc_public_rt" {
  vpc_id = aws_vpc.mtc_vpc.id

  tags = {
    Name = "dev_public_rt"
  }
}

resource "aws_route" "default_route" {
  route_table_id         = aws_route_table.mtc_public_rt.id
  destination_cidr_block = "0.0.0.0/0"
  gateway_id             = aws_internet_gateway.mtc_internet_gateway.id
}
Route table association
We need to create an association between the route table and subnet.
resource "aws_route_table_association" "mtc_public_access" {
  subnet_id      = aws_subnet.mtc_public_subnet.id
  route_table_id = aws_route_table.mtc_public_rt.id
}
AMI Data source
- AMI = Amazon Machine Image
- AMI are a customization of an EC2 instance
- You add your own software, configuration, operating system, monitoring
- Faster boot / configuration time because all software is pre-packaged.
- AMIs are build for a specific region (and can be copied across regions)
Create a new file datasources.tf and copy the below code
data "aws_ami" "server_ami" {
    most_recent = true
    owners = ["099720109477"]

    filter {
        name = "name"
        values  = ["ubuntu/images/hvm-ssd/ubuntu-bionic-18.04-amd64-server-*"]
    }
}
Security Groups
- Security groups are the fundamental of network security in AWS. They control how traffic is allowed into or out of our EC2 Instances.
- Security groups only contain allow rules.
- Security groups rules can reference by IP or by security group.
- Security groups act as a firewall on EC2 Instances
- They regulate:
- Access to ports.
- Authorized IP ranges - IPv4 AND IPv6
- Control of inbound network.
- Control of outbound network.
resource "aws_security_group" "mtc_sg" {
  name        = "dev_sg"
  description = "dev security group"
  vpc_id      = aws_vpc.mtc_vpc.id

  ingress {
    from_port   = 0
    to_port     = 0
    protocol    = "-1"
    cidr_blocks = ["0.0.0.0/0"]

  }

  egress {
    from_port   = 0
    to_port     = 0
    protocol    = "-1"
    cidr_blocks = ["0.0.0.0/0"]
  }
}
Key Pair
Generating a Key Pair for SSH
ssh-keygen -t ed25519

resource "aws_key_pair" "mtc_auth" {
  key_name   = "mtc_key"
  public_key = file("~/.ssh/mtckey.pub")
}
Creating an EC2 Instance
resource "aws_instance" "dev_node" {
  instance_type = "t2.micro" // free tier

  ami = data.aws_ami.server_ami.id

  tags = {
    Name = "dev-node"
  }

  key_name               = aws_key_pair.mtc_auth.id
  vpc_security_group_ids = [aws_security_group.mtc_sg.id]

  subnet_id = aws_subnet.mtc_public.id

  root_block_device {
    volume_size = 10
  }
}
SSH login
login to EC2 Instance using SSH.
ssh ~\.ssh\mtckey ubuntu@public-ip-address
Cleanup
We need to clean up all the created resources using terraform destroy.
terraform destroy


Top comments (0)