I had a friend who needed to raise funds for a tumour surgery a couple of months ago. Obviously, the popular gofundme is the option. However, for those who have visited the gofund me page, only a few countries are supported. My friend had to look for someone living in one of the supported countries to assist set up a gofundme account.
I wondered why we cannot have our own local gofund me-like application in our own local currency. Therefore, this tutorial aims to demonstrate the design and implementation of a simple application with minimum requirements to have a funding application up and running in roughly an hour depending on your speed. That said, c’est parti!
Scope/Features
- Our application application would allow users to register and create a funding request with target amount
- Users should be able to share the link to the funding request on their Facebook
- The fund request link would allow donors make payments.
Tools
CodeSandbox. We would be building our application inside codesanbox. A quick search on google with “codesandbox” shows that it is nothing other than an online code editor and prototyping tool. Many programming languages are supported as today.
Next Js. This would be our progamming language/framework.
Cloudinary. Images that users upload would be stored on Cloudinary online database instead of housing the images locally. You need to create a Cloudinary account if you do not have one aready.
GetForm: Since this is a simple application, we opted not to use an explicit database. Rather we would utilise a Getform back-end for storing user details. Create your getform user account on getform site
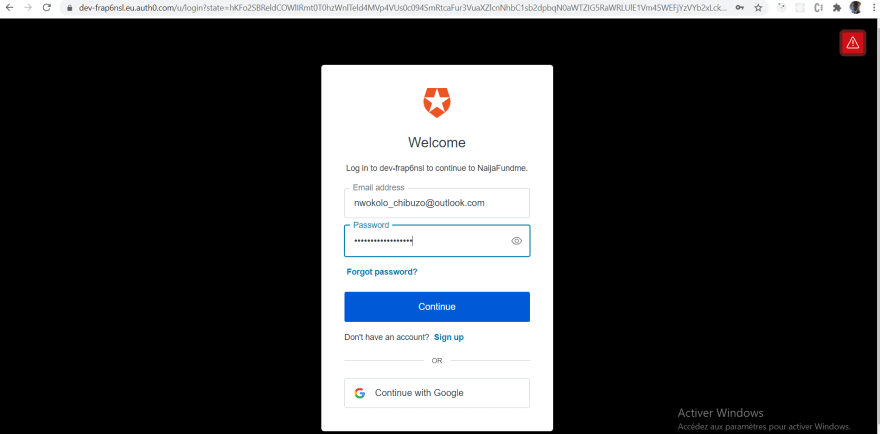
Auth0. Our authentication would be delegated to a third party authentication service Auth0. Create a free account on the Auth 0 website
Payment Gateway Integration. There are several payment processors ranging from paypal, paystack, flutterwave etc. For this demonstration, we would use Fidelity bank Paygate integraton because of the ease of integration. Feel free to use any other option based on your choice and country.
Creation of Sandbox: This sandbox for the app is on the link Code Sandbox link. I already created an account on code sandbox and created a sandbox named naijafundme. The link on how to create a sandbox is detailed in the documentation for code sanbox . Ensure that you select the Next js template while creating your sandbox to follow along with the tutorial
Dependencies. To add a dependency, simply type the name of the dependency under Dependencies as shown in the left hand side menu search. Once the name of the dependency is displayed, click it and it gets added to your project.

After installing all the required dependencies, your package.json file should look like this.
{
  "name": "naijafundme",
  "version": "1.0.0",
  "scripts": {
    "dev": "next",
    "build": "next build",
    "start": "next start",
    "post-update": "yarn upgrade --latest"
  },
  "dependencies": {
    "@auth0/nextjs-auth0": "1.5.0",
    "bootstrap": "5.1.1",
    "cloudinary": "1.27.0",
    "dotenv": "10.0.0",
    "form-data": "4.0.0",
    "formidable": "1.2.2",
    "next": "11.1.2",
    "react": "17.0.2",
    "react-dom": "17.0.2"
  },
  "license": "MIT",
  "keywords": [],
  "description": ""
}
Navheader.js. The nav bar is common to all the pages of the application. We therefore created a component for the navbar under the components folder.
import "bootstrap/dist/css/bootstrap.css";
export default function NavHeader(pageProps) {
  return (
    <nav
      class="navbar navbar-icon-top navbar-expand-lg navbar-dark bg-primary"

    >
Layout file. We modified the layout of the application by creating a layout.js file under the components folder.
import Head from "next/head";
import NavHeader from "./nav/navbar";
export default function Layout({ children, pageProps }) {
  return (
    <div>
      <Head>
        <title>Create Next App</title>
        <meta name="description" content="Generated by create next app" />
        <link rel="icon" href="/favicon.ico" />
        <meta name="viewport" content="width=device-width, initial-scale=1" />
        <link
          href="https://cdn.jsdelivr.net/npm/bootstrap@5.0.0-beta1/dist/css/bootstrap.min.css"
          rel="stylesheet"
          integrity="sha384-giJF6kkoqNQ00vy+HMDP7azOuL0xtbfIcaT9wjKHr8RbDVddVHyTfAAsrekwKmP1"
          crossorigin="anonymous"
        />
        <script
          src="https://cdn.jsdelivr.net/npm/bootstrap@5.0.0-beta1/dist/js/bootstrap.bundle.min.js"
          integrity="sha384-ygbV9kiqUc6oa4msXn9868pTtWMgiQaeYH7/t7LECLbyPA2x65Kgf80OJFdroafW"
          crossorigin="anonymous"
        ></script>
      </Head>
      <NavHeader {...pageProps} />
      <div class="container">{children}</div>;
    </div>
  );
}
_App js. Modify the _app.js file by using the layout.js created above.
import React from "react";
import Layout from "../components/layout";
export default function MyApp({ Component, pageProps }) {
  return (
      <Layout {...pageProps}>
        <Component {...pageProps} />
      </Layout>
  );
}
Configuring Auth0 Authentication
Create an account on Auth0. Then create a new application or use the default app created during your account creation. We would need the following parameters which can be gotten from the settings of the application you created. These are the Domain name, the Client Id and the Client Secret. To get to the settings, click on the application name. For instance, I would click on the NaijaFundme to go its settings.


The next thing to do is to configure the the callback URL and logout URL. The callback URL is the URL where your users are redirected to after they are successfully authenticated. While the logout URL is the page users are taken to after they are logged out.

Once the configurations are done, we add the @auth0/nextjs-auth0 to our codesandbox dependencies.
To Configure the SDK just added, follow the following steps.
-
Create a .env file under the project root folder and add the following code.
AUTH0_SECRET='use [openssl rand -hex 32] to generate a 32 bytes value'
AUTH0_BASE_URL='The base url of your application here'
AUTH0_ISSUER_BASE_URL='Your domain gotten from the dashboard of Auth0'
AUTH0_CLIENT_ID='Your Client Id here'
AUTH0_CLIENT_SECRET='Your Client Secret here' -
Creating the Dynamic Routes.
Inside the directory page/api/auth create a file named auth/[...auth0].js and add the code snippet below.
// pages/api/auth/[...auth0].jsimport { handleAuth } from "@auth0/nextjs-auth0";
export default handleAuth();
This creates the following routes automatically when needed:
-
/api/auth/login: The route that performs login with Auth0. -
/api/auth/logout: This route is used to logout a logged in user -
/api/auth/callback: This is the route Auth0 takes the user to after login -
/api/auth/me: This route fetches the user profile
Modification of _app.js
Auth0 uses react context to manage the state of users of the application. We can get this user state information by leveraging on the component UserProvider. To make the user detail provided by UserProvider component available to all pages of the application, we need to modify our _app.js file.
Modify the _app.js file by importing the UserProvider and wrapping the Layout with the UserProvider Component as shown below .
import { UserProvider } from "@auth0/nextjs-auth0";
import React from "react";
import Layout from "../components/layout";
export default function MyApp({ Component, pageProps }) {
  return (
    <UserProvider {...pageProps}>
      <Layout {...pageProps}>
        <Component {...pageProps} />
      </Layout>
    </UserProvider>
  );
}
Creating a login and logout components
Add the login and logout functionality by creating a SignedIn and Signout Components under the Nav folder. These components are child components of the Navbar Component.
  export default function SignInUser() {
  return (
    <a href="/api/auth/login">
      <i class="fa fa-envelope-o nav-link disabled marg">
        <span class="badge badge-warning">Sign In</span>
      </i>
    </a>
  );
}


export default function SignOutUser({ user }) {
  return (
    <div>
      <span>{user.email}</span>
      <a href="/api/auth/logout">
        <i class="fa fa-envelope-o nav-link disabled marg">
          <span class="badge badge-warning">Log Out</span>
        </i>
      </a>
    </div>
  );
}
Usage inside the Navbar Component
import { useUser } from "@auth0/nextjs-auth0";
import SignInUser from "./signinuser";
import SignOutUser from "./signoutuser";
import "bootstrap/dist/css/bootstrap.css";
export default function NavHeader(pageProps) {
  const { user, error, isLoading } = useUser();
  **********************Other Page tags************************
              {user ? <SignOutUser user={user} /> : <SignInUser />}
            **********************Other Page tags************************
}
Cloudinary For Image Upload:
We would make use of Cloudinary for storing the image files that users upload when setting up a fund donation request. Create a cloudinary account and create an application on the dashboard.
The parameters cloud name, api key and api secret from the dashboard would be used to create a function to upload files to Cloudinary. create the file named uploadserverless.js inside the pages/api folder

///// uploadserverless.js

import cloudinary from "cloudinary";
import { useUser } from "@auth0/nextjs-auth0";
cloudinary.config({
  cloud_name: "your cloudname here",
  api_key: "your api key",
  api_secret: "your api_secret"
});
export const config = {
  api: {
    bodyParser: false
  }
};
Getform integration…
We would use getform as our backend management platform. Create an endpoint as shown below. We would store the users, email, the message for donors, a target amount and then a cloudinary image url to view the image uploaded regarding the user’s situation

Once the endpoint is created, we would use it to create another function named uploadform.js to assist us upload the users details.
/////upload.js

import FormData from "form-data";
export default async (req, res) => {
  var formData = new FormData();
  try {
    console.log(JSON.stringify(req.body));
    Object.entries(req.body).forEach(([key, value]) => {
      formData.append(key, value);
    });
    const response = await fetch(
      "https://getform.io/f/6673e6dc-f6ac-45",
      {
        method: "post",
        body: formData
      }
    );
    return res.json(response);
  } catch (error) {
  } finally {
  }
};
Upload Button widget.
Create a uploadbutton.js file component under the component folder. This widget for image upload would be imported into the createfund.js page
export function UploadButton({ email, setImageUrl }) {
  const onChange = async (event) => {
    event.preventDefault();
    const formData = new FormData();
    const file = event.target.files[0];
    formData.append("inputFile", file);
    formData.append("email", email);
    try {
      const response = await fetch("/api/uploadserverless", {
        method: "POST",
        body: formData
      });
      const data = await response.json();
      setImageUrl(data.secure_url);
    } catch (error) {
      console.log("Error", error);
      //return res.json(error);
    } finally {
      //
    }
  };
  return <input class="form-control" type="file" onChange={onChange} />;
}
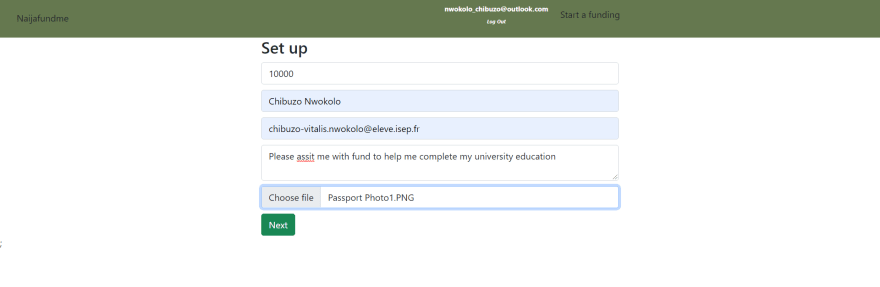
Create fund Page:
Pages/createfund.js

import { UploadButton } from "../components/images/uploadButton";
import React, { useEffect, useState } from "react";
import Router from "next/router";
import styles from "../styles/Home.module.css";
export default function CreateFund() {
  const formSubmit = async (e) => {
    e.preventDefault();
    const res = await fetch("/api/uploadForm", {
      body: JSON.stringify({
        email: email,
        name: name,
        message: message,
        target: target,
        url: url
      }),
      headers: {
        "Content-Type": "application/json"
      },
      method: "POST"
    });
    const { error } = await res.json();
    if (error) {
      console.log(error);
      return;
    }
    const { pathname } = Router;
    if (pathname === "/createfund") {
      Router.push({ pathname: "/sharepage", query: { email: email } });
    }
  };
  return (
      <div class="container marginTop">
      <div class="row">
        <div class="col-lg-3"></div>
        <div class="col-lg-6">
          <h3 class="colorp">Set up</h3>
          <form onSubmit={formSubmit}>
            **** name input****
              **** name email****
             **** message for donors input****
            </div>
            <div className={styles.margin}>
              <UploadButton email={email} setImageUrl={setImageUrl} />
            </div>
            <button class="btn btn-success" type="submit">
              Next
            </button>
          </form>
        </div>
      </div>
    </div>
  );
}
Social Media Share button
Create a file named sharepage.js under the pages folder. This would allow users to share the payment link generated on Facebook
import React, { useState } from "react";
import { useUser } from "@auth0/nextjs-auth0";
import { useRouter } from "next/router";
import styles from "../styles/Home.module.css";
export default function SharePage() {
  const router = useRouter();
  const { email } = router.query;
  console.log(email);
  return (
    <div class="container marginTop">
      <div class="row">
        <div class="col-lg-6">
          <form>
            <div className={styles.margin}>
              {/* <label>Name</label> */}
              <input
                type="text"
                name="target"
                required
                readOnly
                className="form-control"
                value={encodeURI(
                  `https://0hhjm.sse.codesandbox.io/paymentpage?email=${email}`
                )}
              />
            </div>
          </form>
          <a
            class="btn btn-success"

          >
            Share on Facebook
          </a>
        </div>
      </div>
    </div>
  );
}
Payment Page Integration
For the purpose of this implementation, we used the payment gateway option from fidelity bank in Nigeria. Create a paymentpage.js file under pages with the following content.
import Image from "next/image";
import styles from "../styles/Home.module.css";
import { useState } from "react";
export default function PaymentPage({ email, target, message, name, url }) {
  return (
    <div class="container marginTop">
      ***** Payment Details embedded in hidden inputs ********
    </div>
  );
}
// This server function gets the fund creators details using the email on the link he shared to friends
export async function getServerSideProps(context) {
  //
  const fundName = context.query;
  console.log(fundName.email);
  const res = await fetch(
    "https://api.getform.io/v1/forms/667"
  ); // Get the user details from the form
  const response = await res.json();
  var myFund = response.data.submissions.filter(
    (x) => x.email === fundName.email
  )[0];
  return {
    props: myFund
  };
}
Demo
visit the url https://0hhjm.sse.codesandbox.io/ to demo the project. The css is currently not working properly and would be fixed
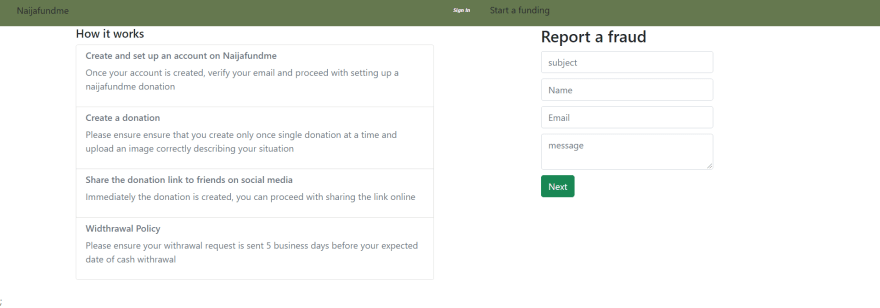
Login
Create a fund me request by clicking the create fund.
Share link on Facebook. Once the set up is completed above, a user can share the link on facebook.

Donation.
Users can donate by clicking the link shared on Facebook.


Backend Management.
The details of the fund can be seen on the getform platform.

The payment processors are capable of providing the details of every payment made on the system.
Conclusion
We have demonstrated that it is indeed possible to set up simple application to help raise funds within countries where gofundme is not currently available. Check the sandbox link and github for the full source code
Improvements
The design of the project can be greatly improved. Also a proper backend application can be created to manage users.
References
The following were used as main references for this tutorial:
Content created for the Hackmamba Jamstack Content Hackathon using Auth0 and Cloudinary

Top comments (5)
A simple donation request application aims to streamline the process of seeking financial assistance for individuals or organizations in need. It typically includes basic details such as the applicant's background, the purpose of the request, and the amount requested. This application serves as a formal channel for those seeking help, ensuring transparency and clarity in their appeal for support. Moreover, integrating features to track SASSA application can enhance efficiency by providing real-time updates on the status of requests, thereby improving accountability and responsiveness to applicants' needs.
What is your twitter handle please ?
@nwokolo_chibuzo
Thanks
That’s a brilliant idea, especially for regions where GoFundMe isn’t available. Similarly, in South Africa, tools like the SRD Status Check App help locals manage grants easily without relying on global platforms.