Pardon my nostalgia, but it's hard not to miss the good old days of the world-wide-web. Websites consisted of the most straightforward architecture: single-node servers. It's hard to imagine the internet of the 90s, where blogs, forums, and obscure Flash sites were almost exclusively hosted on simple LAMP stacks instead of a myriad of cloud services that AWS has convinced us we need. We didn't need entire VPCs serving as ecosystems to countless microservices. Instead, each of us spun up individual servers. By no coincidence, the vast majority of such US-based servers were located in Texas.
Cheap energy costs aside, Texas is notably equidistant between the east and west coasts of the United States. Most US citizens live in coastal states; thus, we can expect the majority of traffic to any US-based website to originate on opposite sides of the country.
Connections to a server need to travel physical distances, and traveling distance takes time, more commonly known as latency. Therefore, as our user base grows and strays further and further from our node in Texas, the average user will experience longer load times when fetching assets from our site.
For all the magic of the internet, no amount of magic can defy physics to "solve" latency. That said, we can implement something indistinguishable from magic 😉.
CDNs In A Nutshell
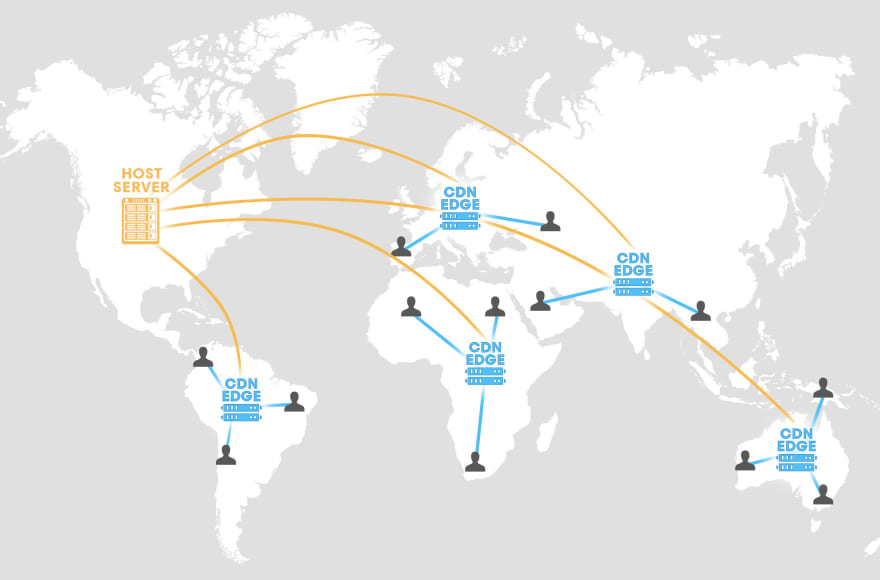
The "not quite magic" solution to our latency problem is a Content-Delivery Network. We can't control where our users are geographically, but we can control where we serve chunks of our app from. For example, why should users in Asia wait to load images (or other static assets) from our app's server in Texas, when there are quality data centers in Singapore? CDNs are designed to mitigate this very scenario.
A CDN is a distributed network of machines that spans countries and continents to serve assets closer to the users requesting them. For example, a user in Europe might fetch Asset X from a node in the Netherlands. In contrast, a user in the Philippines might fetch Asset X from an edge node in Manila. Our hypothetical app still resides in Texas, yet neither user had to wait for Asset X to make its way halfway across the world via a transatlantic cable.
CDNs are Worth the Trouble
Performance improvements offered by CDNs have shifted from "borderline excessive" to "absolutely critical" for the success of many (if not most) internet entities. Latency has a measurable impact on the bottom line - you're probably familiar with the Amazon study that equated 100ms in additional latency to a 1% loss in revenue.
Depending on your business model (if you have one), an equally (or arguably more significant side effect) is the indirect impact latency has on SEO. Tools like Google's Lighthouse have brought excruciating visibility into how serving large uncached assets affects site ranking. The results can be brutal:

By Google's standards, the performance of Hackersandslackers.com is God-awful. Unbeknownst to me, I'd likely been committing atrocities against Google's page rank algorithms for years prior to the availability of Lighthouse. This is particularly unfortunate for a site where Google is the single traffic source.
Given the topic of this post, it should come as no surprise that these shortcomings are almost always related to CDN issues:
- Serving large assets from a centralized location (as opposed to a distributed CDN).
- Assigning proper cache policies to large assets to avoid reloads.
- Serving massive JS/CSS bundles arbitrarily defined by build processes.

What about Cloudflare? Netlify?
"Plug-and-play" CDN services such as these fill the demand for a common (and necessary) niche. Such services have, dare I say, "democratized" CDNs and the performance benefits they yield via an effective 1-2 punch:
- Affordable pricing (ranging from free to a ceiling of perhaps $20/month).
- Zero-effort implementation.
Indeed, any web app can live behind a Cloudflare CDN for zero dollars while requiring zero effort. This is good enough for most people, and I would implore those people to stop reading now and live a happier life by sticking with what's easy.
Unfortunately for me, these CDN services don't apply to sites heavy on user-generated content. Hackersandslackers.com is primarily generated by editors (posts containing images), with secondary content coming from users (comments, personal profiles, avatars). "Content" can be created by nearly anybody at any time. It's almost impossible to cache apps that are constantly changing by nature effectively.
Google Cloud CDN Architecture
Google Cloud follows its own unique service architecture that's admittedly a bit unintuitive. GCP's own documentation doesn't do much to help this problem, which is precisely what drove me to write this piece in the first place.
Setting up a proper Google Cloud CDN requires four separate GCP services:
- Cloud DNS: Safely look past the obnoxious inclusion of the word "Cloud" here (Google marketing be damned). This "service" involves DNS configuration for a given domain, such as adding A/AAAA records. This allows us to serve assets from a custom domain (such as cdn.hackersandslackers.com , in my case).
- Load Balancer: It feels a bit excessive, but GCP forces us to handle the routing of a frontend (our DNS) to a backend (storage bucket) via a load balancer.
- Cloud Storage: Google's equivalent to an S3 bucket. This is where we'll be storing assets to serve our users.
- Cloud CDN: When we configure our load balancer to point to a Cloud Storage bucket, we receive the option to enable "Cloud CDN." This is what tells Google to serve assets from edges in its global network and allows us to set caching policies.
The final product looks something like this:

We'll tackle this one step at a time. Before we can configure our Load Balancer, we'll need our Cloud Storage backend and Cloud DNS frontends in place. We'll start with the former.
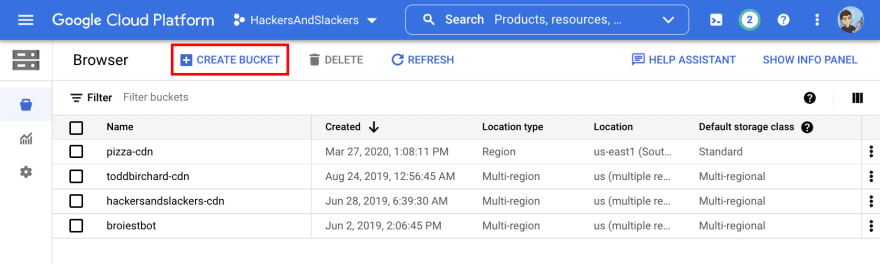
Create a GCS Bucket
While logged into the Google Cloud console, go to your bucket browser. Here we'll create a new storage bucket via the self-explanatory "Create Bucket" button:
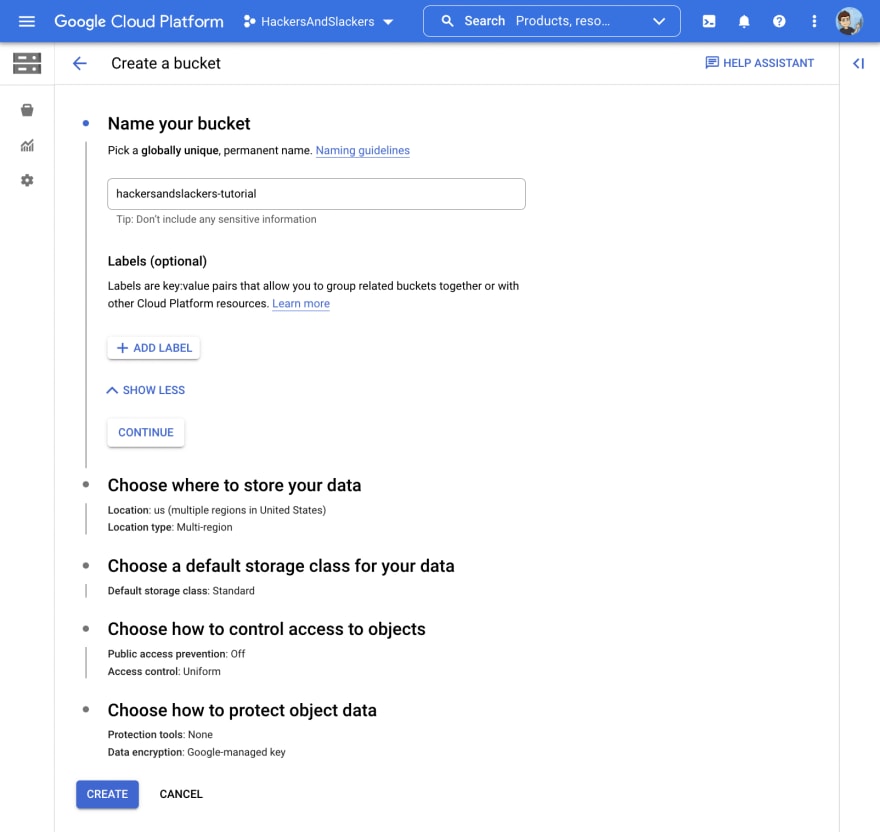
Give your bucket a name and you're good to go:
Configure Cloud DNS
I'll assume you have a domain in your possession from which to serve assets (this can be a subdomain, such as cdn.[YOUR_DOMAIN].com).
Navigate to the Cloud DNS console and create a new zone, as such:

This will prompt you to "Create a DNS zone." This is straightforward:
- Set Zone type is set to Public.
- Enter a Zone name (this can be anything you please; it is for internal use only).
- Set DNS name to the domain in your possession from which all assets will be hosted.

Your newly created DNS zone should be visible from the Cloud DNS console:

Google should provide you with 4 nameservers. Ensure your domain is pointed to these nameservers via whichever provider you purchased your domain from:

Create & Configure a Load Balancer
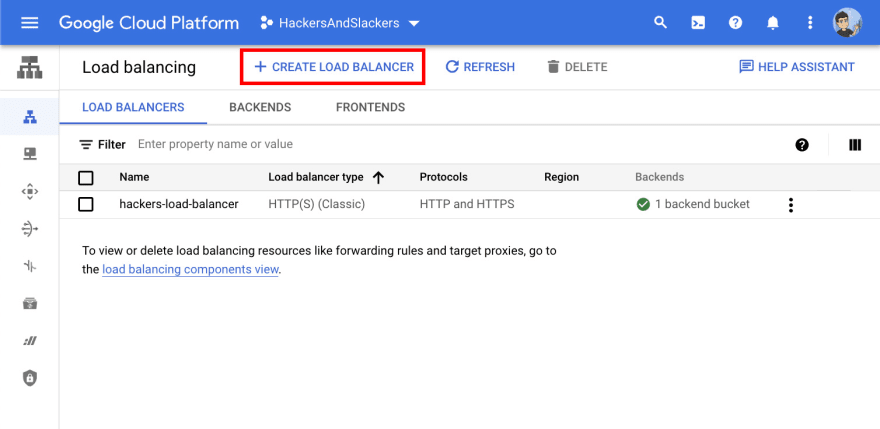
Now that we've set up our " frontend" and " backend," we can turn our attention to the meat and potatoes of our architecture: the Load Balancer. Navigate to GCP's Load Balancing console:

Here we'll Create a new Load Balancer :
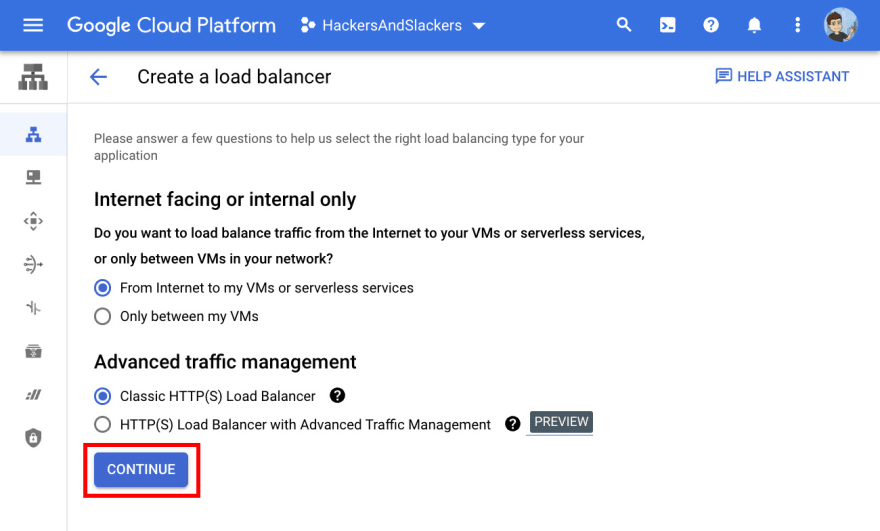
We'll be serving assets over the internet (HTTP/HTTPS), so go ahead and start configuration for HTTP(S) Load Balancing:

The next step is self-explanatory; we want an Internet-facing , Classic HTTP(S) Load Balancer:
The foundation of our load balancer is in place! Let's make our load balancer to do what load balancers do: distribute incoming traffic.
"Incoming Traffic," in this sense, is any request made to the domain associated with our Cloud DNS frontend. From a user's perspective, it's as though we're hosting images and such on a domain separate from our application. Behind the scenes, the domain isn't a host so much as a traffic cop.
Depending on where the user resides, they'll fetch assets from whichever "host" offers the best connection for them, where said host is a replica of Cloud Storage backend. Thankfully, only a few steps remain for us to achieve this sorcery.
I. Backend Configuration
We have a load balancer, but it doesn't do anything just yet. We need to tell the load balancer what the end "destination" is for incoming requests. Our options are:
Backend Service : Think servers, cloud-hosted applications, microservices, etc. Basically, things we don't want.
Backend Bucket : Indeed, this is how Google's product team chose to represent CDNs on their platform. As far as GCP is concerned, a CDN is just anther service to be served behind a load balancer (and yet it isn't, hence a separate option, but whatever). This is the option we want.

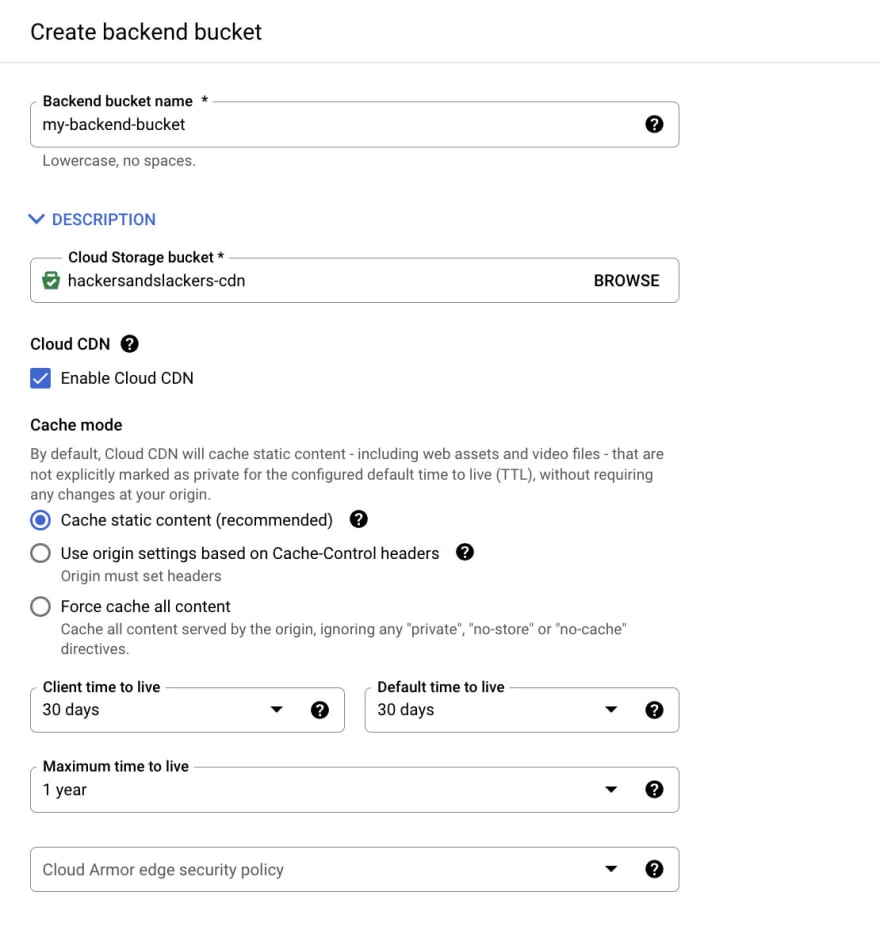
Now we're actually getting somewhere. This is perhaps the most important step of all: tuning the configuration of our load balancers "backend bucket." On this step, we want to:
- Name our backend bucket. Yes, your bucket already has a name - this name is intended to represent the relationship said bucket has to your load balancer. Look, the process is really, really dumb. But the end result is great.
- Select which GCS bucket to point to. Select the bucket you created earlier via the "browse" button.
- ENABLE CLOUD CDN! This unsuspecting checkbox is responsible for the magic that hosts our bucket over a distributed network. It's essentially the entire reason we're here... CLICK IT.
- Set cache policies. I could drone on about which Time To Live (TTL) settings might give you the best shot at convincing Google to rank your page higher. Instead, I implore you to mimic something similar to what I have below, and encourage you to experiment and make your own tweaks once you get comfortable:
II. Host & Path Rules
Leave Simple host and path rule selected. All we need to do is select the backend we created in the previous step from the Backend 1 dropdown:

III. Frontend Configuration
Almost there, folks. We've set up a backend bucket to host assets, configured a distributed CDN from said backend bucket, and configured a load balancer to point to said CDN. All that remains is accepting incoming traffic for our load balancer to distribute.
The domain associated with our Cloud DNS will serve as our source of traffic. Go ahead and Add Frontend IP And Port :

This will expand a configuration menu for accepting traffic on a given hostname. We'll be creating configurations to accept traffic on via HTTP (port 80) and HTTPS (port 443).
Before we do anything, we need to reserve an IP address. Click the IP Address dropdown:
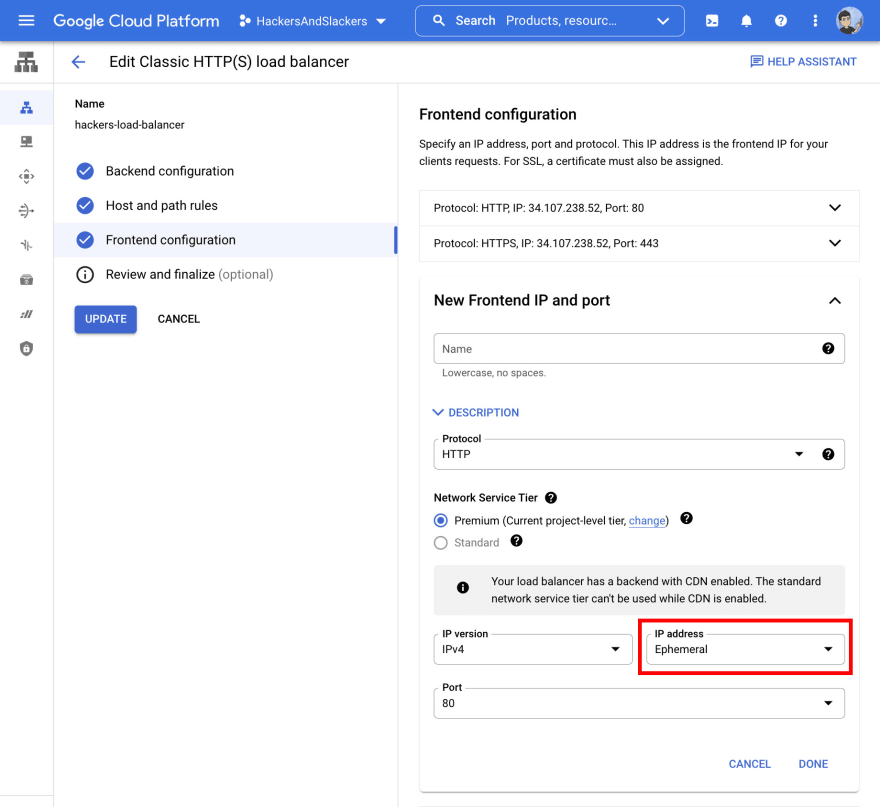
This simple menu will have a single option to Create IP Address :
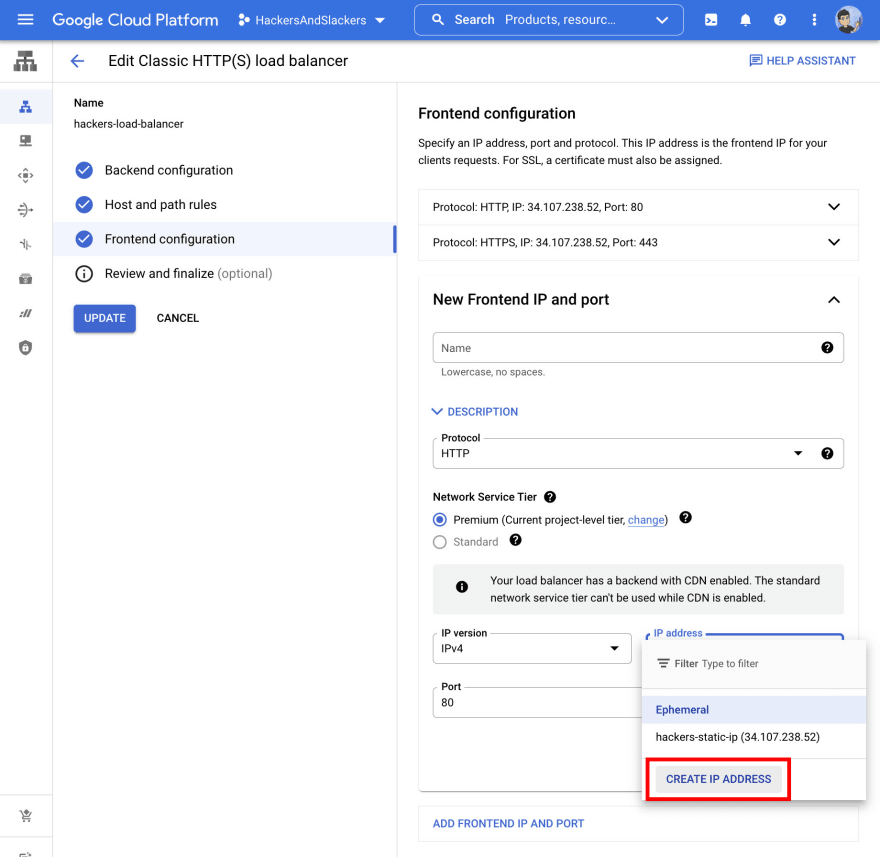
Go ahead and wrap up this frontend config with the default values in place: Protocol set to HTTP, IP Version as IPv4, and Port left as 80. Click Done to wrap up the first of our two frontend configs:

For our second config (HTTPS), we'll repeat the process with a few notable differences; Protocol should now be HTTPS, and Port set to 443, and most notably, specify an SSL Certificate. Google Cloud makes acquiring SSL certs easy via a dropdown.
Create A New Certificate here, and we're DONE:

OH GOD YES ITS FINALLY OVER. I know I told you everything was going to be okay, but deep down I wasn't sure we'd finally get here. Hell, I wouldn't read a tutorial this long... but apparently I'd write one.
Oh yeah, we haven't hit the Confirm and Finalize button yet.
IV. Confirm & Finalize
PRESS THE UPDATE BUTTON FOR GREAT JUSTICE:

And NOW we've done it! Christ... it's a good thing Google Cloud can't design UIs or write documentation to save their lives. Otherwise, I'd be out of business.
Take a breath of fresh air. You've made it, and your CDN is in place. After you take a moment to regroup, you may be wondering how to make sure your CDN is actually doing what we think its doing. I'll point you in the right direction.
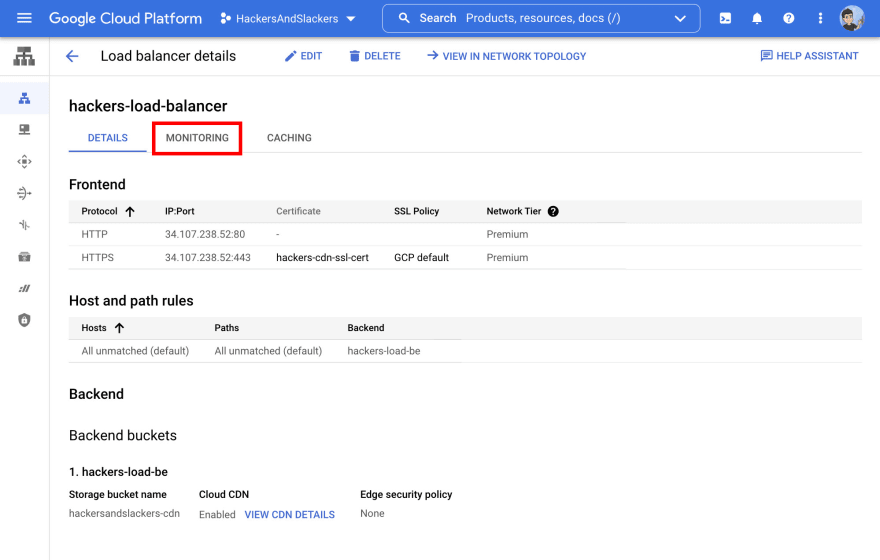
Monitoring Your CDN in Action
There are two ways to visualize our CDN in action. First is by monitoring our load balancer.
Load Balancer Traffic
"Monitoring" our load balancer gives us a cool visual of where incoming traffic is coming from, and how the traffic is being routed:
Using my own load balancer as an example, the below graphic shows incoming traffic requests broken out by continent:
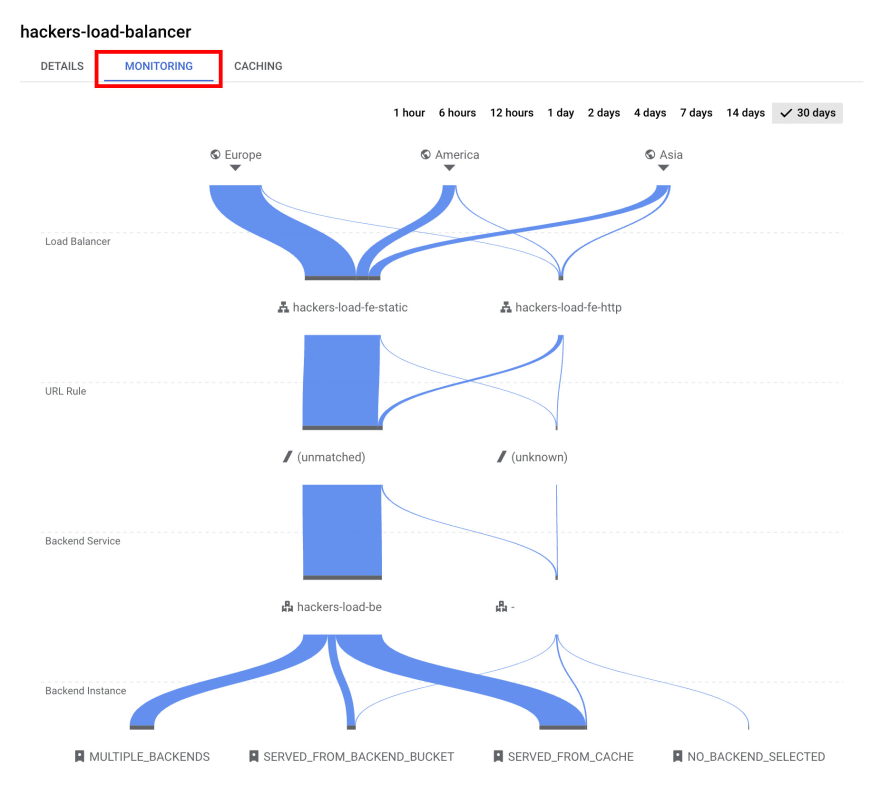
There are some key takeaways from what we're seeing here. First, nearly all traffic is being served over HTTPS, even including requests which were attempted over HTTP. These requests are successfully being forced over a secure connection.
At the bottom of my chart, I see most assets are being served from my CDN's cache (seen as SERVED_FROM_CACHE). This is what we like to see, but perhaps there's room for improvement in my caching policies to ensure this is the case more often.
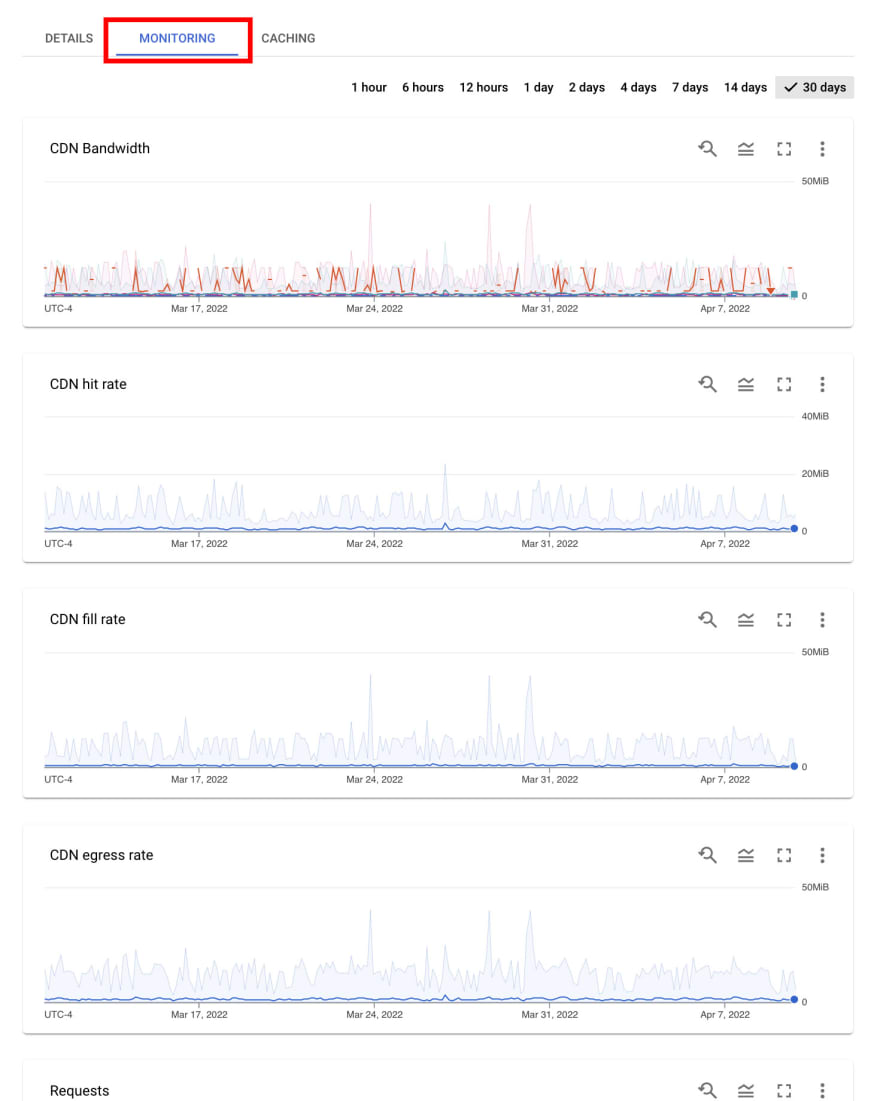
CDN Bandwidth & Hit Rate
We can also monitor our CDN itself. While staying in the "Networking services" tab of Google Cloud, our Cloud CDN can be found via the left-hand menu. We only have a single CDN, so let's check it out:

Smash that Monitoring button to check out how your CDN is performing over time with metrics such as bandwidth, hit rate, number of requests, and more:
Parting Thoughts
Well folks, it's been fun (by which I of course mean the opposite). So, was it worth the effort after-all? In my personal case, web.dev bumped my site's performance ranking to 80+, which is a substantial increase. Considering the load times this saves my readers (as well as the SEO bump for not sucking), the process and costs of serving assets via CDN are certainly worth it.
Was it worth writing this tutorial about a niche service on a relatively small cloud provider? Almost certainly not. Unless you enjoyed it, of course.
See you next time.

Top comments (0)