
Kraken CI is a new Continuous Integration tool. It is a modern, open-source, on-premise CI/CD system that is highly scalable and focused on testing. It is licensed under Apache 2.0 license. Its source code is available on Kraken CI GitHub page.
This tutorial is the third installment of the series of articles about Kraken CI. Part 1, Kraken CI, New Kid on the CI block, presented the installation of Kraken. The second part covered how to prepare a workflow for a simple Python project.
This time we would like to show the latest feature that was developed in Kraken CI: autoscaling.
Intro
Maintaining a fixed number of machines for Kraken CI can be costly. If there is no high traffic of builds, then some machines sit idle and waste power. The solution to this problem is autoscaling ie. spawning machines with Kraken Agents dynamically depending on the current needs in the Kraken CI. If there is submitted a new flow with many building or testing jobs, then new machines are spawned. When the flow completes, machines are terminated and no costs are incurred.
Currently, Kraken CI autoscaling is supporting AWS EC2 virtual machines.
The following chapters show how to configure access to AWS, then how to configure parameters and behaviour of spawned machines. In the end, the usage in job definitions is presented.
Details about configuration can be found in the Kraken docs.
Global Cloud Settings
First, global settings have to be set to allow access to a given cloud provider. In Web UI, on Kraken -> Settings page, in Cloud tab, there is a form for collecting credentials to cloud providers:

In the case of AWS, there are required Access Key and Secret Access Key. After filling in the values and saving settings, it is possible to check if it works by clicking Test Access button.
Preparing Cloud Environment
In the case of AWS it is also required to assign proper permissions so that Kraken can create or destroy EC2 instances. The list of all requires permissions looks as follows:
{
    "Version": "2012-10-17",
    "Statement": [
        {
            "Sid": "VisualEditor0",
            "Effect": "Allow",
            "Action": [
                "ec2:AuthorizeSecurityGroupIngress",
                "ec2:CreateKeyPair",
                "ec2:CreateSecurityGroup",
                "ec2:CreateTags",
                "ec2:DeleteKeyPair",
                "ec2:DescribeInstances",
                "ec2:DescribeInstanceStatus"
                "ec2:DescribeInstanceTypeOfferings",
                "ec2:DescribeRegions",
                "ec2:DescribeSecurityGroups",
                "ec2:DescribeVpcs",
                "ec2:RunInstances",
                "ec2:TerminateInstances",
            ],
            "Resource": "*"
        }
    ]
}
Configuration in Agents Groups
Having set credentials to cloud providers, it is possible now to configure aspects of spawning new machines. This can be done on Kraken -> Agents -> Groups page. Let's create a new Agents Group by clicking Add New Group button and naming it aws-t2-micro. The newly created details will be presented on a separate tab. On this tab, there is a section Agents Deployment. So the deployment can be manual (default)
or automated to a particular cloud provider. In the case of Amazon Web Services, there are the following options that can be set:

Select any region that fits you. Limit of instances can be set to 2. This will not allow having more running machines than 2. For now, the default AMI can be empty.
Then in VM options, let's stick to AWS free tier and select t2.micro instance type. The rest of the checkboxes leave empty. Init script also can be blank.
To ensure that dangling instances do not eat up our budget, let's set the options in Destruction section to 1 job and 10 minutes. So a spawned machine will be terminated after executing 1 job. And even then, if it sits idle for more than 10 minutes, it will be destroyed as well.
Job Definition
Now, to use the defined aws-t2-micro Agents Group, we need to prepare a project with a branch and a stage. More details about that can be found in Introductory Guide. So let's concentrate now on defining a job.
{
    "parent": "root",
    "triggers": {
        "parent": True
    },
    "configs": [],
    "jobs": [{
        "name": "hello",
        "timeout": 500,
        "steps": [{
            "tool": "shell",
            "cmd": "echo 'hello world'"
        }],
        "environments": [{
            "system": "ami-0967f290f3533e5a8",
            "agents_group": "aws-t2-micro",
            "config": "default"
        }]
    }]
}
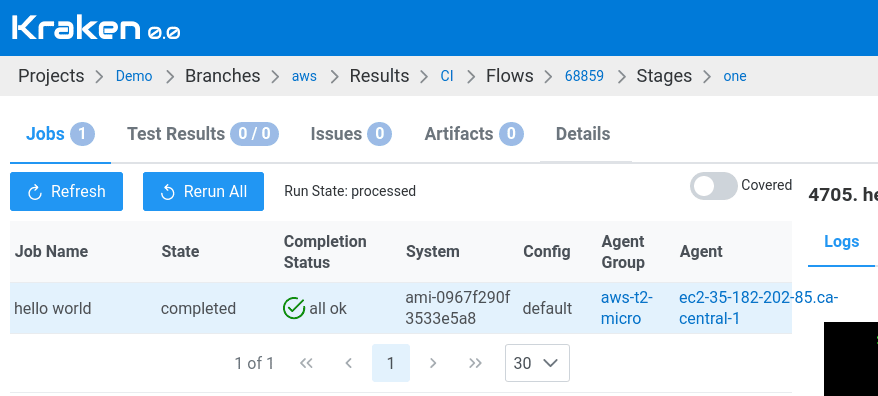
There is no much difference comparing to regular Kraken jobs. The job has a defined environments section where we are pointing to out aws-t2-micro Agents Group. What's is new is system field which points to AMI identifier - this indicates AWS EC2 image.
Run
Now when a job is assigned to an agents group with configured Agents Deployment then a new machine will be spawned for that job if agents are no available in the Kraken.
Let's change the view to Branch Results view and trigger a new flow by clicking Run Flow button. On the run page, the list of jobs shows our AWS job:
That's it!

Top comments (0)