originally posted on my blog
If you follow me on Twitter (and you should), you're aware that I'm an avid fan of the platform. So it's only natural that when I finally got a Google Home this year, the first thing I do is start tinkering with the platform to work with my Twitter account - now, the Google Home development software allows for automatic Twitter integration, but it's not a solve-all, I needed something with a little bit more oomph.
The first step was to choose my language. This was easy enough, I'd spent the past few weeks exploring NodeJS, and this seemed like the perfect opportunity to develop my skills a bit. As I developed, the application went through a number of iterations and platforms. Sometimes it used express, sometimes it didn't. I deployed to Firebase, then Heroku, the AWS Lambda, then back to Firebase, and then Google Cloud Functions (basically Firebase).
But what I'll be discussing today is the process to produce the final product, or rather, the product as it exists today which, while far from perfect, is functional, and an excellent starting point for anyone interested in getting started with Google Home development.
Getting Started With Dialogflow
![]()

In order to build for the Google Home, the first thing you'll need to do is get yourself setup with Google's dedicated development environment. In this case, Dialogflow is a dedicated platform for training the Google Home to respond to your voice, and pass the necessary data to your app. This is, in my opinion, the coolest part of building the application, because not only is it easy to get started, but once you've registered with your Google account, your app is immediately available for testing on any Google Home under the same account.
Signing up is simple, chances are you've got a Google account already, so let's go ahead and go to our console.
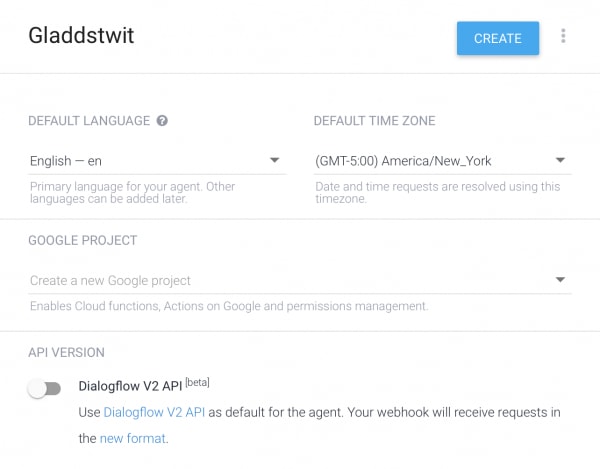
Once you reach your console, the first thing you need to do is create a new agent, this will be your method of interacting with your web application that will make up the back end of your Google Home skill. Here you'll set the basic information - the skill name, language, default time zone, and you can also set a web hook from here, but we'll leave that blank for now. We'll come back to it later.
Congratulations. You've officially created a Google Home skill. Sort of. It doesn't actually do anything just yet, but it does exist.
From here you'll train your app in intents, that's to say you'll train it to respond in a predetermined way when the user says key phrases. To get started, head over to your "Intent" bar on the left, and select "Create Intent"
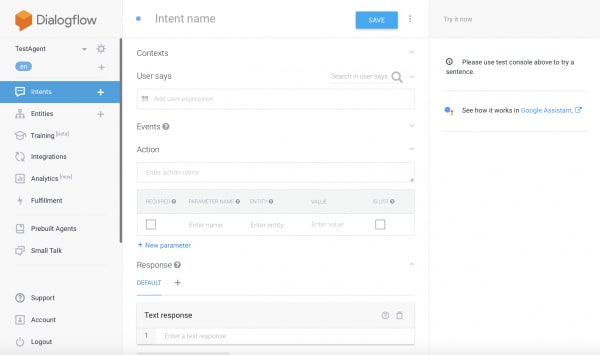
There's a lot of information here, so let's take a minute to break it down. First, you've got your intent name. This is simply for organizational purposes, so name it something that will allow you to recognize what it does.
The "User Says" bar is where you will supply Google with sample phrases with which to train it to recognize commands.
The "Action" bar is where we set the name of the action that will be executed by our app's backend (essentially a function). Below it is the data values and types that will be passed to that action as parameters. We'll dig into this in just a minute.
Below that is your Text response, which is exactly what you think it is. For this application, we'll be leaving this blank, as the response we send will need to confirm the tweet was properly sent, therefore it will need to be handled by our backend.
Finally, we have two dropdown menus - Fulfillment and Google Assistant. Go ahead and drop down Fulfillment and select "Use webhook." This will enable this intent to execute an action on our backend application.

Next, we need to create an entity. This entity will allow us to recognize what our user wants to do - in this case, post a tweet. So go over to "Entities" on the left and select "Create Entity." This brings us to a table with two columns. The first column is our main value, or the word that Google Assistant will recognize as the entity. On the right, we can define synonyms of this value. We want our user to be able to send a tweet by saying "Send [tweet]." So, our value on the left is send. Now we can go to the right column and enter some synonyms - post, tweet, update, etc.
When you're ready, name it - in my case, I call this entity tweetPrompt, as it prompts the application to send a new tweet. Now hit save and go back to your intent.
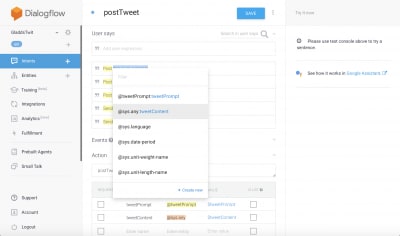
Now that we have our entity created, lets set our Event parameters. First,we set parameter name tweetPrompt. This is of entity type @tweetPrompt (the one we just created), and it has a value of $tweetPrompt (we'll set this shortly).
We have the prompt, now we need the content. Effectively what we'll do here is write a blank check for Google Assistant to cash by throwing in everything that isn't the tweetPrompt (ie "Tweet [all this stuff here]"). We'll call this parameter tweetContent, and we need it to have an entity type of @sys.any. This will allow for the Google Assistant to grab anything the user says as the value of this parameter. Finally, set the value to $tweetContent.
All that remains to be done now is instruct the Google Assistant in how to set these values for us. This can be a little tricky, particularly with the tweetContent, but in my experience, four or five solid examples are enough to give it a solid enough grasp of where things should go.
 Lets go on up to "User says" and type our first example. Type "Send I'm eating a cheeseburger" and hit enter. This will create you first example. Dialogflow should be able to pick out the word "Send" and set that as your tweetPrompt, but your tweetContent will require our intervention. To set tweetContent, simply highlight the remainder of the message. This will bring up a dialog box containing "@sys.any:tweetContent". Select this, and that portion of the text will become highlighted.
That's it! Now repeat this four or five times (remember to use your synonyms for your tweetPrompt entity) in order to complete the training.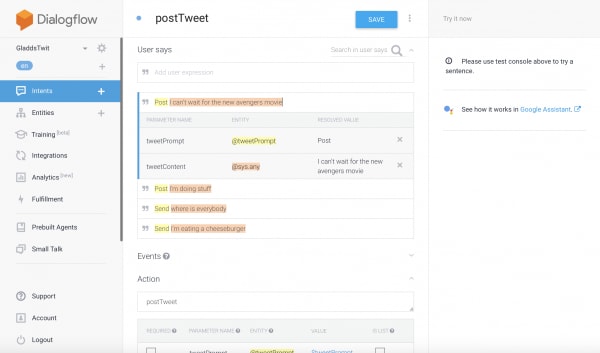
Firebase/Google Cloud Functions
For this project, we'll be using Firebase to host our application. The reason for this being that Firebase is a part of Google Cloud Functions which, as you may imagine, plays very nicely with our Dialogflow app. Other options for hosting would be things like Amazon Web Services, or Heroku, and they each have their own advantages and drawbacks, but for the sake of simplicity we'll focus on Firebase and Google Cloud Functions here.
To get started, let's create a local directory on our development machine. In this case, I've called mine "Gladdstwit." Now go ahead and navigate to this directory in your terminal of choice (for me, I use PowerShell on Windows, and the stock terminal on OSX, although there are a variety of options out there). First and foremost, you'll need both NodeJS and NPM installed. If you aren't sure, you can check if they are installed with
node -v

npm -v
If you don't have them, take a moment to download and set these up. This process will vary from operating system to operating system.

Now that we have Node and NPM ready, we can create out Firebase application. First, we run <code>npm install -g firebase-tools</code>. This will install Firebase globally on our machine. Now we have to login to Firebase using <code>firebase login</code>. This is a handy command that will allow you to authenticate within the browser.

With Firebase set up and authenticated, we can create our application within our working directory using <code>firebase init functions</code>. Once you've completed setup for your JavaScript app, your project directory should look something like this (pulled from the Google documentation)

<p class="prettyprint"><code><span class="pln">myproject
</span><span class="pun">+-</span> <span class="pun">.</span><span class="pln">firebaserc    </span><span class="com"># Hidden file that helps you quickly switch between</span><span class="pln">
</span><span class="pun">|</span><span class="pln">                 </span><span class="com"># projects with `firebase use`</span><span class="pln">
</span><span class="pun">|</span><span class="pln">
</span><span class="pun">+-</span><span class="pln"> firebase</span><span class="pun">.</span><span class="pln">json  </span><span class="com"># Describes properties for your project</span><span class="pln">
</span><span class="pun">|</span><span class="pln">
</span><span class="pun">+-</span><span class="pln"> functions</span><span class="pun">/</span><span class="pln">     </span><span class="com"># Directory containing all your functions code</span><span class="pln">
</span><span class="pun">|</span><span class="pln">
</span><span class="pun">+-</span> <span class="pun">.</span><span class="pln">eslintrc</span><span class="pun">.</span><span class="pln">json  </span><span class="com"># Optional file containing rules for JavaScript linting.</span><span class="pln">
</span><span class="pun">|</span><span class="pln">
</span><span class="pun">+-</span> <span class="kwd">package</span><span class="pun">.</span><span class="pln">json  </span><span class="com"># npm package file describing your Cloud Functions code</span><span class="pln">
</span><span class="pun">|</span><span class="pln">
</span><span class="pun">+-</span><span class="pln"> index</span><span class="pun">.</span><span class="pln">js      </span><span class="com"># main source file for your Cloud Functions code</span><span class="pln">
</span><span class="pun">|</span><span class="pln">
</span><span class="pun">+-</span><span class="pln"> node_modules</span><span class="pun">/</span> <span class="com"># directory where your dependencies (declared in</span><span class="pln">
</span><span class="com"># package.json) are installed</span></code>

Now that our directory is set up, lets go back to Dialogflow for a moment to grab some boilerplate code that Google was ever so considerate to supply for us. To get it, navigate to "Fulfillment" on the left sidebar. This will take us to the page from which we can manage our web hook. For now, turn on the Inline Editor, this is where our boilerplate code will come from.

<img class="size-full wp-image-80 aligncenter" src="http://joefarrell.me/wp-content/uploads/2018/01/Screen-Shot-2018-01-25-at-10.10.02-AM-e1516893040397.png" alt="" width="500" height="293" />

Go ahead and copy the text from the inline editor into your index.js file, then turn of Inline Editor and enable Webhook, we'll come back to this momentarily. Now we're ready to build our application!


<h2>Building our NodeJS Application</h2>

All right, so you have your Dialogflow project, you've got your boilerplate code, it's time to get to coding. Before we start modifying the boilerplate, I recommend taking a few minutes to explore the code provided. The whole thing is fairly straight forward, and with a few minutes of reading, you can pretty easily get a feel for what we're going to be doing, here.

By default, the Dialogflow boilerplate code uses several NodeJS modules, but we'll need one more to allow us to communicate with the Twitter API. Now, there are several ways to do this is through the twit module. In addition to the twit module, we'll also need to include our own config.js file (this will house the necessary information that will be passed to the twit module). Once that's done, your require section should look something like this

[caption id="attachment_83" align="aligncenter" width="600"]<img class="wp-image-83 size-full" src="http://joefarrell.me/wp-content/uploads/2018/01/Screen-Shot-2018-01-29-at-12.09.13-AM-e1517202600217.png" alt="" width="600" height="143" /> <em>                                                     Don't forget to npm install twit!</em>[/caption]

Next we need to set up the config.js file. This file will contain four unique keys provided to you by Twitter. To get these, you'll need to go to apps.twitter.com and select "Create new app."

<img class="size-full wp-image-84 alignleft" src="http://joefarrell.me/wp-content/uploads/2018/01/Screen-Shot-2018-01-29-at-12.14.27-AM-e1517202910111.png" alt="" width="300" height="177" />

Here, you'll set your application's name, description, and associated website. Most importantly, remember to change your app's permissions from "Read Only" to "Read and Write" (otherwise our application won't work - obviously). If you intend to include direct message functionality later on, accessing those is a separate permission, and you will need to activate that instead.

Now that your app is created, you can go to your Keys and Access Tokens tab. You will need four forms of identification from here to access the Twitter API - consumer key, consumer secret, access token, and access token secret. These will all be encapsulated within a JSON object in your config.js file. Remember not to store these values anywhere someone might see them!

<img class="size-full wp-image-85 aligncenter" src="http://joefarrell.me/wp-content/uploads/2018/01/Screen-Shot-2018-01-29-at-12.19.54-AM-e1517203233414.png" alt="" width="600" height="139" />

And there you have it! You are now ready to connect to the Twitter API. Only one step remains, and that is to process the user request to your application.

In order to do this, we'll be working with the processV1Request function. This is the function that handles standard web hook requests from Dialogflow. There is also a processV2Request function, which includes some further functionality, but is currently in beta, and we won't be dealing with it today.

The key to the processV1Request function is its actionHandlers. This contains all of the possible actions that your application can take. The first one that we'll look at is called "input.welcome." This handles the welcome message when your user opens the application from their Google Home, and as you might imagine, it's fairly simple.
'input.welcome': () => {
// Use the Actions on Google lib to respond to Google requests; for other requests use JSON
if(requestSource===googleAssistantRequest){
sendGoogleResponse('Welcome to Gladdstwit, the Twitter client for Google Home.');// Send simple response to user
}else{
sendResponse('Welcome to Gladdstwit, the Twitter client for Google Home.');// Send simple response to user
}
},
The first thing it does is verify that you are indeed connecting to it via a Google Assistant device, and then sends your message back. Easy enough. This is the rough format for all of your action handlers, and should give you a fairly good idea of what needs to happen from here on out.

Now, let's create the function that sends your tweet. We'll call this postTweet, and we'll enter it immediately after the "input.welcome" function for simplicity's sake.

Notice above the constants that are declared at the very start of the processV1Request function. The one we want to focus on right now is called "parameters." These are the values that the Google Home will pass to your application - for our purposes, this will be the tweet that our user wishes to post. So what we want to do is get that value out of parameters and send it to Twitter with the instructions to post it as a tweet.

We know that the parameter's name is tweetContent, so we can retrieve it from parameters like you would any other JSON object.
"postTweet": () => {
responseToUser="Success!";
let statusText=parameters.tweetContent;
// Post the tweet
if(requestSource===googleAssistantRequest){
sendGoogleResponse(responseToUser);
}
else{
sendResponse(responseToUser);
}
},
So now we have our tweet, we have a confirmation response to send to our user upon success, all we have to do is communicate with the Twitter API. Luckily, twit makes this extremely easy. The function, in this case, is called twitter.post(), and it takes three values - "statuses/updates", a string that defines where we are posting (our status), the status text itself in JSON format (this can also take other values, but for now we'll stick with just the plain text), and an error function (error).

Personally, rather than build a separate function, I prefer to use an arrow function to handle the error method. In this case, the code looks something like this.
twitter.post("statuses/update", {status: statusText}, (err, data, res) => {
if(err){
responseToUser="Something went wrong";
}
else{
// responseToUser = "Success!";
}
});
So, when you're done, your entire action handler should look like this.
"postTweet": () => {
responseToUser="Success!";
letstatusText=parameters.tweetContent;
twitter.post("statuses/update",{status:statusText},(err,data,res)=>{
if(err){
responseToUser="Something went wrong";
}
else{
// responseToUser = "Success!";
}
});
if(requestSource===googleAssistantRequest){
sendGoogleResponse(responseToUser);
}
else{
sendResponse(responseToUser);
}
},
Not so bad, right? Thanks to the magic of Node, connecting Google and Twitter is extremely easy, and with this function implemented, we're ready to deploy our application! So go on back to your terminal and type

<center><code>firebase deploy</code></center>

In order to deploy your application. Once that's done, we can go to our Google Cloud Functions. From the menu, go to "Cloud Functions" and select your function name. Under the "trigger" menu, you will find a URL of type HTTP Trigger. Copy this URL and paste it into your webhook URL into Dialogflow and save.

That's it! You're ready to test. We can do this in a couple of ways. Dialogflow offers it's own emulator, or, if you signed up with the same account connected to your Google Home, you can simply tell your Google Home "Talk to [name of your application]."

This has a ways to go before it's ready to be called a "useful" app, but hopefully it has been helpful in showing you the ropes of working with Dialogflow and Google Cloud Functions.


**Thank you!**
This is my first attempt at something this long, I hope you enjoyed reading it. If you feel confused about something, or if I left something out (possible, if not downright likely), leave a comment or shoot me a tweet!
You can follow me on Twitter <a href="http://www.twitter.com/Pithpifth">@Pithpifth</a>
Or see my (brand-spanking new) blog at <a href="http://joefarrell.me">joefarrell.me</a>


Top comments (1)
Nice post, helped me to build my own Action - youtu.be/LeGuJo7QBbI