A couple of months ago Open AI released their Assistant API which is at the time of writing this article still in beta. In short, Assistants are a new and (hopefully) better way of utilizing OpenAI models. Before, when using the Chat Completions API, you had to keep a history of each message that was exchanged between the user and model, and then send that whole history each time back to the API, because Chat Completions API isn't stateful.
Enter Assistants. Assistants are stateful and will keep a history for you, so you can easily send just the last user's message, and receive back an answer. Besides Function Calling, they also include cool tools like Code Interpreter and Knowledge Retrieval.
Getting Started
Now, to interact with OpenAI API through Laravel we are going to use an already popular package developed by Nuno Maduro and Sandro Gehri: https://github.com/openai-php/client and a Laravel specific wrapper of that package: https://github.com/openai-php/laravel.
First, simply require the Laravel wrapper package:
composer require openai-php/laravel
That will install the required dependencies as well, including the OpenAI PHP Client package. After that execute the install command:
php artisan openai:install
Next, you should add your OpenAI API key inside your .env file:
OPENAI_API_KEY=sk-...
OPENAI_ORGANIZATION=org-...
Find or create your API key in the API keys section:
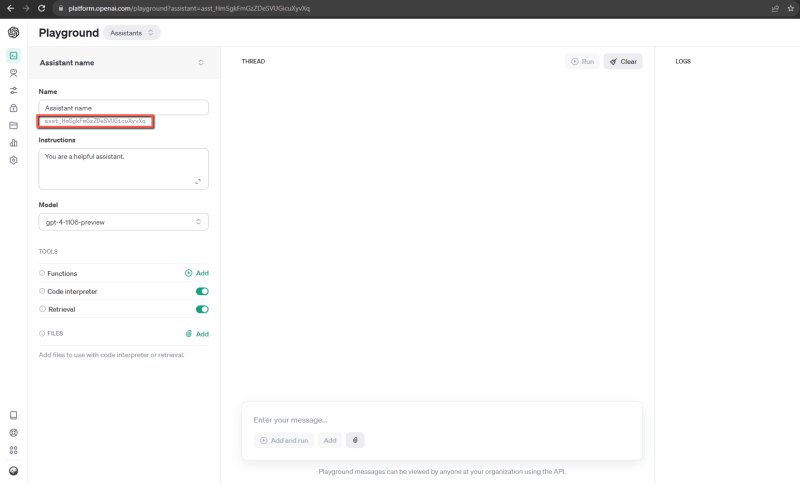
Now we are ready to use the package to interact with the API. But, before that, let's create an Assistant. Bare in mind that Assistant can also be created through API, but for simplicity in speed we are going to create an assistant in OpenAI's Playgound. Head to: https://platform.openai.com/playground and create an Assistant. Give him any name you like, enter any instructions you may have, select a model and you may or may not enable additional tools. When you do save your changes, make sure to copy the assistant's ID, we are going to need it later.
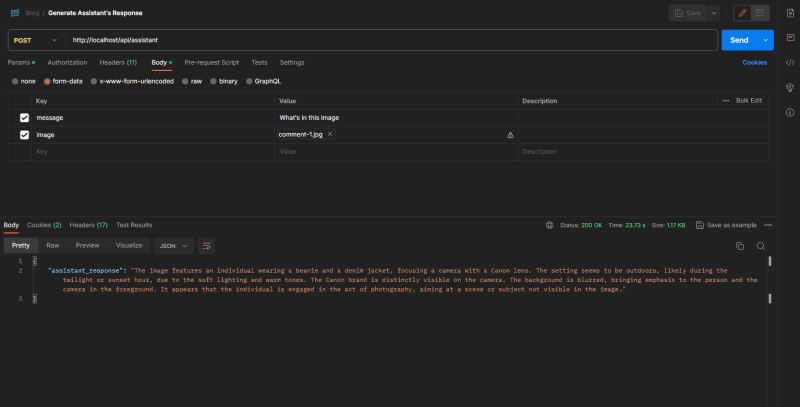
Ok, now, imagine we are developing an app where we are in charge of the backend. User will enter a chat message on the frontend, typically some kind of a question for our Assistant to answer, frontend will then use our app's internal API, and send us the message the user entered. On the backend side, we are going to make a request to the Assistant and await his response. When we get the response, we are going to return it to the frontend to display it to the user. This article will just focus on the backend side of the process. I mentioned that in theory some frontend would be calling our backend API, but we could use Postman just as well to simulate that process, which we will actually do later.
Let's create just one route and an AssistantController.php in which we will perform our logic.
php artisan make:controller AssistantController
// api.php

Route::post('/assistant', [AssistantController::class, 'generateAssistantsResponse']);
Creating and running threads
Before we create our main generateAssistantsResponse function, let's create a few helper functions. The way the Assistant's flow works, we would have to create a thread using our Assistant's ID, which is a type of holder for any messages exchanged between a user and an assistant, then we need to submit an actual user's message, and trigger a run. When the run finishes successfuly we should get our response back.
// AssistantController.php

use OpenAI\Laravel\Facades\OpenAI;

class AssistantController extends Controller
{
    private function submitMessage($assistantId, $threadId, $userMessage)
    {
        $message = OpenAI::threads()->messages()->create($threadId, [
            'role' => 'user',
            'content' => $userMessage,
        ]);

        $run = OpenAI::threads()->runs()->create(
            threadId: $threadId,
            parameters: [
                'assistant_id' => $assistantId,
            ],
        );

        return [
            $message,
            $run
        ];
    }

    private function createThreadAndRun($assistantId, $userMessage)
    {
        $thread = OpenAI::threads()->create([]);

        [$message, $run] = $this->submitMessage($assistantId, $thread->id, $userMessage);

        return [
            $thread,
            $message,
            $run
        ];
    }

    private function waitOnRun($run, $threadId)
    {
        while ($run->status == "queued" || $run->status == "in_progress")
        {
            $run = OpenAI::threads()->runs()->retrieve(
                threadId: $threadId,
                runId: $run->id,
            );

            sleep(1);
        }

        return $run;
    }

    private function getMessages($threadId, $order = 'asc', $messageId = null)
    {
        $params = [
            'order' => $order,
            'limit' => 10
        ];

        if($messageId) {
            $params['after'] = $messageId;
        }

        return OpenAI::threads()->messages()->list($threadId, $params);
    }
}
In short, we will use the createThreadAndRun function to create a thread, submit a message to the thread, and create a run. There is an equivalent createAndRun function in the package we are using, but this function we created might help you initially to better understand what is going on. We will then use waitOnRun function to wait for the run to complete and finally we can use getMessages function to get the response from the assistant.
Merging the pieces together
Now, we can create our main function generateAssistantsResponse as defined in the assistant route we created previously.
public function generateAssistantsResponse(Request $request)
{
    // hard coded assistant id
    $assistantId = 'asst_someId';
    $userMessage = $request->message;

    // create new thread and run it
    [$thread, $message, $run] = $this->createThreadAndRun($assistantId, $userMessage);

    // wait for the run to finish
    $run = $this->waitOnRun($run, $thread->id);

    if($run->status == 'completed') {
        // get the latest messages after user's message
        $messages = $this->getMessages($run->threadId, 'asc', $message->id);

        $messagesData = $messages->data;

        if (!empty($messagesData)) {
            $messagesCount = count($messagesData);
            $assistantResponseMessage = '';

            // check if assistant sent more than 1 message
            if ($messagesCount > 1) {
                foreach ($messagesData as $message) {
                    // concatenate multiple messages
                    $assistantResponseMessage .= $message->content[0]->text->value . "\n\n";
                }

                // remove the last new line
                $assistantResponseMessage = rtrim($assistantResponseMessage);
            } else {
                // take the first message
                $assistantResponseMessage = $messagesData[0]->content[0]->text->value;
            }

            return response()->json([
                "assistant_response" => $assistantResponseMessage,
            ]);
        } else {
            \Log::error('Something went wrong; assistant didn\'t respond');
        }
    } else {
        \Log::error('Something went wrong; assistant run wasn\'t completed successfully');
    }
}
So, we take the user's message from the request, and use that data along with our assistant's ID to generate a new thread, submit a message, and start the run. From the createThreadAndRun function we are getting all of the necessary data back to us which we can use further in the process. After the run has started we will periodically check if the run has been completed.
After a few seconds the status of the run will be set to completed. As soon as that happens, we are getting the latest messages after the one the user sent. Since (per OpenAI docs) assistant can sometimes send more than one message (never happened to me, but just in case) we are checking the number of messages sent and concatenating them into a single response for simplicity. Otherwise, if there is just one message, we just get the first message. In the end the assistant's message is returned in a JSON response.
Using assistant functions to send images to the Vision API
Note: before we start using the Vision API, please bare in mind that while you can use the Chat and Assistants API with GPT-3 models, you will need access to GPT-4 models to use Vision, and you will need to spend $1 in order to unlock access to GPT-4 models: https://help.openai.com/en/articles/7102672-how-can-i-access-gpt-4.
Ok, we are ready to talk about assistant functions and how we can utilize them to pass different data (3rd party or from our own app) to the assistant. With Vision API you can for example allow your user to upload an image, and then the GPT-4 model will be able to take in that image and answer different questions about it. Now, the thing is that Vision isn't yet available for Assistants API. If you try to upload an image and send it to the assistant it won't be able to describe the contents of that image. But there is a workaround.
Enter function calling. Using assistant functions, we are able to tell the assistant to call a specific function which will in turn call another API - Chat Completions API: https://platform.openai.com/docs/api-reference/chat/create which does have Vision available. Later on we will feed that data from the Chat API to our assistant so he can respond accordingly.
Back in our AssistantController.php, let's start with another helper function. We will create a processRunFunctions method that checks if our assistant run requires any action to be performed, in this case if any function should be called. If the assistant decides that the describe_image function should be called we will fire up the Chat API and ask it to provide us with the image description based on the message and the image user has already provided. Then we will submit the Vision related data back to the assistant and wait for that run to complete. Bare in mind that we are increasing the default value for max_tokens so the response is not cut off.
private function processRunFunctions($run)
{
    // check if the run requires any action
    while ($run->status == 'requires_action' && $run->requiredAction->type == 'submit_tool_outputs')
    {
        // Extract tool calls
        // multiple calls possible
        $toolCalls = $run->requiredAction->submitToolOutputs->toolCalls;
        $toolOutputs = [];

        foreach ($toolCalls as $toolCall) {
            $name = $toolCall->function->name;
            $arguments = json_decode($toolCall->function->arguments);

            if ($name == 'describe_image') {
                $visionResponse = OpenAI::chat()->create([
                    'model' => 'gpt-4-vision-preview',
                    'messages' => [
                        [
                            'role' => 'user',
                            'content' => [
                                [
                                    "type" => "text",
                                    "text" => $arguments?->user_message
                                ],
                                [
                                    "type" => "image_url",
                                    "image_url" => [
                                        "url" => $arguments?->image,
                                    ],
                                ],
                            ]
                        ],
                    ],
                    'max_tokens' => 2048
                ]);

                // you get 1 choice by default
                $toolOutputs[] = [
                    'tool_call_id' => $toolCall->id,
                    'output' => $visionResponse?->choices[0]?->message?->content
                ];
            }
        }

        $run = OpenAI::threads()->runs()->submitToolOutputs(
            threadId: $run->threadId,
            runId: $run->id,
            parameters: [
                'tool_outputs' => $toolOutputs,
            ]
        );

        $run = $this->waitOnRun($run, $run->threadId);
    }

    return $run;
}
We can now amend our main method generateAssistantsResponse to process the image user uploaded, and process any functions the assistant may call. I won't get into detail on how to validate and save the image user provided, just bare in mind that the image can be sent as an URL or base64 to the Vision, but an URL is preferred.
public function generateAssistantsResponse(Request $request)
{
    $assistantId = 'asst_someId';
    $userMessage = $request->message;

    // check if user uploaded a file
    if($request->file('image')) {
        // validate image

        // store the image and get the url - url hard coded for this example
        $imageURL = 'https://images.unsplash.com/photo-1575936123452-b67c3203c357';

        // concatenate the URL to the message to simplify things
        $userMessage = $userMessage . ' ' . $imageURL;
    }

    [$thread, $message, $run] = $this->createThreadAndRun($assistantId, $userMessage);

    $run = $this->waitOnRun($run, $thread->id);

    // check if any assistant functions should be processed
    $run = $this->processRunFunctions($run);

    if($run->status == 'completed') {
        $messages = $this->getMessages($run->threadId, 'asc', $message->id);
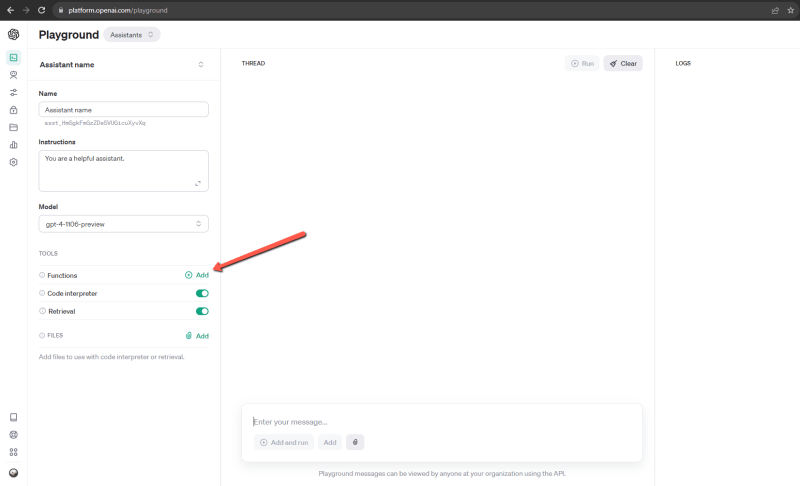
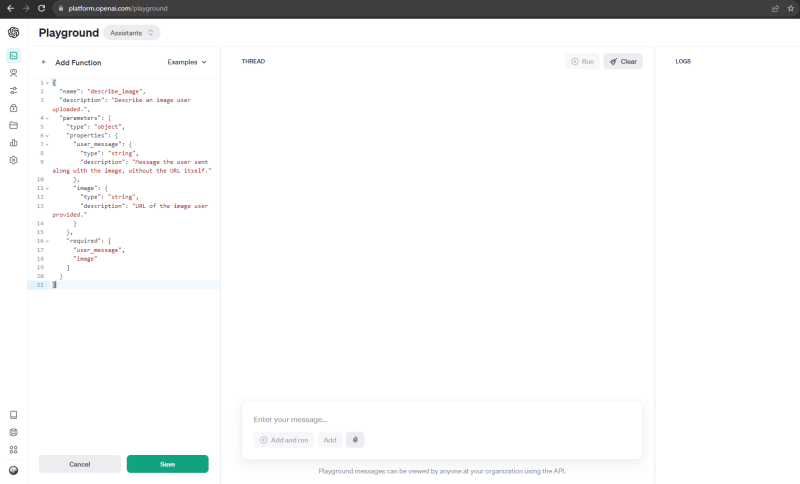
The last thing to do is to add a function definition. You can add a function definition through the API, but again, since it is more straightforward for this example we will add the function definition through Playground. Here is the definition we will use:
{
  "name": "describe_image",
  "description": "Describe an image user uploaded, understand the art style, and use it as an inspiration for constructing an appropriate prompt that will be later used to generate a skybox.",
  "parameters": {
    "type": "object",
    "properties": {
      "user_message": {
        "type": "string",
        "description": "Message the user sent along with the image, without the URL itself"
      },
      "image": {
        "type": "string",
        "description": "URL of the image user provided"
      }
    },
    "required": [
      "user_message",
      "image"
    ]
  }
}
And here is how that might look like in the Playground.
And here is how the whole API request/response flow might look like in Postman.
In case you want to copy the whole code from AssistantController.php head out to Gist.
Conclusion
In conclusion, bare in mind that this is just a basic example to showcase some of the possibilities, and that the code can and should be improved in many ways. For example, you probably shouldn't hard code your Assistant ID, instead you could keep it in your database model. Currently the only way to check if a run has been completed is to periodically check if that has happened, which is far from ideal, but in the documentation is it mentioned that will change in the future: https://platform.openai.com/docs/assistants/how-it-works/limitations. Instead of waiting for the runs to complete in a single request you could dispatch parts of code to a Laravel Job and run it asynchronously. After a Job is completed it could broadcast an event through Websockets and send a notification to the frontend with the response from the assistant, or you could use Webhooks to send results to other users.
Also, as I already mentioned the Assistants API is in beta and it will probably change and evolve in the coming weeks or months.
That's it for this article, hope it provided you with a good starting point for using the Assistants API.
Happy building!
Enjoyed the article? Consider subscribing to my newsletter for future updates.
Originally published at geoligard.com.


Top comments (0)