Wouldn’t it be awesome if you could get notified on a messaging platform such as Rocket.Chat, Discord, Telegram or Slack if someone mentioned you on Twitter? Well, it is super easy to set this up with n8n (pronounced nodemation). n8n allows you to automate this whole workflow without having to understand the API documentation for each of these different providers.
Big Picture Overview
In this tutorial, we will be setting up a workflow which runs every 5 minutes. This workflow will get all tweets mentioning us from the Twitter API, filtering the data from the Twitter API, checking for tweets which haven’t been posted into Rocket.Chat and then sending only those tweets to Rocket.Chat.
 Our workflow!
Our workflow will be composed of 5 nodes:
Cron Node — This node allows us to run our workflow every 5 minutes
Twitter Node — This node will enable us to consume the Twitter API and grab all the tweets mentioning us.
Set Node — This node will take the data from the Twitter Node and will filter out only the important information such as the Tweet Content, Tweet ID and the Tweet URL.
Function Node — This node will check for tweets that have already been posted in the Rocket.Chat channel and then the function will return only the new tweets that have been made in the last 5 minutes.
-
Rocket.Chat Node — This node will then send the new tweets to a Rocket.Chat channel. Note that this node can be replaced with any messaging platform of your choice, such as Discord and Slack.
Note that this workflow has been posted on the n8n.io website so if you don’t want to follow this tutorial then you can download the workflow and set up the credentials for Twitter and Rocket.chat, and you should be good to go.
Prerequisites:
To start building this workflow, you will need:
node.jsnpmTwitter API Credentials. Follow the instructions here to grab these credentials.
Rocket Chat API Credentials (User Id, Auth Key and Domain). Follow the instructions here to grab these credentials.
n8n (If you haven’t already installed n8n then you can through the command npm install -g n8n on the terminal)
Once that is done, you can type n8non the terminal to start it up. Once it has started type “o” to open the Editor UI.
Building the workflow
Cron Node
This node is a trigger node. A trigger node is essentially a node that starts a workflow and supplies the initial data. In our case we want to trigger our workflow every 5 minutes, this is why the Cron Node is so great; it allows us to add a “Cron Time” which will enable us to specify how often this workflow should be triggered.
First, add the Cron Node by clicking the + button in the top right corner, a menu will open, click on the “Trigger” tab and search for Cron, click on it to add it to the editor. To configure this node, double click on it and click on “Add Cron Time”, change the mode to “Every X” and then change the unit to “Minutes” and the Value to 5. This means to execute our workflow every 5 minutes. Note that you can configure to your desire (once a day, once every hour or you can even add a Cron Expression for more customizability!)
Note that the Cron Node will only run when the workflow is active. We will check this at the end of this tutorial, for now, we will be manually triggering our workflow to check that everything works correctly.
 Configuring the Cron Node
Twitter Node
The next node is a Twitter Node which will grab data from the Twitter API. Like before, add the Twitter Node to the editor by searching for it and clicking on it. Make sure the Cron Node has an arrow to the Twitter Node.
To configure this node, double click on it. Before we can get any data, we need to provide this node with our credentials to the Twitter OAuth API. In the prerequisites section, you should have created a set of Twitter Credentials. To configure those credentials with this node, click on the “Select Credentials” dropdown and click on “Create New”, a modal should pop up asking for the Consumer Key and Consumer Secret. Grab this information from the Twitter API dashboard and also ensure that the OAuth callback URL is verified with the Twitter API. You can name your credentials whatever you like, I’ve kept it as “Twitter Credentials”. After this, give the Twitter Node access to these credentials.
 Where to paste in your Twitter Credentials
Once the credentials have been set up, we will set up this node to search for all tweets that mention us (in our case, find all tweets that mention @n8n_io ). To do this make sure the Resource is “Tweet”, the Operation is “Search”, and the Search Text is set to your tweet handle, in our case “@n8n_io ”, we will also set the limit to 10 tweets as we don’t want to bash the Twitter API while testing out the workflow. Once the workflow has been set up, the limit can be changed to your desire. To test that this node works, we can click on “Execute Node”, this should give us an array of JSON objects where each object contains information about tweets mentioning @n8n_io .
 Getting all tweets which contain “@n8n_io
”
Getting all tweets which contain “@n8n_io
”
Set Node
From the Twitter Node, we saw that we received a lot of data from the Twitter API, we, however, only want the data that is important to us. In our case, we only want the Tweet Contents, Tweet ID and a URL to the Tweet. To filter this data out, we will use the Set Node. Like we’ve been doing, add the Set Node to the editor and ensure that it is connected to the Twitter Node.
We will now configure the node, double click on it and ensure that “Keep Only Set” has been ticked. This will ensure only the information we set will be retained, the rest will be removed.
To filter only the information we want, we will be adding key-value pairs under the “Values to Set”:
- Tweet: Add a String value, the name will be “Tweet”, and the Value will be an “expression” which will get the required information from the previous Twitter Node. Click on the “cogs” next to the value input and click on “Add Expression”. Go to Nodes > Twitter > Output Data > JSON > “text” and click on it. This should give us the expression
{{$node[“Twitter”].json[“text”]}}which gives us the contents of the tweet.
 Setting the Tweet Expression
- Tweet ID: Add a String value, the name will be “Tweet ID” and add an expression the value. Similar to before go to Nodes > Twitter > Output Data > JSON > “id” and click on it. This should give us the expression:
{{$node[“Twitter”].json[“id_str”]}}which gives the id of the tweet.
 Setting the Tweet ID
Tweet URL: Add a String value, the name will be “Tweet URL” and add an expression the value. Notice that the Twitter API does not give us the URL, but we can construct it ourselves from the username and Tweet ID!
To do this, add an expression like before, in the expression editor we will add
“https://twitter.com/"Then we will select the username from the data (Nodes > Twitter > Output Data > JSON > user > screen_name). The expression editor should now be
https://twitter.com/{{$node["Twitter"].json["user"]["screen_name"]}}.We will append
“/status/”to this expressionThen select the Tweet ID (Nodes > Twitter > Output Data > JSON > “id”). Our final expression should look like:
https://twitter.com/{{$node["Twitter"].json["user"]["screen_name"]}}/status/{{$node["Twitter"].json["id"]}}
 Setting the Tweet URL
If we execute this node, we will see that our JSON output is much more cleaner and contains all the information we want.
Function Node
To ensure we don’t spam the Rocket.Chat channel, we only want to post the tweets which are new and haven’t been posted already onto the channel. To do this, we will be using the getWorkflowStaticData() function that n8n provides, this function allows us to store our data in an active running workflow. This data will also persist when you make a workflow inactive and then active again. The data we will be persisting will be the ids of the tweets which have been sent to the Rocket.Chat channel.
To do this, we will add a function node to our editor and double click on it. We will then click on the code to bring up the code editor. We will add this Javascript code into the editor:
const staticData = getWorkflowStaticData('global');
const newTweetIds = items.map((item) => item.json['Tweet ID']);
const oldTweetIds = staticData.oldTweetIds;

if (!oldTweetIds) {
  staticData.oldTweetIds = newTweetIds;
  return items;
}

const actualNewTweetIds = newTweetIds.filter((id) => !oldTweetIds.includes(id));
const actualNewTweets = items.filter((data) =>
  actualNewTweetIds.includes(data.json['Tweet ID'])
);
staticData.oldTweetIds = [...actualNewTweetIds, ...oldTweetIds];

return actualNewTweets;
 Adding the code into the Function Node
This code first grabs the new tweet ids from the previous node and also any old tweet ids from getWorkflowStaticData(‘global’). If there are no old tweet ids, then it means it is our first time sending tweets to Rocket.Chat so we will save the new tweet ids and then return all the tweets. If there are however old tweet ids, we want to remove all of those tweet ids from our new tweet ids array. This is done through the filter() method in Javascript.
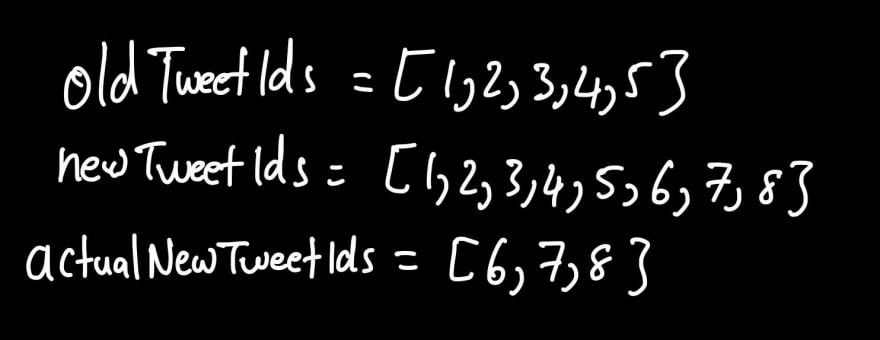 An example of what Line 12 does
We then persist all the old tweet ids and also the new tweet ids by combining these two arrays using the spread operator. Lastly, we filter out only the new tweets from the JSON we got from the previous node by once again using the filter() function. We now return actualNewTweets as it contains an array of our new tweet objects.
RocketChat Node
This node will help us send our new tweets into a Rocket.Chat channel. Similar to before, add a RocketChat node into the editor.
RocketChat Node Configuration:
Credentials: Ensure that you have created an Auth Key for RocketChat, if you haven’t a link is in the prerequisites section. Once you have, set up credentials for the Rocket API, add in your User Id, Auth Key and Domain of the RocketChat channel. Lastly, name your credentials something meaningful and give access to the RocketChat node. This is similar to the way we set up the Twitter credentials.
Resource: Chat
Operation: Post Message
Channel: default (This can be configured to whichever channel you would like to post to on RocketChat)
Text: New Mention!:
{{$node[“Function”].json[“Tweet”]}. See it here:{{$node[“Function”].json[“Tweet URL”]}}(We generated this expression in a similar way like the Set Node).
 Configuring our RocketChat node
Now once you click on execute workflow, the RocketChat channel should have been flooded with 10 new messages!
 Executing our workflow!
Once you are happy with your workflow, you can set the workflow to Active which will turn the workflow on to run every 5 minutes. This is where our function will come in handy because it will only send a message if fresh tweets have arrived!
Conclusion
Well done! You have built a workflow to get all tweets that mention you and post them to Rocket.Chat, you have also understood how to use getWorkflowStaticData() to persist data between each workflow cycle. You have also learnt how to use the Cron Node to set a time for your workflow to trigger, the Twitter Node to get all the tweets which mention you, the Set Node to filter only the information you want through expressions, the Function node to persist data and send the newest tweets to avoid duplication and finally the RocketChat node to post these tweets onto a channel!
Feel free to customise this workflow to your desire by changing the cron job time, changing the messenger platform you use or even which data you want to send to the platform! I am interested to see what you come up with! If you do decide to build upon this workflow, feel free to share it.
In case you’ve run into an issue while following the tutorial, feel free to reach out to me on Twitter or ask for help on the official n8n forum 💙

Top comments (1)
This is my first time writing an article on dev.to so do let me know if you have any feedback :)