
![]()
New Year is around the corner and soon, fireworks will fill the sky. As the last tutorial for this year, I've decided to try to replicate fireworks in JavaScript.
In this tutorial - inspired by Haiqing Wang from Codepen - we will take a look at not only firing colorful fireworks with mouse clicks but also on
- How to create and manage different layers
- How to load and draw images
- How to rotate objects around a custom anchor point
- How to generate particles affected by gravity
If you would like to skip to any of the parts in this tutorial, you can do so by using the table of contents below. The project is also hosted on GitHub.
Setting Up the Project
Let's start by setting up the structure of the project. As always, start with an index.html with two canvas and two script elements:
<!DOCTYPE html>
<html lang="en">
    <head>
        <meta charset="UTF-8" />
        <meta name="viewport" content="width=device-width, initial-scale=1.0" />
        <title>✨ Fireworks in JavaScript</title>
        <link rel="stylesheet" href="styles.css" />
    </head>
    <body>
        <canvas id="background"></canvas>
        <canvas id="firework"></canvas>

        <script src="background.js"></script>
        <script src="firework.js"></script>
    </body>
</html>
This is because we will have two separate layers; one for the background where we draw the static assets, and one for the actual fireworks and interactive elements. At this stage, both script files are currently empty. I also referenced a styles.css, that will only have two rules:
body {
    margin: 0;
}

canvas {
    cursor: pointer;
    position: absolute;
}
We will make the canvas take the whole screen, so make sure you reset the margin on the body. It's also important to set canvas elements to absolute positioning, as we want to overlay them on top of each other.
Lastly, I have two images in an assets folder, one for the wand, and one for the wizard. You can download them from the GitHub repository. With this in mind, this is how the project structure looks like:
Drawing the Background
To get some things on the screen, let's start by adding the background first. Open up your background.js file, and set the canvas to take up the whole document with the following:
(() => {
    const canvas = document.getElementById('background');
    const context = canvas.getContext('2d');

    const width = window.innerWidth;
    const height = window.innerHeight;

    // Set canvas to fullscreen
    canvas.width = width;
    canvas.height = height;
})();
I've put the whole file into an IIFE to avoid name collisions and polluting the global scope. While here, also get the rendering context for the canvas with getContext('2d'). To create a gradient background, add the following function:
const drawBackground = () => {
    // starts from x, y to x1, y1
    const background = context.createLinearGradient(0, 0, 0, height);
    background.addColorStop(0, '#000B27');
    background.addColorStop(1, '#6C2484');

    context.fillStyle = background;
    context.fillRect(0, 0, width, height);
};
This will create a nice gradient from top to bottom. The createLinearGradient method takes in the starting and end positions for the gradient. This means you can create a gradient in any direction.
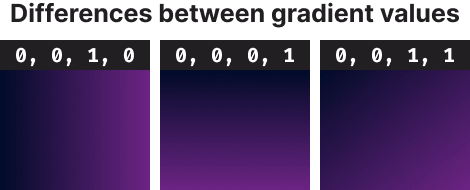
You can also add as many colors with the addColorStop method as you want. Keep in mind, your offset (the first param) needs to be a number between 0 and 1, where 0 is the start and 1 is the end of the gradient. For example, to add a color stop at the middle at 50%, you would need to set the offset to 0.5.
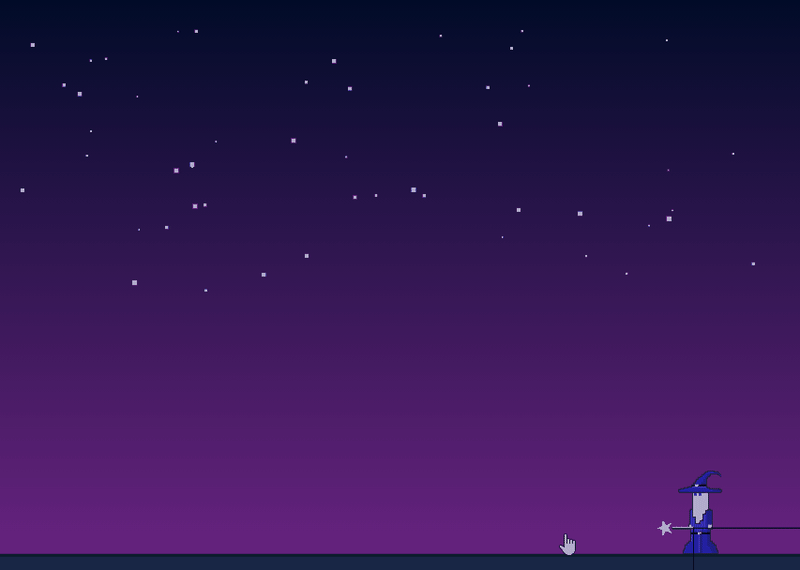
To draw the foreground - represented by a blue line at the bottom - extend the file with the following function:
const drawForeground = () => {
    context.fillStyle = '#0C1D2D';
    context.fillRect(0, height * .95, width, height);

    context.fillStyle = '#182746';
    context.fillRect(0, height * .955, width, height);
};
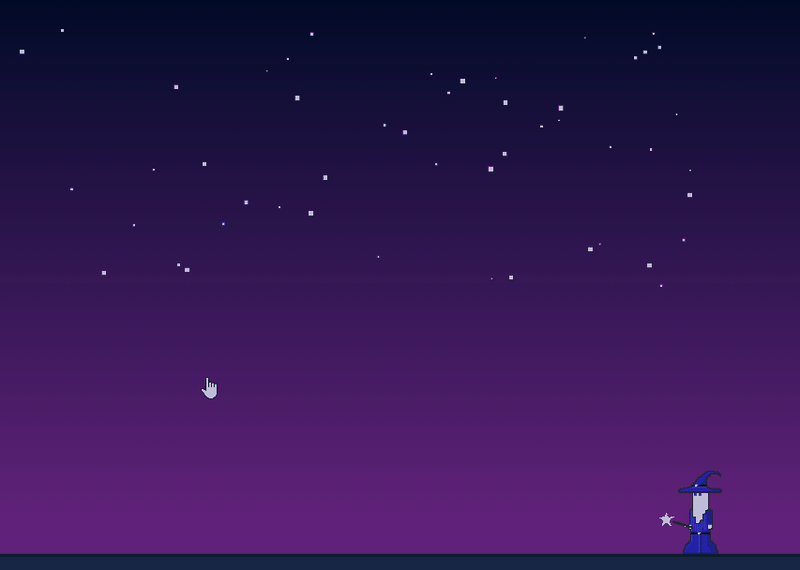
This will create a platform on the last 5% of the canvas (height * 95%). At this stage, you should have the following on the screen:

Drawing the wizard
To add the wizard to the scene, we need to load in the proper image from the assets folder. To do that, add the below function to background.js:
const drawWizard = () => {
    const image = new Image();
    image.src = './assets/wizard.png';

    image.onload = function () {
        /**
         * this - references the image object
         * draw at 90% of the width of the canvas - the width of the image
         * draw at 95% of the height of the canvas - the height of the image
         */
        context.drawImage(this, (width * .9) - this.width, (height * .95) - this.height);
    };
};
You need to construct a new Image object, set the source to the image you want to use, and wait for its load event before you draw it on the canvas. Inside the onload event, this references the Image object. This is what you want to draw onto the canvas. The x and y coordinates for the image are decided based on the width and height of the canvas, as well as the dimensions of the image.

Drawing stars
The last thing to draw to the background are the stars. To make them more easily configurable, I've added a new variable at the top of the file, as well as a helper function for generating random numbers between two values:
const numberOfStars = 50;
const random = (min, max) => Math.random() * (max - min) + min;
And to actually draw them, add the following function to the end of your file:
const drawStars = () => {
    let starCount = numberOfStars;

    context.fillStyle = '#FFF';

    while (starCount--) {
        const x = random(25, width - 50);
        const y = random(25, height * .5);
        const size = random(1, 5);

        context.fillRect(x, y, size, size);
    }
};
This will create 50 stars at random positions, with random sizes, but not below the half of the screen. I've also added a 25px padding to avoid getting stars drawn to the edge of the screen.

Note that I'm using a while loop. Although this is a small application, drawing to the screen, especially animating things is a computation heavy process. Because of this, I've chosen to use - at the writing of this article - the fastest loop in JavaScript. While this can be considered premature optimization, if you are writing a complete game or a computation heavy application, you want to minimize the amount of used resources.

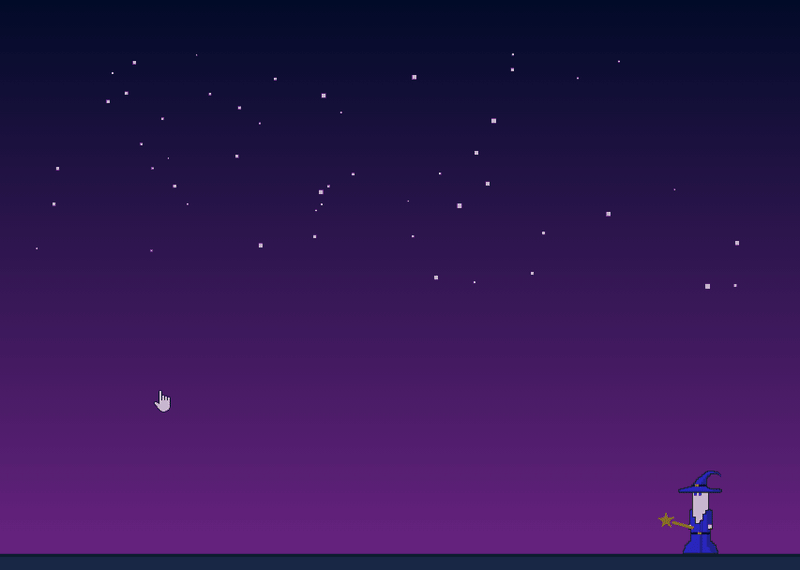
Adding the Wand
The next step is to add the wand. Open your firework.js and add a couple of variables here as well:
(() => {
    const canvas = document.getElementById('firework');
    const context = canvas.getContext('2d');

    const width = window.innerWidth;
    const height = window.innerHeight;

    const positions = {
        mouseX: 0,
        mouseY: 0,
        wandX: 0,
        wandY: 0
    };

    const image = new Image();

    canvas.width = width;
    canvas.height = height;

    image.src = './assets/wand.png';
    image.onload = () => {
        attachEventListeners();
        loop();
    }
})();
Once again, you want to give the same height and width for this canvas element as for the background. A better way than this would be to have a separate file or function that handles setting up all canvases. That way, you won't have code duplication.
This time, I've also added a positions object that will hold the x and y coordinates both for the mouse as well as for the wand. This is where you also want to create a new Image object. Once the image is loaded, you want to attach the event listeners as well as call a loop function for animating the wand. For the event listener, you want to listen to the mousemove event and set the mouse positions to the correct coordinates.
const attachEventListeners = () => {
    canvas.addEventListener('mousemove', e => {
        positions.mouseX = e.pageX;
        positions.mouseY = e.pageY;
    });
};
As we will have event listeners for the fireworks, we need to add both the wand and the fireworks to the same layer. For the loop function, right now, only add these two lines:
const loop = () => {
    requestAnimationFrame(loop);
    drawWand();
};
This will call the loop function indefinitely and redraw the screen every frame. And where should you put your requestAnimationFrame call? Should it be the first the or the last thing you call?
- If you put
requestAnimationFrameat the top, it will run even if there's an error in the function. - If you put
requestAnimationFrameat the bottom, you can do conditionals to pause the animations.
Either way, the function is asynchronous so it doesn't make much difference. So let's see what's inside the drawWand function:
const drawWand = () => {
    positions.wandX = (width * .91) - image.width;
    positions.wandY = (height * .93) - image.height;

    const rotationInRadians = Math.atan2(positions.mouseY - positions.wandY, positions.mouseX - positions.wandX) - Math.PI;
    const rotationInDegrees = (rotationInRadians * 180 / Math.PI) + 360;

    context.clearRect(0, 0, width, height);

    context.save(); // Save context to remove transformation afterwards
    context.translate(positions.wandX, positions.wandY);

    if (rotationInDegrees > 0 && rotationInDegrees < 90) {
        context.rotate(rotationInDegrees * Math.PI / 180); // Need to convert back to radians
    } else if (rotationInDegrees > 90 && rotationInDegrees < 275) {
        context.rotate(90 * Math.PI / 180); // Cap rotation at 90° if it the cursor goes beyond 90°
    }

    context.drawImage(image, -image.width, -image.height / 2); // Need to position anchor to right-middle part of the image

    // You can draw a stroke around the context to see where the edges are
    // context.strokeRect(0, 0, width, height);
    context.restore();
};
This function might look a little complicated at first, so let's break it down. First, we need to get the position for the wand on the canvas. This will position the wand at 91% / 93%, next to the hand of the wizard.
Based on this position, we want to calculate the amount of rotation between the pointer of the cursor, and the position of the wand. This can be done with Math.atan2 at line:5. To convert this into degrees, you want to use the following equation:
degrees = radians * 180 / Math.PI
Note that since the context is flipped, you need to add +360 to the value to get positive numbers. They are easier to read and work with, but otherwise, you could leave this out and replace the values used in this function with their negative counterparts.
You also want to save the context to later restore it at the end of the function. This is needed, otherwise the translate and rotate calls would add up. After saving the context, you can translate it to the position of the wand.

Next, you want to rotate the image to make it always point at the cursor. Note that you need to convert degrees back to radians, as rotate also expects radians. The if statements are used for preventing the wand to be fully rotated around its axes.
Lastly, you can draw the image. As the last step, you need to minus the width and half of the height to put the anchor point at the right-middle part of the image.

Shooting Fireworks
Now we want to finally shoot some fireworks. To help keep things more configurable, I've set up some variables and helper functions at the top of the file:
const fireworks = [];
const particles = [];
const numberOfParticles = 50; // keep in mind performance degrades with higher number of particles

const random = (min, max) => Math.random() * (max - min) + min;

const getDistance = (x1, y1, x2, y2) => {
    const xDistance = x1 - x2;
    const yDistance = y1 - y2;

    return Math.sqrt(Math.pow(xDistance, 2) + Math.pow(yDistance, 2));
};

let mouseClicked = false;
We have two arrays for holding each firework, and eventually, the particles associated with them. I've also added a variable for the number of particles, so it's easier to tweak them. Keep in mind that performance will degrade fast if you increase the number of particles to high values. I've also added a flag for keeping track of whether the mouse is clicked. And lastly, we also have a function for calculating the distance between two points. For that, you can use the Pythagorean theorem:
d = √x² + y², where x = x1 - x2, and y = y1 - y2
To track mouse click events, add the following two event listeners to the attachEventListeners function:
const attachEventListeners = () => {
    canvas.addEventListener('mousemove', e => {
        positions.mouseX = e.pageX;
        positions.mouseY = e.pageY;
    });

    canvas.addEventListener('mousedown', () => mouseClicked = true);
    canvas.addEventListener('mouseup', () => mouseClicked = false);
};
We will use this variable to decide when to draw a firework. To create new fireworks, we will use a function with an init function inside it:
function Firework() {
    const init = () => {
        // Construct the firework object
    };

    init();
}
This is where we will initialize the default values of each firework object, such as its coordinates, target coordinates, or color.
const init = () => {
    let fireworkLength = 10;

    // Current coordinates
    this.x = positions.wandX;
    this.y = positions.wandY;

    // Target coordinates
    this.tx = positions.mouseX;
    this.ty = positions.mouseY;

    // distance from starting point to target
    this.distanceToTarget = getDistance(positions.wandX, positions.wandY, this.tx, this.ty);
    this.distanceTraveled = 0;

    this.coordinates = [];
    this.angle = Math.atan2(this.ty - positions.wandY, this.tx - positions.wandX);
    this.speed = 20;
    this.friction = .99; // Decelerate speed by 1% every frame
    this.hue = random(0, 360); // A random hue given for the trail

    while (fireworkLength--) {
        this.coordinates.push([this.x, this.y]);
    }
};
First, you have the length of the firework. The higher this value is, the longer the tail will be. The x, y, and tx, ty values will hold the initial and target coordinates. Initially, they will always equal to the position of the wand, and the position where the click occurred. Based on these values, we can use the getDistance function we defined earlier to get the distance between the two points, and we will also need a property to keep track of the traveled distance.
And a couple more things; we need to keep track of the coordinates, its angle and speed to calculate velocities, and a random color defined as hue.
Drawing fireworks
To draw each firework based on the defined values, add a new method to the Firework function called draw:
this.draw = index => {
    context.beginPath();
    context.moveTo(this.coordinates[this.coordinates.length - 1][0],
                   this.coordinates[this.coordinates.length - 1][1]);
    context.lineTo(this.x, this.y);
    context.strokeStyle = `hsl(${this.hue}, 100%, 50%)`;
    context.stroke();

    this.animate(index);
};

// Animating the firework
this.animate = index => { ... }
This will take the index from the fireworks array and pass it down to the animate method. To draw the trails, you want to draw a line from the very last coordinates from the coordinates array, to the current x and y positions. For the color, we can use HSL notation, where we give it a random hue, 100% saturation, and 50% brightness.
Animating fireworks
This alone, won't do much, you also have to animate them. Inside your animate method, add the following:
this.animate = index => {
    this.coordinates.pop();
    this.coordinates.unshift([this.x, this.y]);

    this.speed *= this.friction;

    let vx = Math.cos(this.angle) * this.speed;
    let vy = Math.sin(this.angle) * this.speed;

    this.distanceTraveled = getDistance(positions.wandX, positions.wandY, this.x + vx, this.y + vy);

    if(this.distanceTraveled >= this.distanceToTarget) {
        let i = numberOfParticles;

        while(i--) {
            particles.push(new Particle(this.tx, this.ty));
        }

        fireworks.splice(index, 1);
    } else {
        this.x += vx;
        this.y += vy;
    }
};
In order, this method will get rid of the last item from the coordinates, and creates a new entry at the beginning of the array. By reassigning the speed to friction, it will also slow down the firework (by 1% each frame) as it reaches near its destination.
You also want to get the velocity for both axis based on:
x = cos(angle) * velocity
y = sin(angle) * velocity
These values are used for updating the x and y coordinates of the firework, as long as it didn't reach its final destination. If it did reach - which we can verify, by getting the distance between the wand and its current positions, including the velocities and checking it against the target distance - we want to create as many particles as we have defined at the beginning of the file. Don't forget to remove the firework from the array once it's exploded.
As a very last step, to create these new fireworks, add the following to your loop:
if (mouseClicked) {
    fireworks.push(new Firework());
}

let fireworkIndex = fireworks.length;
while(fireworkIndex--) {
    fireworks[fireworkIndex].draw(fireworkIndex);
}
This will initiate a new Firework, every time the mouse is clicked. As long as the array is not empty, it will draw, and animate them.
Adding Particles
The last thing to add is the particles, once the trail reaches the destination. Just as for the fireworks, create a new function with an init called Particle.
function Particle(x, y) {
    const init = () => { ... };

    init();
}
This will take an x and y coordinates as parameters. For the init, we will have roughly the same properties as for fireworks.
const init = () => {
    let particleLength = 7;

    this.x = x;
    this.y = y;

    this.coordinates = [];

    this.angle = random(0, Math.PI * 2);
    this.speed = random(1, 10);

    this.friction = 0.95;
    this.gravity = 2;

    this.hue = random(0, 360);
    this.alpha = 1;
    this.decay = random(.015, .03);

    while(this.coordinateCount--) {
        this.coordinates.push([this.x, this.y]);
    }
};
First, you can define the length of the particles, create the x and y coordinates and assign a random angle and speed to each individual particle. random(0, Math.PI * 2) will generate a random radian, with every possible direction.
friction and gravity will slow down particles and makes sure they fall downwards. For colors, we can define a random hue, and this time, an alpha for transparency, and a decay value, which is used to tell how fast each particle should fade out.
Drawing the particles
For the draw method, add the following lines:
this.draw = index => {
    context.beginPath();
    context.moveTo(this.coordinates[this.coordinates.length - 1][0],
                   this.coordinates[this.coordinates.length - 1][1]);
    context.lineTo(this.x, this.y);

    context.strokeStyle = `hsla(${this.hue}, 100%, 50%, ${this.alpha})`;
    context.stroke();

    this.animate(index);
}
The same logic applies here, what is used for the trail of the firework. Only this time, the strokeStyle also contains an alpha value to fade out the particles over time.
Animating the particles
For the animate method, you want a similar logic to fireworks. Only this time, you don't need to worry about distances.
this.animate = index => {
    this.coordinates.pop();
    this.coordinates.unshift([this.x, this.y]);

    this.speed *= this.friction;

    this.x += Math.cos(this.angle) * this.speed;
    this.y += Math.sin(this.angle) * this.speed + this.gravity;

    this.alpha -= this.decay;

    if (this.alpha <= this.decay) {
        particles.splice(index, 1);
    }
}
Again, start by getting rid of the last item in the coordinates and adding a new one to the beginning of the array with unshift. Then reassign speed to slow each particle down over time, and don't forget to also apply velocities for the x and y coordinates. Lastly, the alpha value can be decreased each frame until the particle is not visible anymore. Once it's invisible, it can be removed from the array. And to actually draw them, don't forget to add the same while loop to the loop function you have for the fireworks:
let particleIndex = particles.length;
while (particleIndex--) {
    particles[particleIndex].draw(particleIndex);
}
Summary
And you've just created your very first firework effects in JavaScript! As mentioned, the project is hosted on GitHub, so you can clone it in one piece and play with it.
Do you have anything else to add to this tutorial? Let us know in the comments below! Thank you for reading through, this was the last tutorial for this year, but more to come next year. Happy coding and happy holidays! 🎉🎅🎄❄️


Top comments (0)